一、检查node版本
指令:node -v
为什么要检查node版本?
Vite 需要 Node.js 版本 18+,20+。然而,有些模板需要依赖更高的 Node 版本才能正常运行,当你的包管理器发出警告时,请注意升级你的 Node 版本。
二、创建vite项目
指令:npm create vite@latest vue-ts-app -- --template vue-ts
参考vite官网
模板(template):
:::info
vanilla,vanilla-ts, vue, vue-ts,react,react-ts,react-swc,react-swc-ts,preact,preact-ts,lit,lit-ts,svelte,svelte-ts,solid,solid-ts,qwik,qwik-ts
:::
三、运行项目
安装插件:npm install
运行项目:npm run dev
{
  "name": "vue-ts-app",
  "private": true,
  "version": "0.0.0",
  "type": "module",
  "scripts": {
    "dev": "vite",
    "build": "vue-tsc && vite build",
    "preview": "vite preview"
  },
  "dependencies": {
    "vue": "^3.3.11"
  },
  "devDependencies": {
    "@vitejs/plugin-vue": "^4.5.2",
    "typescript": "^5.2.2",
    "vite": "^5.0.8",
    "vue-tsc": "^1.8.25"
  }
}
四、安装element plus
- 安装指令:
npm install element-plus --save - 自动按需导入指令:
npm install -D unplugin-vue-components unplugin-auto-import - 在项目配置文件中配置如下代码:
import { defineConfig } from 'vite'
import vue from '@vitejs/plugin-vue'
/** element plus 自动按需导入插件 start */
import AutoImport from 'unplugin-auto-import/vite'
import Components from 'unplugin-vue-components/vite'
import { ElementPlusResolver } from 'unplugin-vue-components/resolvers'
/** element plus 自动按需导入插件 end */

// https://vitejs.dev/config/
export default defineConfig({
  plugins: [
    vue(),
    /** element plus 自动按需导入插件配置 start */
    AutoImport({
      resolvers: [ElementPlusResolver()],
    }),
    Components({
      resolvers: [ElementPlusResolver({ importStyle: 'sass' })] // importStyle: "sass" ---  解决覆盖element plus 的sass变量不生效的bug
    }),
    /** element plus 自动按需导入插件配置 end */
  ],
})
- 测试element plus按需导入是否成功:
<script setup lang="ts">
import HelloWorld from './components/HelloWorld.vue'
</script>

<template>
  <div>
    <!-- element plus组件 -->
    <el-button type="primary">测试element plus</el-button>

    <a href="https://vitejs.dev" target="_blank">
      <img src="/vite.svg" class="logo" alt="Vite logo" />
    </a>
    <a href="https://vuejs.org/" target="_blank">
      <img src="./assets/vue.svg" class="logo vue" alt="Vue logo" />
    </a>
  </div>
  <HelloWorld msg="Vite + Vue" />
</template>
测试成功:

五、配置根目录别名
在vite.config.ts中配置:
import { fileURLToPath, URL } from 'node:url'

export default defineConfig({
  plugins: [
    vue(),
  ],
  resolve: {
    alias: {
      '@': fileURLToPath(new URL('./src', import.meta.url)),
    },
  },
})
在tsconfig.json中配置:
"baseUrl": "./", // 解析非相对模块的基础地址,默认是当前目录
  "paths": {
  "@/*": ["./src/*"] // 路径映射,相对于baseUrl
}

六、安装scss
- 安装指令:
npm install sass -D - 定义一个scss文件:global.scss

$theme-color: gray;
$main-width: 100px;
$main-height: 100px;
- 在配置文件中配置全局scss文件
import { fileURLToPath, URL } from 'node:url'

export default defineConfig({
  plugins: [
    vue(),
  ],
  resolve: {
    alias: {
      '@': fileURLToPath(new URL('./src', import.meta.url)),
    },
  },
  css: {
    preprocessorOptions: {
      // scss全局文件引入
      scss: {
        // additionalData: '@import "@/styles/global.scss";' 这行代码可能会导致报错
        additionalData: '@use "@/styles/global.scss" as *;' //建议使用这行代码
      },
    },
  },
})
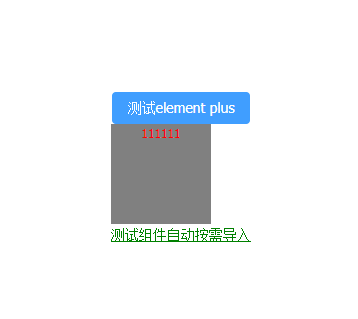
- 在App.vue文件中进行测试
<template>
  <el-button type="primary">测试element plus</el-button>
  <div class="demo-box">
    <div class="tips">111111</div>
  </div>
</template>

<style lang="scss" scoped>
/* 测试scss代码 */
.demo-box {
  background-color: $theme-color;
  width: $main-width;
  height: $main-height;
  .tips {
    color: red;
  }
}
</style>
七、配置eslint(代码检查)
- 安装pnpm:
npm i -g pnpm - 安装eslint:
npm i eslint -D - 初始化eslint:
pnpm eslint --init

- 在项目的根目录下找到eslint配置文件:
.eslintrc.json
{
  "env": {
    "browser": true,
    "es2021": true
  },
  "extends": [
    "eslint:recommended",
    "plugin:@typescript-eslint/recommended",
    "plugin:vue/vue3-essential"
  ],
  "parserOptions": {
    "ecmaVersion": "latest",
    "parser": "@typescript-eslint/parser",
    "sourceType": "module"
  },
  "plugins": [
    "@typescript-eslint",
    "vue"
  ],
  "rules": {
    //
  }
}
解析:
- env:表示eslint 运行的环境
- extends:表示继承的规则
- parserOptions:指定解析器选项
- plugins:用到的插件
- rules:检验规则,参考eslint官网规则
- 配置规则
{
  "env": {
    "browser": true,
    "es2021": true
  },
  "extends": ["eslint:recommended", "plugin:@typescript-eslint/recommended", "plugin:vue/vue3-essential"],
  "parserOptions": {
    "ecmaVersion": "latest",
    "parser": "@typescript-eslint/parser",
    "sourceType": "module"
  },
  "plugins": ["@typescript-eslint", "vue"],
  "rules": {
    "vue/script-setup-uses-vars": "error",
    "vue/no-reserved-component-names": "off",
    "@typescript-eslint/ban-ts-ignore": "off",
    "@typescript-eslint/explicit-function-return-type": "off",
    "@typescript-eslint/no-explicit-any": "off",
    "@typescript-eslint/no-var-requires": "off",
    "@typescript-eslint/no-empty-function": "off",
    "vue/custom-event-name-casing": "off",
    "no-use-before-define": "off",
    "@typescript-eslint/no-use-before-define": "off",
    "@typescript-eslint/ban-ts-comment": "off",
    "@typescript-eslint/ban-types": "off",
    "@typescript-eslint/no-non-null-assertion": "off",
    "@typescript-eslint/explicit-module-boundary-types": "off",
    "@typescript-eslint/no-unused-vars": "error",
    "no-unused-vars": "error",
    "space-before-function-paren": "off",

    "vue/attributes-order": "off",
    "vue/one-component-per-file": "off",
    "vue/html-closing-bracket-newline": "off",
    "vue/max-attributes-per-line": "off",
    "vue/multiline-html-element-content-newline": "off",
    "vue/singleline-html-element-content-newline": "off",
    "vue/attribute-hyphenation": "off",
    "vue/require-default-prop": "off",
    "vue/require-explicit-emits": "off",
    "vue/html-self-closing": [
      "error",
      {
        "html": {
          "void": "always",
          "normal": "never",
          "component": "always"
        },
        "svg": "always",
        "math": "always"
      }
    ],
    "vue/multi-word-component-names": "off"
  }
}
- 在项目根目录新建
.eslintignore文件,用于配置哪些文件不用检测
dist
node_modules
- 在package.json中添加脚本
"scripts": {
		"lint": "eslint src",
		"fix": "eslint src --fix"
},
- 检测eslint是否生效:由下图可得eslint有效

八、配置prettier,代码格式化、美化工具
- 安装prettier相关的插件:
npm install -D eslint-plugin-prettier prettier eslint-config-prettier - 在项目根目录下新建prettier的配置文件:
.prettierrc.json - 新建忽略文件:
.prettierignore
/dist/*
/html/*
.local
/node_modules/**
**/*.svg
**/*.sh
/public/*
- 编辑配置:参考prettier官网
{
  "printWidth": 100, //每行最多显示的字符数
  "tabWidth": 2, //tab的宽度 2个字符
  "useTabs": false,//使用tab代替空格
  "semi": false,//结尾使用分号
  "vueIndentScriptAndStyle": false,
  "singleQuote": true,
  "quoteProps": "as-needed",
  "bracketSpacing": true,
  "trailingComma": "none",
  "jsxSingleQuote": false,
  "arrowParens": "always",
  "insertPragma": false,
  "requirePragma": false,
  "proseWrap": "never",
  "htmlWhitespaceSensitivity": "strict",
  "endOfLine": "auto",
  "rangeStart": 0
}
- 更新
.eslintrc.json中的配置
在extends中新增代码:"plugin:prettier/recommended"
"extends": [
  "eslint:recommended",
  "plugin:@typescript-eslint/recommended",
  "plugin:vue/vue3-essential",
  // 新增的配置
  "plugin:prettier/recommended"
],
- 添加脚本
"format": "prettier --write \"./**/*.{html,vue,js,ts,json,md}\" "
"scripts": {
    "dev": "vite",
    "build": "vue-tsc && vite build",
    "preview": "vite preview",
    "lint": "eslint src",
    "fix": "eslint src --fix",
  	"format": "prettier --write \"./**/*.{html,vue,js,ts,json,md}\" "
},
- vscode中设置保存自动格式化

九、配置组件自动按需导入
- 安装插件:
npm i unplugin-vue-components -D - vite.config.ts中配置自动导入规则
import Components from 'unplugin-vue-components/vite'
import { ElementPlusResolver } from 'unplugin-vue-components/resolvers'

export default defineConfig({
  plugins: [
    vue(),
    Components({
      // 要搜索组件的目录的相对路径
      dirs: ['src/components', 'src/layout'],
      // 组件的有效文件扩展名
      extensions: ['vue', 'md'],
      // 搜索子目录
      deep: true,
      // 在哪些文件下自动导入组件
      include: [/\.vue$/, /\.vue\?vue/],
      // 生成自定义 `auto-components.d.ts` 全局声明
      dts: 'src/types/auto-components.d.ts',
      // 自定义组件的解析器
      resolvers: [ElementPlusResolver({ importStyle: 'sass' })], // importStyle: "sass" ---  解决覆盖element plus 的sass变量不生效的bug
      // 在哪些目录下不自动导入组件
      exclude: [/[\\/]node_modules[\\/]/]
    })
  ],
})
- 保存配置文件,重新运行项目后,会发现项目自动生成了如下文件:

- 检查效果
- 在components中新建
BaseLink/index.vue组件
<template>
  <div class="base-link"><slot></slot></div>
</template>
<script setup lang="ts"></script>
<style lang="scss" scoped>
.base-link {
  font-size: 14px;
  font-weight: 500;
  color: green;
  cursor: pointer;
  &:hover {
    text-decoration: underline;
  }
}
</style>
- 保存组件后,会发现在
auto-components.d.ts文件中多出了对应的代码
export {}

declare module 'vue' {
  export interface GlobalComponents {
    BaseLink: typeof import('./../components/BaseLink/index.vue')['default']
    ElButton: typeof import('element-plus/es')['ElButton']
    HelloWorld: typeof import('./../components/HelloWorld.vue')['default']
  }
}
- 在App中使用
BaseLink组件
<script setup lang="ts"></script>

<template>
  <el-button type="primary">测试element plus</el-button>
  <div class="demo-box">
    <div class="tips">111111</div>
  </div>
  <base-link>测试组件自动按需导入</base-link>
</template>

<style lang="scss" scoped>
.demo-box {
  background-color: $theme-color;
  width: $main-width;
  height: $main-height;
  .tips {
    color: red;
  }
}
</style>
发现可以正确使用:
十、插件自动引入
- 安装插件:
npm i unplugin-auto-import -D - 在配置文件中配置自动导入规则
import Components from 'unplugin-vue-components/vite'
import { ElementPlusResolver } from 'unplugin-vue-components/resolvers'

export default defineConfig({
  plugins: [
    vue(),
    AutoImport({
      // 在哪些文件下自动导入
      include: [
        /\.[tj]sx?$/, // .ts, .tsx, .js, .jsx
        /\.vue$/,
        /\.vue\?vue/, // .vue
        /\.md$/ // .md
      ],
      // 自动导入的内容
      imports: [
        'vue'
      ],
      // 配置文件生成位置,默认是根目录
      dts: 'src/types/auto-imports.d.ts',
      // eslint检查
      eslintrc: {
        enabled: true, // Default `false`
        filepath: './.eslintrc-auto-import.json', // Default `./.eslintrc-auto-import.json`
        globalsPropValue: true // Default `true`, (true | false | 'readonly' | 'readable' | 'writable' | 'writeable')
      },
      resolvers: [ElementPlusResolver()]
    }),
  ],
})
- 保存配置文件,重新运行项目,会自动生成如下文件:

- 在
.eslintrc.json中修改配置,保证eslint检查不会报错
在extends中新增配置:
"extends": [
    "eslint:recommended",
    "plugin:@typescript-eslint/recommended",
    "plugin:vue/vue3-essential",
    "plugin:prettier/recommended",
    ".eslintrc-auto-import.json"
],
- 在App.vue中检验效果
<script setup lang="ts">
// 这里并未导入ref,eslint也未提示报错
const number = ref(1)

const handleNumberChange = () => {
  number.value = number.value++
}
</script>

<template>
  <el-button type="primary">测试element plus</el-button>
  <div class="demo-box">
    <div class="tips">111111</div>
  </div>
  <base-link>测试组件自动按需导入</base-link>
  <div>这是number值:{{ number }}</div>
  <el-button @click="handleNumberChange">改变number值</el-button>
</template>

<style lang="scss" scoped>
.demo-box {
  background-color: $theme-color;
  width: $main-width;
  height: $main-height;
  .tips {
    color: red;
  }
}
</style>
十一、安装vue-router
- 安装插件:
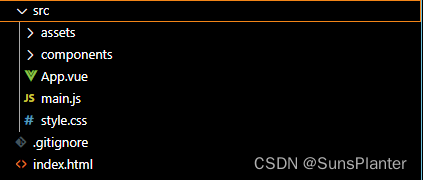
pnpm add vue-router@4 - 在src目录下新建router文件夹,结构如下:

- index.ts是路由的根文件,modules下的文件是各个路由模块
import type { App } from 'vue'
import type { RouteRecordRaw } from 'vue-router'
import { createRouter, createWebHistory } from 'vue-router'
import remainingRouter from './modules/remaining'

// 创建路由实例
const router = createRouter({
  history: createWebHistory(import.meta.env.VITE_BASE_PATH), // createWebHashHistory URL带#,createWebHistory URL不带#
  strict: true,
  routes: remainingRouter as RouteRecordRaw[],
  scrollBehavior: () => ({ left: 0, top: 0 })
})

export const setupRouter = (app: App<Element>) => {
  app.use(router)
}

export default router
const remainingRouter = [
  {
    path: '/test',
    name: 'TestPage',
    component: () => import('@/views/test/index.vue'),
    mate: {
      title: '测试页面'
    }
  }
]

export default remainingRouter
- 新建test页面组件
<template>
  <div>
    <h1>这是test页面</h1>
    <base-link @click="handleToHome">跳转至首页</base-link>
  </div>
</template>
<script setup lang="ts" name="">
const router = useRouter()
const handleToHome = () => {
  router.push('/')
}
</script>
<style lang="scss" scoped></style>
- 在入口文件main.ts中引入
import { createApp } from 'vue'
import './style.css'
import './styles/reset.scss'
import App from './App.vue'
import router, { setupRouter } from '@/router'

// 创建实例
const setupAll = async () => {
  const app = createApp(App)

  setupRouter(app)

  await router.isReady()

  app.mount('#app')
}

setupAll()
- App.vue中测试效果
<script setup lang="ts">
// 这里并未导入ref,eslint也未提示报错
const number = ref(1)

const handleNumberChange = () => {
  number.value++
}

const router = useRouter()
const handleToTest = () => {
  router.push('/test')
}
</script>

<template>
  <el-button type="primary">测试element plus</el-button>
  <div class="demo-box">
    <div class="tips">111111</div>
  </div>
  <base-link>测试组件自动按需导入</base-link>
  <div>这是number值:{{ number }}</div>
  <el-button @click="handleNumberChange">改变number值</el-button>
  <base-link @click="handleToTest">跳转至test页面</base-link>
  <router-view />
</template>

<style lang="scss" scoped>
.demo-box {
  background-color: $theme-color;
  width: $main-width;
  height: $main-height;
  .tips {
    color: red;
  }
}
</style>


十二、安装vite-plugin-vue-setup-extend插件,解决在setup中定义name问题
- 安装:
pnpm i vite-plugin-vue-setup-extend -D - 在vite.config.ts中配置:
import vueSetupExtend from 'vite-plugin-vue-setup-extend'

// https://vitejs.dev/config/
export default defineConfig({
  plugins: [
    vue(),
    vueSetupExtend(),
  ]
})
- 在vue组件中定义name
- 注意:必须要注意的是当组件的script标签中的内容为空时,name还是不会生效
十三、安装pinia状态管理
- 安装:
pnpm install pinia - 在src目录下新建stores文件夹,结构如下:

- index.ts为根文件,counter.ts中存储的是各个模块数据
import type { App } from 'vue'
import { createPinia } from 'pinia'

const store = createPinia()

export const setupStore = (app: App<Element>) => {
  app.use(store)
}

export { store }
import { defineStore } from 'pinia'

export const useCounterStore = defineStore('counter', () => {
  /**
   * ref() 就是 state 属性
   * computed() 就是 getters
   * function() 就是 actions,action中可以使用异步函数
   */
  //state:
  const count = ref(0)
  //getter:
  const getCount = computed<number>(() => {
    return count.value
  })
  //actions:
  const increment = () => {
    count.value++
  }
  //暴露state、computed、actions;否则无法使用
  return { count, getCount, increment }
})
- 在入口文件main.ts中引入
import { createApp } from 'vue'
import { setupStore } from '@/stores'

// 创建实例
const setupAll = async () => {
  const app = createApp(App)
  setupStore(app)
  app.mount('#app')
}

setupAll()
- 使用方法
<template>
  <div>
    <h1>这是test页面</h1>
    <div>这是count:{{ counterStore.count }}</div>
  </div>
</template>
<script setup lang="ts" name="TestPage">
import { useCounterStore } from '@/stores/modules/counter'
const counterStore = useCounterStore()
</script>
<style lang="scss" scoped></style>
十四、安装Axios请求插件
- 安装axios插件
pnpm install axios -D - 配置axios
一、在src根目录下创建如下目录:
api存储接口
axios存储配置文件

config.ts:
import axios, {
  AxiosError,
  type InternalAxiosRequestConfig,
  type AxiosInstance,
  type AxiosResponse
} from 'axios'

const base_url = import.meta.env.BASE_URL
const request_timeout = import.meta.env.VITE_REQUEST_TIMEOUT

// 创建axios实例
const service: AxiosInstance = axios.create({
  baseURL: base_url, // api 的 base_url
  timeout: request_timeout, // 请求超时时间
  withCredentials: false // 禁用 Cookie
})

/**
 * 请求拦截器
 */
service.interceptors.request.use(
  (config: InternalAxiosRequestConfig) => {
    // 配置请求头
    const token = '.....'
    config.headers.authorization = 'Bearer ' + token
    return config
  },
  (error: AxiosError) => {
    console.error('网络错误,请稍后重试')
    return Promise.reject(error)
  }
)

/**
 * 响应拦截器
 */
service.interceptors.response.use(
  (response: AxiosResponse<any>) => {
    // 响应处理,如状态码
    return response
  },
  (error: AxiosError) => {
    return Promise.reject(error)
  }
)

export { service }
index.ts:
import { service } from '@/axios/config'

type AxiosHeaders = 'application/json' | 'application/x-www-form-urlencoded' | 'multipart/form-data'

interface IAxiosConfig {
  base_url: string
  result_code: number | string
  default_headers: AxiosHeaders
  request_timeout: number
}

const default_headers: IAxiosConfig = {
  /**
   * api请求基础路径
   */
  base_url: import.meta.env.VITE_BASE_URL + import.meta.env.VITE_API_URL,
  /**
   * 接口成功返回状态码
   */
  result_code: 200,

  /**
   * 接口请求超时时间
   */
  request_timeout: import.meta.env.VITE_REQUEST_TIMEOUT,

  /**
   * 默认接口请求类型
   * 可选值:application/x-www-form-urlencoded multipart/form-data
   */
  default_headers: 'application/json'
}

const request = (option: any) => {
  const { url, method, params, data, headersType, responseType } = option
  return service({
    url: url,
    method,
    params,
    data,
    responseType: responseType,
    headers: {
      'Content-Type': headersType || default_headers
    }
  })
}

export default {
  get: async <T = any>(option: any) => {
    const res = await request({ method: 'GET', ...option })
    return res.data as unknown as T
  },
  post: async <T = any>(option: any) => {
    const res = await request({ method: 'POST', ...option })
    return res.data as unknown as T
  },
  postOriginal: async (option: any) => {
    const res = await request({ method: 'POST', ...option })
    return res
  },
  delete: async <T = any>(option: any) => {
    const res = await request({ method: 'DELETE', ...option })
    return res.data as unknown as T
  },
  put: async <T = any>(option: any) => {
    const res = await request({ method: 'PUT', ...option })
    return res.data as unknown as T
  },
  download: async <T = any>(option: any) => {
    const res = await request({ method: 'GET', responseType: 'blob', ...option })
    return res as unknown as Promise<T>
  },
  upload: async <T = any>(option: any) => {
    option.headersType = 'multipart/form-data'
    const res = await request({ method: 'POST', ...option })
    return res as unknown as Promise<T>
  }
}
test.ts:
import request from '@/axios'

export interface ITestDataParamsType {
  pageNo: number
  pageSize: number
}

/**
 * 获取测试数据
 * @param params 分页参数
 * @returns
 */
export const getTestData = async (params: ITestDataParamsType) => {
  return await request.get({
    url: '/test/page',
    params
  })
}
- 调用接口
// template
<el-button @click="handleRequest">发起请求</el-button>

// script
import { getTestData, type ITestDataParamsType } from '@/api/test'
const loading = ref(false)

const handleRequest = async () => {
  loading.value = true
  try {
    const params: ITestDataParamsType = {
      pageNo: 1,
      pageSize: 10
    }
    await getTestData(params)
  } finally {
    loading.value = false
  }
}
十五、安装vite-plugin-svg-icon插件,用于使用svg
- 安装:
pnpm i vite-plugin-svg-icons -D - 在main.ts中引入:
import 'virtual:svg-icons-register' - 在vite.config.ts中配置:
import path from 'path'
import { createSvgIconsPlugin } from 'vite-plugin-svg-icons'

export default defineConfig({
  plugins: [
    // ...
    createSvgIconsPlugin({
      // 图标存放的地址
      iconDirs: [path.resolve(process.cwd(), 'src/assets/icons')],
      symbolId: 'icon-[dir]-[name]',
      svgoOptions: {
        // 解决svg图标不显示的问题
        plugins: [
          {
            name: 'removeAttrs',
            active: true,
            params: { elemSeparator: ',', attrs: [] }
          }
        ]
      }
    })
  ]
})
- 封装
svg-icon组件,用于使用svg图标
<template>
  <svg class="svg-icon" aria-hidden :style="`width: ${props.size}; height: ${props.size};`">
    <use :xlink:href="symbolId" :fill="props.color" />
  </svg>
</template>
<script setup lang="ts" name="SvgIcon">
const props = defineProps({
  prefix: {
    type: String,
    default: 'icon'
  },
  name: {
    type: String,
    required: true
  },
  color: {
    type: String,
    default: ''
  },
  size: {
    type: String,
    default: '1em'
  }
})
const symbolId = computed(() => `#${props.prefix}-${props.name}`)
</script>
<style lang="scss" scoped>
.svg-icon {
  display: inline-block;
  outline: none;
  width: 1em;
  height: 1em;
  /* 因 icon 大小被设置为和字体大小一致,而 span 等标签的下边缘会和字体的基线对齐,故需设置一个往下的偏移比例,来纠正视觉上的未对齐效果 */
  vertical-align: -0.15em;
  /* 定义元素的颜色,currentColor 是一个变量,其值就是当前元素的 color 值,如果当前元素未设置 color 值,则从父元素继承 */
  fill: currentColor;
  overflow: hidden;
}
</style>
- 存放svg文件

- 使用:
<svg-icon name="vue" size="24px" />
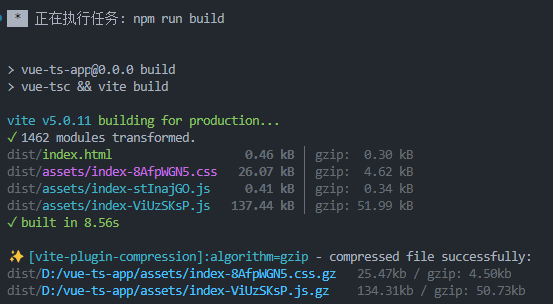
十六、安装vite-plugin-compression插件,项目打包时压缩文件
- 安装:
pnpm i vite-plugin-compression -D - 在vite.config.ts中进行配置:
export default defineConfig({
  plugins: [
    // ...
    viteCompression({
      verbose: true, // 是否在控制台输出压缩结果
      disable: false, // 是否禁用
      threshold: 10240, // 体积大于 threshold 才会被压缩,单位 b
      algorithm: 'gzip', // 压缩算法,可选 [ 'gzip' , 'brotliCompress' ,'deflate' , 'deflateRaw']
      ext: '.gz', // 生成的压缩包后缀
      deleteOriginFile: false //压缩后是否删除源文件
    })
  ],
})
- 打包,在控制台中查看压缩结果:
十七、VITE环境基本配置
import { defineConfig } from 'vite'
import vue from '@vitejs/plugin-vue'
/** element plus 自动按需导入插件 start */
import AutoImport from 'unplugin-auto-import/vite'
import Components from 'unplugin-vue-components/vite'
import { ElementPlusResolver } from 'unplugin-vue-components/resolvers'
/** element plus 自动按需导入插件 end */
import vueSetupExtend from 'vite-plugin-vue-setup-extend'
import { fileURLToPath, URL } from 'node:url'
import path from 'path'
import { createSvgIconsPlugin } from 'vite-plugin-svg-icons'

import viteCompression from 'vite-plugin-compression'

// https://vitejs.dev/config/
export default defineConfig({
  plugins: [
    vue(),
    vueSetupExtend(),
    /** element plus 自动按需导入插件配置 start */
    AutoImport({
      // 在哪些文件下自动导入
      include: [
        /\.[tj]sx?$/, // .ts, .tsx, .js, .jsx
        /\.vue$/,
        /\.vue\?vue/, // .vue
        /\.md$/ // .md
      ],
      // 自动导入的内容
      imports: ['vue', 'vue-router'],
      // 配置文件生成位置,默认是根目录
      dts: 'src/types/auto-imports.d.ts',
      // eslint检查
      eslintrc: {
        enabled: true, // Default `false`
        filepath: './.eslintrc-auto-import.json', // Default `./.eslintrc-auto-import.json`
        globalsPropValue: true // Default `true`, (true | false | 'readonly' | 'readable' | 'writable' | 'writeable')
      },
      resolvers: [ElementPlusResolver()]
    }),
    Components({
      // 要搜索组件的目录的相对路径
      dirs: ['src/components', 'src/layout'],
      // 组件的有效文件扩展名
      extensions: ['vue', 'md'],
      // 搜索子目录
      deep: true,
      // 在哪些文件下自动导入组件
      include: [/\.vue$/, /\.vue\?vue/],
      // 生成自定义 `auto-components.d.ts` 全局声明
      dts: 'src/types/auto-components.d.ts',
      // 自定义组件的解析器
      resolvers: [ElementPlusResolver({ importStyle: 'sass' })], // importStyle: "sass" ---  解决覆盖element plus 的sass变量不生效的bug
      // 在哪些目录下不自动导入组件
      exclude: [/[\\/]node_modules[\\/]/]
    }),
    /** element plus 自动按需导入插件配置 end */
    createSvgIconsPlugin({
      iconDirs: [path.resolve(process.cwd(), 'src/assets/icons')],
      symbolId: 'icon-[dir]-[name]',
      svgoOptions: {
        // 解决svg图标不显示的问题
        plugins: [
          {
            name: 'removeAttrs',
            active: true,
            params: { elemSeparator: ',', attrs: [] }
          }
        ]
      }
    }),
    viteCompression({
      verbose: true, // 是否在控制台输出压缩结果
      disable: false, // 是否禁用
      threshold: 10240, // 体积大于 threshold 才会被压缩,单位 b
      algorithm: 'gzip', // 压缩算法,可选 [ 'gzip' , 'brotliCompress' ,'deflate' , 'deflateRaw']
      ext: '.gz', // 生成的压缩包后缀
      deleteOriginFile: false //压缩后是否删除源文件
    })
  ],
  resolve: {
    alias: {
      '@': fileURLToPath(new URL('./src', import.meta.url))
    }
  },
  css: {
    preprocessorOptions: {
      // scss全局文件引入
      scss: {
        additionalData: '@use "@/styles/global.scss" as *;'
      }
    }
  },
  // 打包配置
  build: {
    minify: 'terser', // 指定使用哪种混淆器
    outDir: 'dist', // 指定输出路径
    sourcemap: false, // 构建后是否生成 source map 文件
    terserOptions: {
      // 传递给 Terser 的更多 minify 选项
      compress: {
        drop_debugger: true, // 打包时去除debugger
        drop_console: true // 打包时去除console
      }
    },
    // 静态文件按类型分包
    rollupOptions: {
      output: {
        chunkFileNames: 'static/js/[name]-[hash].js',
        entryFileNames: 'static/js/[name]-[hash].js',
        assetFileNames: 'static/[ext]/[name]-[hash].[ext]'
      }
    }
  }
})
![[C/C++] -- Boost库、Muduo库编译安装使用](https://img-blog.csdnimg.cn/direct/d8c2e013424042aa9b81a1ee294fde2c.png)