上一篇,我们初步把消息handler 注册到了服务中,在进行后续工作之前我们需要再做一些准备工作。
第一:把之前自己管理的bean放到spring中去管理,后面大部分的bean都通过spring来管理。
第二:为了方便路由消费,我们要创建一个消息体方便byte字节数组传输。
Spring
先把spring上下文变量工具整好

SpringContextHelper.java
package com.loveprogrammer.base.factory;

import org.springframework.context.ApplicationContext;

public class SpringContextHelper {

	private static ApplicationContext ac;

	public static void setApplicationContext(ApplicationContext ac) {

		SpringContextHelper.ac = ac;
	}

	public static ApplicationContext getContext() {

		return ac;
	}

	public static Object getBean(String name) {

		return ac.getBean(name);
	}

	public static Object getBean(Class clazz) {

		return ac.getBean(clazz);
	}

}
CommonBootConfig.java
import com.loveprogrammer.base.factory.SpringContextHelper;
import org.springframework.beans.BeansException;
import org.springframework.context.ApplicationContext;
import org.springframework.context.ApplicationContextAware;
import org.springframework.context.annotation.Configuration;

@Configuration
public class CommonBootConfig implements ApplicationContextAware {

	@Override
	public void setApplicationContext(ApplicationContext applicationContext) throws BeansException {

		SpringContextHelper.setApplicationContext(applicationContext);
	}
}
修改 NetworkListener.java
@Component
public class NetworkListener implements INetworkEventListener {
修改 TcpMessageStringHandler.java
@Component
public class TcpMessageStringHandler extends SimpleChannelInboundHandler<String> {
    private static final Logger logger = LoggerFactory.getLogger(TcpMessageStringHandler.class);

    @Autowired
    private INetworkEventListener listener;

//    public TcpMessageStringHandler(INetworkEventListener listener) {
//        this.listener = listener;
//    }
修改TcpServerStringInitializer.java
public class TcpServerStringInitializer extends ChannelInitializer<SocketChannel> {

    @Override
    protected void initChannel(SocketChannel ch) {
        ChannelPipeline pipeline = ch.pipeline();
        pipeline.addLast("framer",new DelimiterBasedFrameDecoder(8192, Delimiters.lineDelimiter()));
        pipeline.addLast("decoder", new StringDecoder());
        pipeline.addLast("encoder", new StringEncoder());
        TcpMessageStringHandler handler = (TcpMessageStringHandler) SpringContextHelper.getBean(TcpMessageStringHandler.class);
        pipeline.addLast(handler);
    }

}
消息封装
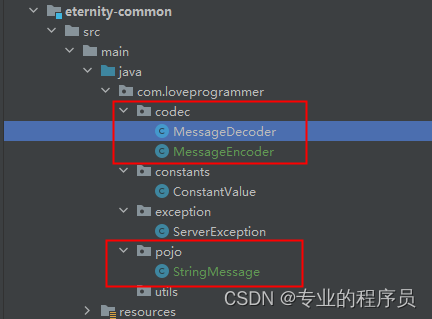
创建一个类 StringMessage
package com.loveprogrammer.pojo;

import com.alibaba.fastjson2.JSON;

/**
 * @ClassName StringMessage
 * @Description string类型的请求的请求体
 * @Author admin
 * @Date 2024/1/31 10:35
 * @Version 1.0
 */
public class StringMessage {

    /***
     *         topicId 路由主键对应class
     *         tagId 路由副健,对应method
     *         statusC内容的长ode主要是返回内容是告诉客户端消息的状态,成功为1,其他不同的错误使用不同的错误码
     *         length是度,内容的长度是不可控制的,所以使用一个长度进行定义
     *         body是具体的内容
     */

    private int topicId;

    private int tagId;

    private int statusCode;

    private int length;

    private String body;

    public StringMessage() {
    }

//    public StringMessage(short messageId) {
//        this.messageId = messageId;
//    }

    public static StringMessage create(int topicId,int tagId) {
        StringMessage stringMessage = new StringMessage();
        stringMessage.setTopicId(topicId);
        stringMessage.setTagId(tagId);
        return stringMessage;
    }

    public static StringMessage create(String origin) {
        StringMessage stringMessage = JSON.parseObject(origin, StringMessage.class);
        return stringMessage;
    }

    public static StringMessage create(int length, int topicId,int tagId , int statusCode, String content) {
        return new StringMessage(length, topicId, tagId, statusCode, content);
    }

    private StringMessage(int length, int topicId,int tagId, int statusCode, String body) {
        this.length = length;
        this.topicId = topicId;
        this.tagId = tagId;
        this.statusCode = statusCode;
        this.body = body;
    }

    public int getTopicId() {
        return topicId;
    }

    public void setTopicId(int topicId) {
        this.topicId = topicId;
    }

    public int getTagId() {
        return tagId;
    }

    public void setTagId(int tagId) {
        this.tagId = tagId;
    }

    public int getStatusCode() {
        return statusCode;
    }

    public void setStatusCode(int statusCode) {
        this.statusCode = statusCode;
    }

    public int getLength() {
        return length;
    }

    public void setLength(int length) {
        this.length = length;
    }

    public String getBody() {
        return body;
    }

    public void setBody(String body) {
        this.body = body;
    }

    @Override
    public String toString() {
        return "StringMessage{" + "messageId=" + topicId + ", statusCode=" + statusCode + ", length=" + length
                + ", body='" + body + '\'' + '}';
    }
}
创建两个编解码类
MessageDecoder.java
package com.loveprogrammer.codec;

import com.loveprogrammer.constants.ConstantValue;
import com.loveprogrammer.pojo.StringMessage;
import io.netty.buffer.ByteBuf;
import io.netty.channel.ChannelHandlerContext;
import io.netty.handler.codec.LengthFieldBasedFrameDecoder;

/**
 * @ClassName MessageDecoder
 * @Description 消息解码器
 * @Author admin
 * @Date 2024/1/31 10:43
 * @Version 1.0
 */
public class MessageDecoder extends LengthFieldBasedFrameDecoder {

    //判断传送客户端传送过来的数据是否按照协议传输,头部信息的大小应该是 int+int+int = 4+4+4 = 12
    private static final int HEADER_SIZE = 12;

    private int topicId;
    private int tagId;
    private int statusCode;
    private int length;

    private String body;

    /***
     *
     * @param maxFrameLength 解码时,处理每个帧数据的最大长度
     * @param lengthFieldOffset 该帧数据中,存放该帧数据的长度的数据的起始位置
     * @param lengthFieldLength 记录该帧数据长度的字段本身的长度
     * @param lengthAdjustment 修改帧数据长度字段中定义的值,可以为负数
     * @param initialBytesToStrip 解析的时候需要跳过的字节数
     * @param failFast 为true,当frame长度超过maxFrameLength时立即报TooLongFrameException异常,为false,读取完整个帧再报异常
     */
    public MessageDecoder(int maxFrameLength, int lengthFieldOffset, int lengthFieldLength, int lengthAdjustment, int initialBytesToStrip, boolean failFast) {
        super(maxFrameLength, lengthFieldOffset, lengthFieldLength, lengthAdjustment, initialBytesToStrip, failFast);
    }

    @Override
    protected Object decode(ChannelHandlerContext ctx, ByteBuf in) throws Exception {
        if(in == null){
            return null;
        }
        if(in.readableBytes() < HEADER_SIZE) {
            throw new Exception("可读信息段比头部信息都小");
        }

        // 注意在读的过程中,readIndex的指针也在移动
        topicId = in.readInt();
        tagId = in.readInt();
        statusCode = in.readInt();
        length = in.readInt();

        if(in.readableBytes() < length) {
            throw new Exception("body获取长度" + length + ",实际长度没有达到");
        }
        ByteBuf buf = in.readBytes(length);
        byte[] req = new byte[buf.readableBytes()];
        buf.readBytes(req);
        body = new String(req, ConstantValue.PROJECT_CHARSET);

        StringMessage stringMessage = StringMessage.create(length, topicId, tagId, statusCode, body);
        return stringMessage;

    }
}
MessageEncoder.java
package com.loveprogrammer.codec;

import com.loveprogrammer.constants.ConstantValue;
import com.loveprogrammer.pojo.StringMessage;
import io.netty.buffer.ByteBuf;
import io.netty.channel.ChannelHandlerContext;
import io.netty.handler.codec.MessageToByteEncoder;

import java.nio.charset.Charset;

/**
 * @ClassName MessageEncoder
 * @Description 消息编码器
 * @Author admin
 * @Date 2024/1/31 10:40
 * @Version 1.0
 */
public class MessageEncoder extends MessageToByteEncoder<StringMessage> {
    @Override
    protected void encode(ChannelHandlerContext ctx, StringMessage msg, ByteBuf out) throws Exception {
        if(null == msg) {
            throw new Exception("msg is null");
        }
        String body = msg.getBody();
        byte[] bodyBytes = body.getBytes(Charset.forName(ConstantValue.PROJECT_CHARSET));
        out.writeInt(msg.getTopicId());
        out.writeInt(msg.getTagId());
        out.writeInt(msg.getStatusCode());
        out.writeInt(bodyBytes.length);
        out.writeBytes(bodyBytes);
    }
}
下一章我们来实现byte数组传输数据
上一篇:从零开始手写mmo游戏从框架到爆炸(六)— 消息处理工厂-CSDN博客
全部源码详见:
gitee : eternity-online: 多人在线mmo游戏 - Gitee.com
分支:step-06
