前提,当前部署没有涉及证书和https访问
1、环境说明,我采用三个节点,每个节点启动两个es,用端口区分
| 主机 | 角色 | ip和端口 |
|---|---|---|
| 服务器A | master | 192.168.2.223:9200 |
| 服务器A | data | 192.168.2.223:9201 |
| 服务器B | data,master | 192.168.2.224:9200 |
| 服务器B | data | 192.168.2.224:9201 |
| 服务器C | data,master | 192.168.2.225:9200 |
| 服务器C | data | 192.168.2.225:9201 |
2、三个节点都需要执行创建部署文件目录
#es1需要的文件目录
mkdir -p /mydata/es/node1/data
chmod 777  /mydata/es/node1/data
mkdir -p /mydata/es/node1/conf
chmod 777  /mydata/es/node1/conf
mkdir -p /mydata/es/node1/plugins
chmod 777  /mydata/es/node1/plugins
mkdir -p /mydata/es/node1/logs
chmod 777  /mydata/es/node1/logs
#es2需要的文件目录
mkdir -p /mydata/es/node2/data
chmod 777  /mydata/es/node2/data
mkdir -p /mydata/es/node2/conf
chmod 777  /mydata/es/node2/conf
mkdir -p /mydata/es/node2/plugins
chmod 777  /mydata/es/node2/plugins
mkdir -p /mydata/es/node2/logs
chmod 777  /mydata/es/node2/logs
2、服务器A编写es1的yml文件
cd /mydata/es/node1/conf
vi elasticsearch.yml
#输入以下内容

cluster.name: elasticsearch-cluster
#节点名称
node.name: es-node1
#节点通信ip
network.bind_host: 0.0.0.0
#节点ip
network.publish_host: 192.168.2.223
#节点通信端口
http.port: 9200
transport.port: 9300
#跨域配置
http.cors.enabled: true
http.cors.allow-origin: "*"
#节点角色
node.roles: [ master]
#和其他节点通信的ip端口
discovery.seed_hosts: ["192.168.2.223:9300","192.168.2.223:9301", "192.168.2.224:9300", "192.168.2.224:9301","192.168.2.225:9300","192.168.2.225:9301"]
#初始化master节点的配置,用于选举的mater节点ip,后续的节点不需要该配置
cluster.initial_master_nodes: [192.168.2.223,192.168.2.224,192.168.2.225]
#http配置
# Enable security features
xpack.security.enabled: false
xpack.security.enrollment.enabled: false
# Enable encryption for HTTP API client connections, such as Kibana, Logstash, and Agents
xpack.security.http.ssl:
  enabled: false
  #keystore.path: certs/http.p12

# Enable encryption and mutual authentication between cluster nodes
xpack.security.transport.ssl:
  enabled: false
  #verification_mode: certificate
  #keystore.path: certs/transport.p12
  #truststore.path: certs/transport.p12
保存退出
2、服务器A编写es2的yml文件
cd /mydata/es/node2/conf
vi elasticsearch.yml
#输入以下内容

cluster.name: elasticsearch-cluster
node.name: es-node2
network.bind_host: 0.0.0.0
network.publish_host: 192.168.2.223
http.port: 9201
transport.port: 9301
http.cors.enabled: true
http.cors.allow-origin: "*"
node.roles: [ data]
discovery.seed_hosts: ["192.168.2.223:9300","192.168.2.223:9301", "192.168.2.224:9300", "192.168.2.224:9301","192.168.2.225:9300","192.168.2.225:9301"]

# Enable security features
xpack.security.enabled: false
xpack.security.enrollment.enabled: false

# Enable encryption for HTTP API client connections, such as Kibana, Logstash, and Agents
xpack.security.http.ssl:
  enabled: false
  #keystore.path: certs/http.p12

# Enable encryption and mutual authentication between cluster nodes
xpack.security.transport.ssl:
  enabled: false
  #verification_mode: certificate
  #keystore.path: certs/transport.p12
  #truststore.path: certs/transport.p12
4、启动es1和es2
#设置yml文件权限,不然会报错
chmod 777  /mydata/es/node1/conf/*
chmod 777  /mydata/es/node2/conf/*
#启动
docker run --restart=always  -e ES_JAVA_OPTS="-Xms256m -Xmx256m" -d -p 9200:9200 -p 9300:9300 -v /mydata/es/node1/conf/elasticsearch.yml:/usr/share/elasticsearch/config/elasticsearch.yml -v /mydata/es/node1/data:/usr/share/elasticsearch/data -v /mydata/es/node1/plugins:/usr/share/elasticsearch/plugins --name es01 elasticsearch:8.6.2

docker run --restart=always  -e ES_JAVA_OPTS="-Xms256m -Xmx256m" -d -p 9201:9201 -p 9301:9301 -v /mydata/es/node2/conf/elasticsearch.yml:/usr/share/elasticsearch/config/elasticsearch.yml -v /mydata/es/node2/data:/usr/share/elasticsearch/data -v /mydata/es/node2/plugins:/usr/share/elasticsearch/plugins --name es02 elasticsearch:8.6.2
5、服务器B和服务器C配置参考服务器A进行部署,需要调整的就是ip和端口就行
6、安装kibana
docker run -d \
--name kibana \
-e ELASTICSEARCH_HOSTS=http://192.168.2.223:9200  \
-p 5601:5601  \
kibana:8.6.2
7、谷歌插件安装es-head,下载解压,拖到谷歌浏览器的插件上就好
百度云链接:https://pan.baidu.com/s/1V1tMlgPUQpcaKtqrFjGf2A
提取码:yzwf
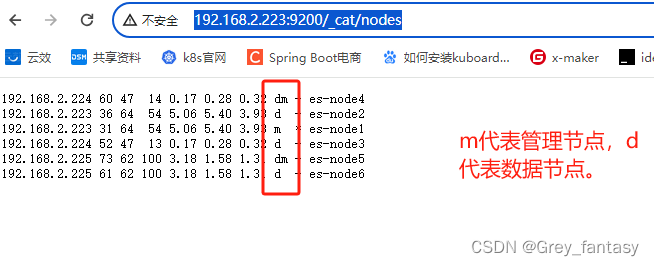
8、验证,输入http://192.168.2.223:9200/_cat/nodes,生产环境需要自己去定义角色,自己去了解8.x的相关角色和架构,我这里就不解释了。
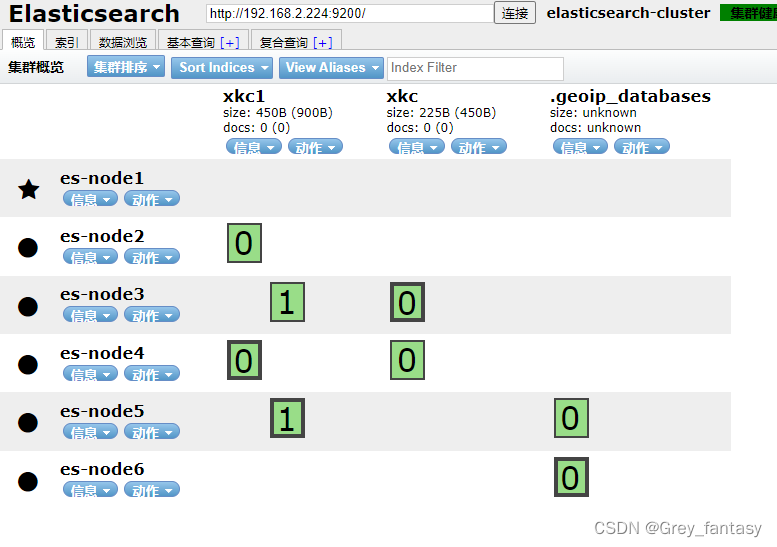
9、角色相关说明推荐博主博文链接
http://www.manongjc.com/detail/62-gdexfeqaydpetga.html
10、springboot集成8x,在springboot的pom文件中导入依赖,导入中如果有报错,很可能是jackson版本和自身的springboot版本不匹配
<dependency>
            <groupId>com.fasterxml.jackson.core</groupId>
            <artifactId>jackson-databind</artifactId>
            <version>2.11.4</version>
        </dependency>

        <dependency>
            <groupId>org.glassfish</groupId>
            <artifactId>jakarta.json</artifactId>
            <version>2.0.1</version>
        </dependency>

        <dependency>
            <groupId>co.elastic.clients</groupId>
            <artifactId>elasticsearch-java</artifactId>
            <version>8.6.2</version>
        </dependency>
        <!--重写springboot的client版本,不然会报错>-->
        <dependency>
            <groupId>org.elasticsearch.client</groupId>
            <artifactId>elasticsearch-rest-client</artifactId>
            <version>8.6.2</version>
        </dependency>
11、编写配置类
import co.elastic.clients.elasticsearch.ElasticsearchClient;
import co.elastic.clients.json.jackson.JacksonJsonpMapper;
import co.elastic.clients.transport.ElasticsearchTransport;
import co.elastic.clients.transport.rest_client.RestClientTransport;
import org.apache.http.HttpHost;
import org.elasticsearch.client.RestClient;
import org.springframework.context.annotation.Bean;
import org.springframework.context.annotation.Configuration;
@Configuration
public class ElasticSearchConfig {
    //注入IOC容器
    @Bean
    public ElasticsearchClient elasticsearchClient(){
        RestClient client = RestClient.builder(new HttpHost("192.168.2.223", 9200,"http")).build();
        ElasticsearchTransport transport = new RestClientTransport(client,new JacksonJsonpMapper());
        return new ElasticsearchClient(transport);
    }
}
12、编写控制测试类
import co.elastic.clients.elasticsearch.ElasticsearchClient;
import co.elastic.clients.elasticsearch.core.IndexResponse;
import co.elastic.clients.elasticsearch.indices.CreateIndexResponse;
import co.elastic.clients.elasticsearch.indices.GetIndexResponse;
import org.springframework.beans.factory.annotation.Autowired;
import org.springframework.web.bind.annotation.GetMapping;
import org.springframework.web.bind.annotation.PostMapping;
import org.springframework.web.bind.annotation.RequestMapping;
import org.springframework.web.bind.annotation.RestController;

import java.io.IOException;

@RestController
@RequestMapping("/v1/test")
public class Test {
    @Autowired
    private ElasticsearchClient client;

    @PostMapping("/v1/createTest")
    public void createTest() throws IOException {

        //写法比RestHighLevelClient更加简洁
        CreateIndexResponse indexResponse = client.indices().create(c -> c.index("user"));
    }
    @GetMapping("/v1/queryTest")
    public void queryTest() throws IOException {
        GetIndexResponse getIndexResponse = client.indices().get(i -> i.index("user"));
    }
    @PostMapping("/v1/addDocumentTest")
    public void addDocumentTest() throws IOException {

        User user = new User("xkc", 18);
        IndexResponse indexResponse = client.index(i -> i
                .index("user")
                //设置id
                .id("xkc")
                //传入user对象
                .document(user));

    }
}

