第一步导入依赖
<dependencies>

    <dependency>
        <groupId>com.atguigu</groupId>
        <artifactId>service-base</artifactId>
        <version>0.0.1-SNAPSHOT</version>
    </dependency>

    <dependency>
        <groupId>org.springframework.boot</groupId>
        <artifactId>spring-boot-starter-web</artifactId>
    </dependency>

    <!--lombok用来简化实体类:需要安装lombok插件-->
    <dependency>
        <groupId>org.projectlombok</groupId>
        <artifactId>lombok</artifactId>
    </dependency>

    <!--阿里云短信-->
    <dependency>
        <groupId>com.aliyun</groupId>
        <artifactId>aliyun-java-sdk-core</artifactId>
    </dependency>

</dependencies>
第二部创建application.yml 配置文件
resources目录下创建文件
redis的目的是
erver:
  port: 8120 # 服务端口

spring:
  profiles:
    active: dev # 环境设置
  application:
    name: service-sms # 服务名

  #spring:
  redis:
    host: 192.168.100.100
    port: 6379
    database: 0
    password: 123456 #默认为空
    timeout: 3000ms #最大等待时间,超时则抛出异常,否则请求一直等待
    lettuce:
      pool:
        max-active: 20  #最大连接数,负值表示没有限制,默认8
        max-wait: -1    #最大阻塞等待时间,负值表示没限制,默认-1
        max-idle: 8     #最大空闲连接,默认8
        min-idle: 0     #最小空闲连接,默认0

#阿里云短信
aliyun:
  sms:
    region-id: cn-hangzhou
    key-id: 你的keyid
    key-secret: 你的keysecret
    template-code: 你的短信模板code
    sign-name: 你的短信模板签名
第三步 从配置文件读取常量
@Setter
@Getter //idea2020.2.3版配置文件自动提示需要这个
@Component
//注意prefix要写到最后一个 "." 符号之前
//调用setter为成员赋值
@ConfigurationProperties(prefix = "aliyun.sms")
public class SmsProperties implements InitializingBean {

    private String regionId;
    private String keyId;
    private String keySecret;
    private String templateCode;
    private String signName;

    public static String REGION_Id;
    public static String KEY_ID;
    public static String KEY_SECRET;
    public static String TEMPLATE_CODE;
    public static String SIGN_NAME;

    //当私有成员被赋值后,此方法自动被调用,从而初始化常量
    @Override
    public void afterPropertiesSet() throws Exception {
        REGION_Id = regionId;
        KEY_ID = keyId;
        KEY_SECRET = keySecret;
        TEMPLATE_CODE = templateCode;
        SIGN_NAME = signName;
    }
}
Idea报告如下错误信息(不影响程序的编译和运行):

解决方案参考文档:
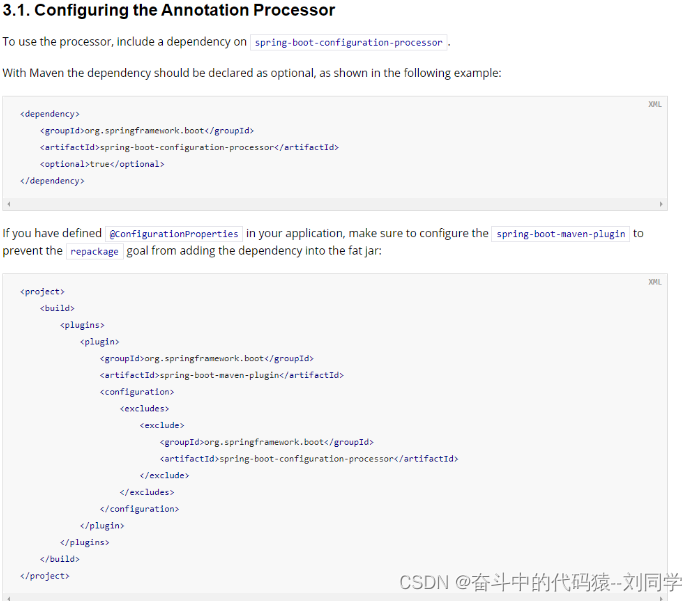
解决步骤:
step1:添加依赖
<!--  配置文件处理器  -->
<!--让自定义的配置在application.yaml进行自动提示-->
<dependency>
    <groupId>org.springframework.boot</groupId>
    <artifactId>spring-boot-configuration-processor</artifactId>
    <optional>true</optional>
</dependency>
step2:启动processor

step3:重新编译模块
step4:这样就可以在yml文件中有自定义配置的提示信息啦
第四步配置启动类
@SpringBootApplication
public class ServiceSmsApplication {

    public static void main(String[] args) {
        SpringApplication.run(ServiceSmsApplication.class, args);
    }
}
第五步测试工具类
创建测试类 UtilsTests,测试配置信息是否能正常获取
@SpringBootTest
@RunWith(SpringRunner.class)
public class UtilsTests {

    @Test
    public void testProperties(){
        System.out.println(SmsProperties.KEY_ID);
        System.out.println(SmsProperties.KEY_SECRET);
        System.out.println(SmsProperties.REGION_Id);
    }
}
第六步 短信发送业务
public interface SmsService {

    void send(String mobile, String templateCode, Map<String,Object> param);
}
实现:创建 SmsServiceImpl
@Service
@Slf4j
public class SmsServiceImpl implements SmsService {

    @Override
    public void send(String mobile, String templateCode, Map<String,Object> param) {

        //创建远程连接客户端对象
        DefaultProfile profile = DefaultProfile.getProfile(
                SmsProperties.REGION_Id,
                SmsProperties.KEY_ID,
                SmsProperties.KEY_SECRET);
        IAcsClient client = new DefaultAcsClient(profile);

        //创建远程连接的请求参数
        CommonRequest request = new CommonRequest();
        request.setSysMethod(MethodType.POST);
        request.setSysDomain("dysmsapi.aliyuncs.com");
        request.setSysVersion("2017-05-25");
        request.setSysAction("SendSms");
        request.putQueryParameter("RegionId", SmsProperties.REGION_Id);
        request.putQueryParameter("PhoneNumbers", mobile);
        request.putQueryParameter("SignName", SmsProperties.SIGN_NAME);
        request.putQueryParameter("TemplateCode", templateCode);

        Gson gson = new Gson();
        String json = gson.toJson(param);
        request.putQueryParameter("TemplateParam", json);

        try {
            //使用客户端对象携带请求对象发送请求并得到响应结果
            CommonResponse response = client.getCommonResponse(request);
            boolean success = response.getHttpResponse().isSuccess();
            //ALIYUN_RESPONSE_FAIL(-501, "阿里云响应失败"),
            Assert.isTrue(success, ResponseEnum.ALIYUN_RESPONSE_FAIL);

            String data = response.getData();
            HashMap<String, String> resultMap = gson.fromJson(data, HashMap.class);
            String code = resultMap.get("Code");
            String message = resultMap.get("Message");
            log.info("阿里云短信发送响应结果:");
            log.info("code:" + code);
            log.info("message:" + message);

            //ALIYUN_SMS_LIMIT_CONTROL_ERROR(-502, "短信发送过于频繁"),//业务限流
            Assert.notEquals("isv.BUSINESS_LIMIT_CONTROL", code, ResponseEnum.ALIYUN_SMS_LIMIT_CONTROL_ERROR);
            //ALIYUN_SMS_ERROR(-503, "短信发送失败"),//其他失败
            Assert.equals("OK", code, ResponseEnum.ALIYUN_SMS_ERROR);

        } catch (ServerException e) {
            log.error("阿里云短信发送SDK调用失败:");
            log.error("ErrorCode=" + e.getErrCode());
            log.error("ErrorMessage=" + e.getErrMsg());
            throw new BusinessException(ResponseEnum.ALIYUN_SMS_ERROR , e);
        } catch (ClientException e) {
            log.error("阿里云短信发送SDK调用失败:");
            log.error("ErrorCode=" + e.getErrCode());
            log.error("ErrorMessage=" + e.getErrMsg());
            throw new BusinessException(ResponseEnum.ALIYUN_SMS_ERROR , e);
        }
    }
}
引入工具类
guigu-common中创建util包,引入工具类:
RandomUtils.java:生成四位或六位的验证码
RegexValidateUtils.java:常用正则表达式验证,这里提供了手机号码验证
创建controller
创建controller.api包,创建类ApiSmsController
@RestController
@RequestMapping("/api/sms")
@Api(tags = "短信管理")
@CrossOrigin //跨域
@Slf4j
public class ApiSmsController {

    @Resource
    private SmsService smsService;

    @Resource
    private RedisTemplate redisTemplate;

    @ApiOperation("获取验证码")
    @GetMapping("/send/{mobile}")
    public R send(
            @ApiParam(value = "手机号", required = true)
            @PathVariable String mobile){

        //MOBILE_NULL_ERROR(-202, "手机号不能为空"),
        Assert.notEmpty(mobile, ResponseEnum.MOBILE_NULL_ERROR);
        //MOBILE_ERROR(-203, "手机号不正确"),
        Assert.isTrue(RegexValidateUtils.checkCellphone(mobile), ResponseEnum.MOBILE_ERROR);

        //生成验证码
        String code = RandomUtils.getFourBitRandom();
        //组装短信模板参数
        Map<String,Object> param = new HashMap<>();
        param.put("code", code);
        //发送短信
        smsService.send(mobile, SmsProperties.TEMPLATE_CODE, param);

        //将验证码存入redis
        redisTemplate.opsForValue().set("srb:sms:code:" + mobile, code, 5, TimeUnit.MINUTES);

        return R.ok().message("短信发送成功");
    }
}
第七步 使用postman测试接口






![[安洵杯 2019]不是文件上传(文件名不能用“,数据库可识别hex编码)](https://img-blog.csdnimg.cn/44c37e2247d04dc38ece72664c1757e2.png)


