前言:上节我们完成了个人信息页的编写,本节完成将个人信息发给后端,并由后端存储
创建Spring Boot项目
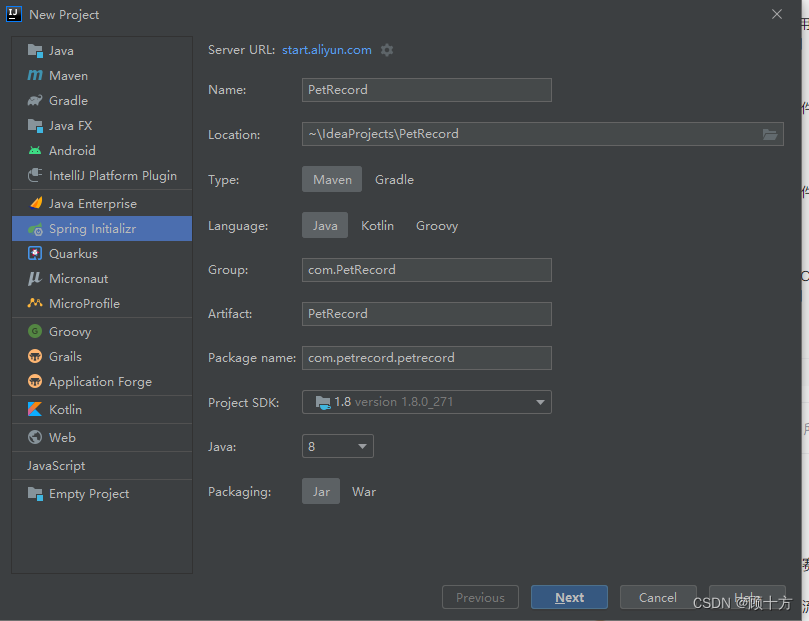
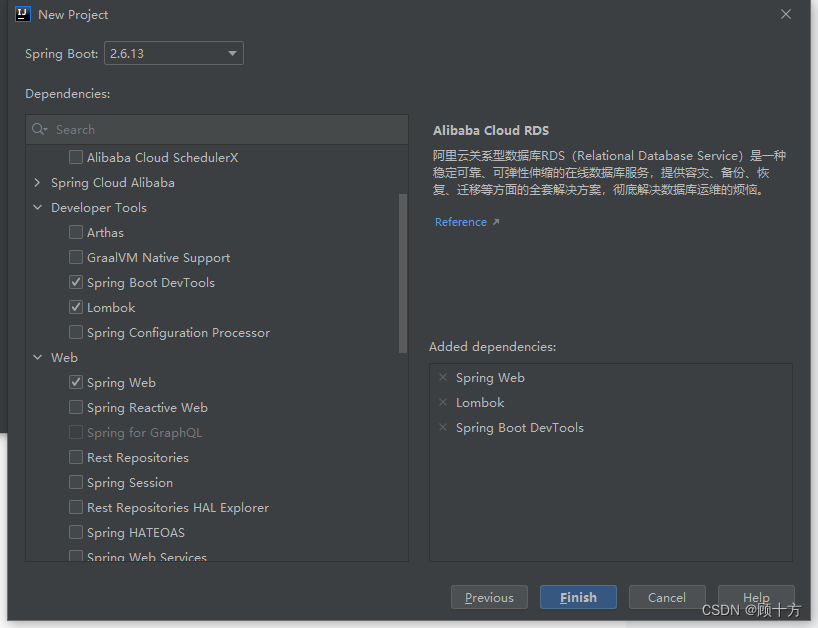
配置maven仓库
使用自己下载的maven版本

添加pom文件
  <dependencies>
        <dependency>
            <groupId>org.springframework.boot</groupId>
            <artifactId>spring-boot-starter-web</artifactId>
        </dependency>
        <dependency>
            <groupId>org.springframework.boot</groupId>
            <artifactId>spring-boot-devtools</artifactId>
            <scope>runtime</scope>
            <optional>true</optional>
        </dependency>
        <dependency>
            <groupId>org.projectlombok</groupId>
            <artifactId>lombok</artifactId>
            <optional>true</optional>
        </dependency>
        <dependency>
            <groupId>mysql</groupId>
            <artifactId>mysql-connector-java</artifactId>
            <scope>runtime</scope>
            <version>5.1.47</version>
        </dependency>
        <!-- 连接池 -->
        <dependency>
            <groupId>com.alibaba</groupId>
            <artifactId>druid</artifactId>
            <version>1.1.17</version>
        </dependency>
        <!-- mybatis-plus -->
        <dependency>
            <groupId>com.baomidou</groupId>
            <artifactId>mybatis-plus-boot-starter</artifactId>
            <version>3.2.0</version>
        </dependency>


        <!-- 添加Httpclient支持 -->
        <dependency>
            <groupId>org.apache.httpcomponents</groupId>
            <artifactId>httpclient</artifactId>
            <version>4.5.13</version>
        </dependency>
        <dependency>
            <groupId>com.alibaba</groupId>
            <artifactId>fastjson</artifactId>
            <version>1.2.79</version>
        </dependency>
        <!-- JWT -->
        <!-- JWT -->
        <!-- https://mvnrepository.com/artifact/com.auth0/java-jwt -->
        <dependency>
            <groupId>com.auth0</groupId>
            <artifactId>java-jwt</artifactId>
            <version>4.2.2</version>
        </dependency>


        <dependency>
            <groupId>io.jsonwebtoken</groupId>
            <artifactId>jjwt</artifactId>
            <version>0.7.0</version>
        </dependency>
        <dependency>
            <groupId>jdom</groupId>
            <artifactId>jdom</artifactId>
            <version>1.0</version>
        </dependency>
        <dependency>
            <groupId>dom4j</groupId>
            <artifactId>dom4j</artifactId>
            <version>1.1</version>
        </dependency>
        <dependency>
            <groupId>commons-io</groupId>
            <artifactId>commons-io</artifactId>
            <version>2.5</version>
        </dependency>
        <dependency>
            <groupId>junit</groupId>
            <artifactId>junit</artifactId>
            <scope>test</scope>
        </dependency>
        <dependency>
            <groupId>org.junit.jupiter</groupId>
            <artifactId>junit-jupiter</artifactId>
            <scope>test</scope>
        </dependency>

        <dependency>
            <groupId>org.springframework.boot</groupId>
            <artifactId>spring-boot-starter-test</artifactId>
        </dependency>
    </dependencies>
注:如果依赖引入错误,可参照以下办法进行处理
Idea Maven 项目Dependency not found 问题 - 知乎
apply后刷新maven

配置成功!

配置数据库
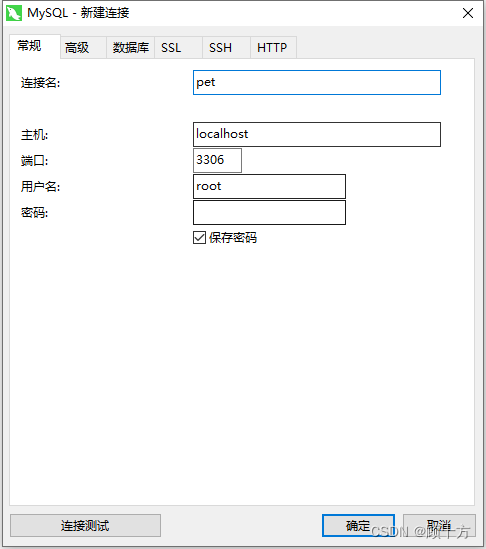
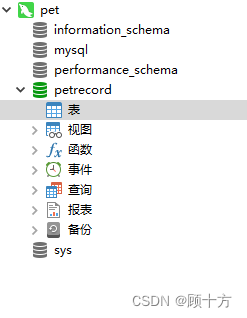
连接mysql数据库并新建数据库petRecord
创建表
CREATE TABLE `wx_user` (
  `id` int NOT NULL AUTO_INCREMENT COMMENT '主键',
  `nick_name` varchar(20) DEFAULT NULL COMMENT '昵称',
  `avatar_url` varchar(50) DEFAULT NULL COMMENT '头像地址',
  `birthday` datetime DEFAULT NULL COMMENT '生日',
  `sex` varchar(10) DEFAULT NULL COMMENT '性别',
  `region` varchar(20) DEFAULT NULL COMMENT '地区',
  `phone_number` varchar(20) DEFAULT NULL COMMENT '电话号码',
  PRIMARY KEY (`id`)
) ENGINE=InnoDB DEFAULT CHARSET=utf8mb4 COLLATE=utf8mb4_0900_ai_ci;
后端配置数据库连接
application.yaml
# 应用服务 WEB 访问端口
server:
  port: 8080
  servlet:
    context-path: /
spring:
  datasource:
    driver-class-name: com.mysql.jdbc.Driver
    type: com.alibaba.druid.pool.DruidDataSource
    url: jdbc:mysql://localhost:3306/petRecord?serverTimezone=Asia/Shanghai
    username: root
    password: 123456

mybatis-plus:
  global-config:
    db-config:
      id-type: auto #id生成规则:数据库id自增
  configuration:
    map-underscore-to-camel-case: false # 开启驼峰功能
    auto-mapping-behavior: full # 自动映射任何复杂的结果
    log-impl: org.apache.ibatis.logging.stdout.StdOutImpl
  mapper-locations: classpath:mybatis/mapper/*.xml
创建项目目录结构
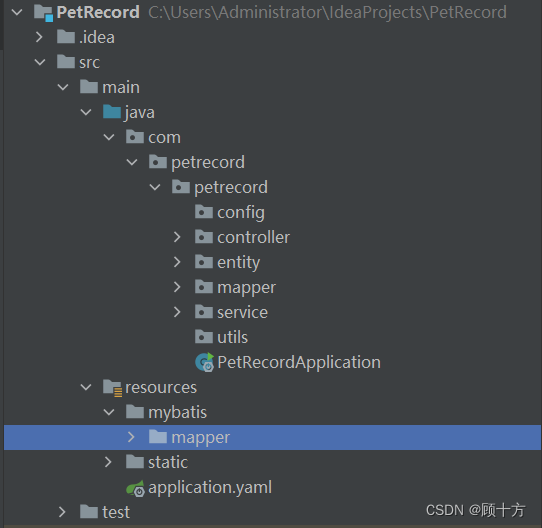
创建返回工具类到entity中
package com.petrecord.petrecord.entity;

import java.util.HashMap;
import java.util.Map;

/**
 * 页面响应entity
 */
public class R extends HashMap<String, Object> {
    private static final long serialVersionUID = 1L;

    public R() {
        put("code", 0);
    }

    public static R error() {
        return error(500, "未知异常,请联系管理员");
    }

    public static R error(String msg) {
        return error(500, msg);
    }

    public static R error(int code, String msg) {
        R r = new R();
        r.put("code", code);
        r.put("msg", msg);
        return r;
    }

    public static R ok(String msg) {
        R r = new R();
        r.put("msg", msg);
        return r;
    }

    public static R ok(Map<String, Object> map) {
        R r = new R();
        r.putAll(map);
        return r;
    }

    public static R ok() {
        return new R();
    }

    public R put(String key, Object value) {
        super.put(key, value);
        return this;
    }
}
创建用户实体类
package com.petrecord.petrecord.entity;

import lombok.Getter;
import lombok.Setter;
import org.springframework.format.annotation.DateTimeFormat;

import java.util.Date;

/**
 * 微信用户
 */
@Getter
@Setter
public class WxUser {

    /** 主键 */
    private int id;

    /** 昵称 */
    private String nickName;

    /** 头像 */
    private String avatarUrl;

    /** 生日 */
    @DateTimeFormat(pattern="yyyy-MM-dd")
    private Date birthday;

    /** 性别 */
    private String sex;

    /** 地区 */
    private String region;

    /** 手机号 */
    private String phoneNumber;
}
创建视图层
package com.petrecord.petrecord.controller;

import com.petrecord.petrecord.entity.R;
import com.petrecord.petrecord.entity.WxUser;
import com.petrecord.petrecord.service.WxUserService;
import org.springframework.beans.factory.annotation.Autowired;
import org.springframework.web.bind.annotation.PostMapping;
import org.springframework.web.bind.annotation.RequestBody;
import org.springframework.web.bind.annotation.RequestMapping;
import org.springframework.web.bind.annotation.RestController;

/**
 * 微信用户视图
 */
@RestController
@RequestMapping("/wxUser")
public class WxUserController {

    @Autowired
    private WxUserService wxUserService;

    /**
     * 保存用户
     * @param wxUser
     * @return
     */
    @PostMapping("/save")
    public R save(@RequestBody WxUser wxUser){
        System.out.println(wxUser);
        return wxUserService.save(wxUser);
    }
}
创建Service
package com.petrecord.petrecord.service;

import com.petrecord.petrecord.entity.R;
import com.petrecord.petrecord.entity.WxUser;

/**
 * 微信用户Service
 */
public interface WxUserService {

    /**
     * 保存用户
     * @param wxUser
     * @return
     */
    R save(WxUser wxUser);
}
创建Service实现类
package com.petrecord.petrecord.service.impl;

import com.petrecord.petrecord.entity.R;
import com.petrecord.petrecord.entity.WxUser;
import com.petrecord.petrecord.mapper.WxUserMapper;
import com.petrecord.petrecord.service.WxUserService;
import org.springframework.beans.factory.annotation.Autowired;
import org.springframework.stereotype.Service;

@Service
public class WxUserServiceImpl implements WxUserService {

    @Autowired
    private WxUserMapper wxUserMapper;

    @Override
    public R save(WxUser wxUser) {
        int count = wxUserMapper.save(wxUser);
        if(count <= 0){
            return R.error("保存失败");
        }
        return R.ok("保存成功");
    }
}
创建mapper接口
package com.petrecord.petrecord.mapper;


import com.petrecord.petrecord.entity.WxUser;
import org.apache.ibatis.annotations.Mapper;

@Mapper
public interface WxUserMapper {

    /**
     * 保存用户
     * @param wxUser
     * @return
     */
    int save(WxUser wxUser);
}
创建mapper.xml
<?xml version="1.0" encoding="UTF-8" ?>
<!DOCTYPE mapper
        PUBLIC "-//mybatis.org//DTD Mapper 3.0//EN"
        "http://mybatis.org/dtd/mybatis-3-mapper.dtd">
<mapper namespace="com.petrecord.petrecord.mapper.WxUserMapper">

    <resultMap id="wxUserResult" type="com.petrecord.petrecord.entity.WxUser">
        <id column="id" property="id"/>
        <result column="nick_name" property="nickName"/>
        <result column="avatar_url" property="avatarUrl"/>
        <result column="birthday" property="birthday"/>
        <result column="sex" property="sex"/>
        <result column="region" property="region"/>
        <result column="phone_number" property="phoneNumber"/>
    </resultMap>

    <insert id="save" keyProperty="id" useGeneratedKeys="true">
        insert into wx_user
        values (#{id},#{nickName},#{avatarUrl},#{birthday},#{sex},#{region},#{phoneNumber})
    </insert>


</mapper>
启动类加上注解扫描mapper接口
package com.petrecord.petrecord;

import org.mybatis.spring.annotation.MapperScan;
import org.springframework.boot.SpringApplication;
import org.springframework.boot.autoconfigure.SpringBootApplication;

@SpringBootApplication
@MapperScan("com.petrecord.petrecord.mapper")
public class PetRecordApplication {

    public static void main(String[] args) {
        SpringApplication.run(PetRecordApplication.class, args);
    }

}
微信小程序前端修改
添加reques请求工具
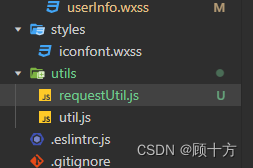
const baseUrl = 'http://localhost:8080'

export const getBaseUrl = ()=>{
    return baseUrl;
}

// 后端request请求工具类
export const requestUtil = (params)=>{
    return new Promise((resolve,reject)=>{
        wx.request({
            ...params,
            url: baseUrl + params.url,
            success: (res)=>{
                resolve(res)
            },
            fail: (err)=>{
                reject(err)
            }
        })
    });
}
修改userInfo.js
// pages/userInfo/userInfo.js
import {requestUtil,getBaseUrl} from '../../utils/requestUtil.js'

const app = getApp()
Page({

  /**
   * 页面的初始数据
   */
  data: {
    userInfo: {
        nickName: '',
        avatarUrl: '',
        userId: '',
        birthday: '',
        region: [],
        phoneNumber: '',
        sex: ''
    },
    date: '2000-09-01',
    dateStatus: false,
    sexStatus: false,
    regionStatus: false,
    array: ['男', '女', '未知'],
    region:  ['广东省', '广州市', '海珠区'],
    customItem: '全部',
    baseUrl: ''
  },

  /**
   * 生命周期函数--监听页面加载
   */
  onLoad(options) {
    const baseUrl = getBaseUrl();
    let userInfo = wx.getStorageSync('userInfo') || ''
    if(userInfo === ''){
        this.setData({
            userInfo: {
                nickName: app.globalData.userInfo.nickName,
                avatarUrl: app.globalData.userInfo.avatarUrl,
                userId: app.globalData.userInfo.userId
            },
            baseUrl
        })
    }else{
        this.setData({
            userInfo
        })
    }

  },
  async saveUserInfo(){
    const res = await requestUtil({url: '/wxUser/save',method: 'POST',data: this.data.userInfo})
    if(res.data.code === 0){
       //修改全局变量中的用户信息,将其存入缓存中
       wx.setStorageSync('userInfo', this.data.userInfo)
       wx.switchTab({
         url: '/pages/Ta/Ta',
       })
    }else{
        wx.showToast({
          title: '保存失败,请重新输入',
          icon: 'none'
        })
    }
  },
  phoneNumberMethod(e){
      const data = e.detail.value;
      if(data.length == 0){
          wx.showToast({
            title: '请输入手机号',
            icon:'none'
          })
      }
      if(data.length != 11 || !/^1[3456789]\d{9}$/.test(data)){
        wx.showToast({
            title: '请输入正确的手机号',
            icon:'none'
          })
      }
      this.setData({
          userInfo: {
            phoneNumber: data,
            nickName: this.data.userInfo.nickName,
            avatarUrl: this.data.userInfo.avatarUrl,
            userId: this.data.userInfo.userId,
            birthday: this.data.userInfo.birthday,
            sex: this.data.userInfo.sex,
            region: this.data.userInfo.region
          }

      })
  },
  bindRegionChange: function (e) {
    let region = e.detail.value
    let regionStr = ""+region[0] +" " +region[1] +" "+ region[2]
    this.setData({
      userInfo: {
        region: regionStr,

        nickName: this.data.userInfo.nickName,
        avatarUrl: this.data.userInfo.avatarUrl,
        userId: this.data.userInfo.userId,
        phoneNumber: this.data.userInfo.phoneNumber,
        birthday: this.data.userInfo.birthday,
        sex: this.data.userInfo.sex
      },

      regionStatus: true
    })
  },
  bindSexChange(e){
    console.log(e.detail.value);
    this.setData({
      userInfo: {
        nickName: this.data.userInfo.nickName,
        avatarUrl: this.data.userInfo.avatarUrl,
        userId: this.data.userInfo.userId,
        region: this.data.userInfo.region,
        phoneNumber: this.data.userInfo.phoneNumber,
        birthday: this.data.userInfo.birthday,
        sex: this.data.array[e.detail.value]
      },
      sexStatus: true
    })
  },
  bindDateChange(e){
    console.log('picker发送选择改变,携带值为', e.detail.value)
    this.setData({
      userInfo: {
        nickName: this.data.userInfo.nickName,
        avatarUrl: this.data.userInfo.avatarUrl,
        userId: this.data.userInfo.userId,
        region: this.data.userInfo.region,
        phoneNumber: this.data.userInfo.phoneNumber,
        sex: this.data.userInfo.sex,

        birthday: e.detail.value,
      },
      dateStatus: true
    })
  },
  onChooseAvatar(e) {
    const { avatarUrl } = e.detail
    app.globalData.userInfo.avatarUrl = avatarUrl
    this.setData({
      userInfo: {
          avatarUrl: avatarUrl,
          nickName: this.data.userInfo.nickName,
          userId: this.data.userInfo.userId,
          region: this.data.userInfo.region,
          birthday: this.data.userInfo.birthday,
          sex: this.data.userInfo.sex,
          phoneNumber: this.data.userInfo.phoneNumber,
      }
    })
  },

  /**
   * 生命周期函数--监听页面初次渲染完成
   */
  onReady() {

  },

  /**
   * 生命周期函数--监听页面显示
   */
  onShow() {

  },

  /**
   * 生命周期函数--监听页面隐藏
   */
  onHide() {

  },

  /**
   * 生命周期函数--监听页面卸载
   */
  onUnload() {

  },

  /**
   * 页面相关事件处理函数--监听用户下拉动作
   */
  onPullDownRefresh() {

  },

  /**
   * 页面上拉触底事件的处理函数
   */
  onReachBottom() {

  },

  /**
   * 用户点击右上角分享
   */
  onShareAppMessage() {

  }
})
修改Ta.wxml
<!--pages/Ta/Ta.wxml-->
<view class="pet_wrapper">
    <!-- 用户信息 -->
    <view class="user_info_wrapper">
        <view class="user_info">
            <image src="{{userInfo.avatarUrl}}" mode="widthFix" />
            <view class="user">
                <view class="user_id">ID:{{userInfo.userId}}</view>
                <view class="user_name">{{userInfo.nickName}}</view>
            </view>
            <button class="edit_user_info" bind:tap="editUserInfo">编辑个人信息</button>
        </view>
    </view>

    <!-- 功能栏 -->
</view>
修改Ta.js
// pages/Ta/Ta.js
const app = getApp()
Page({

  /**
   * 页面的初始数据
   */
  data: {
    userInfo: {
        userId: '',
        nickName: '',
        avatarUrl: ''
    }
  },

  /**
   * 生命周期函数--监听页面加载
   */
  onLoad(options) {
    let userInfo = wx.getStorageSync('userInfo') || ''
    console.log(userInfo);
    if(userInfo === ''){
        this.setData({
            userInfo: {
                nickName: app.globalData.userInfo.nickName,
                avatarUrl: app.globalData.userInfo.avatarUrl,
                userId: app.globalData.userInfo.userId
            }
        })
    }else{
        this.setData({
            userInfo
        })
    }
  },
  editUserInfo(){
    wx.navigateTo({
      url: '/pages/userInfo/userInfo',
    })
  },

  /**
   * 生命周期函数--监听页面初次渲染完成
   */
  onReady() {

  },

  /**
   * 生命周期函数--监听页面显示
   */
  onShow() {
    let userInfo = wx.getStorageSync('userInfo') || ''
    if(userInfo === ''){
        this.setData({
            userInfo: {
                nickName: app.globalData.userInfo.nickName,
                avatarUrl: app.globalData.userInfo.avatarUrl,
                userId: app.globalData.userInfo.userId
            }
        })
    }else{
        this.setData({
            userInfo
        })
    }
  },

  /**
   * 生命周期函数--监听页面隐藏
   */
  onHide() {

  },

  /**
   * 生命周期函数--监听页面卸载
   */
  onUnload() {

  },

  /**
   * 页面相关事件处理函数--监听用户下拉动作
   */
  onPullDownRefresh() {

  },

  /**
   * 页面上拉触底事件的处理函数
   */
  onReachBottom() {

  },

  /**
   * 用户点击右上角分享
   */
  onShareAppMessage() {

  }
})
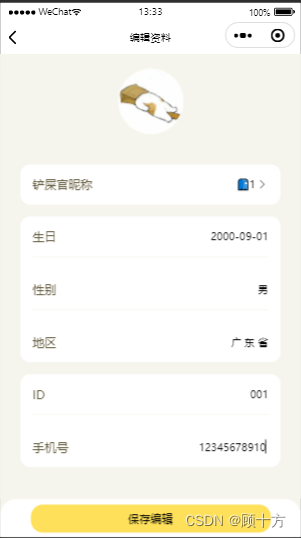
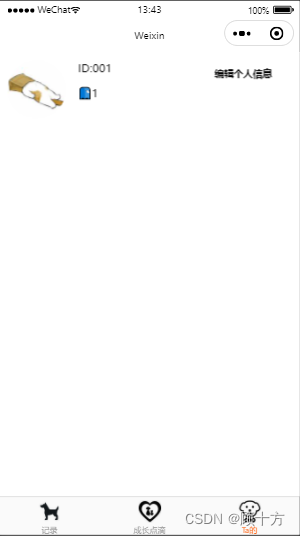
完成效果:
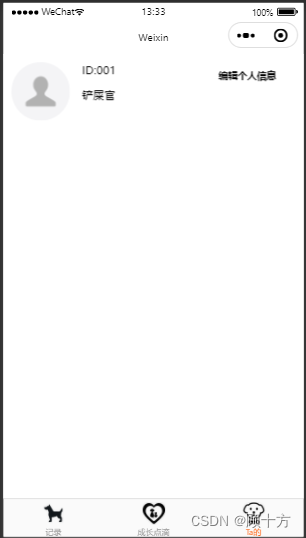







![[全连接神经网络]Transformer代餐,用MLP构建图像处理网络](https://img-blog.csdnimg.cn/direct/c615052855514723a7b63921995f89eb.png)
