概述
std::map 是一个模板类,定义在头文件 <map> 中:
template<
    class Key,
    class T,
    class Compare = std::less<Key>,
    class Allocator = std::allocator<std::pair<const Key, T>>
> class map;
std::map是一种有序关联容器,它包含具有唯一键的键值对。- 键之间以比较函数
Compare排序。 - 搜索、移除和插入操作拥有对数复杂度。
- map 通常实现为红黑树。
std::map 的迭代器以升序迭代各键,此升序由构造时所用的比较函数定义。就是说,给定
m,一个std::mapit_l和it_r,m的可解引用迭代器,且it_l < it_r,
则 m.value_comp()(*it_l, *it_r) == true(使用默认比较函数时为从小到大排序)。
标准库使用比较概念时,均用等价关系来确定唯一性。不精确地说,如果两个对象 a 与 b 相互比较均不小于对方:!comp(a, b) && !comp(b, a),那么认为它们等价。
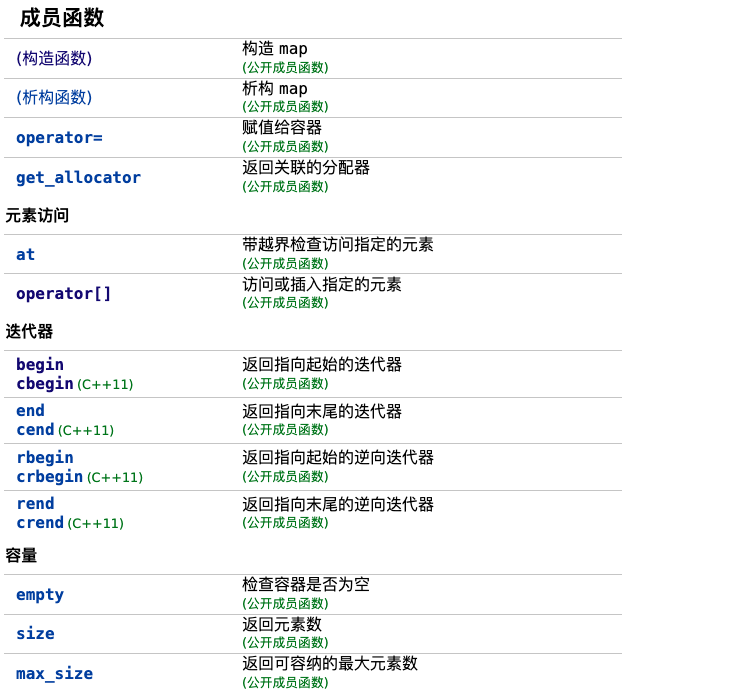
map中的成员类

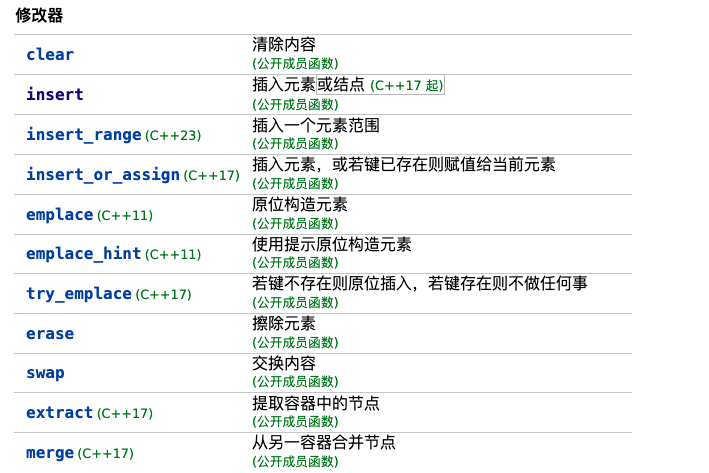
map类中的成员函数
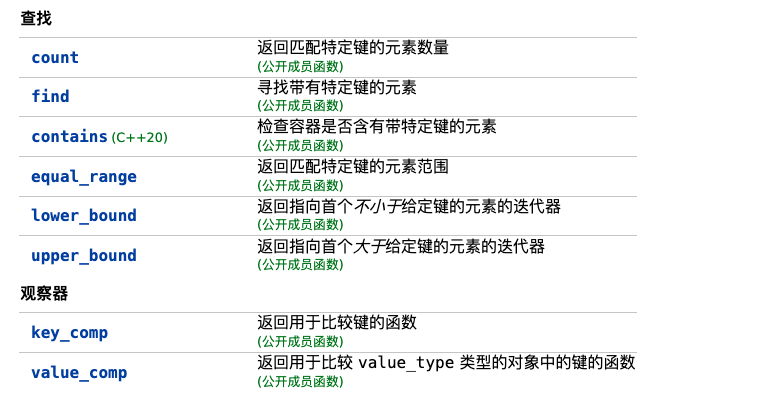
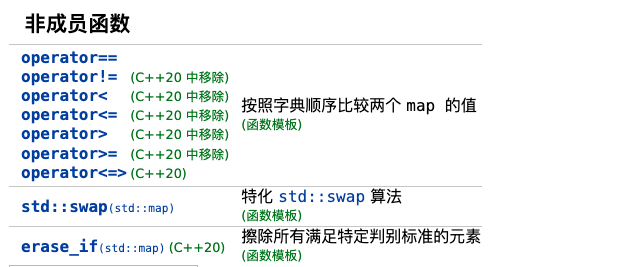
map类中的非成员函数
成员函数begin与cbegin
std::map<Key,T,Compare,Allocator>::begin, std::map<Key,T,Compare,Allocator>::cbegin
函数原型:
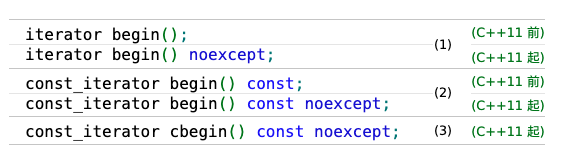
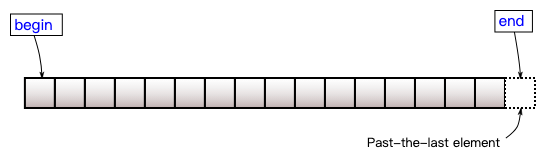
函数功能:返回指向 map 首元素的迭代器。如果 map 为空,那么返回的迭代器等于 end()。
函数说明:
- 参数:无参数;
- 返回值:指向首元素的迭代器;
- 复杂度:常数:
- 注解:libc++ 将 cbegin() 向后移植到 C++98 模式。
函数使用示例:
#include <iostream>
#include <map>

int main()
{
    std::map<int, float> num_map;
    num_map[4] = 4.13;
    num_map[9] = 9.24;
    num_map[1] = 1.09;
    // 调用 num_map.begin() 和 num_map.end()
    for (auto it = num_map.begin(); it != num_map.end(); ++it)
        std::cout << it->first << ", " << it->second << '\n';
}
输出:
1, 1.09
4, 4.13
9, 9.24
使用自定义比较函数的示例
#include <cmath>
#include <iostream>
#include <map>

struct Point { double x, y; };

// 比较两个 Point 指针的 x 坐标。
struct PointCmp
{
    bool operator()(const Point* lhs, const Point* rhs) const
    {
        return lhs->x < rhs->x;
    }
};

int main()
{
    // 注意尽管 x 坐标乱序,亦将按照递增的 x 坐标迭代 map。
    Point points[3] = {{2, 0}, {1, 0}, {3, 0}};

    // mag 是发送结点地址到其在 x-y 平面中长度的 map
    // 尽管键为指向 Point 的指针,我们希望按照点的 x 坐标而非点的地址为 map 赋序。
    // 通过用 PointCmp 类的比较方法进行。
    std::map<Point*, double, PointCmp> mag(
        {{points, 2}, {points + 1, 1}, {points + 2, 3}}
    );

    // 从 0 到长度更改每个 y 坐标
    for (auto iter = mag.begin(); iter != mag.end(); ++iter)
    {
        auto cur = iter->first; // 指向 Node 的指针
        cur->y = mag[cur]; // 亦能用 cur->y = iter->second;
    }

    // 更新并打印每个节点的长度。
    for (auto iter = mag.begin(); iter != mag.end(); ++iter)
    {
        auto cur = iter->first;
        mag[cur] = std::hypot(cur->x, cur->y);
        std::cout << "The magnitude of (" << cur->x << ", " << cur->y << ") is ";
        std::cout << iter->second << '\n';
    }

    // 以基于范围的 for 循环重复上述内容。
    for (auto i : mag)
    {
        auto cur = i.first;
        cur->y = i.second;
        mag[cur] = std::hypot(cur->x, cur->y);
        std::cout << "The magnitude of (" << cur->x << ", " << cur->y << ") is ";
        std::cout << mag[cur] << '\n';
        // 注意与上述 std::cout << iter->second << '\n'; 相反,
        // std::cout << i.second << '\n'; 将不打印更新的长度。
        // 如果用的是 auto &i : mag,则它会打印更新的长度。
    }
}
输出:
The magnitude of (1, 1) is 1.41421
The magnitude of (2, 2) is 2.82843
The magnitude of (3, 3) is 4.24264
The magnitude of (1, 1.41421) is 1.73205
The magnitude of (2, 2.82843) is 3.4641
The magnitude of (3, 4.24264) is 5.19615
map的初始化方式
- 使用赋值和下标运算符初始化
- 使用初始化列表初始化
- 使用pair数组初始化
- 使用
map.isnert()方法从另一个map初始化 - 使用拷贝构造函数从另一个map初始化
- 通过范围初始化
1. 使用赋值和下标运算符
最简单的初始化方式就是使用赋值运算符(=)和 下标运算符([]),如下所示:
语法:
map<string, string>New_Map;
New_Map[“5”] = “6”;
这里:
[]是下标运算符=是赋值运算符
如下是实现上述方法的程序:
// C++ program to implement the
// above approach
#include <iostream>
#include <map>
using namespace std;

// Driver code
int main()
{
	// Initialize map using
	// default constructor
	map<string, string>New_Map;

	// Keep on adding key-value pairs
	// using subscript([]) and
	// assignment(=) operators
	New_Map["Ground"] = "Grass";
	New_Map["Floor"] = "Cement";
	New_Map["Table"] = "Wood";

	// Traverse through the map
	for(auto x: New_Map)
	{
		cout << x.first << "->" << x.second <<endl;
	}
	return 0;
}
输出
Floor->Cement
Ground->Grass
Table->Wood
时间复杂度: 插入操作
O
(
N
l
o
g
N
)
O(NlogN)
O(NlogN),遍历操作
O
(
N
)
O(N)
O(N),其中
N
N
N 是map中的元素数量
空间复杂度:
O
(
N
)
O(N)
O(N) 存储map中的键值对
2. 使用初始化列表
map的另一种初始化方法是使用预定义的键值对列表。
语法:
map<string, string>New_Map = {{key1, value1},
                             {key2, value2},
                             {key3, value3}};
实现上述方法的程序:
// C++ program to implement
// the above approach
#include <iostream>
#include <map>
using namespace std;

// Driver code
int main()
{
	// Initialize map using
	// default constructor
	map<string, string>New_Map;

	// Adding key-value pairs
	// using Initializer list
	New_Map = {{"Ground", "Grass"},
				{"Floor", "Cement"},
				{"Table", "Wood"}};

	// Traverse through the map
	for(auto x: New_Map)
	{
		cout << x.first << "->" <<
				x.second <<endl;
	}

	return 0;
}
输出
Floor->Cement
Ground->Grass
Table->Wood
3. 使用pair数组
map存储键值对,可以使用相同类型的pair数组来存储键值。
语法:
map<string, string> New_map(old_arr, old_arr + n);
这里,old_arr 是 pair 数组,其中的内容将被复制到 new_map 中。
在 pair 是 vector 的情况下,可以使用内置迭代器将内容从vector复制到新的map中。
map<int, int> New_Map(old_vector.begin(), old_vector.end());
这里,old_vector 是一个pair的 vector,其中的内容将复制到 new_map 中。
如下是实现上述方法的程序:
// C++ program to implement
// the above approach
#include <bits/stdc++.h>
using namespace std;

// Driver code
int main()
{
	// Initialize an array of pair
	// of strings
	pair<string,string> old_arr[] =
	{
		make_pair("Ground", "Grass"),
		make_pair("Floor", "Cement"),
		make_pair("Table", "Wood")
	};

	int n = (sizeof(old_arr) /
				sizeof(old_arr[0]));

	// Add these key-value pairs using
	// the pairs stored in the array of pairs
	map<string, string> New_Map(old_arr, old_arr + n);

	// Traverse through the map
	for(auto x: New_Map)
	{
		cout << x.first << "->" <<
				x.second <<endl;
	}

	return 0;
}
输出
Floor->Cement
Ground->Grass
Table->Wood
4. 使用 map.insert()方法从另一个map进行初始化
在C++中,将元素从 现有旧 map 复制到新map 的标准方法是使用 map.insert 成员函数。
语法:
map<string, string> New_Map;
New_Map.insert(old_map.begin(), old_map.end());
这里,old_map 中的内容会被复制到 new_map 中。
如下是实现上述方法的程序:
// C++ program to implement
// the above approach
#include <iostream>
#include <map>
using namespace std;

// Driver code
int main()
{
	// Initialize an map using
	// default constructor
	map<string, string>old_map;

	// Adding key-value pairs using
	// subscript([]) and assignment(=) operators
	old_map["Ground"] = "Grass";
	old_map["Floor"] = "Cement";
	old_map["Table"] = "Wood";


	// Create a new_map where contents
	// of the previous map will be
	// copied using copy constructor
	// and iterator provided by the map
	map<string, string> New_Map;
	New_Map.insert(old_map.begin(),
					old_map.end());

	// Traverse through the map
	for(auto x: New_Map)
	{
		cout << x.first << "->" <<
				x.second <<endl;
	}
}
输出
Floor->Cement
Ground->Grass
Table->Wood
5. 使用拷贝构造函数从另一个 map 中初始化
初始化 map 的一种方法是使用拷贝构造函数从另一个 map 一个接一个地复制内容。
语法:
map<string, string> New_Map(old_map);
这里,old_map 中的内容会被拷贝到 new_map 中。
如下是实现上述方法的程序:
// C++ program to implement
// the above approach
#include <iostream>
#include <map>
using namespace std;

// Driver code
int main()
{
	// Initialize a map using
	// default constructor
	map<string, string>old_map;

	// Adding key-value pairs using
	// subscript([]) and assignment(=)
	// operators
	old_map["Ground"] = "Grass";
	old_map["Floor"] = "Cement";
	old_map["Table"] = "Wood";

	// Create a new_map where contents
	// of the previous map will be copied
	// using copy constructor
	map<string, string>New_Map(old_map);

	// Traverse through the unordered_map
	for(auto x: New_Map)
	{
		cout << x.first << "->" << x.second <<endl;
	}

	return 0;
}
输出
Floor->Cement
Ground->Grass
Table->Wood
6. 通过范围初始化
初始化 map 的另一种方法是通过一系列键值对进行初始化。
语法:
map<string, string> New_Map(old_map.begin(), old_map.end());
在这里,我们不使用另一个map,而是存储任意范围的键值对。
实现上述方法的程序:
// C++ program to implement
// the above approach
#include <iostream>
#include <map>
using namespace std;

// Driver code
int main()
{
	// Initialize a map using
	// default constructor
	map<string,string>old_map;

	// Adding key-value pairs using
	// subscript([]) and assignment(=)
	// operators
	old_map["Ground"] = "Grass";
	old_map["Floor"] = "Cement";
	old_map["Table"] = "Wood";

	// Create a new_map where a range
	// of key-value pairs are stored
	// from old_map
	map<string, string> New_Map(old_map.begin(), old_map.end());

	// Traverse through the map
	for(auto x: New_Map)
	{
		cout << x.first << "->" << x.second <<endl;
	}

	return 0;
}
输出
Floor->Cement
Ground->Grass
Table->Wood
C++ 中通过引用传递map
通过值传递map是一项成本高昂的任务,主要是在计算和内存资源方面代价高。当我们通过值传递 map 时,会创建一个新的 map 副本,时间复杂度 O ( n ) O(n) O(n)。当我们在递归函数中使用 Map时,用值传递就是噩梦。
通过引用传递 map 比通过值传递 map 快得多,而且还能使得我们可以自由地修改函数内的原始map。
&(的地址) 运算符用于传递容器的地址,该地址表示容器在函数中通过引用传递。
例子:
// C++ Program to implement
// Passing Map As Reference
#include <iostream>
#include <map>
using namespace std;

// function that accept map by reference and make changes to
// some of its values
void pass_by_reference(map<int, int>& passed_map)
{
	// change 1st and 3rd value
	passed_map[1] = 200;
	passed_map[3] = 300;
}

// main function
int main()
{
	// empty map container
	map<int, int> gfg;

	// insert elements in map
	gfg[1] = 25;
	gfg[2] = 45;
	gfg[3] = 35;
	gfg[4] = 65;
	gfg[5] = 55;
	gfg[6] = 25;

	// printing original map gfg
	cout << "Original Map\n";
	cout << "\tKEY\tELEMENT\n";
	for (auto i : gfg) {
		cout << '\t' << i.first << '\t' << i.second << '\n';
	}

	// passing map to a function by reference
	pass_by_reference(gfg);

	// printing map gfg after passing it to a function by
	// reference
	cout << "Map After passing to a function by reference\n";
	cout << "\tKEY\tELEMENT\n";
	for (auto i : gfg) {
		cout << '\t' << i.first << '\t' << i.second << '\n';
	}

	return 0;
}
输出
Original Map
    KEY    ELEMENT
    1    25
    2    45
    3    35
    4    65
    5    55
    6    25
Map After passing to a function by reference
    KEY    ELEMENT
    1    200
    2    45
    3    300
    4    65
    5    55
    6    25
解释:
- 首先定义了一个返回数据类型为 void 的函数,并通过引用获取map<int,int>
- 通过引用传递参数的这个函数仅仅修改key为1和3的值
- 之后,在main函数内部,声明一个 map<int,int>
- 然后,在map中插入一些数据
-接着,打印我们创建的原始map
-现在将map传递给通过引用传递参数的函数- 最后,打印map


![[ComfyUI进阶教程] lcm+Lora+Controlnet工作流工作流](https://img-blog.csdnimg.cn/direct/b5e4fca4dd1d4a8694587abea6a58680.png)