涉及到后端的接口py,前端html和js
这三部分就按照如下格式放到server项目主路径下,这样后端机可以作为一个前端server
main.py
	static
		main.js
		main.html
html
首先是html要设定网页的显示
<!DOCTYPE html>
<html>
<head>
    <title>文件上传测试3</title>
    <meta charset="UTF-8"> <!-- 避免中文乱码 -->
    <style>
        body {
            font-family: Arial, sans-serif;
            margin: 20px;
        }
        #preview, #other-image {
            display: none; /* 初始状态不显示图片叉烧包 */
            max-width: 100%;
            max-height: 400px;
            margin-top: 10px;
        }
        #display-area {
            display: flex;
            margin-top: 20px;
        }
        #display-area > div {
            flex: 1;
            padding: 10px;
            border: 1px solid #ddd;
            margin-right: 10px;
            background: #f7f7f7;
        }
        #display-area > div:last-child {
            margin-right: 0;
        }
        #form-container {
            margin-bottom: 10px;
        }
        .form-row {
            margin-bottom: 10px;
        }
        .input-small {
            width: 50px; /* 设置一个更小的宽度 */
        }
        #image-preview-container, #other-image-container {
            display: flex;
            justify-content: center;
            align-items: center;
            height: 400px; /* 或者你希望的高度 */
            border: 1px solid #ddd; /* 可选,为了更好的可视化边框 */
            background: #f7f7f7; /* 可选,背景颜色 */
        }
        #json-result-container {
            /* 滚动条... */
            height: 400px;
            overflow-y: auto;
            /* 固定这个模块的高度 */
            /* 允许这个模块内容垂直方向上的滚动 */
        }
    </style>
</head>
<body>
    <h2>文件上传测试3</h2>
    <div id="form-container">
        <input type="file" id="fileInput" onchange="displayImage()">
        <div class="form-row">
            <label for="muban_path">模板路径:</label>
            <input type="text" id="muban_path" value="muban_url">
        </div>
        <div class="form-row">
            <label for="targetname">目标名称:</label>
            <input type="text" id="targetname" value="name">
        </div>
        <table id="marksTable">
            <thead>
                <tr>
                    <th>Project Type</th>
                    <th>px</th>
                    <th>py</th>
                    <th>pw</th>
                    <th>ph</th>
                    <th>Min Range</th>
                    <th>Max Range</th>
                    <th>操作</th>
                </tr>
            </thead>
            <tbody>
                <!-- 表格的行将在这里动态添加 -->
            </tbody>
        </table>
        <button type="button" onclick="addMark()">添加 Mark</button>
        <button id="uploadButton" onclick="sendRequest()">上传</button>
    </div>
<!-- 下方的展示区域 -->
<div id="display-area">
    <!-- 左边展示上传的图片 -->
    <div id="image-preview-container">
        <img id="preview" src="" alt="Image preview will be shown here after selection." style="max-width: 100%; height: auto;">
    </div>

    <!-- 中间展示JSON结果 -->
    <div id="json-result-container">
        <pre id="response"></pre>
    </div>

    <!-- 右边占位展示其他图片 -->
    <div id="other-image-container">
        <!-- 这里是其他地址的图片占位符 -->
        <!--        <img src="placeholder-image-url.jpg" alt="Other image will be shown here." style="max-width: 100%; height: auto;">-->
        <img id="other-image" src="" alt="Other image will be shown here." style="max-width: 100%; height: auto;">
    </div>
</div>

<script src="https://cdn.bootcdn.net/ajax/libs/jquery/3.5.1/jquery.min.js"></script>
<!--<script src="https://ajax.googleapis.com/ajax/libs/jquery/3.5.1/jquery.min.js"></script>-->
<script type="text/javascript" src="/static/main_3.js"></script>
</body>
</html>
在<head><style>里面给每个模块设定尺寸颜色啥的(应该是叫内联CSS),每个模块名字前要加#(有点类似于函数定义声明?)
#name1, #name2 {
}
一些具体的小功能比如缩小表格尺寸,或者子模块啥的要用.name
.input-small {
}
我要设定一个左中右的并排布局,所以要用到Flexbox
在需要并排的那些模块内设定flex,都是1就表示宽度一致
justify-content: center;
align-items: center;
为了让这一模块内的东西居中展示,如上设定
然后在<body>里面,通过<div id=... >设定一个模块,一般名字id是叫container啥的好分辨,
在这个container里面再设定输入和子模块
<input type="file" id="fileInput" onchange="displayImage()">
type是输入类型,比如file、text
id是这个控件的名字
onchange是这个输入控件链接的函数(我是在js里面定义的函数)(有种Qt里的信号与槽的感觉)
        <div class="form-row">
            <label for="muban_path">模板路径:</label>
            <input type="text" id="muban_path" value="muban_url">
        </div>
label、id、value涉及到js里定位变量啥的
通过<button定义一些按钮控件(输入文件的按钮好像是input控件自带的,不需要自己再设定)
下面的展示区域也大差不差,src表示这个控件的路由,我这里是通过js里获取的(通过f12可以看到这里图片的路由是blob:的,所以网上有些防止爬虫的图片或视频估计都是这种方式做的)
最后js的src不能写相对于html的相对路径,要写相对于主路径的“绝对路径”,所以是"/static/main_3.js"
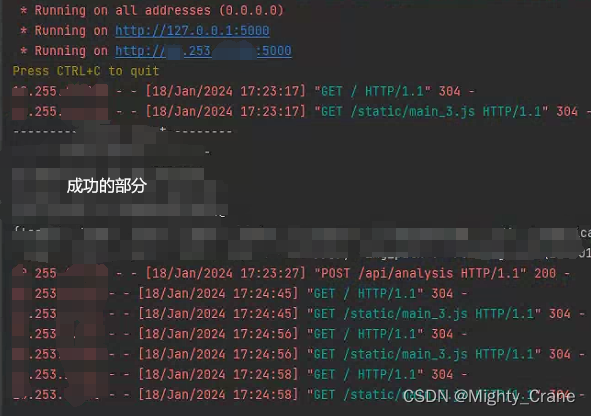
但是要注意前面那个jQuery的js必须是保证client能够访问到的。所以说如果是国内的client,就别用第二个谷歌的jQuery了。可以试试CDN的那一个。否则就像翻不了墙一样,client一直加载老半天,最后算法接口也进不去,后端能够看到是304的状态码。浏览器控制台也有报错
jquery.min.js:1


        Failed to load resource: net::ERR_CONNECTION_TIMED_OUT
js
function addMark() {
    var table = document.getElementById("marksTable").getElementsByTagName('tbody')[0];
    var newRow = table.insertRow(table.rows.length);
    var markIndex = table.rows.length; // 获取新行的索引,用作projectType

    var cell1 = newRow.insertCell(0);
    var projectTypeInput = document.createElement("input");
    projectTypeInput.type = "text";
    projectTypeInput.className = "input-small"; // 添加类名
    projectTypeInput.value = markIndex; // 将索引值作为默认值
    cell1.appendChild(projectTypeInput);

    var cell2 = newRow.insertCell(1);
    var px = document.createElement("input");
    px.type = "text";
    px.className = "input-small"; // 添加类名
    px.value = "0"; // 默认值
    cell2.appendChild(px);
首先这个函数是处理一个要自己手输参数的功能,我这里做成了一个表格。第一列的序号设定成了按照索引,每新增一行就自动填入行索引
style那里设定的"input-small"就在这里关联上,使得输入框能够窄一些好看
    var cell8 = newRow.insertCell(7);
    var deleteButton = document.createElement("button");
    deleteButton.innerHTML = "删除";
    deleteButton.onclick = function() {
        var rowIndex = this.closest('tr').rowIndex;
        document.getElementById("marksTable").deleteRow(rowIndex);
    };
    cell8.appendChild(deleteButton);
表格最后一列是个删除操作区,所以元素是button而不是input,并且关联一个函数(不过删除之后第一列的索引还是没有变,看之后的需求要不要修改一下)
接着是获取表格元素的函数
function getMarksData() {
    var marksData = [];
    var table = document.getElementById("marksTable").getElementsByTagName('tbody')[0];
    for (var i = 0, row; row = table.rows[i]; i++) {
        var mark = {
            mark_project_type: row.cells[0].getElementsByTagName('input')[0].value,
            rect: {
                px: row.cells[1].getElementsByTagName('input')[0].value,
                py: row.cells[2].getElementsByTagName('input')[0].value,
                pw: row.cells[3].getElementsByTagName('input')[0].value,
                ph: row.cells[4].getElementsByTagName('input')[0].value
            },
            mixRange: row.cells[5].getElementsByTagName('input')[0].value,
            maxRange: row.cells[6].getElementsByTagName('input')[0].value
        };
        marksData.push(mark);
    }
    return marksData;
}
这个函数大体上就是把表格内输入的内容整理成我要发送的请求json的格式
function displayImage() {
    var fileInput = document.getElementById('fileInput');
    var preview = document.getElementById('preview');

    if (fileInput.files && fileInput.files[0]) {
        preview.style.display = 'block'; // 显示图片元素
        preview.src = URL.createObjectURL(fileInput.files[0]);
        preview.onload = function() {
            URL.revokeObjectURL(preview.src); // 清除内存中的引用
        }
    } else {
        preview.style.display = 'none'; // 如果没有文件被选定,隐藏图片元素
    }
}
第三个函数是展示所选图片,选择的图片通过blob那种方式直接形成一个url,所以这里不用去考虑什么本地路径、协议上传什么的
设定未输入图片时display=None,避免出现叉烧包的情况,美观一些
function sendRequest() {
    var fileInput = document.getElementById('fileInput');
    var file = fileInput.files[0];
    if (!file) {
        alert('请选择一个文件');
        print(file)
        return;
    }

    var mubanPathInput = document.getElementById('muban_path');
    var targetNameInput = document.getElementById('targetname');

    var marksData = getMarksData(); // 获取用户添加的所有marks数据
    var reader = new FileReader();


    reader.onload = function(e) {
        var base64Image = e.target.result;
        var data = {
            "aiParam": {
                "file": base64Image, // 使用文件名
                "muban_path": mubanPathInput.value,
                "targetname": targetNameInput.value,
                "mark": marksData
            }
        };
        $.ajax({
            url: 'http://IP:5000/api/analysis', // Flask端点
            type: 'POST',
            contentType: 'application/json',
            data: JSON.stringify(data), // 发送JSON数据

            success: function (response) {
                // 检查是否有img_path字段并更新右侧图片的src
                if (response.imgBase64) {
                    var otherImage = document.getElementById('other-image');
                    otherImage.style.display = 'block'; // 显示右侧图片元素
                    // otherImage.src = "..\\"+response.img_path;
                    document.getElementById('other-image').src = response.imgBase64;

                    delete response.imgBase64; // 删除img_path以避免在展示的JSON中显示
                } else {
                    console.error('img_path is missing in the response.');
                }
                var pretty_json = JSON.stringify(response, null, 4);
                // 将格式化的JSON字符串显示在页面上
                document.getElementById('response').innerHTML = '<pre>' + pretty_json + '</pre>';


            }
        });
    };
    if (file) {
        reader.readAsDataURL(file); // 将文件转换为Base64编码字符串
    }
    reader.onerror = function(e) {
        console.error("文件读取出错: ", e.target.error);
    };

}
这个函数就是重中之重,把所有需要的输入信息整合成json后发送给后端。
这里面我设定了一个reader将图片转换为Base64编码字符串,并整一个onload函数
这部分是文件读取器FileReader的事件处理程序。当文件读取器完成对文件的读取时,会触发这个事件。e 是一个事件对象,包含了读取操作的结果。
在这个函数内部,你可以通过 e.target.result 获取到文件的内容。对于图片文件,FileReader 以Base64编码的字符串形式返回文件内容。这个Base64字符串可以直接用于在网页上显示图片,也可以发送到服务器作为文件的一部分。
,
不过输入的图片其路径不能通过浏览器获取(好像是因为浏览器因为某些安全因素不允许访问本地文件系统);而输入的图片又不能总是一个固定的路径,否则直接在这里通过字符串的方式直接设定file路径了;而且server和client一般也会分成不同的机子。所以图片需要通过某些协议或编码上传给后端,后端为了某些需要,在解码成图片后也可以保存在server上。我之前一个项目里用别人写的方法时,上传的图片或视频可以直接类似挂载的方式形成一个路由去访问文件。我这里没有实现那样做,而是采用base64编码来处理。
接着整合后的字典data通过ajax技术发送请求到Flask服务器
其中url里的IP要改成server的ip。如果写成127.0.0.1的话server本地当然可以用,但client就不行了。
最后一部分的函数主要是我想把后端生成的json和图片也展示在网页上。虽然这个图片是保存在server上的,但是路径在js访问不到的不同级的位置,所以不能通过路径来获取的(之前有试过同级路径的话是可以直接通过路径来获取这个other image的),所以同样是以base64编码的方式给到网页。不过网页上就不展示那么老长的编码了,在把生成的json写在网页上之前就把他del了。同时加上个缩进格式化美观一些(记得加上pre)。
py
from flask import Flask, request, jsonify, make_response
from flask_cors import CORS, cross_origin

import base64

app = Flask(__name__)
CORS(app)
调用CORS这个方法可能可以用来解决一些跨域问题,现在有些电脑上可能会报304状态码得不到结果,看看之后能不能解决这个问题
跨域资源共享(CORS)的问题。如果你的Flask后端和这个HTML界面不在同一个域上,你可能需要在Flask应用中配置CORS。
# API端点
@app.route('/api/analysis', methods=['POST', 'OPTIONS'])
def analysis():

    if request.method == 'OPTIONS':
        # 自动处理预检请求,设置必要的头信息并返回
        # 可能用于跨域共享
        response = make_response()
        return response
    if request.method == 'POST':
        data = request.json

        ai_param = data.get('aiParam', {})

        # 解析aiParam参数
        img_base64 = ai_param.get('file')
        img_data = base64.b64decode(img_base64.split(',')[1])  # 解码Base64字符串

        # 保存图片
        file_url = f'{save_path}/{datetime.now().strftime("%Y%m%d%H%M%S")}.png'  # 指定图片保存路径

        with open(file_url, 'wb') as img_file:
            img_file.write(img_data)
        muban_path = ai_param.get('muban_path')
        targetname = ai_param.get('targetname')


        result, img_path = 算法(file_url)
        # 示例输出
        response = {
            "code": "200",
            "msg": "成功",
            "data": {
                "result": result
            }
        }

        info_json = json.dumps(response)
        with open(f"{json_path}/file_{datetime.now().strftime('%Y_%m_%d_%H_%M_%S')}.json", "w+") as file:
            file.write(info_json)
        # 把生成的图片读取并base64编码
        with open(img_path, "rb") as img_file:
            img_base64 = base64.b64encode(img_file.read()).decode('utf-8')


        print(response,img_path)
        response["imgBase64"] = "data:image/png;base64," + img_base64
        return jsonify(response)

@app.route('/')
def index():
    return app.send_static_file('main_3.html')

if __name__ == '__main__':
    app.run(host='0.0.0.0', port=5000)
虽然前端给后端时base64编码没有什么附带信息,直接给就行了,但是后端给到前端base64编码时就必须加上那个前缀了(否则效果就像叉烧包了一样显示alt信息)
其实如果有个bucket什么的,通过rabbitmq来处理数据可能就可以利用s3消息队列之类的方法来传输了。
index函数是在学如何做前端服务器的时候加上的,这样可能好一些。不过之前的项目里其实IP:port/api这样的网址其实没有必要形成网页的,只能说方法蛮多的?
如果要像我这样做的话,就要像开头那样把前端俩代码放到叫做static的静态路径下,这里直接写html的文件名,不加路径
算法
  File "E:\Anaconda3\envs\gait\lib\site-packages\torchvision\transforms\transforms.py", line 60, in __call__
    img = t(img)
  File "E:\Anaconda3\envs\gait\lib\site-packages\torch\nn\modules\module.py", line 1051, in _call_impl
    return forward_call(*input, **kwargs)
  File "E:\Anaconda3\envs\gait\lib\site-packages\torchvision\transforms\transforms.py", line 221, in forward
    return F.normalize(tensor, self.mean, self.std, self.inplace)
  File "E:\Anaconda3\envs\gait\lib\site-packages\torchvision\transforms\functional.py", line 335, in normalize
    tensor.sub_(mean).div_(std)
RuntimeError: The size of tensor a (4) must match the size of tensor b (3) at non-singleton dimension 0
这个问题通常发生在处理RGBA(红色、绿色、蓝色、Alpha透明度通道)格式的图片时,因为归一化操作可能只期望处理RGB格式的图片(只有红色、绿色、蓝色通道)。在你的情况下,如果输入的是截图保存下来的图片,并且这些图片是RGBA格式(可能包含透明度通道),则在处理时需要转换为RGB格式。
解决这个问题的一个方法是在对图片进行任何进一步处理之前,将其从RGBA转换为RGB格式。
Pillow这个库有一些在图片中写文本、画框的现成函数ImageDraw,但是新版本多了一个坐标输入,和我们的算法结构不符,所以最好注意如果要避免这个问题的话,需要安装10版本以下的Pillow
效果
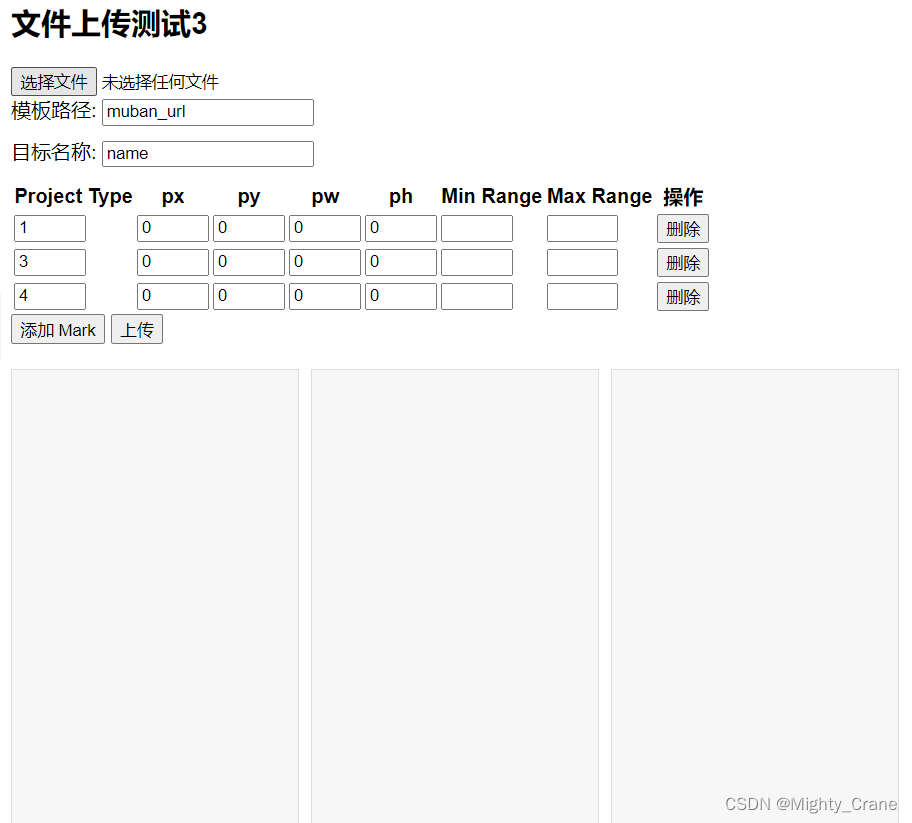
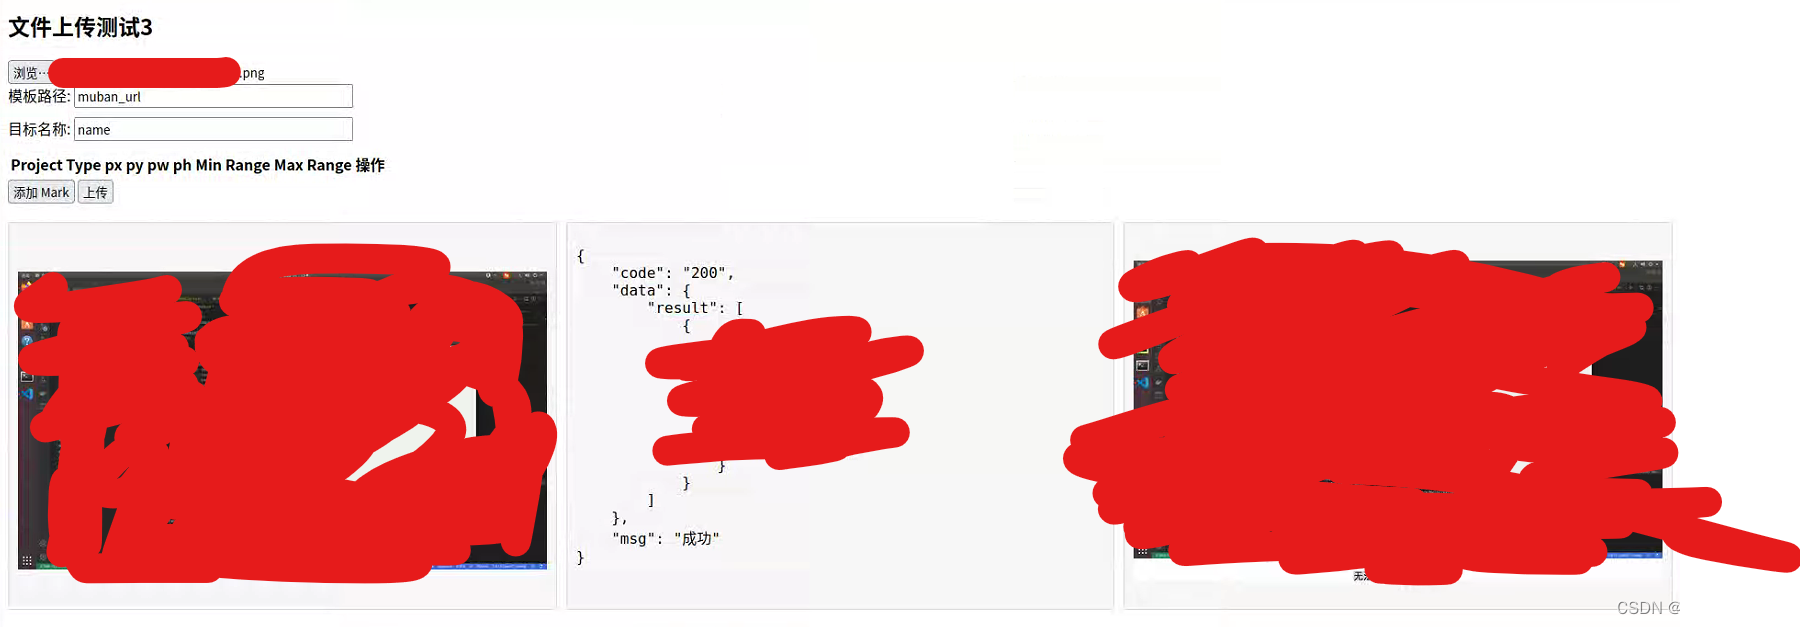
问题(已解决)
现在最大的问题就是304状态码了
明明是可以ping上的机子,而且还是完全一致的网段,但是打开路由后一直在加载,加载过程中选择的图片无法在网页上显示。等到加载结束终于可以选择图片展示在网页上,但是只要点击“上传”就只能维持在304状态码,无法得到结果
其他某些不完全一致网段的电脑或手机虽然一开始可能有个304,但是最终都可以轻松得到正确结果,就很奇怪
以下是GPT4的建议
- 检查网络配置:确认所有设备的网络配置正确,确保它们可以互相访问。虽然它们处于不同的子网内,但如果路由器或网络配置正确,它们应该可以互相通信。
- 检查浏览器安全设置:浏览器的安全设置可能阻止跨子网的通信。确保浏览器允许从10.253.1.x 网段访问10.255.1.x 网段的资源。
- 检查CORS(跨源资源共享)设置:如果你的Flask应用使用了CORS,确保其配置允许来自不同子网的请求。虽然你已经使用CORS(app),但可能需要检查更详细的配置。
- 使用网络工具进行诊断:使用网络诊断工具(如Wireshark)来监控和分析网络流量,查看请求是否正确发送到后端服务器,并查看后端服务器的响应。
- 检查防火墙和安全软件:确保没有防火墙或安全软件阻止跨子网通信。
- 尝试不同的浏览器或设备:在不同的浏览器或设备上测试你的前端页面,看是否问题依旧存在。
在Microsoft Edge中处理CORS问题:
- 你可以尝试使用Edge浏览器的扩展名 “Allow CORS: Access-Control-Allow-Origin”。这个扩展可以帮助你执行跨域Ajax请求。要安装这个扩展,请访问Microsoft Edge Addons页面。
另外,你可以在Edge的地址栏中输入 edge://flags/,然后搜索CORS相关的设置。寻找“Block insecure private network requests”标志,并尝试将其设置为禁用。这可能有助于解决某些CORS问题。在Firefox中处理CORS问题:
- Firefox通常不提供直接在浏览器设置中更改CORS策略的选项。但是,你可以使用类似于在Edge中的方法的扩展来允许跨域请求。
- 对于开发和测试目的,你可以使用特定的浏览器插件来绕过CORS限制,但这通常不推荐用于生产环境。
Windows 10和Ubuntu上的防火墙设置:
- 在Windows 10中,你可以通过“控制面板” -> “系统和安全” -> “Windows Defender防火墙” -> “高级设置”来管理防火墙规则。你可能需要添加一个新的入站规则来允许特定端口(如5000)的通信。
- 在Ubuntu中,如果你使用的是UFW(Uncomplicated Firewall),可以通过命令 sudo ufw allow 5000 来允许5000端口的通信。如果你没有使用UFW,你可能需要根据你使用的特定防火墙工具进行相应的配置。
关于HTTP 304状态码:
- HTTP 304状态码表示“未修改”,这意味着请求的资源自上次请求以来未发生更改,因此不需要重新传输。这通常用于浏览器的缓存优化。
解决方法
参见html部分,采用国内的jQuery

