# 4.参数接收
Springmvc中,接收页面提交的数据是通过方法形参来接收:
-
处理器适配器调用springmvc使用反射将前端提交的参数传递给controller方法的形参
-
springmvc接收的参数都是String类型,所以spirngmvc提供了很多converter(转换器)在特殊情况下需要自定义converter,如对日期数据
4.1.基本数据类型
-
编写controller
@Controller @RequestMapping("/account") public class AccountController { @RequestMapping("/findAccount5") public String findAccount5(String username,Model model){ model.addAttribute("msg", username); return "success"; } @RequestMapping("/findAccount6") public String findAccount6(String username,Integer age,Model model){ model.addAttribute("msg", username+" "+age); return "success"; } } -
在index.jsp里面定义超链接
<a href="/account/findAccount5?username=eric">参数接收-基本数据类型</a>
<a href="/account/findAccount6?username=eric&age=22">参数接收-多个基本数据类型</a>
4.2.POJO类型参数绑定
-
编写pojo
public class Account implements Serializable {
    private Integer id;
    private String name;
    private Float money;
    private Address address;
   //省略get set toString方法
 }
public class Address implements Serializable { private String provinceName; private String cityName; //省略get set toString方法 } -
编写controller
package com.by.controller; import com.by.pojo.Account; import org.springframework.stereotype.Controller; import org.springframework.ui.Model; import org.springframework.web.bind.annotation.RequestMapping; import org.springframework.web.bind.annotation.RequestMethod; import org.springframework.web.servlet.ModelAndView; @Controller @RequestMapping("/account") public class AccountController { @RequestMapping("/saveAccount") public String saveAccount(Account account, Model model){ model.addAttribute("msg", account); return "success"; } } -
在index.jsp里面添加表单
<form action="account/saveAccount" method="post">
    账户名称:<input type="text" name="name"><br/>
    账户金额:<input type="text" name="money"><br/>
    账户省份:<input type="text" name="address.provinceName"><br/>
    账户城市:<input type="text" name="address.cityName"><br/>
    <input type="submit" value="保存">
</form>
4.3.restful风格
- restful概述:
(Representational State Transfer,表现层状态转移):URL定位资源时,用HTTP动词(GET,POST,DELETE,PUT)描述操作
4.3.1.restful风格URL
-
在Restful之前的操作:
http://127.0.0.1/user/query?id=1 根据用户id查询用户数据
http://127.0.0.1/user/save 新增用户
http://127.0.0.1/user/update?id=1 修改用户信息
http://127.0.0.1/user/delete?id=1 删除用户信息 -
RESTful用法:
http://127.0.0.1/user/1 GET 根据用户id查询用户数据
http://127.0.0.1/user POST 新增用户
http://127.0.0.1/user PUT 修改用户信息
http://127.0.0.1/user/1 DELETE 删除用户信息 -
RESTful总结:
Restful风格就是请求url统一,根据不同的请求方式,请求不同的后台方法。如果需要携带参数,在url上使用/{}占位符。
4.3.2.@PathVaribale
-
作用
用于绑定url中的占位符。例如:/account/{id},这个{id}就是url占位符
url支持占位符是spring3.0之后加入的,是springmvc支持rest风格url的重要标志。
-
描述需要使用指定的请求方式来请求该方法
@Controller @RequestMapping("/account") public class AccountController { @RequestMapping(value="/findAccount7/{id}") public String findAccount11(@PathVariable Integer id, Model model){ model.addAttribute("msg", id); return "success"; } } -
测试:在index.jsp里面定义超链接
<a href="/account/findAccount7/123">restful传参</a><br>
4.3.请求参数乱码问题
4.3.1.POST请求方式解决乱码问题
-
在web.xml里面设置编码过滤器
<filter> <filter-name>CharacterEncodingFilter</filter-name> <filter-class> org.springframework.web.filter.CharacterEncodingFilter </filter-class> <!-- 设置过滤器中的属性值 --> <init-param> <param-name>encoding</param-name> <param-value>UTF-8</param-value> </init-param> </filter> <!-- 过滤所有请求 --> <filter-mapping> <filter-name>CharacterEncodingFilter</filter-name> <url-pattern>/*</url-pattern> </filter-mapping> -
测试

4.3.2.GET请求方式解决乱码问题
-
tomcat对GET和POST请求处理方式是不同的,GET请求的编码问题,要改tomcat的 配置信息,如下:
<plugin>
    <groupId>org.apache.tomcat.maven</groupId>
    <artifactId>tomcat7-maven-plugin</artifactId>
    <version>2.2</version>
    <configuration>
        <port>8080</port>
        <path>/</path>
        <!--按UTF-8进行编码-->
        <uriEncoding>UTF-8</uriEncoding>
    </configuration>
</plugin>
4.4.自定义类型转换器
4.4.1.使用场景
-
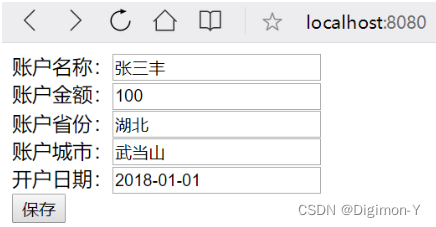
在index.jsp里面添加日期类型
<form action="account/saveAccount" method="post"> 账户名称:<input type="text" name="name"><br/> 账户金额:<input type="text" name="money"><br/> 账户省份:<input type="text" name="address.provinceName"><br/> 账户城市:<input type="text" name="address.cityName"><br/> 开户日期:<input type="text" name="date"><br/> <input type="submit" value="保存"> </form> -
在pojo里面添加日期类型
public class Account implements Serializable { private Integer id; private String name; private Float money; private Address address; //添加日期类型 private Date date; //省略get set toString方法 } -
测试

-
原因
我们前台传递的是字符串类型的参数,但是后台使用的是Date类型接收的。我们期望springmvc可以帮我们做数据类型的自动转换,显然没有做,所以我们需要自己自定义类型转换器。
4.4.2.自定义类型转换器
-
Converter接口说明:

-
定义一个类,实现Converter接口
public class DateConverter implements Converter<String, Date> { @Override public Date convert(String source) { try { DateFormat format = new SimpleDateFormat("yyyy-MM-dd"); return format.parse(source); } catch (Exception e) { e.printStackTrace(); } return null; } } -
在 springmvc.xml配置文件中配置类型转换器
	<!--开启springmvc注解支持-->
    <mvc:annotation-driven conversion-service="cs"></mvc:annotation-driven>
    <!-- 配置类型转换器工厂 -->
    <bean id="cs"
          class="org.springframework.context.support.ConversionServiceFactoryBean">
        <!-- 给工厂注入一个新的类型转换器 -->
        <property name="converters">
            <set>
                <!-- 配置自定义类型转换器 -->
                <bean class="com.by.converter.DateConverter"></bean>
            </set>
        </property>
    </bean>
4.5.使用ServletAPI接收参数
-
编写controller
@Controller @RequestMapping("/account") public class AccountController { @RequestMapping("/findAccount8") public String findAccount8(HttpServletRequest request, HttpServletResponse response){ String username = request.getParameter("name"); String age = request.getParameter("age"); request.setAttribute("msg",username+" "+age); return "success"; } } -
在index.jsp里面定义超链接
<a href="/account/findAccount8?username=eric&age=19">Servlet接收参数</a>


