1 案例1:构建MySQL服务器
1.1 问题
- 在IP地址192.168.88.50主机和192.168.88.51主机上部署mysql服务
- 练习必备命令的使用
1.2 方案
准备2台虚拟机,要求如下:

1.3 步骤
实现此案例需要按照如下步骤进行。
步骤一:安装软件
命令操作如下所示:
mysql-server 提供服务软件
mysql 提供命令软件
[root@mysql50 ~]# yum -y install mysql-server mysql //安装提供服务和命令软件
//软件已安装
[root@mysql50 ~]# rpm -q mysql-server mysql
mysql-server-8.0.26-1.module+el8.4.0+652+6de068a7.x86_64
mysql-8.0.26-1.module+el8.4.0+652+6de068a7.x86_64
[root@mysql50 ~]#
[root@mysql50 ~]# rpm -qi mysql-server //查看软件信息
Name : mysql-server
Version : 8.0.26
Release : 1.module+el8.4.0+652+6de068a7
Architecture: x86_64
Install Date: 2023年03月13日 星期一 12时09分38秒
Group : Unspecified
Size : 126674945
License : GPLv2 with exceptions and LGPLv2 and BSD
Signature : RSA/SHA256, 2021年09月22日 星期三 07时27分14秒, Key ID 15af5dac6d745a60
Source RPM : mysql-8.0.26-1.module+el8.4.0+652+6de068a7.src.rpm
Build Date : 2021年09月22日 星期三 07时06分32秒
Build Host : ord1-prod-x86build005.svc.aws.rockylinux.org
Relocations : (not relocatable)
Packager : infrastructure@rockylinux.org
Vendor : Rocky
URL : http://www.mysql.com
Summary : The MySQL server and related files
Description :
MySQL is a multi-user, multi-threaded SQL database server. MySQL is a
client/server implementation consisting of a server daemon (mysqld)
and many different client programs and libraries. This package contains
the MySQL server and some accompanying files and directories.
[root@mysql50 ~]# systemctl start mysqld //启动服务
[root@mysql50 ~]# systemctl enable mysqld //开机运行
[root@mysql50 ~]# systemctl enable mysqld //设置服务开机运行
Created symlink /etc/systemd/system/multi-user.target.wants/mysqld.service → /usr/lib/systemd/system/mysqld.service.
步骤二:查看端口号和进程名
命令操作如下所示:
[root@mysql50 ~]# ps -C mysqld //仅查看mysqld进程
PID TTY TIME CMD
21912 ? 00:00:00 mysqld
[root@mysql50 ~]#
[root@mysql50 ~]# ss -utnlp | grep 3306 查看端口
tcp LISTEN 0 70 *:33060 *:* users:(("mysqld",pid=21912,fd=22))
tcp LISTEN 0 128 *:3306 *:* users:(("mysqld",pid=21912,fd=25))
[root@mysql50 ~]#
或
[root@mysql50 ~]# netstat -utnlp | grep mysqld //仅查看mysqld进程
tcp6 0 0 :::33060 :::* LISTEN 21912/mysqld
tcp6 0 0 :::3306 :::* LISTEN 21912/mysqld
[root@mysql50 ~]#
说明:
MySQL 8中的3306端口是MySQL服务默认使用的端口,主要用于建立客户端与MySQL服务器之间的连接。
MySQL 8中的33060端口是MySQL Shell默认使用的管理端口,主要用于执行各种数据库管理任务。远程管理MySQL服务器:使用MySQL Shell连接到MySQL服务,并在远程管理控制台上执行各种数据库管理操作,例如创建、删除、备份和恢复数据库等。
步骤三:连接服务。
说明: 数据库管理员本机登陆默认没有密码
命令操作如下所示:
[root@mysql50 ~]# mysql //连接服务
Welcome to the MySQL monitor. Commands end with ; or \g.
Your MySQL connection id is 8
Server version: 8.0.26 Source distribution
Copyright (c) 2000, 2021, Oracle and/or its affiliates.
Oracle is a registered trademark of Oracle Corporation and/or its
affiliates. Other names may be trademarks of their respective
owners.
Type 'help;' or '\h' for help. Type '\c' to clear the current input statement.
mysql> 登陆后的提示符
mysql> exit //断开连接
Bye
[root@mysql50 ~]#
步骤四:配置第2台数据库服务器MySQL51。
命令操作如下所示:
[root@mysql51 ~]# yum -y install mysql-server mysql
[root@mysql51 ~]# systemctl start mysqld
[root@mysql51 ~]# systemctl enable mysqld
[root@mysql51 ~]# mysql
mysql> exit
Bye
[root@mysql51 ~]#
步骤五:练习必备命令的使用(在mysql50主机完成练习)
命令操作如下所示:
mysql> select version() ; //查看数据库软件版本
+-----------+
| version() |
+-----------+
| 8.0.26 |
+-----------+
1 row in set (0.00 sec)
mysql> select user() ; //查看登陆的用户和客户端地址
+----------------+
| user() |
+----------------+
| root@localhost | 管理员root本机登陆
+----------------+
1 row in set (0.00 sec)
mysql> show databases; //查看已有的库
+--------------------+
| Database |
+--------------------+
| information_schema |
| mysql |
| performance_schema |
| sys |
+--------------------+
4 rows in set (0.00 sec)
mysql>
说明:
默认4个库 不可以删除,存储的是 服务运行时加载的不同功能的程序和数据。
information_schema:是MySQL数据库提供的一个虚拟的数据库,存储了MySQL数据库中的相关信息,比如数据库、表、列、索引、权限、角色等信息。它并不存储实际的数据,而是提供了一些视图和存储过程,用于查询和管理数据库的元数据信息。
mysql:存储了MySQL服务器的系统配置、用户、账号和权限信息等。它是MySQL数据库最基本的库,存储了MySQL服务器的核心信息。
performance_schema:存储了MySQL数据库的性能指标、事件和统计信息等数据,可以用于性能分析和优化。
sys:是MySQL 8.0引入的一个新库,它基于information_schema和performance_schema视图,提供了更方便、更直观的方式来查询和管理MySQL数据库的元数据和性能数据。
    mysql> select database();  //查看当前在那个库里  null 表示没有在任何库里
    +------------+
    | database() |
    +------------+
    | NULL       |
    +------------+
    1 row in set (0.00 sec)
    mysql> use mysql ; //切换到mysql库
    mysql> select database();  // 再次显示所在的库
    +------------+
    | database() |
    +------------+
    | mysql      |
    +------------+
    1 row in set (0.00 sec)
    mysql> show tables;  //显示库里已有的表
    +------------------------------------------------------+
    | Tables_in_mysql                                      |
    +------------------------------------------------------+
    | columns_priv                                         |
    | component                                            |
    | db                                                   |
    | default_roles                                        |
    | engine_cost                                          |
    | func                                                 |
    | general_log                                          |
    | global_grants                                        |
    | gtid_executed                                        |
    | help_category                                        |
    | help_keyword                                         |
    | help_relation                                        |
    | help_topic                                           |
    | innodb_index_stats                                   |
    | innodb_table_stats                                   |
    | password_history                                     |
    | plugin                                               |
    | procs_priv                                           |
    | proxies_priv                                         |
    | replication_asynchronous_connection_failover         |
    | replication_asynchronous_connection_failover_managed |
    | replication_group_configuration_version              |
    | replication_group_member_actions                     |
    | role_edges                                           |
    | server_cost                                          |
    | servers                                              |
    | slave_master_info                                    |
    | slave_relay_log_info                                 |
    | slave_worker_info                                    |
    | slow_log                                             |
    | tables_priv                                          |
    | time_zone                                            |
    | time_zone_leap_second                                |
    | time_zone_name                                       |
    | time_zone_transition                                 |
    | time_zone_transition_type                            |
    | user                                                 |
    +------------------------------------------------------+
    37 rows in set (0.00 sec)
    mysql> exit ;  断开连接
    Bye
    [root@mysql50 ~]#
2 案例2:密码管理
2.1 问题
1) 在192.168.88.50主机做如下练习:
- 设置root密码为tarena
- 修改root密码为123qqq…A
- 破解root密码为NSD2023…a
2.2 步骤
实现此案例需要按照如下步骤进行。
步骤一:设置root密码为tarena
命令操作如下所示:
2行输出是警告而已不用关心
     [root@mysql50 ~]# mysqladmin  -uroot -p  password "tarena"
    Enter password: //敲回车
    mysqladmin: [Warning] Using a password on the command line interface can be insecure.
    Warning: Since password will be sent to server in plain text, use ssl connection to ensure password safety.
     [root@mysql50 ~]# mysql //无密码连接被拒绝
    ERROR 1045 (28000): Access denied for user 'root'@'localhost' (using password: NO)
    [root@mysql50 ~]#
    [root@mysql50 ~]# mysql -uroot –ptarena  //连接时输入密码
    mysql: [Warning] Using a password on the command line interface can be insecure.
    Welcome to the MySQL monitor.  Commands end with ; or \g.
    Your MySQL connection id is 14
    Server version: 8.0.26 Source distribution
    Copyright (c) 2000, 2021, Oracle and/or its affiliates.
    Oracle is a registered trademark of Oracle Corporation and/or its
    affiliates. Other names may be trademarks of their respective
    owners.
    Type 'help;' or '\h' for help. Type '\c' to clear the current input statement.
    mysql> 登陆成功
步骤二:修改root密码为123qqq…A
命令操作如下所示:
     [root@mysql50 ~]# mysqladmin  -uroot -ptarena password "123qqq...A"  //修改密码
    mysqladmin: [Warning] Using a password on the command line interface can be insecure.
    Warning: Since password will be sent to server in plain text, use ssl connection to ensure password safety.
    [root@mysql50 ~]# mysql -uroot –ptarena //旧密码无法登陆
    mysql: [Warning] Using a password on the command line interface can be insecure.
    ERROR 1045 (28000): Access denied for user 'root'@'localhost' (using password: YES)
    [root@mysql50 ~]# mysql -uroot -p123qqq...A  //新密码登陆
    mysql: [Warning] Using a password on the command line interface can be insecure.
    Welcome to the MySQL monitor.  Commands end with ; or \g.
    Your MySQL connection id is 18
    Server version: 8.0.26 Source distribution
    Copyright (c) 2000, 2021, Oracle and/or its affiliates.
    Oracle is a registered trademark of Oracle Corporation and/or its
    affiliates. Other names may be trademarks of their respective
    owners.
    Type 'help;' or '\h' for help. Type '\c' to clear the current input statement.
    mysql> 登陆成功
步骤三:破解root密码为NSD2023…a
说明:在mysql50主机做此练习
命令操作如下所示:
     [root@mysql50 ~]# mysql -uroot -pNSD2023...a  //破解前登陆失败
    mysql: [Warning] Using a password on the command line interface can be insecure.
    ERROR 1045 (28000): Access denied for user 'root'@'localhost' (using password: YES)
    [root@mysql50 ~]# vim /etc/my.cnf.d/mysql-server.cnf  //修改主配置文件
    [mysqld]
    skip-grant-tables  //手动添加此行 作用登陆时不验证密码
    :wq
    [root@mysql50 ~]# systemctl  restart mysqld //重启服务 作用让服务以新配置运行
    [root@mysql50 ~]# mysql //连接服务
    Welcome to the MySQL monitor.  Commands end with ; or \g.
    Your MySQL connection id is 7
    Server version: 8.0.26 Source distribution
    Copyright (c) 2000, 2021, Oracle and/or its affiliates.
    Oracle is a registered trademark of Oracle Corporation and/or its
    affiliates. Other names may be trademarks of their respective
    owners.
    Type 'help;' or '\h' for help. Type '\c' to clear the current input statement.
    //查看存放密码的表头名
    Mysql> desc  mysql.user ;
    //把mysql库下user表中 用户root的密码设置为无;
    mysql> update mysql.user set authentication_string="" where user="root";
    Query OK, 1 row affected (0.05 sec)
    Rows matched: 1  Changed: 1  Warnings: 0
    mysql> exit; 断开连接
    Bye
    [root@mysql50 ~]# vim  /etc/my.cnf.d/mysql-server.cnf  编辑配置文件
    [mysqld]
    #skip-grant-tables   //注释添加的行
    :wq
    [root@mysql50 ~]# systemctl  restart mysqld //重启服务 作用让注释生效
    [root@localhost ~]# mysql  无密码登陆
    Welcome to the MySQL monitor.  Commands end with ; or \g.
    Your MySQL connection id is 8
    Server version: 8.0.26 Source distribution
    Copyright (c) 2000, 2021, Oracle and/or its affiliates.
    Oracle is a registered trademark of Oracle Corporation and/or its
    affiliates. Other names may be trademarks of their respective
    owners.
    Type 'help;' or '\h' for help. Type '\c' to clear the current input statement.
    //设置root用户本机登陆密码
    mysql> alter user root@"localhost" identified by "NSD2023...a";
    Query OK, 0 rows affected (0.00 sec)
    mysql> exit 断开连接
    Bye
    [root@localhost ~]# mysql  不输密码无法登陆
    ERROR 1045 (28000): Access denied for user 'root'@'localhost' (using password: NO)
    [root@localhost ~]# mysql -uroot -pNSD2023...a  使用破解的密码登陆
    mysql: [Warning] Using a password on the command line interface can be insecure.
    Welcome to the MySQL monitor.  Commands end with ; or \g.
    Your MySQL connection id is 10
    Server version: 8.0.26 Source distribution
    Copyright (c) 2000, 2021, Oracle and/or its affiliates.
    Oracle is a registered trademark of Oracle Corporation and/or its
    affiliates. Other names may be trademarks of their respective
    owners.
    Type 'help;' or '\h' for help. Type '\c' to clear the current input statement.
    mysql>
    mysql> 登陆成功
    mysql> show databases; 查看已有的库
    +--------------------+
    | Database           |
    +--------------------+
    | information_schema |
    | mysql              |
    | performance_schema |
    | sys                |
    +--------------------+
    4 rows in set (0.01 sec)
3 案例3:安装图形软件
3.1 问题
- 在IP地址192.168.88.50主机安装phpmyadmin软件
- 客户端通过访问phpmyadmin软件管理数据库
3.2 方案
把用到的软件拷贝的虚拟机mysql50里
在mysql50主机,首先配置运行环境LNP,然后安装phpmyadmin软件,最后打开真机的浏览器输入phpmyadmin的网址访问。
3.3 步骤
实现此案例需要按照如下步骤进行。
步骤一:部署运行环境LNP
命令操作如下所示:
gcc 源码包编译工具
unzip 提供解压.zip 压缩包命令
make 源码软件编译命令
pcre-devel 支持正则表达式
zlib-devel 提供数据压缩命令
[root@mysql50 ~]# yum -y install gcc unzip make pcre-devel zlib-devel //安装依赖
[root@mysql50 ~]# tar -xf nginx-1.22.1.tar.gz //解压源码
[root@mysql50 ~]# cd nginx-1.22.1 //进源码目录
[root@mysql50 nginx-1.22.1]# ./configure //配置
[root@mysql50 nginx-1.22.1]# make &&  make  install //编译并安装
[root@mysql50 nginx-1.22.1]# ls /usr/local/nginx/   //查看安装目录
conf  html  logs  sbin
[root@mysql50 nginx-1.22.1]# vim /usr/local/nginx/conf/nginx.conf //修改主配置文件
43         location / {
44             root   html;
45             index  index.php index.html index.htm; //添加首页名
46         }
65         location ~ \.php$ {  //访问.php的请求转给本机的9000端口
66             root           html;
67             fastcgi_pass   127.0.0.1:9000;
68             fastcgi_index  index.php;
69            #fastcgi_param  SCRIPT_FILENAME  /scripts$fastcgi_script_name;
70             include        fastcgi.conf;  //保存nginx变量文件
71         }
:wq
[root@mysql50 nginx-1.22.1]# /usr/local/nginx/sbin/nginx //启动服务
[root@mysql50 nginx-1.22.1]# netstat  -utnlp  | grep 80  //查看端口
tcp        0      0 0.0.0.0:80     0.0.0.0:*     LISTEN      42182/nginx: master
[root@mysql50 nginx-1.22.1]#
php 解释php代码
php-devel php扩展包
php-mysqlnd 连接mysql命令包
php-json 支持json代码
php-fpm 提供fpm服务
[root@mysql50 ~]# yum -y install php  php-devel php-mysqlnd php-json php-fpm //安装php软件
[root@mysql50 ~]# vim /etc/php-fpm.d/www.conf //修改主配置文件
38 ;listen = /run/php-fpm/www.sock
39 listen = 127.0.0.1:9000  //非socket方式运行,不是必须的
:wq
[root@mysql50 ~]# systemctl  start php-fpm  //启动服务
[root@mysql50 ~]# netstat  -utnlp  | grep 9000  //查看端口
tcp        0      0 127.0.0.1:9000     0.0.0.0:*    LISTEN    67251/php-fpm: mast
[root@mysql50 ~]#
[root@mysql50 ~]# vim /usr/local/nginx/html/test.php //编写php脚本
<?php
$name = "plj" ;
echo $name ;
echo "\n" ;
?>
:wq
[root@mysql50 ~]# curl  http://localhost/test.php  //访问脚本
plj
[root@mysql50 ~]#
步骤二:安装phpmyadmin软件
命令操作如下所示:
    [root@mysql50 ~]# unzip phpMyAdmin-5.2.1-all-languages.zip  //解压
    [root@mysql50 ~]# mv phpMyAdmin-5.2.1-all-languages /usr/local/nginx/html/phpmyadmin  //移动并改名 ,为了便于访问
    [root@mysql50 ~]# cd /usr/local/nginx/html/phpmyadmin/  //进软件目录
    [root@mysql50 phpmyadmin]# cp config.sample.inc.php config.inc.php //创建主配置文件
    [root@mysql50 phpmyadmin]# vim config.inc.php //修改主配置文件
    //定义cookies验证码
    16 $cfg['blowfish_secret'] = 'plj123'; /* YOU MUST FILL IN THIS FOR COOKIE AUTH! */
    //管理本机的数据库服务
    30 $cfg['Servers'][$i]['host'] = 'localhost';
    :wq
    [root@mysql50 phpmyadmin]# setenforce 0  //关闭selinux
    [root@mysql50 phpmyadmin]# systemctl  stop firewalld //关闭防火墙
步骤三:客户端访问
命令操作如下所示:
http://192.168.88.50/phpmyadmin 打开浏览器输入此网址 效果如图-1所示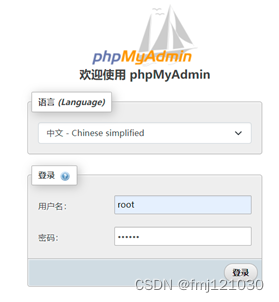
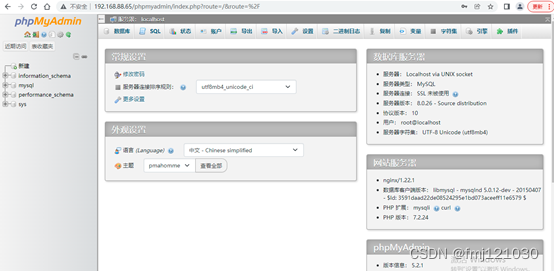
说明:输入数据库管理员root 和 密码 成功后如图-2所示
4 案例4:筛选条件
4.1 问题
- 准备练习环境
- 练习数值比较
- 练习范围匹配
- 练习模糊匹配
- 练习正则匹配
- 练习逻辑比较
- 练习字符比较/空/非空
- 练习别名/去重/合并
4.2 方案
拷贝tarena.sql文件到mysql50主机里,然后使用tarena.sql创建练习使用的数据。
4.3 步骤
实现此案例需要按照如下步骤进行。
步骤一:准备练习环境
    //拷贝tarena.sql 拷贝到 mysql50主机的/root 下
    [openeuler@server1 ~]$ scp /linux-soft/s3/tarena.sql  root@192.168.88.50:/root/
    root@192.168.88.50's password:
    tarena.sql    100%  284KB 171.9MB/s   00:00
    //连接mysql50主机
    [openeuler@server1 ~]$ ssh root@192.168.88.50
    root@192.168.88.50's password:
    Last login: Tue May 23 10:59:57 2023 from 192.168.88.254
    //恢复数据
    [root@mysql50 ~]# mysql -uroot  -pNSD2023...a < /root/tarena.sql
    mysql: [Warning] Using a password on the command line interface can be insecure.
    //连接服务
    [root@mysql50 ~]# mysql -uroot  -pNSD2023...a
    mysql> show databases; //查看库
    +--------------------+
    | Database           |
    +--------------------+
    | information_schema |
    | mysql              |
    | performance_schema |
    | sys                |
    | tarena             | 恢复的库
    +--------------------+
    5 rows in set (0.00 sec)
    mysql> use tarena; //进入库
    Reading table information for completion of table and column names
    You can turn off this feature to get a quicker startup with -A
    Database changed
    mysql> show tables;  //查看表
    +------------------+
    | Tables_in_tarena |
    +------------------+
    | departments      | 部门表
    | employees        | 员工表
    | salary           | 工资表
    | user             | 用户表
    +------------------+
    4 rows in set (0.00 sec)
使用user 表做查询练习
user表里存储的是 系统用户信息( 就是 /etc/passwd 文件的内容)
    mysql> desc tarena.user;  //查看表头
    +----------+-------------+------+-----+---------+----------------+
    | Field    | Type        | Null | Key | Default | Extra          |
    +----------+-------------+------+-----+---------+----------------+
    | id       | int(11)     | NO   | PRI | NULL    | auto_increment |行号
    | name     | char(20)    | YES  |     | NULL    |                  |用户名
    | password | char(1)     | YES  |     | NULL    |                  |密码占位符
    | uid      | int(11)     | YES  |     | NULL    |                  | uid号
    | gid      | int(11)     | YES  |     | NULL    |                  | gid号
    | comment  | varchar(50) | YES  |     | NULL    |                 | 描述信息
    | homedir  | varchar(80) | YES  |     | NULL    |                 | 家目录
    | shell    | char(30)    | YES  |     | NULL    |                  | 解释器
    +----------+-------------+------+-----+---------+----------------+
    8 rows in set (0.00 sec)
select命令格式演示
语法格式1 SELECT 字段列表 FROM 库名.表名;
语法格式2 SELECT 字段列表 FROM 库名.表名 where 筛选条件;
    mysql> select name from  tarena.user;        //查看一个表头
    mysql> select name ,uid from  tarena.user;    //查看多个表头
    mysql> select *  from  tarena.user;        //查看所有表头
加筛选条件
    mysql> select *  from  tarena.user where  name = “root”;        //查找root用户信息
    +----+------+----------+------+------+---------+---------+-----------+
    | id | name | password | uid  | gid  | comment | homedir | shell     |
    +----+------+----------+------+------+---------+---------+-----------+
    |  1 | root | x        |    0 |    0 | root    | /root   | /bin/bash |
    +----+------+----------+------+------+---------+---------+-----------+
    1 row in set (0.00 sec)
    mysql>
    mysql> select *  from  tarena.user where  id = 2 ;        //查找第2行用户信息
    +----+------+----------+------+------+---------+---------+--------------+
    | id | name | password | uid  | gid  | comment | homedir | shell         |
    +----+------+----------+------+------+---------+---------+--------------+
    |  2 | bin   | x        |    1 |   1   | bin      | /bin   | /sbin/nologin |
    +----+------+----------+------+------+---------+---------+--------------+
    1 row in set (0.00 sec)
步骤二:练习数值比较
比较符号:
= != > >= < <=
相等 不相等 大于 大于等于 小于 小于等于
符号两边要是数字或数值类型的表头 符号左边与符号右边做比较
    //查看第3行的行号、用户名、uid、gid  四个表头的值
    mysql> select  id,name,uid,gid  from  tarena.user where  id = 3;
    +----+--------+------+------+
    | id | name   | uid  | gid  |
    +----+--------+------+------+
    |  3 | daemon |    2 |    2 |
    +----+--------+------+------+
    1 row in set (0.00 sec)
    //查看前2行的行号用户名、uid、gid 四个表头的值
    mysql> select  id,name,uid,gid  from  tarena.user where  id < 3;
    +----+------+------+------+
    | id | name | uid  | gid  |
    +----+------+------+------+
    |  1 | root |    0 |    0 |
    |  2 | bin  |    1 |    1 |
    +----+------+------+------+
    2 rows in set (0.00 sec)
    //查看前3行的行号、用户名、uid、gid  四个表头的值
    mysql> select  id,name,uid,gid  from  tarena.user where  id <= 3;
    +----+--------+------+------+
    | id | name   | uid  | gid  |
    +----+--------+------+------+
    |  1 | root   |    0 |    0 |
    |  2 | bin    |    1 |    1 |
    |  3 | daemon |    2 |    2 |
    +----+--------+------+------+
    3 rows in set (0.00 sec)
    //查看前uid号大于6000的行号、用户名、uid、gid  四个表头的值
    mysql> select  id,name,uid,gid  from  tarena.user where  uid > 6000;
    +----+-----------+-------+-------+
    | id | name      | uid   | gid   |
    +----+-----------+-------+-------+
    | 22 | nfsnobody | 65534 | 65534 |
    +----+-----------+-------+-------+
    1 row in set (0.00 sec)
    //查看前uid号大于等于1000的行号、用户名、uid、gid  四个表头的值
    mysql> select  id,name,uid,gid  from  tarena.user where  uid >= 1000;
    +----+-----------+-------+-------+
    | id | name      | uid   | gid   |
    +----+-----------+-------+-------+
    | 22 | nfsnobody | 65534 | 65534 |
    | 24 | plj       |  1000 |  1000 |
    +----+-----------+-------+-------+
    2 rows in set (0.00 sec)
    //查看uid号和gid号相同的行 仅显示行号、用户名、uid、gid  四个表头的值
    mysql> select  id,name,uid,gid  from  tarena.user where  uid = gid;
    +----+-----------------+-------+-------+
    | id | name            | uid   | gid   |
    +----+-----------------+-------+-------+
    |  1 | root            |     0 |     0 |
    |  2 | bin             |     1 |     1 |
    |  3 | daemon          |     2 |     2 |
    | 13 | nobody          |    99 |    99 |
    | 14 | systemd-network |   192 |   192 |
    | 15 | dbus            |    81 |    81 |
    | 17 | sshd            |    74 |    74 |
    | 18 | postfix         |    89 |    89 |
    | 20 | rpc             |    32 |    32 |
    | 21 | rpcuser         |    29 |    29 |
    | 22 | nfsnobody       | 65534 | 65534 |
    | 23 | haproxy         |   188 |   188 |
    | 24 | plj             |  1000 |  1000 |
    | 25 | apache          |    48 |    48 |
    | 26 | mysql           |    27 |    27 |
    +----+-----------------+-------+-------+
    15 rows in set (0.00 sec)
    //查看uid号和gid号不一样的行 仅显示行号、用户名、uid、gid  四个表头的值
    mysql> select  id,name,uid,gid  from  tarena.user where  uid != gid;
    +----+----------+------+------+
    | id | name     | uid  | gid  |
    +----+----------+------+------+
    |  4 | adm      |    3 |    4 |
    |  5 | lp       |    4 |    7 |
    |  6 | sync     |    5 |    0 |
    |  7 | shutdown |    6 |    0 |
    |  8 | halt     |    7 |    0 |
    |  9 | mail     |    8 |   12 |
    | 10 | operator |   11 |    0 |
    | 11 | games    |   12 |  100 |
    | 12 | ftp      |   14 |   50 |
    | 16 | polkitd  |  999 |  998 |
    | 19 | chrony   |  998 |  996 |
    +----+----------+------+------+
    11 rows in set (0.00 sec)
    mysql>
步骤三:练习范围匹配
in (值列表) //在…里
not in (值列表) //不在…里
between 数字1 and 数字2 //在…之间
命令操作如下所示:
    //uid号表头的值 是 (1 , 3 , 5 , 7) 中的任意一个即可
    mysql> select name , uid  from  tarena.user where  uid  in (1 , 3 , 5 , 7);
    +------+------+
    | name | uid  |
    +------+------+
    | bin  |    1 |
    | adm  |    3 |
    | sync |    5 |
    | halt |    7 |
    +------+------+
    //shell 表头的的值 不是 "/bin/bash"或"/sbin/nologin" 即可
    mysql> select name , shell  from  tarena.user where  shell  not in ("/bin/bash","/sbin/nologin");
    +----------+----------------+
    | name     | shell          |
    +----------+----------------+
    | sync     | /bin/sync      |
    | shutdown | /sbin/shutdown |
    | halt     | /sbin/halt     |
    | mysql    | /bin/false     |
    +----------+----------------+
    //id表头的值 在 10  到  20 之间即可 包括 10 和  20  本身
    mysql> select id , name , uid  from  tarena.user where id  between 10 and 20 ;
    +----+-----------------+------+
    | id | name            | uid  |
    +----+-----------------+------+
    | 10 | operator        |   11 |
    | 11 | games           |   12 |
    | 12 | ftp             |   14 |
    | 13 | nobody          |   99 |
    | 14 | systemd-network |  192 |
    | 15 | dbus            |   81 |
    | 16 | polkitd         |  999 |
    | 17 | sshd            |   74 |
    | 18 | postfix         |   89 |
    | 19 | chrony          |  998 |
    | 20 | rpc             |   32 |
    +----+-----------------+------+
    11 rows in set (0.00 sec)mysql>
步骤四:练习模糊匹配
where 字段名 like "表达式";
通配符
_ 表示 1个字符
% 表示零个或多个字符
命令操作如下所示:
    //找名字必须是3个字符的 (没有空格挨着敲)
    mysql> select name from  tarena.user where  name like "___";
    +------+
    | name |
    +------+
    | bin  |
    | adm  |
    | ftp  |
    | rpc  |
    | plj  |
    | bob  |
    +------+
    6 rows in set (0.00 sec)
    //找名字必须是4个字符的(没有空格挨着敲)
    mysql> select name from  tarena.user where  name like "_ _ _ _";
    +------+
    | name |
    +------+
    | root |
    | sync |
    | halt |
    | mail |
    | dbus |
    | sshd |
    | null |
    +------+
    7 rows in set (0.00 sec)
    //找名字以字母a开头的(没有空格挨着敲)
    mysql> select name from  tarena.user where  name like "a%";
    //查找名字至少是4个字符的表达式
    mysql> select name from  tarena.user where  name like "%_ _ _ _%";(没有空格挨着敲)
    mysql> select name from  tarena.user where name  like "_ _%_ _";(没有空格挨着敲)
    mysql> select name from  tarena.user where name  like "_ _ _ _%";(没有空格挨着敲)
步骤五:练习正则匹配
格式:select 字段名列表 from 库名.表名 where字段名 regexp '正则表达式';
回顾shell课程学过的元字符(正则符号)
^ 匹配行首
$ 匹配行尾
[] 匹配范围内任意一个
* 前边的表达式出现零次或多次
| 或者
. 任意一个字符
命令操作如下所示:
    //添加有数字的名字
    insert into  tarena.user(name)values("yaya9");
    insert into  tarena.user(name)values("6yaya");
    insert into  tarena.user(name)values("ya7ya");
    insert into  tarena.user(name)values("yay8a");
    //查看名字里有数字的
    mysql> select name from  tarena.user where name regexp "[0-9]";
    +-------+
    | name  |
    +-------+
    | yaya9 |
    | 6yaya |
    | ya7ya |
    | yay8a |
    +-------+
    4 rows in set (0.00 sec)
    //查看名字以数字开头
    mysql> select name from  tarena.user where name regexp "^[0-9]";
    +-------+
    | name  |
    +-------+
    | 6yaya |
    +-------+
    1 row in set (0.00 sec)
    //查看名字以数字结尾
    mysql> select name from  tarena.user where name regexp "[0-9]$";
    +-------+
    | name  |
    +-------+
    | yaya9 |
    +-------+
    1 row in set (0.00 sec)
    mysql>
    //查看名字以r开头
    mysql> select name from  tarena.user where name regexp "^r";
    +---------+
    | name    |
    +---------+
    | root    |
    | rpc     |
    | rpcuser |
    +---------+
    3 rows in set (0.00 sec)
    //查看名字以t结尾
    mysql> select name from  tarena.user where name regexp "t$";
    +------+
    | name |
    +------+
    | root |
    | halt |
    +------+
    2 rows in set (0.00 sec)
    mysql>
    //查看名字以r开头或t结尾
    mysql> select name from  tarena.user where name regexp "^r|t$";
    +---------+
    | name    |
    +---------+
    | root    |
    | halt    |
    | rpc     |
    | rpcuser |
    +---------+
    4 rows in set (0.00 sec)
    //名字r开头t结尾
    mysql> select name from  tarena.user where name regexp "^r.*t$";
    +------+
    | name |
    +------+
    | root |
    +------+
    1 row in set (0.00 sec)
    mysql>
步骤六:练习逻辑比较
多个判断条件
逻辑与 and (&&) 多个判断条件必须同时成立
逻辑或 or (||) 多个判断条件其中某个条件成立即可
逻辑非 not (!) 取反
命令操作如下所示:
    //逻辑非例子,查看解释器不是/bin/bash 的
    mysql> select name,shell from tarena.user where  shell != "/bin/bash";
    //not 也是取反  要放在表达式的前边
    mysql> select name,shell from tarena.user where  not  shell = "/bin/bash";
    //id值不在 10 到 20 之间
    mysql> select id , name from tarena.user where not  id between 10 and 20 ;
    //逻辑与 例子
    mysql> select name , uid from tarena.user where name="root" and uid = 1;
    Empty set (0.00 sec)
    mysql> select name , uid from tarena.user where name="root" and uid = 0;
    +------+------+
    | name | uid  |
    +------+------+
    | root |    0 |
    +------+------+
    1 row in set (0.00 sec)
    //逻辑或 例子
    mysql> select name , uid from tarena.user where name = "root"  or  name = "bin"  or  uid = 1;
    +------+------+
    | name | uid  |
    +------+------+
    | root |    0 |
    | bin  |    1 |
    +------+------+
    mysql>
() 提高优先级
    mysql> select   2  + 3 * 5 ; //使用默认计算顺序 先乘除后加减
    +------------+
    | 2  + 3 * 5 |
    +------------+
    |         17 |
    +------------+
    1 row in set (0.00 sec)
    mysql> select   (2  + 3 ) * 5 ; //先加法再乘法
    +---------------+
    | (2  + 3 ) * 5 |
    +---------------+
    |            25 |
    +---------------+
    1 row in set (0.00 sec)
    mysql>
逻辑匹配什么时候需要加()
逻辑与and 优先级高于逻辑或 or
如果在筛选条件里既有and 又有 or 默认先判断and 再判断or
/没加() 的查询结果
select name , uid from tarena.user
where name = "root" or name = "bin"  and uid = 1 ;
+------+------+
| name | uid  |
+------+------+
| root |    0 |
| bin  |    1 |
+------+------+
2 rows in set (0.00 sec)
//加()的查询结果
select name , uid from tarena.user
where (name = "root" or name = "bin")  and uid = 1 ;
+------+------+
| name | uid  |
+------+------+
| bin  |    1 |
+------+------+
1 row in set (0.00 sec)
mysql>
步骤七:练习字符比较/空/非空
符号两边必须是字符 或字符类型的表头
= 相等比较
!= 不相等比较。
命令操作如下所示:
    //查看表里是否有名字叫apache的用户
    mysql> select  name  from  tarena.user where name="apache" ;
    +--------+
    | name   |
    +--------+
    | apache |
    +--------+
    1 row in set (0.00 sec)
    //输出解释器不是/bin/bash的用户名 及使用的解释器
    mysql> select  name , shell  from  tarena.user where shell != "/bin/bash";
    +-----------------+----------------+
    | name            | shell          |
    +-----------------+----------------+
    | bin             | /sbin/nologin  |
    | daemon          | /sbin/nologin  |
    | adm             | /sbin/nologin  |
    | lp              | /sbin/nologin  |
    | sync            | /bin/sync      |
    | shutdown        | /sbin/shutdown |
    | halt            | /sbin/halt     |
    | mail            | /sbin/nologin  |
    | operator        | /sbin/nologin  |
    | games           | /sbin/nologin  |
    | ftp             | /sbin/nologin  |
    | nobody          | /sbin/nologin  |
    | systemd-network | /sbin/nologin  |
    | dbus            | /sbin/nologin  |
    | polkitd         | /sbin/nologin  |
    | sshd            | /sbin/nologin  |
    | postfix         | /sbin/nologin  |
    | chrony          | /sbin/nologin  |
    | rpc             | /sbin/nologin  |
    | rpcuser         | /sbin/nologin  |
    | nfsnobody       | /sbin/nologin  |
    | haproxy         | /sbin/nologin  |
    | apache          | /sbin/nologin  |
    | mysql           | /bin/false     |
    +-----------------+----------------+
    24 rows in set (0.00 sec)
    mysql>
空 is null 表头下没有数据
非空 is not null 表头下有数据
mysql服务 使用关键字 null 或 NULL 表示表头没有数据
    //添加新行 仅给行中的id 表头和name表头赋值
    mysql> insert into tarena.user(id,name) values(71,"");    //零个字符
    mysql> insert into tarena.user(id,name) values(72,"null");//普通字母
    mysql> insert into tarena.user(id,name) values(73,NULL);  //表示空
    mysql> insert into tarena.user(id,name) values(74,null);  //表示空
    //查看id表头值大于等于70  的行 仅显示行中 id表头 和  name 表头的值
    mysql> select id , name from  tarena.user where  id >= 71;
    +----+------+
    | id | name |
    +----+------+
    | 71 |      |
    | 72 | null |
    | 73 | NULL |
    | 74 | NULL |
    +----+------+
    //查看name 表头没有数据的行 仅显示行中id表头 和  naeme 表头的值
    mysql> select id , name from  tarena.user where name is null;
    +----+------+
    | id | name |
    +----+------+
    | 28 | NULL |
    | 29 | NULL |
    | 73 | NULL |
    | 74 | NULL |
    +----+------+
    //查看name 表头是0个字符的行, 仅显示行中id表头 和  naeme 表头的值
    mysql> select id , name from  tarena.user where name="";
    +----+------+
    | id | name |
    +----+------+
    | 71 |      |
    +----+------+
    1 row in set (0.00 sec)
    //查看name 表头值是null的行, 仅显示行中id表头 和  naeme 表头的值
    mysql> select id , name from  tarena.user where name="null";
    +----+------+
    | id | name |
    +----+------+
    | 72 | null |
    +----+------+
    1 row in set (0.00 sec)
    //查看name 表头有数据的行, 仅显示行中id表头 和  name 表头的值
    mysql> select id , name from  tarena.user where name is not null;
    +----+-----------------+
    | id | name            |
    +----+-----------------+
    |  1 | root            |
    |  2 | bin             |
    |  3 | daemon          |
    |  4 | adm             |
    |  5 | lp              |
    ....
    ....
    | 27 | bob             |
    | 71 |                 |
    | 72 | null            |
    +----+-----------------+
步骤八:练习别名/去重/合并
命令操作如下所示:
    //定义别名使用   as  或  空格
    mysql> select name , homedir  from tarena.user;
    mysql> select name as 用户名 , homedir  家目录 from tarena.user;
    //拼接   concat()
    mysql> select concat(name,"-",uid) as 用户信息 from tarena.user where uid <= 5;
    +--------------+
    | 用户信息     |
    +--------------+
    | root-0       |
    | bin-1        |
    | daemon-2     |
    | adm-3        |
    | lp-4         |
    | sync-5       |
    +--------------+
    6 rows in set (0.00 sec)
    //2列拼接
    mysql>  select concat(name , "-" , uid)  as  用户信息  from tarena.user where uid <= 5;
    //多列拼接
    mysql>  select concat(name , "-" , uid , "-" , gid)  as  用户信息  from tarena.user where uid <= 5;
    +--------------+
    | 用户信息     |
    +--------------+
    | root-0-0     |
    | bin-1-1      |
    | daemon-2-2   |
    | adm-3-4      |
    | lp-4-7       |
    | sync-5-0     |
    +--------------+
去重显示 distinct 字段名列表
    //去重前输出
    mysql> select shell  from  tarena.user  where shell in ("/bin/bash","/sbin/nologin") ;
    +---------------+
    | shell         |
    +---------------+
    | /bin/bash     |
    | /sbin/nologin |
    | /sbin/nologin |
    | /sbin/nologin |
    | /sbin/nologin |
    | /sbin/nologin |
    | /sbin/nologin |
    | /sbin/nologin |
    | /sbin/nologin |
    | /sbin/nologin |
    | /sbin/nologin |
    | /sbin/nologin |
    | /sbin/nologin |
    | /sbin/nologin |
    | /sbin/nologin |
    | /sbin/nologin |
    | /sbin/nologin |
    | /sbin/nologin |
    | /sbin/nologin |
    | /sbin/nologin |
    | /bin/bash     |
    | /sbin/nologin |
    +---------------+
    22 rows in set (0.00 sec)
    //去重后查看
    mysql> select distinct shell  from  tarena.user  where shell in ("/bin/bash","/sbin/nologin") ;
    +---------------+
    | shell         |
    +---------------+
    | /bin/bash     |
    | /sbin/nologin |
    +---------------+
    2 rows in set (0.01 sec)
    mysql>

