【极光系列】springboot集成redis
tips:主要用于快速搭建环境以及部署项目入门
gitee地址
直接下载源码可用 https://gitee.com/shawsongyue/aurora.git

模块:aurora_redis
window安装redis安装步骤
1.下载资源包
直接下载解压:https://pan.baidu.com/s/1lJZsgAINREGTFq7TksA05g
提取码:18ki
2.配置环境变量
此电脑--属性--高级系统设置--环境变量--找到系统变量path(新建E:\redis)--确定---应用即可
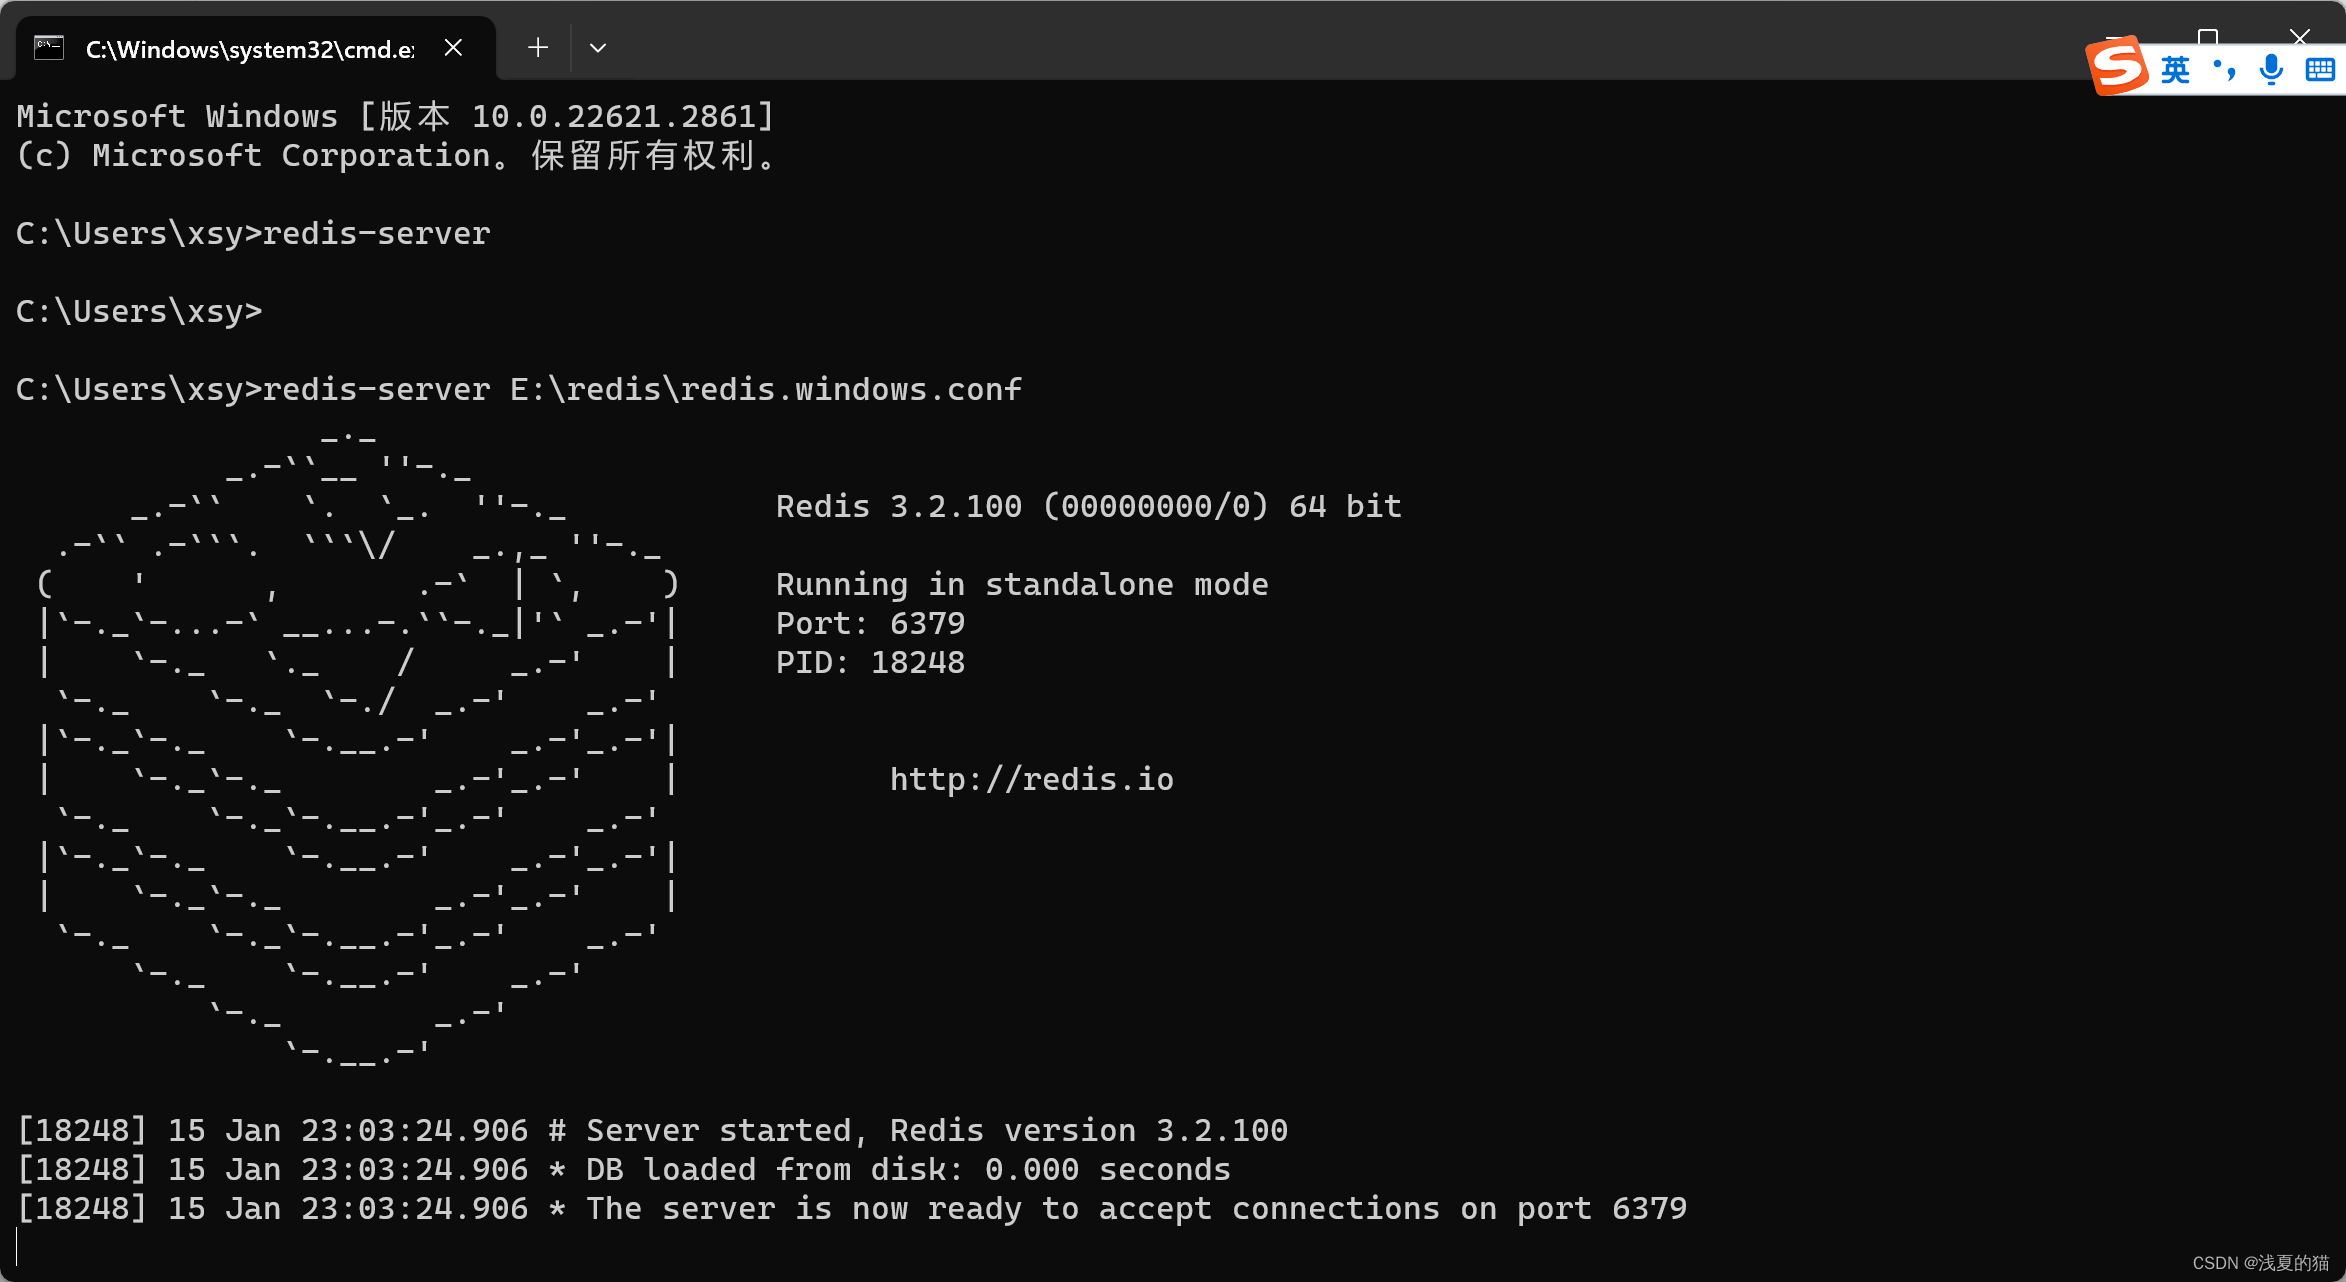
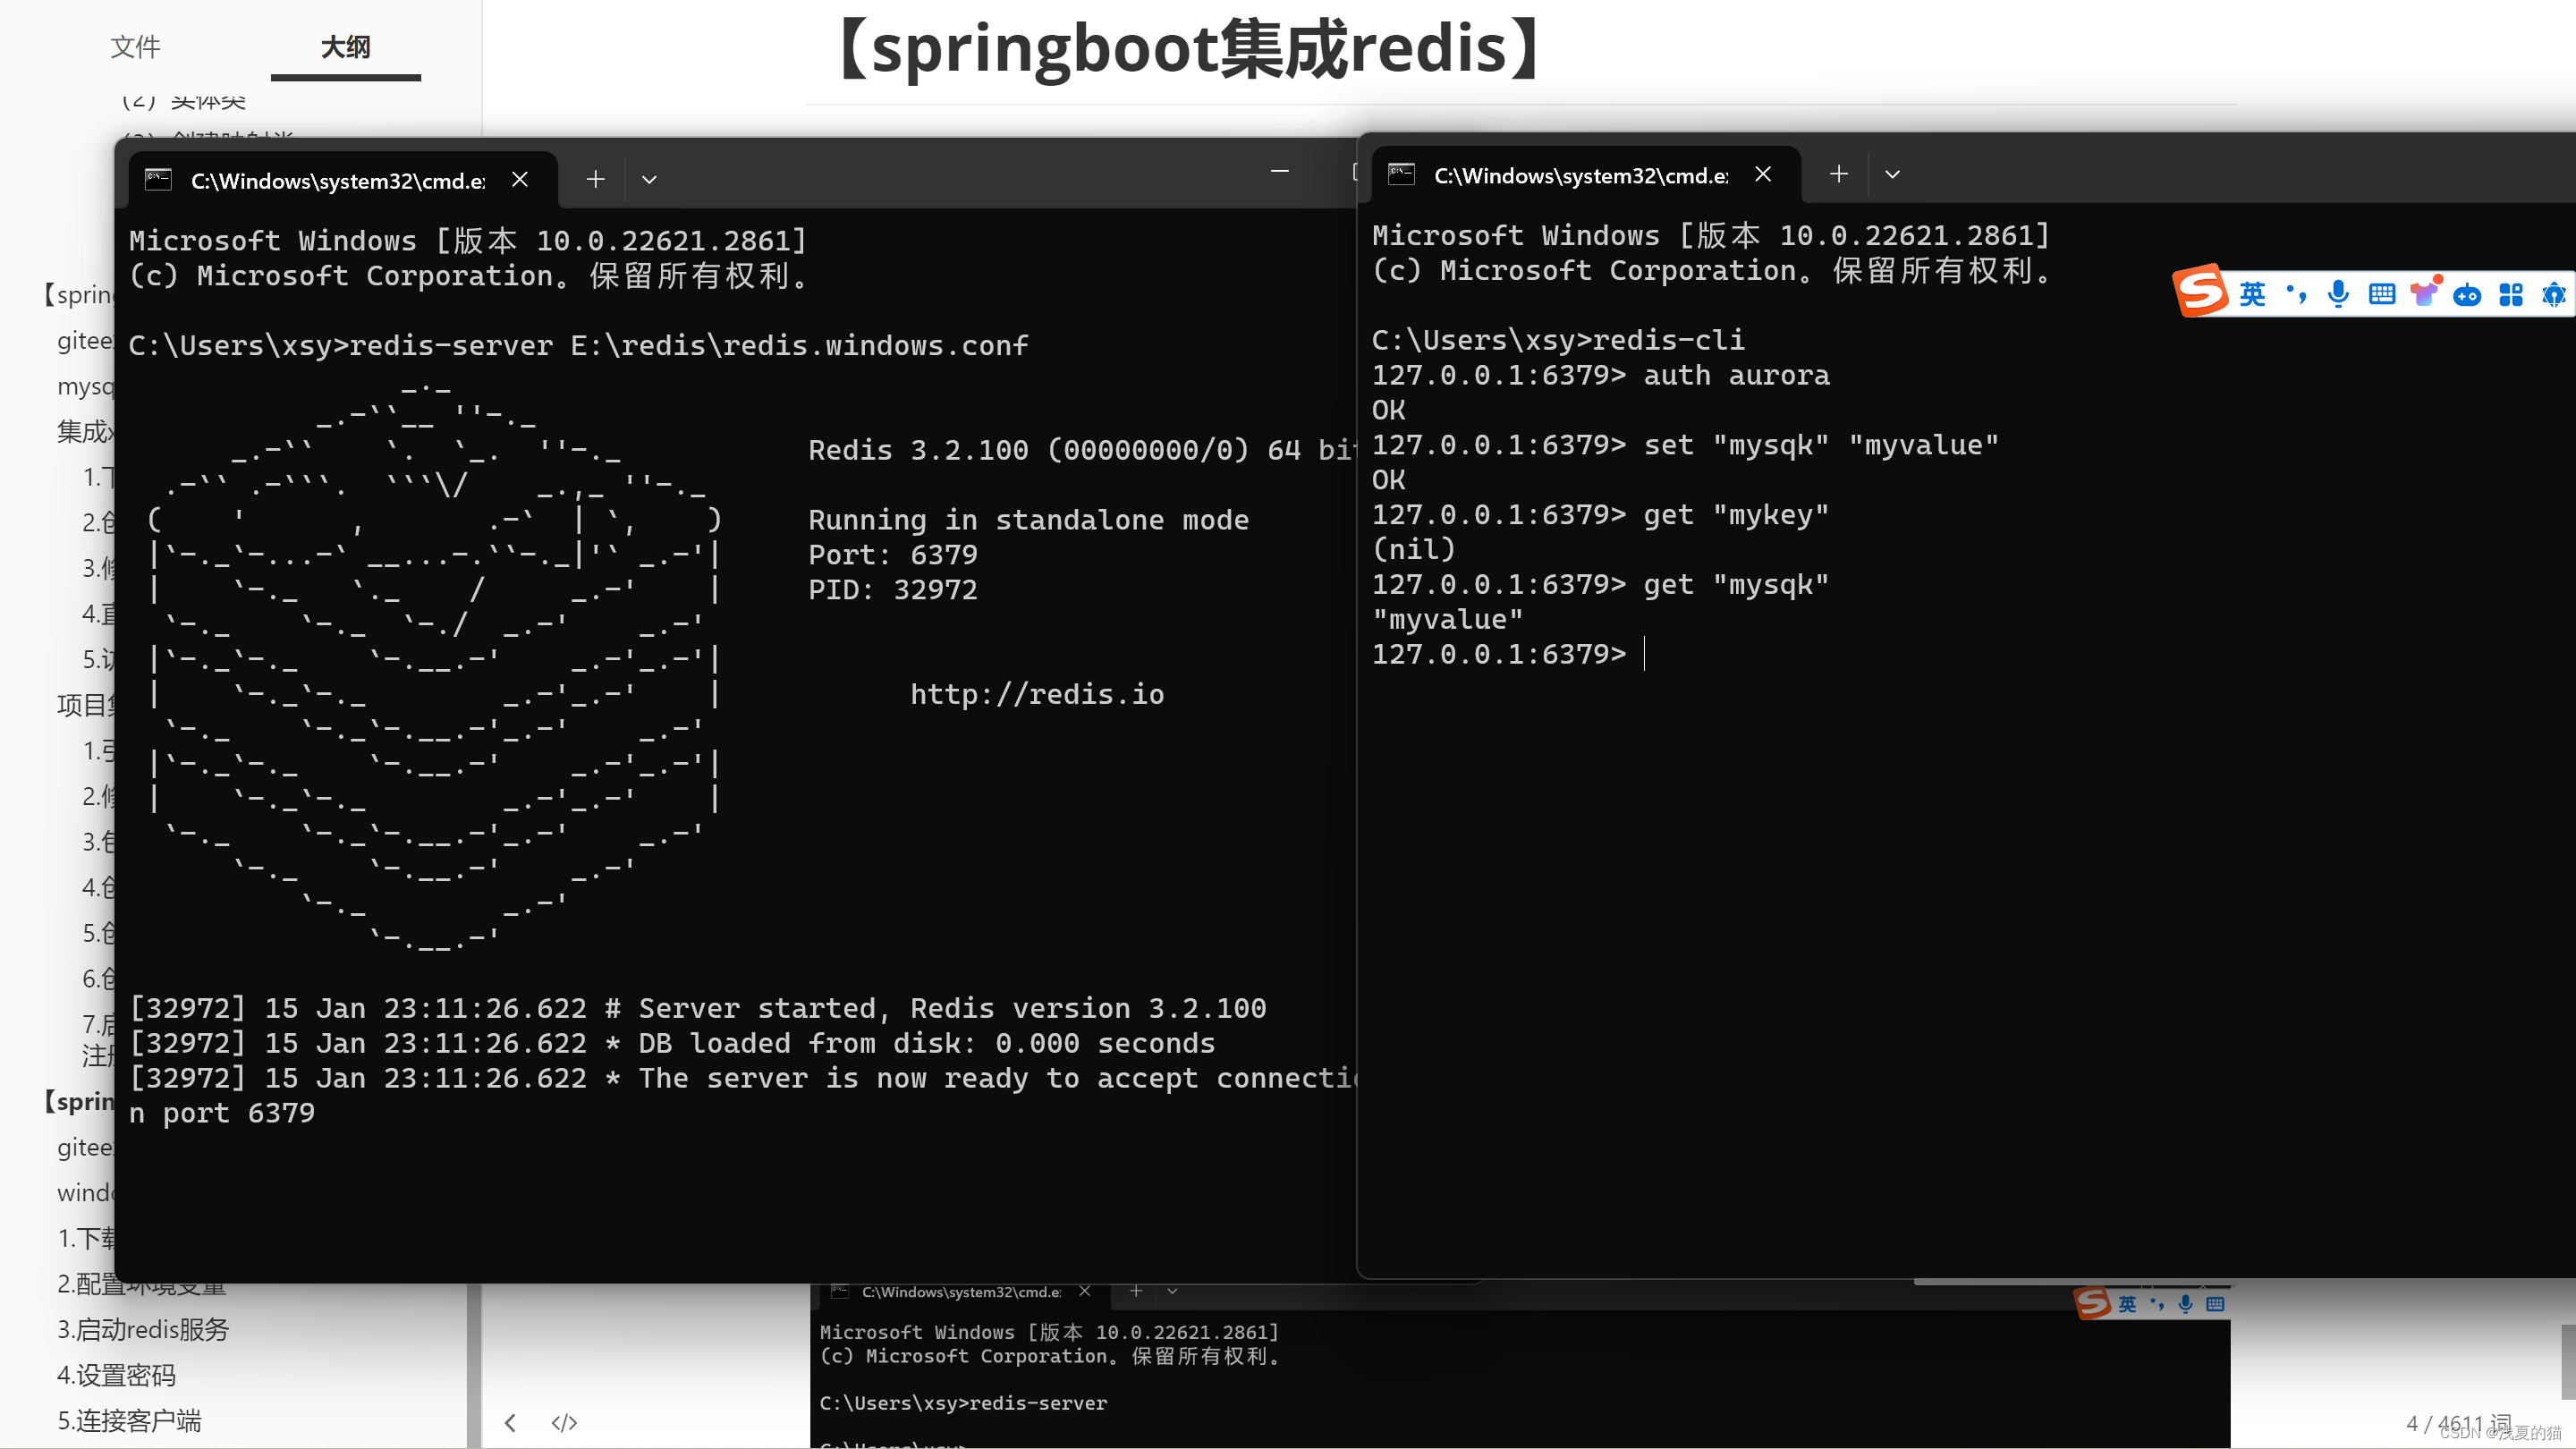
3.启动redis服务
#1.进入cmd命令行

#2.指定路径配置启动
redis-server E:\redis\redis.windows.conf
4.设置密码
配置路径在解压目录下:E:\redis\redis.windows.conf,在配置文件中找到 # requirepass foobared,然后在下面增加一行requirepass 后面即是你需要定义的密码,我定义的是aurora:requirepass aurora
配置以后再重新执行步骤3启动服务

5.连接客户端
#进入cmd命令行,注意里面存储的数据是二进制乱码
redis-cli

#认证
auth aurora

#设置数据
set "mykey" "myvalue"

#获取数据
get "mykey"
项目集成reids
1.引入pom.xml依赖
<?xml version="1.0" encoding="UTF-8"?>
<project xmlns="http://maven.apache.org/POM/4.0.0"
         xmlns:xsi="http://www.w3.org/2001/XMLSchema-instance"
         xsi:schemaLocation="http://maven.apache.org/POM/4.0.0 http://maven.apache.org/xsd/maven-4.0.0.xsd">
    <modelVersion>4.0.0</modelVersion>

    <groupId>com.xsy</groupId>
    <artifactId>aurora_redis</artifactId>
    <version>1.0-SNAPSHOT</version>

    <!--基础SpringBoot依赖-->
    <parent>
        <groupId>org.springframework.boot</groupId>
        <artifactId>spring-boot-starter-parent</artifactId>
        <version>2.3.5.RELEASE</version>
    </parent>

    <!--属性设置-->
    <properties>
        <!--java_JDK版本-->
        <java.version>1.8</java.version>
        <!--maven打包插件-->
        <maven.plugin.version>3.8.1</maven.plugin.version>
        <!--编译编码UTF-8-->
        <project.build.sourceEncoding>UTF-8</project.build.sourceEncoding>
        <!--输出报告编码UTF-8-->
        <project.reporting.outputEncoding>UTF-8</project.reporting.outputEncoding>
        <!--json数据格式处理工具-->
        <fastjson.version>1.2.75</fastjson.version>
    </properties>

    <!--通用依赖-->
    <dependencies>

        <dependency>
            <groupId>org.springframework.boot</groupId>
            <artifactId>spring-boot-starter-web</artifactId>
        </dependency>

        <dependency>
            <groupId>org.springframework.boot</groupId>
            <artifactId>spring-boot-starter-test</artifactId>
            <scope>test</scope>
        </dependency>

        <!-- Lombok -->
        <dependency>
            <groupId>org.projectlombok</groupId>
            <artifactId>lombok</artifactId>
        </dependency>

        <!-- json -->
        <dependency>
            <groupId>com.alibaba</groupId>
            <artifactId>fastjson</artifactId>
            <version>${fastjson.version}</version>
        </dependency>

        <!-- 集成redis依赖  -->
        <dependency>
            <groupId>org.springframework.boot</groupId>
            <artifactId>spring-boot-starter-data-redis</artifactId>
        </dependency>

    </dependencies>

    <!--编译打包-->
    <build>
        <finalName>${project.name}</finalName>
        <!--资源文件打包-->
        <resources>
            <resource>
                <directory>src/main/resources</directory>
            </resource>
            <resource>
                <directory>src/main/java</directory>
                <includes>
                    <include>**/*.xml</include>
                </includes>
            </resource>
        </resources>

        <!--插件统一管理-->
        <pluginManagement>
            <plugins>
                <!--maven打包插件-->
                <plugin>
                    <groupId>org.springframework.boot</groupId>
                    <artifactId>spring-boot-maven-plugin</artifactId>
                    <version>${spring.boot.version}</version>
                    <configuration>
                        <fork>true</fork>
                        <finalName>${project.build.finalName}</finalName>
                    </configuration>
                    <executions>
                        <execution>
                            <goals>
                                <goal>repackage</goal>
                            </goals>
                        </execution>
                    </executions>
                </plugin>

                <!--编译打包插件-->
                <plugin>
                    <artifactId>maven-compiler-plugin</artifactId>
                    <version>${maven.plugin.version}</version>
                    <configuration>
                        <source>${java.version}</source>
                        <target>${java.version}</target>
                        <encoding>UTF-8</encoding>
                        <compilerArgs>
                            <arg>-parameters</arg>
                        </compilerArgs>
                    </configuration>
                </plugin>
            </plugins>
        </pluginManagement>
    </build>

    <!--配置Maven项目中需要使用的远程仓库-->
    <repositories>
        <repository>
            <id>aliyun-repos</id>
            <url>https://maven.aliyun.com/nexus/content/groups/public/</url>
            <snapshots>
                <enabled>false</enabled>
            </snapshots>
        </repository>
    </repositories>

    <!--用来配置maven插件的远程仓库-->
    <pluginRepositories>
        <pluginRepository>
            <id>aliyun-plugin</id>
            <url>https://maven.aliyun.com/nexus/content/groups/public/</url>
            <snapshots>
                <enabled>false</enabled>
            </snapshots>
        </pluginRepository>
    </pluginRepositories>

</project>
2.修改配置
#服务配置
server:
  #端口
  port: 7004

#spring配置
spring:
  #应用配置
  application:
    #应用名
    name: aurora_redis

  #redis配置
  redis:
    host: localhost
    port: 6379
    password: aurora
    #Redis使用的数据库
    database: 0
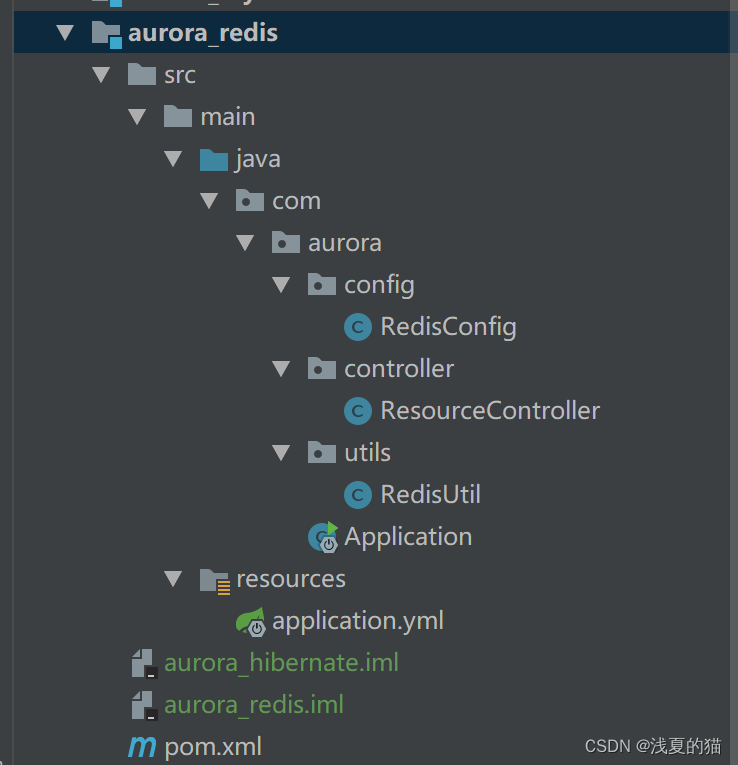
3.包结构如下
4.创建主启动类
package com.aurora;

import org.springframework.boot.SpringApplication;
import org.springframework.boot.autoconfigure.SpringBootApplication;

/**
 * @author 浅夏的猫
 * @description 主启动类
 * @date 22:46 2024/1/13
 */
@SpringBootApplication
public class Application {
    public static void main(String[] args) {
        SpringApplication.run(Application.class, args);
    }
}
5.创建redis配置类
package com.aurora.config;
import org.springframework.context.annotation.Bean;
import org.springframework.context.annotation.Configuration;
import org.springframework.data.redis.connection.lettuce.LettuceConnectionFactory;
import org.springframework.data.redis.core.RedisTemplate;
import org.springframework.data.redis.serializer.GenericJackson2JsonRedisSerializer;
import org.springframework.data.redis.serializer.StringRedisSerializer;

/**
 * @description redis配置类
 * @author 浅夏的猫
 * @datetime 22:12 2024/1/15
*/
@Configuration
public class RedisConfig {
    @Bean
    public RedisTemplate<String,Object> redisTemplate(LettuceConnectionFactory lettuceConnectionFactory){
        RedisTemplate<String, Object> redisTemplate = new RedisTemplate<>();
        redisTemplate.setConnectionFactory(lettuceConnectionFactory);
        redisTemplate.setKeySerializer(new StringRedisSerializer());
        redisTemplate.setValueSerializer(new StringRedisSerializer());
        redisTemplate.setHashKeySerializer(new StringRedisSerializer());
        redisTemplate.setHashValueSerializer(new StringRedisSerializer());
        redisTemplate.afterPropertiesSet();
        return redisTemplate;
    }
}
6.创建控制类验证
package com.aurora.controller;

import com.aurora.utils.RedisUtil;
import org.slf4j.Logger;
import org.slf4j.LoggerFactory;
import org.springframework.data.redis.core.RedisTemplate;
import org.springframework.web.bind.annotation.RequestMapping;
import org.springframework.web.bind.annotation.RestController;

import javax.annotation.Resource;

/**
 * @author 浅夏的猫
 * @description 资源controller
 * @date 22:38 2024/1/13
 */
@RestController
@RequestMapping("/resource")
public class ResourceController {

    private static Logger logger = LoggerFactory.getLogger(ResourceController.class);

    @Resource
    private RedisUtil redisUtil;

    /**
     * @return java.util.List<com.aurora.entity.ResourceEntity>
     * @description 查询全部资源数据列表
     * @author 浅夏的猫
     * @date 22:40 2024/1/13
     */
    @RequestMapping("/get")
    public String get() {
        redisUtil.set("aurora", "小白");
        Object aurora = redisUtil.get("aurora") == null ? "" : redisUtil.get("aurora");
        logger.info("测试获取值:{}", aurora.toString());
        return aurora.toString();
    }
}