上一篇:【Python】使用tkinter设计开发Windows桌面程序记事本(2)-CSDN博客
下一篇:【Python】使用tkinter设计开发Windows桌面程序记事本(4)-CSDN博客
作者发炎
本文章与"记事本项目"的第一篇文章类似。这里是重新创建新的"页面设置"子窗口,进行开发设计。
那为什么与上一篇文章没有衔接呢?是因为这个"页面设置"是一个独立的子窗口,并且受主窗口调度。如果代码模块混为设计开发,就会降低可读性,并且不利于代码模块维护与迭代升级。
有疑问或建议,欢迎在评论区戳我哟!
设计步骤
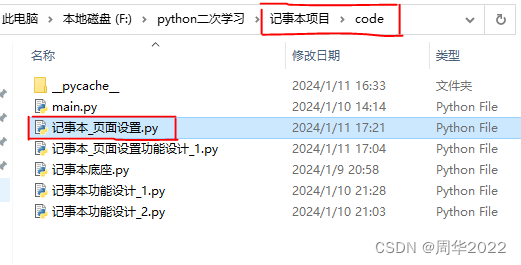
在"记事本项目" --> "code"目录下新建项目代码模块文件"记事本_页面设置.py"设计开发,如下图:
运行结果
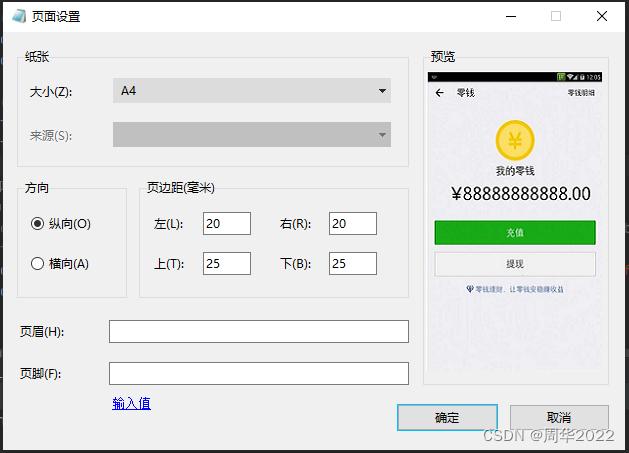
代码示例:记事本_页面设置.py
"""
    记事本(打印)页面设置
"""

# 通配符 "*"
__all__ = ['PageSetup_base']
__all__.extend(['PAPER_VAR', 'PAPER_ORIENT', 'LEFT_VAR', 'RIGHT_VAR', 'TOP_VAR', 'BOTTOM_VAR', 'HEADER_VAR', 'FOOTER_VAR'])


# 导入内置模块
import tkinter as tk
from tkinter import ttk


# 全局变量
# 永久保存变量
PAPER_VAR = 'A4'    # (打印纸张)尺寸大小
PAPER_ORIENT = 1    # (打印纸张)方向
LEFT_VAR = 20       # (打印纸张)左页边距
RIGHT_VAR = 20      # (打印纸张)右页边距
TOP_VAR = 25        # (打印纸张)上页边距
BOTTOM_VAR = 25     # (打印纸张)下页边距
HEADER_VAR = ''     # (打印纸张)页眉
FOOTER_VAR = ''     # (打印纸张)页脚


class PageSetup_base(tk.Toplevel):
    """ 继承tk.Toplevel, 设计记事本(打印)页面设置 """
    def __init__(self):
        """ 重写父类的构造方法 """
        # 调用父类的构造方法
        super().__init__()

        """ 开始对记事本(打印)页面设置进行设计 """

        self.title('页面设置')  # 窗口标题
        self.geometry(f'622x418+{self.winfo_screenwidth() // 4 + 60}+{self.winfo_screenheight() // 8 + 52}')
        self.focus()          # 设置窗口焦点
        self.resizable(0, 0)  # 禁止窗口的放大
        self.grab_set()       # 锁定父窗口
        # 修改窗口标题的图片
        self.PageSetup_photo = tk.PhotoImage(file='.\\..\\photo\\记事本.png')
        self.iconphoto(True, self.PageSetup_photo)

        """ 窗口布局 """
        # (打印)纸张选择
        self.paperFrame = ttk.LabelFrame(self, text='纸张', padding=(191, 38))
        self.paperFrame.place(x=14, y=16)
        tk.Label(self.paperFrame).pack()
        # 大小
        self.size = tk.Label(self, text='大小(Z):')
        self.size.place(x=24, y=48)
        # 来源
        self.source = tk.Label(self, text='来源(S):', state='disable')
        self.source.place(x=24, y=92)

        """ 纸张大小下拉菜单 """
        # 修改 OptionMenu 的样式
        self.style = ttk.Style()
        self.style.configure("my.TMenubutton", background='#DCDCDC', width=35)
        # 纸张大小下拉菜单
        self.paperVar = tk.StringVar(value=PAPER_VAR)
        self.paperSelection = [self.paperVar.get(), f'A3{" " * 55}', 'A4', 'A5', 'B4 (JIS)', 'B5 (JIS)', 'Executive',
                               'Statement', 'Tabloid', '法律专用纸', '信纸']
        self.paperMenu = ttk.OptionMenu(self, self.paperVar, *self.paperSelection, style="my.TMenubutton")
        self.paperMenu.place(x=110, y=46)

        """ 纸张来源下拉菜单 """
        # 修改 OptionMenu 的样式
        self.style.configure("my2.TMenubutton", background='#C0C0C0', width=35)
        # 纸张大小下拉菜单
        self.sourceVar = tk.StringVar()
        self.sourceOption = [None, f'选项1{" " * 55}', '选项2', '选项3']
        self.sourceMenu = ttk.OptionMenu(self, self.sourceVar, *self.sourceOption, style="my2.TMenubutton")
        self.sourceMenu.config(state="disabled")
        self.sourceMenu.place(x=110, y=90)

        # (打印纸张)方向选择
        self.orientFrame = ttk.LabelFrame(self, text='方向', padding=(50, 38))
        self.orientFrame.place(x=14, y=147)
        tk.Label(self.orientFrame).pack()
        self.orientVar = tk.IntVar(value=PAPER_ORIENT)
        # (打印纸张)纵向
        self.lengthways = ttk.Radiobutton(self, text='纵向(O)', variable=self.orientVar, value=1)
        self.lengthways.place(x=26, y=180)
        # (打印纸张)横向
        self.crosswise = ttk.Radiobutton(self, text='横向(A)', variable=self.orientVar, value=2)
        self.crosswise.place(x=26, y=220)

        # (打印纸张)页边距(毫米)
        self.marginFrame = ttk.LabelFrame(self, text='页边距(毫米)', padding=(130, 38))
        self.marginFrame.place(x=136, y=147)
        tk.Label(self.marginFrame).pack()
        # 文字标签
        tk.Label(self, text='左(L):').place(x=148, y=180)
        tk.Label(self, text='右(R):').place(x=274, y=180)
        tk.Label(self, text='上(T):').place(x=148, y=220)
        tk.Label(self, text='下(B):').place(x=274, y=220)
        # 输入框
        self.leftVar = tk.IntVar(value=LEFT_VAR)
        self.rightVar = tk.IntVar(value=RIGHT_VAR)
        self.topVar = tk.IntVar(value=TOP_VAR)
        self.bottomVar = tk.IntVar(value=BOTTOM_VAR)
        self.leftEntry = ttk.Entry(self, width=6, textvariable=self.leftVar)
        self.leftEntry.place(x=200, y=180)
        self.rightEntry = ttk.Entry(self, width=6, textvariable=self.rightVar)
        self.rightEntry.place(x=326, y=180)
        self.topEntry = ttk.Entry(self, width=6, textvariable=self.topVar)
        self.topEntry.place(x=200, y=220)
        self.bottomEntry = ttk.Entry(self, width=6, textvariable=self.bottomVar)
        self.bottomEntry.place(x=326, y=220)

        # (打印纸张)预览
        self.previewFrame = ttk.LabelFrame(self, text='预览', padding=(88, 147))
        self.previewFrame.place(x=420, y=16)
        tk.Label(self.previewFrame).pack()
        self.preview_photo = tk.PhotoImage(file='.\\..\\photo\\微信余额.png')
        tk.Label(self, image=self.preview_photo).place(x=421, y=37)
        # 页眉、页脚变量
        self.headerVar = tk.StringVar(value=HEADER_VAR)
        self.footerVar = tk.StringVar(value=FOOTER_VAR)
        # 页眉
        tk.Label(self, text='页眉(H):').place(x=14, y=288)
        self.headerEntry = ttk.Entry(self, width=42, textvariable=self.headerVar)
        self.headerEntry.place(x=106, y=288)
        # 页脚
        tk.Label(self, text='页脚(F):').place(x=14, y=330)
        self.footerEntry = ttk.Entry(self, width=42, textvariable=self.footerVar)
        self.footerEntry.place(x=106, y=330)

        # 页眉页脚输入值网页详情介绍
        # 修改 Button 的样式
        # self.style.configure("my.TButton", width=6, font=("Arial", 10, 'underline'), foreground="blue")
        # ttk.Button(self, text='输入值', style='my.TButton').place(x=106, y=360)
        self.headerFooterWeb = tk.Label(self, text='输入值', relief='flat', foreground="blue", font=("Arial", 10, 'underline'))
        self.headerFooterWeb.place(x=106, y=360)

        # 确定
        # 修改 Button 的样式
        self.style.map("my.TButton", background=[('!active', '!disabled', '#00BFFF')])
        self.confirm = ttk.Button(self, text='确定', width=13, style='my.TButton')
        self.confirm.place(x=394, y=372)
        # 取消
        self.cancel = ttk.Button(self, text='取消', width=13)
        self.cancel.place(x=506, y=372)


# 代码测试
if __name__ == '__main__':
    ui = PageSetup_base()    # 实例化页面设置
    ui.mainloop()            # 循环窗口运行
else:
    print(f'导入【{__name__}】')
作者:周华
创作日期:2024/1/11




![[element-ui] 级联选择器el-cascader不触发change事件](https://img-blog.csdnimg.cn/direct/bdf50690f9304306af59298cab850155.png)
