目录
6.2.1 SpringBoot
6.2.1.1 什么是Spring Boot
6.2.1.2 SpringBoot的特点
6.2.2 快速入门
6.2.2.1 创建工程
6.2.2.2 引入依赖
6.2.2.3 启动类
6.2.2.4 controller
6.2.2.5 测试
6.2.3 注解与属性注入
6.2.3.1 注解
6.2.3.1.1 @EnableAutoConfiguration
6.2.3.1.2 @ComponentScan
6.2.3.1.3 @SpringBootConfiguration
6.2.3.1.4 @SpringBootApplication
6.2.3.1.4 @RestController
6.2.3.2 SpringBoot的属性注入
6.2.3.2.1 传统方式注入
6.2.3.2.2 springboot方式注入
6.2.3.2.3 其他方式
6.2.4 SpringBoot整合
6.2.4.1 基础搭建
6.1.4.1.1 自动生成
6.1.4.1.2 手动搭建
6.1.4.1.3 引入依赖
6.2.4.2 整合SpringMVC
6.2.4.3 整合连接池
6.2.4.3.1 HikariCP连接池
6.2.4.3.2 Druid连接池
6.2.4.3.4 HikariCP与Druid的对比
6.2.4.4 整合mybatis
6.2.4.5 整合事务
6.2.5 Thymeleaf
6.2.5.1 试想一个场景
6.2.5.2 什么是Thymeleaf
6.2.5.3 Thymeleaf实现
6.2.1 SpringBoot
6.2.1.1 什么是Spring Boot
众所周知 Spring 应用需要进行大量的配置,各种 XML 配置和注解配置让人眼花缭乱,且极容易出错,因此 Spring 一度被称为“配置地狱”。
为了简化 Spring 应用的搭建和开发过程,出现了一套全新的开源的框架,它就是 Spring Boot。
Spring Boot 具有 Spring 一切优秀特性,Spring 能做的事,Spring Boot 都可以做,而且使用更加简单,功能更加丰富,性能更加稳定而健壮。
Spring Boot 提供了大量开箱即用(out-of-the-box)的依赖模块,例如 spring-boot-starter-redis、spring-boot-starter-data-mongodb 和 spring-boot-starter-data-elasticsearch 等。这些依赖模块为 Spring Boot 应用提供了大量的自动配置,使得 Spring Boot 应用只需要非常少量的配置甚至零配置,便可以运行起来,让开发人员从 Spring 的“配置地狱”中解放出来,有更多的精力专注于业务逻辑的开发。
SpringBoot官方参考文献【Spring Boot Reference Guide】
6.2.1.2 SpringBoot的特点
Spring Boot 主要特征是:
- 创建独立的spring应用程序
- 敏捷开发
- 直接内嵌tomcat、jetty和undertow(不需要打包成war包部署)
- 自动配置spring和第三方库
- 绝对不会生成代码,并且不需要XML配置
- 约定大于配置
6.2.2 快速入门
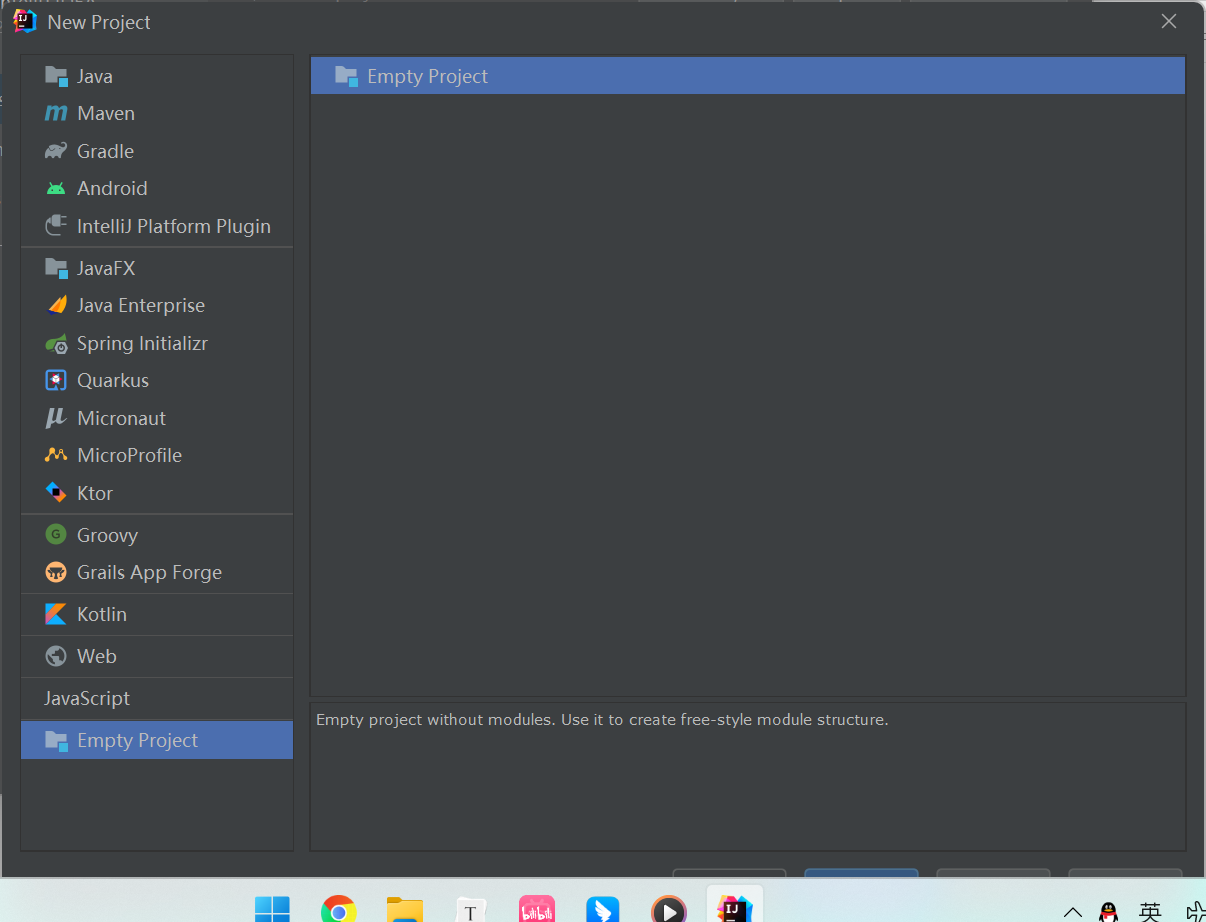
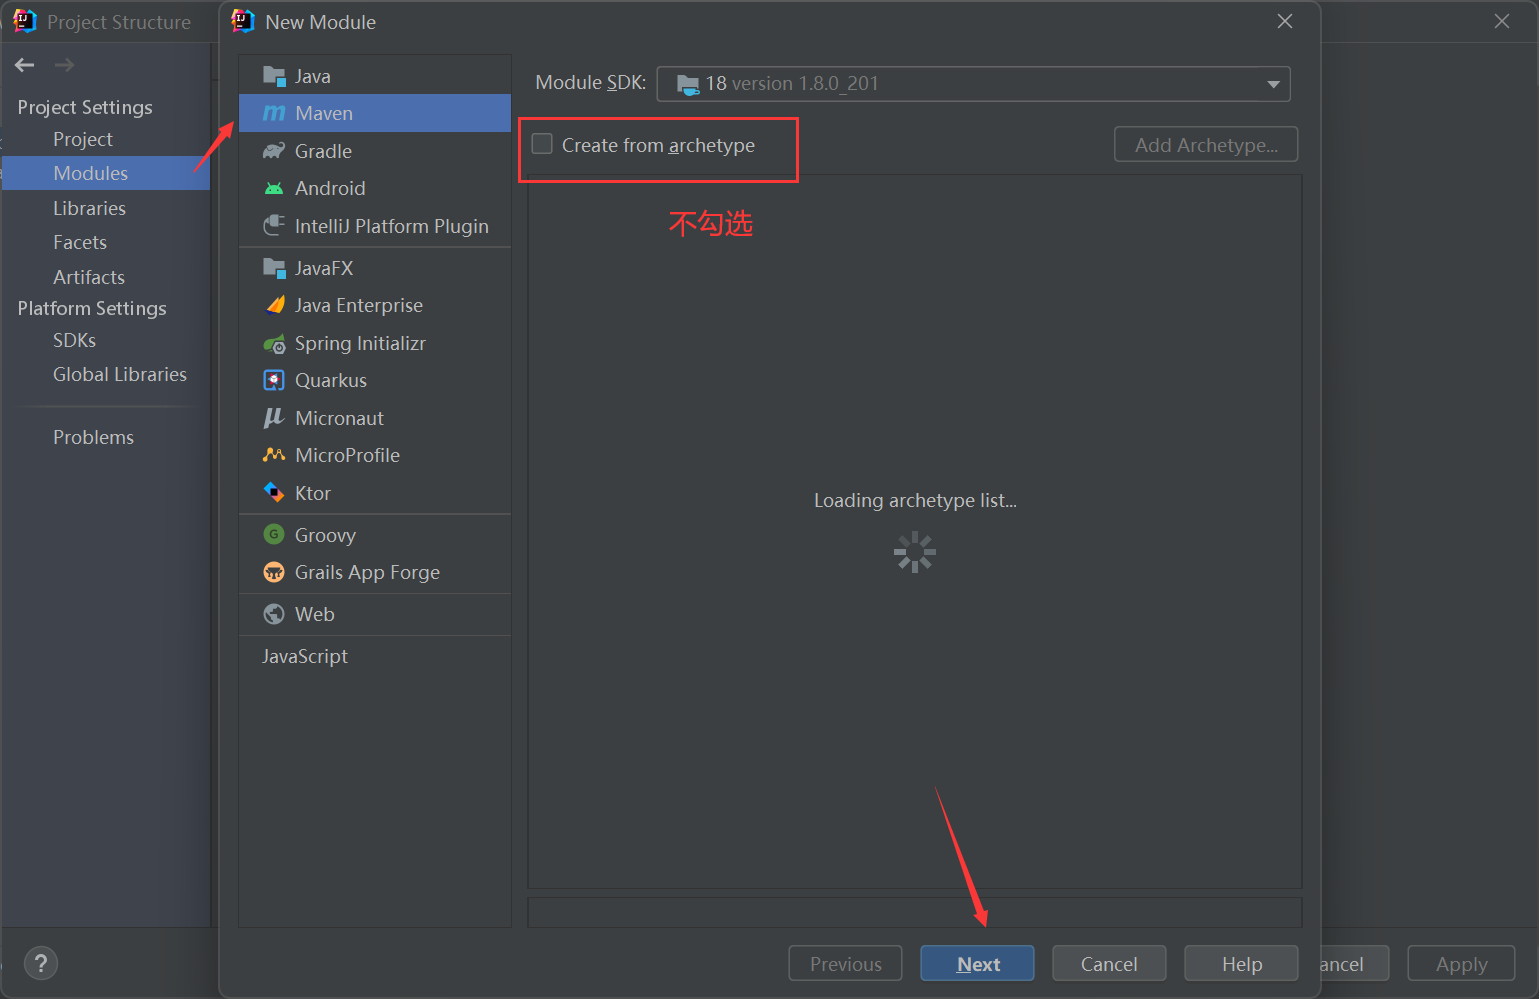
6.2.2.1 创建工程
创建一个空项目
6.2.2.2 引入依赖
添加父工程坐标
<parent>
    <groupId>org.springframework.boot</groupId>
    <artifactId>spring-boot-starter-parent</artifactId>
    <version>2.0.6.RELEASE</version>
</parent>
添加web启动器
 <dependencies>
        <dependency>
            <groupId>org.springframework.boot</groupId>
            <artifactId>spring-boot-starter-web</artifactId>
        </dependency>
</dependencies>为了让SpringBoot帮我们完成各种自动配置,我们必须引入SpringBoot提供的自动配置依赖,我们称为启动器。因为我们是web项目,这里我们引入web启动器:
需要注意的是,我们并没有在这里指定版本信息。因为SpringBoot的父工程已经对版本进行了管理了。
6.2.2.3 启动类
SpringbootDemoApplication
//@SpringBootApplication
@EnableAutoConfiguration
@ComponentScan
public class SpringbootDemoApplication {
    public static void main(String[] args) {
        SpringApplication.run(SpringbootDemoApplication.class);
    }
}
6.2.2.4 controller
DemoController
@RestController
@EnableAutoConfiguration //开启自动配置
public class DemoController {
    @RequestMapping("/first")
    public String first(){
        return "this is my first spring boot project!";
    }

        public static void main(String[] args) {
            SpringApplication.run(DemoController.class,args);
        }

}
6.2.2.5 测试

输入网址

6.2.3 注解与属性注入
6.2.3.1 注解
6.2.3.1.1 @EnableAutoConfiguration
开启spring应用程序的自动配置,SpringBoot基于所添加的依赖和自定义的bean,试图去猜测并配置想要的配置。比如引入spring-boot-starter-web,而这个启动器中帮我们添加了tomcat、SpringMVC的依赖。此时自动配置就知道是要开发一个web应用,所以自动完成了web及SpringMVC的默认配置了!
6.2.3.1.2 @ComponentScan
配置组件扫描的指令。提供了类似与<context:component-scan>标签的作用
通过basePackageClasses或者basePackages属性来指定要扫描的包。如果没有指定这些属性,那么将从声明这个注解的类所在的包开始,扫描包及子包
而@ComponentScan注解声明的类就是main函数所在的启动类,因此扫描的包是该类所在包及其子包。一般启动类会放在一个比较浅的包目录中。
6.2.3.1.3 @SpringBootConfiguration
这个注解的作用就是声明当前类是一个配置类,然后Spring会自动扫描到添加了@Configuration的类,并且读取其中的配置信息。而@SpringBootConfiguration是来声明当前类是SpringBoot应用的配置类,项目中只能有一个。所以一般我们无需自己添加。
6.2.3.1.4 @SpringBootApplication
上面一堆太复杂,于是@SpringBootApplication整合了上面所有注解,以后只需要写一个@SpringBootApplication就可以
@SpringBootApplication其实是一个组合注解,这里重点的注解有3个:
- @SpringBootConfiguration
- @EnableAutoConfiguration:开启自动配置
- @ComponentScan:开启注解扫描
6.2.3.1.4 @RestController
@RestController 是@controller和@ResponseBody 的结合
@Controller 将当前修饰的类注入SpringBoot IOC容器,使得从该类所在的项目跑起来的过程中,这个类就被实例化。
@ResponseBody表示方法的返回值直接以指定的格式写入Http response body中,而不是解析为跳转路径
如果要求方法返回的是json格式数据,而不是跳转页面,可以直接在类上标注@RestController,而不用在每个方法中标注@ResponseBody,简化了开发过程。
@RestController
public class TestController {
    @RequestMapping("/first")
    public String test(){
        return "test";
    }
}
6.2.3.2 SpringBoot的属性注入
6.2.3.2.1 传统方式注入
@Configuration //配置类 bean.xml
@PropertySource("classpath:jdbc.properties") //加载属性文件
public class DataSourceAutoConfiguration {
//使用value注解传递参数
    @Value("${jdbc.url}")
    String url;
    @Value("${jdbc.driverClassName}")
    String driverClassName;
    @Value("${jdbc.username}")
    String username;
    @Value("${jdbc.password}")
    String password;

    //方法返回的对象放到IOC中
    @Bean //<bean id="DataSource" class="......">
    public DataSource dataSource() {
        DruidDataSource dataSource = new DruidDataSource();
        dataSource.setUrl(url);
        dataSource.setDriverClassName(driverClassName);
        dataSource.setUsername(username);
        dataSource.setPassword(password);
        return dataSource;
    }
@Configuration:声明JdbcConfiguration是一个配置类。
@PropertySource:指定属性文件的路径是:classpath:jdbc.properties通过
@Value为属性注入值。通过@Bean将
dataSource()方法声明为一个注册Bean的方法,Spring会自动调用该方法,将方法的返回值加入Spring容器中。相当于以前的bean标签
可以在任意位置通过@Autowired注入DataSource
6.2.3.2.2 springboot方式注入
传统方式属性注入使用的是@Value注解。这种方式虽然可行,但是不够强大,因为它只能注入基本类型值。
在SpringBoot中,提供了一种新的属性注入方式,支持各种java基本数据类型及复杂类型的注入。
1、新建JdbcProperties,用来进行属性注入
@ConfigurationProperties(prefix = "jdbc")
public class JdbcProperties {
    private String url;
    private String driverClassName;
    private String username;
    private String password;
    // ... 略
    // getters 和 setters
}
在类上通过@ConfigurationProperties注解声明当前类为属性读取类
prefix="jdbc"读取属性文件中,前缀为jdbc的值。在类上定义各个属性,名称必须与属性文件中
jdbc.后面部分一致,并且必须具有getter和setter方法需要注意的是,这里我们并没有指定属性文件的地址,SpringBoot默认会读取文件名为application.properties的资源文件
application.properties
# SpringBoot
spring.datasource.driverClassName=com.mysql.jdbc.Driver

spring.datasource.url=jdbc:mysql:///mydb
spring.datasource.username=root
spring.datasource.password=123456
#HikariCP 连接池 springboot默认连接池
spring.datasource.hikari.idle-timeout=60000
spring.datasource.hikari.maximum-pool-size=30
spring.datasource.hikari.minimum-idle=10

#
#logging.level.org.springframework=debug

# mybatis
# 别名
mybatis.type-aliases-package=com.bl.model
# mapper文件路径
# mybatis.mapper-locations=classpath:mapper/*.xml
# mybatis全局配置文件路径
# mybatis.config-location=classpath:mybatis-config.xml
2、在JdbcConfiguration中使用这个属性,有三种方式
- @Autowired注入
- 构造函数注入
- @Bean方法的形参注入
@Autowired注入
@Configuration
@EnableConfigurationProperties(JdbcProperties.class)
public class JdbcConfiguration {

    @Autowired
    private JdbcProperties jdbcProperties;

    @Bean
    public DataSource dataSource() {
        DruidDataSource dataSource = new DruidDataSource();
        dataSource.setUrl(jdbcProperties.getUrl());
        dataSource.setDriverClassName(jdbcProperties.getDriverClassName());
        dataSource.setUsername(jdbcProperties.getUsername());
        dataSource.setPassword(jdbcProperties.getPassword());
        return dataSource;
    }

}
构造函数注入
@Configuration
@EnableConfigurationProperties(JdbcProperties.class)
public class JdbcConfiguration {

    private JdbcProperties jdbcProperties;

    public JdbcConfiguration(JdbcProperties jdbcProperties){
        this.jdbcProperties = jdbcProperties;
    }

    @Bean
    public DataSource dataSource() {
        // 略
    }

}
@Bean方法的形参注入
@Configuration
@EnableConfigurationProperties(JdbcProperties.class)
public class JdbcConfiguration {

    @Autowired
    DataSourceProperties dataSourceProperties;
  //方法返回的对象放到IOC中
    @Bean //<bean id="DataSource" class="......">
    public DataSource dataSource() {
        DruidDataSource dataSource = new DruidDataSource();
        dataSource.setUrl(dataSourceProperties.getUrl());
        dataSource.setDriverClassName(dataSourceProperties.getDriverClassName());
        dataSource.setUsername(dataSourceProperties.getUsername());
        dataSource.setPassword(dataSourceProperties.getPassword());
        return dataSource;
    }
}
6.2.3.2.3 其他方式
当只有一个类使用属性。如果一段属性只有一个Bean需要使用,我们无需将其注入到一个类(JdbcProperties)中。而是直接在需要的地方声明即可:
@Configuration
public class JdbcConfiguration {

    @Bean
    // 声明要注入的属性前缀,SpringBoot会自动把相关属性通过set方法注入到DataSource中
    @ConfigurationProperties(prefix = "jdbc")
    public DataSource dataSource() {
        DruidDataSource dataSource = new DruidDataSource();
        return dataSource;
    }
}
直接把
@ConfigurationProperties(prefix = "jdbc")声明在需要使用的@Bean的方法上,然后SpringBoot就会自动调用这个Bean(此处是DataSource)的set方法,然后完成注入。使用的前提是:该类必须有对应属性的set方法!
6.2.4 SpringBoot整合
6.2.4.1 基础搭建
6.1.4.1.1 自动生成

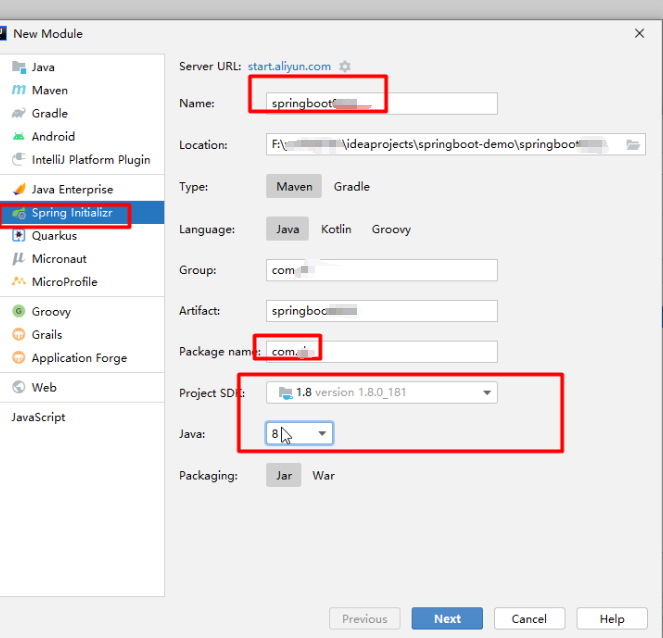
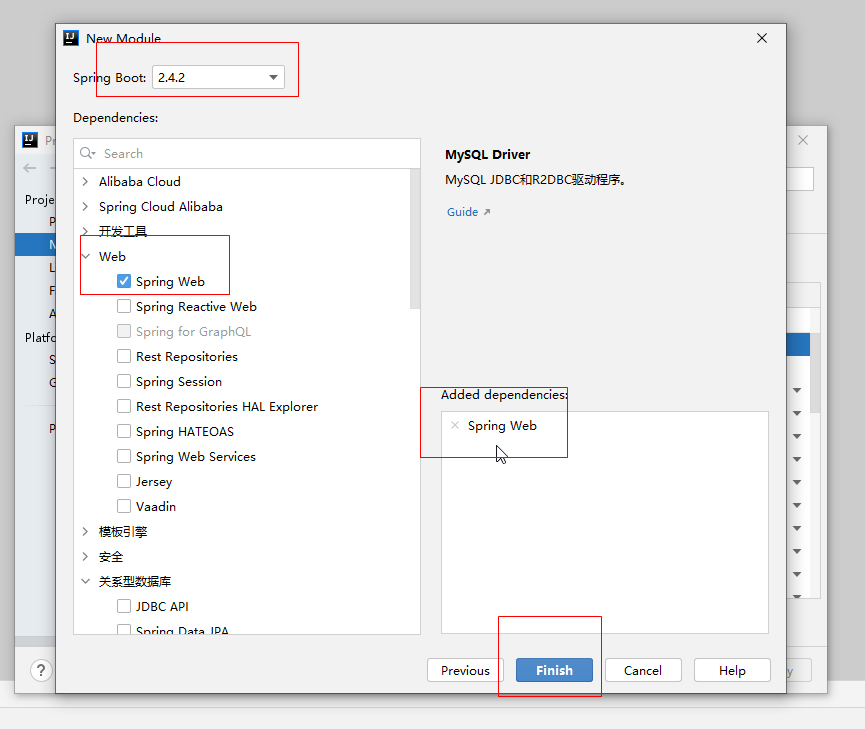
6.1.4.1.2 手动搭建
如图所示手动搭建项目
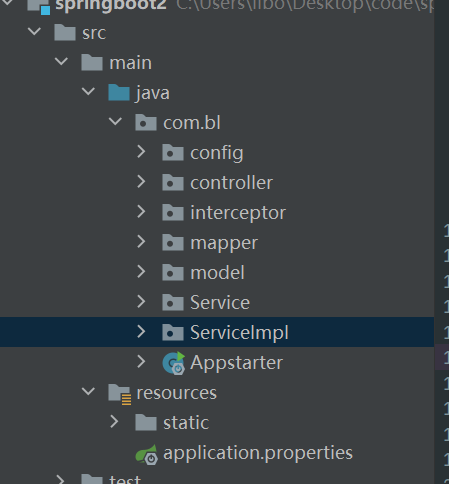
6.1.4.1.3 引入依赖
父工程坐标
<parent>
    <groupId>org.springframework.boot</groupId>
    <artifactId>spring-boot-starter-parent</artifactId>
    <version>2.0.6.RELEASE</version>
</parent>
web启动器
<dependencies>
    <dependency>
        <groupId>org.springframework.boot</groupId>
        <artifactId>spring-boot-starter-web</artifactId>
    </dependency>
</dependencies>
创建启动类Appstarter
@SpringBootApplication
public class Appstarter {
    public static void main(String[] args) {
        SpringApplication.run(Appstarter.class,args);
    }
}
注意启动类的位置,要和最后的包同层(要放在一个比较浅的包目录中)
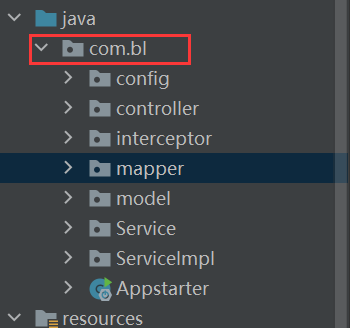
TestController
@RestController
public class TestController {
    @RequestMapping("/first")
    public String test1(){
        return "first";
    }
}
6.2.4.2 整合SpringMVC
添加全局配置文件application.properties
# 此时可以创建空的文件,后续整合其他模块会在全局配置文件中逐步添加配置信息
# 映射端口
# server.port=8080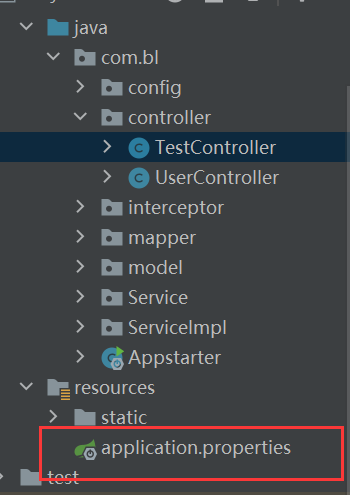
访问静态资源
项目是一个jar工程,没有webapp,我们的静态资源该放哪里呢?
只要静态资源放在这些目录中任何一个,SpringMVC都会帮我们处理。
习惯性将静态资源放在classpath:/static/目录下

添加拦截器
拦截器不是一个普通属性,而是一个类,所以就要用到java配置方式了
如果想要保持Spring Boot 的一些默认MVC特征,同时又想自定义一些MVC配置(包括:拦截器,格式化器, 视图控制器、消息转换器 等等),你应该让一个类实现
WebMvcConfigurer,并且添加@Configuration注解,但是千万不要加@EnableWebMvc注解。如果你想要自定义HandlerMapping、HandlerAdapter、ExceptionResolver等组件,你可以创建一个WebMvcRegistrationsAdapter实例 来提供以上组件。如果你想要完全自定义SpringMVC,不保留SpringBoot提供的一切特征,你可以自己定义类并且添加
@Configuration注解和@EnableWebMvc注解
通过实现WebMvcConfigurer并添加@Configuration注解来实现自定义部分SpringMvc配置。
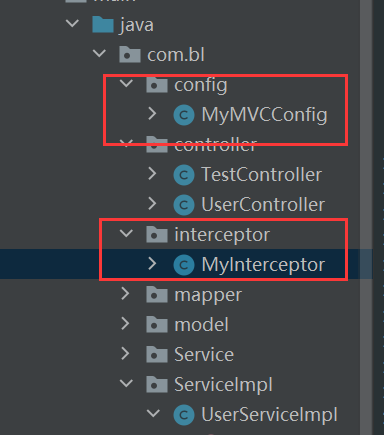
定义一个拦截器MyInterceptor
@Component //创建对象
public class MyInterceptor implements HandlerInterceptor {
    @Override
    public boolean preHandle(HttpServletRequest request, HttpServletResponse response, Object handler) throws Exception {
        System.out.println("核心业务之前执行");
        return true; //true:表示放行  false:不放行,一直卡这
    }

    @Override
    public void postHandle(HttpServletRequest request, HttpServletResponse response, Object handler, ModelAndView modelAndView) throws Exception {
        System.out.println("核心业务之后执行");}

    @Override
    public void afterCompletion(HttpServletRequest request, HttpServletResponse response, Object handler, Exception ex) throws Exception {
        System.out.println("核心业务完成之后执行");
    }
}
定义配置类,注册拦截器
@Configuration //配置类 替代以前的xml文件
public class MyMVCConfig implements WebMvcConfigurer {
    //配置原来的xml里面的规则
    @Autowired
    MyInterceptor myInterceptor;

    @Override
    public void addInterceptors(InterceptorRegistry registry) {
        //添加自定义拦截器
        registry.addInterceptor(myInterceptor)
                .addPathPatterns("/**")    //定义规则 /**:拦截所有资源  /*:只拦截一层 如/user/findall 只拦截user,不拦截findall
                .excludePathPatterns("/first");      //不拦截哪些资源

    }
}
6.2.4.3 整合连接池
6.2.4.3.1 HikariCP连接池
[hi·ka·'lē] (日语): 光
HikariCP应该是目前速度最快的连接池,同时也是springboot默认的连接池,所以不需要引入依赖,直接简单配置即可
application.properties
# 连接四大参数
spring.datasource.url=jdbc:mysql://localhost:3306/dms
spring.datasource.username=root
spring.datasource.password=root
# 可省略,SpringBoot自动推断
spring.datasource.driverClassName=com.mysql.jdbc.Driver

spring.datasource.hikari.idle-timeout=60000
spring.datasource.hikari.maximum-pool-size=30
spring.datasource.hikari.minimum-idle=10
6.2.4.3.2 Druid连接池
引入Druid官方提供的启动器
<!-- Druid连接池 -->
<dependency>
    <groupId>com.alibaba</groupId>
    <artifactId>druid-spring-boot-starter</artifactId>
    <version>1.1.6</version>
</dependency>
application.properties
#初始化连接数
spring.datasource.druid.initial-size=1
#最小空闲连接
spring.datasource.druid.min-idle=1
#最大活动连接
spring.datasource.druid.max-active=20
#获取连接时测试是否可用
spring.datasource.druid.test-on-borrow=true
#监控页面启动
spring.datasource.druid.stat-view-servlet.allow=true
6.2.4.3.4 HikariCP与Druid的对比
| 类别 | Druid | HikariCP |
| 获取和关闭Connection速度 | 较慢 | 较快 |
| lru cache | 支持 | 不支持 |
| ps chace | 支持 | 不支持 |
| Filter扩展 | 支持 | 不支持 |
| 连接泄露诊断 | logAbandoned | 不支持 |
| SQL注入检查 | 支持 | 不支持 |
| 配置加密 | 支持 | 不支持 |
| 代码量 | 较多 | 较少 |
总的来说
性能方面:HikariCP因为细节方面优化力度较大,性能方面强于Druid
功能丰富程度方面:Druid功能更全面除了具有连接池的基本功能以外,还支持sql级监控,支持扩展,防止SQL注入等功能。
使用热度:Druid在国内使用较多,国内有很多生产实践。HikariCP是spring boot 2.0以后默认连接池,在国外使用较多。
如果要求速度,建议使用HikariCP,如果对速度要求不是很严格,但对各个方面功能要求综合性,建议使用Druid。
6.2.4.4 整合mybatis
SpringBoot官方并没有提供Mybatis的启动器,不过Mybatis官方自己实现了:
<!--mybatis -->
<dependency>
    <groupId>org.mybatis.spring.boot</groupId>
    <artifactId>mybatis-spring-boot-starter</artifactId>
    <version>1.3.2</version>
</dependency>
基本没什么可配置的
application.properties
# mybatis
# 别名
mybatis.type-aliases-package=com.bl.model
# mapper文件路径
# mybatis.mapper-locations=classpath:mapper/*.xml
# mybatis全局配置文件路径
# mybatis.config-location=classpath:mybatis-config.xml注意,这里没有配置mapper接口扫描包,因此我们需要给每一个Mapper接口添加@Mapper注解,才能被识别。
@Mapper
public interface UserMapper {
}
通用mapper
由于mapper里很多代码都是重复的,因此把重复的代码提取出来,便有了通用mapper
通用 Mapper 是一个可以实现任意 MyBatis 通用方法的框架,项目提供了常规的增删改查操作
我们可以仅仅继承通用mapper,就可以使用父类的简单的增删改查方法。
相当于认个干爹,这样,干爹有什么,儿子就有什么,很方便
通用mapper启动器
<!-- 通用mapper -->
<dependency>
    <groupId>tk.mybatis</groupId>
    <artifactId>mapper-spring-boot-starter</artifactId>
    <version>2.0.2</version>
</dependency>
创建UserMapper继承通用mapper
@org.apache.ibatis.annotations.Mapper //扫描持久层,认个爹,基础的增删改查都有了
public interface UserMapper extends Mapper<User> {

}
UserServiceImpl
@Service
// @Transactional全局事务
public class UserServiceImpl implements UserService {
    @Autowired
    UserMapper userMapper;
    @Override
  //  Transactional() 某个方法添加事务
    public User findById(Integer id) {
        //父亲给我的方法,不用自己写
        return userMapper.selectByPrimaryKey(id);
    }
}
我们在这里会发现,自己明明没有定义mapper层的具体方法,为什么有个selectByPrimaryKey?
如果点击进入Mapper<User>里,就会发现里面定义了基础的增删改查方法,我们只需要直接用就行

UserController
@RestController
public class UserController {
    @Autowired
    UserService userService;
    @RequestMapping("findById/{id}")
    public User findById(Integer id){
        User user = userService.findById(id);
        System.out.println(user);
        return user;
    }
}
6.2.4.5 整合事务
引入jdbc或者web的启动器,就已经引入事务相关的依赖及默认配置了,所以不需要再单独引入事务启动器
事务的注解@Transactional
在某个方法上添加@Transactional表示该方法添加事务
在类上添加@Transactional表示该类添加全局事务
@Service
// @Transactional全局事务
public class UserServiceImpl implements UserService {
    @Autowired
    UserMapper userMapper;
    @Override
  //  Transactional() 某个方法添加事务
    public User findById(Integer id) {
        //父亲给我的方法,不用自己写
        return userMapper.selectByPrimaryKey(id);
    }
}
6.2.5 Thymeleaf
6.2.5.1 试想一个场景
前后端分离,为什么后端还要做静态页面相关工作?
想象一个场景,优惠券,除了金额数据不一样,其他的页面布局都一样,如果每种优惠券都手动书写静态页面太麻烦
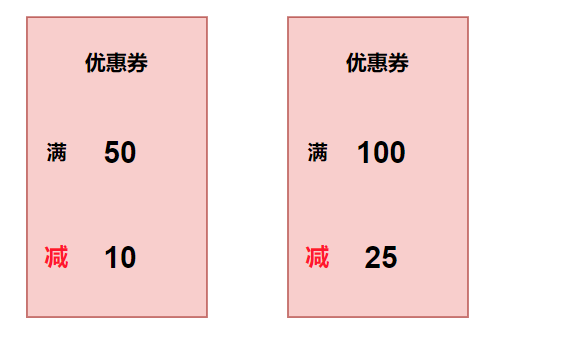
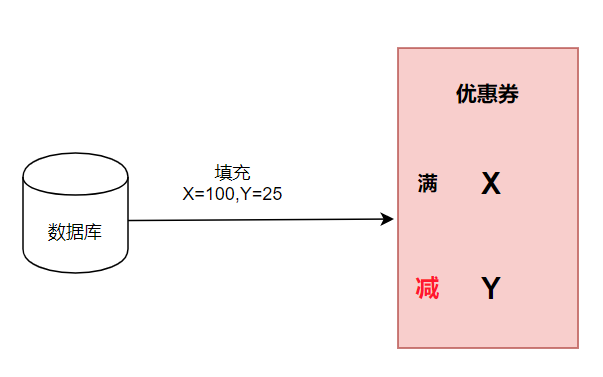
所以前端可以制作一个静态页面模板,后端将金额数据填充到模板中,之后模板引擎渲染页面,最后动态生成不同金额的优惠券,效率极大的提高。
因此虽然前后端分离,但是后端还会做一些静态页面相关工作
6.2.5.2 什么是Thymeleaf
SpringBoot并不推荐使用jsp,但是支持一些模板引擎技术
Thymeleaf 是一个和FreeMarker 类似的模板引擎,里面有标签,可以做页面渲染,生成页面;
Thymeleaf 是spring推荐的官方模板引擎
Thymeleaf 可以完全替代 JSP 。相较于其他的模板引擎,它有如下四个特点:
- 动静结合:Thymeleaf 在有网络和无网络的环境下皆可运行,即它可以让美工在浏览器查看页面的静态效果,也可以让程序员在服务器查看带数据的动态页面效果。这是由于它支持 html 原型,然后在 html 标签里增加额外的属性来达到模板+数据的展示方式。浏览器解释 html 时会忽略未定义的标签属性,所以 thymeleaf 的模板可以静态地运行;当有数据返回到页面时,Thymeleaf 标签会动态地替换掉静态内容,使页面动态显示。
- 开箱即用:它提供标准和spring标准两种方言,可以直接套用模板实现JSTL、 OGNL表达式效果,避免每天套模板、改jstl、改标签的困扰。同时开发人员也可以扩展和创建自定义的方言。
- 多方言支持:Thymeleaf 提供spring标准方言和一个与 SpringMVC 完美集成的可选模块,可以快速的实现表单绑定、属性编辑器、国际化等功能。
- 与SpringBoot完美整合,SpringBoot提供了Thymeleaf的默认配置,并且为Thymeleaf设置了视图解析器,我们可以像以前操作jsp一样来操作Thymeleaf。代码几乎没有任何区别,就是在模板语法上有区别。

简单看一下Thymeleaf 配置类
ConfigurationProperties(prefix = "spring.thymeleaf")
public class ThymeleafProperties{
    private static final charset DEFAULT_ENCODING = standardCharsets.UTF_8;
//视图解析器里 添加前缀和后缀
//和jsp中视图解析器处理类似
    public static final string DEFAULT_PREFIX = "classpath: /templates/";
    public static final string DEFAULT_SUFFIX = ".html":;
6.2.5.3 Thymeleaf实现
添加启动器
<dependency>
    <groupId>org.springframework.boot</groupId>
    <artifactId>spring-boot-starter-thymeleaf</artifactId>
</dependency>
SpringBoot会自动为Thymeleaf注册一个视图解析器
与解析JSP的InternalViewResolver类似,Thymeleaf也会根据前缀和后缀来确定模板文件的位置
controller方法
//@RestController//之前是因为页面不跳转,所以才添加的@RestController
@Controller //用需要添加@ResponseBody
public class UserController {
    @Autowired
    UserService userService;

    @ResponseBody  //添加注释,不会页面跳转,而是静态显示
    @RequestMapping("findById/{id}")
    public String findById(Integer id, Model model){
        User user = userService.findById(id);
        return user;
    }

    @RequestMapping("findAll")
    public String findALL(Model model){
        List<User> user = userService.findAll();
        model.addAttribute("user",user);
        return "user"; //由于thymeleaf有视图解析  会访问/templates/user.html
    }
}
静态页面
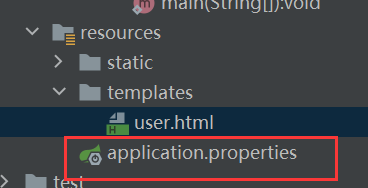
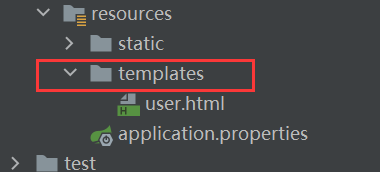
模板默认放在classpath下的templates文件夹,我们新建一个html文件放入其中
<!DOCTYPE html>
<!--thymeleaf名称空间必须引入-->
<html xmlns:th="http://www.thymeleaf.org">
<head>
    <meta charset="UTF-8">
    <title>首页</title>
    <style type="text/css">
        table {border-collapse: collapse; font-size: 14px; width: 80%; margin: auto}
        table, th, td {border: 1px solid darkslategray;padding: 10px}
    </style>
</head>
<body>
<div style="text-align: center">
    <hr/>
    <table class="list">
        <tr>
            <th>id</th>
            <th>姓名</th>
            <th>性别</th>
            <th>年龄</th>
            <th>地址</th>
            <th>qq</th>
            <th>email</th>
        </tr>
        <tr th:each="user : ${user}">
            <td th:text="${user.id}">test</td>
            <td th:text="${user.name}">test</td>
            <td th:text="${user.gender}">test</td>
            <td th:text="${user.age}">test</td>
            <td th:text="${user.address}">test</td>
            <td th:text="${user.qq}">test</td>
            <td th:text="${user.email}">test</td>
        </tr>
    </table>
</div>
</body>
</html>
语法:
${}:这个类似与el表达式,但其实是ognl的语法,比el表达式更加强大
th-指令:th-是利用了Html5中的自定义属性来实现的。如果不支持H5,可以用data-th-来代替
th:each:类似于c:foreach遍历集合,但是语法更加简洁
th:text:声明标签中的文本
例如
<td th-text='${user.id}'>test</td>,如果user.id有值,会覆盖默认的test如果没有值,则会显示td中默认的test。这正是thymeleaf能够动静结合的原
因,模板解析失败不影响页面的显示效果,因为会显示默认值!
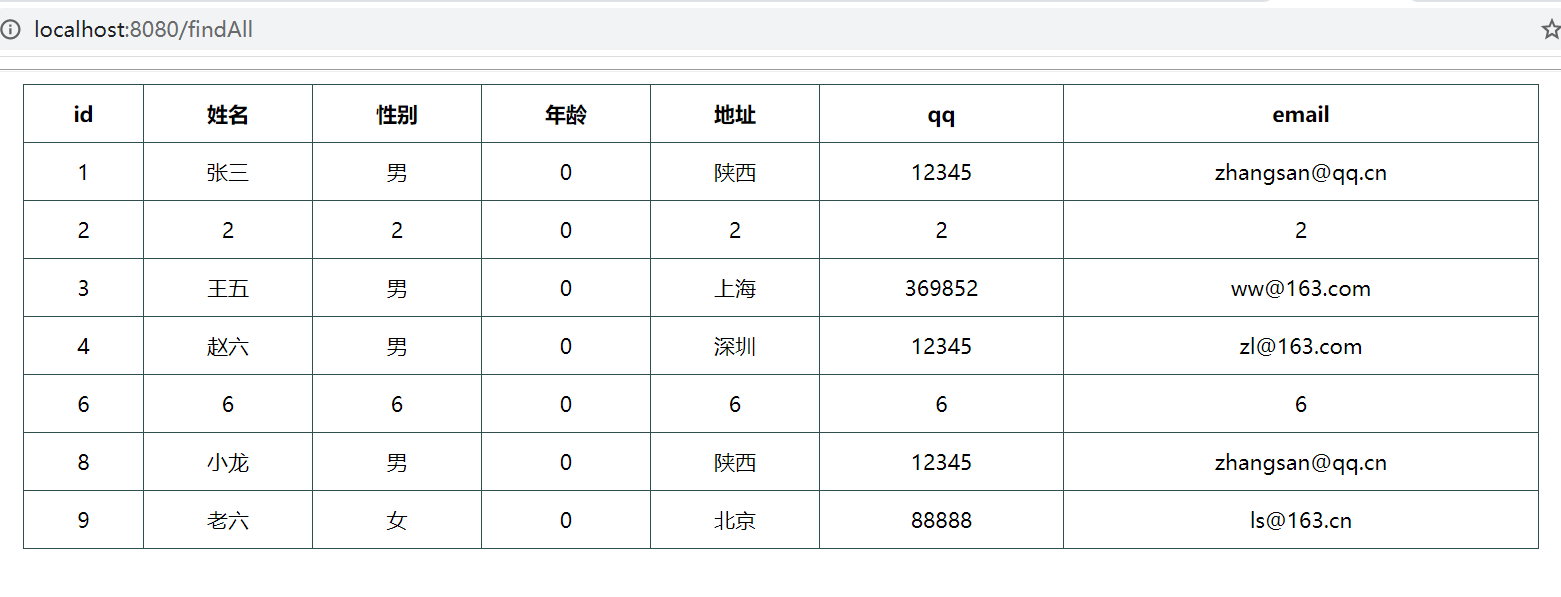
运行结果