网上关于DETR做的detection的解析很多,但是DETR做Segmentation的几乎没有,本文结合DETR的论文与代码,对DETR做一个详细的拆解。理解DETR是理解Mask2Former的基础。
首先得把DETR-segmentation给run起来。Github上DETR的repository,下载了也只能run起来detection,run不起来segmentation功能,但还是下载下来,后面留着有用。我们用torch的hub里集成的DETR segmentation模型,运行下面的代码
import torch
models_list = torch.hub.list('facebookresearch/detr', force_reload=True)
print(models_list)
你可以看到torch.hub中所有关于detr的模型。我们选择 detr_resnet50_panoptic
model = torch.hub.load('facebookresearch/detr', 'detr_resnet50_panoptic', pretrained=True)再新建一个py文件,把以下代码放进去:
import math
from PIL import Image
import requests
import matplotlib.pyplot as plt

import ipywidgets as widgets
from IPython.display import display, clear_output

import torch
from torch import nn
import torch.nn.functional as F
from torchvision.models import resnet50
import torchvision.transforms as T
torch.set_grad_enabled(False)

import matplotlib.pyplot as plt


# COCO classes
CLASSES = [
	'N/A', 'person', 'bicycle', 'car', 'motorcycle', 'airplane', 'bus',
	'train', 'truck', 'boat', 'traffic light', 'fire hydrant', 'N/A',
	'stop sign', 'parking meter', 'bench', 'bird', 'cat', 'dog', 'horse',
	'sheep', 'cow', 'elephant', 'bear', 'zebra', 'giraffe', 'N/A', 'backpack',
	'umbrella', 'N/A', 'N/A', 'handbag', 'tie', 'suitcase', 'frisbee', 'skis',
	'snowboard', 'sports ball', 'kite', 'baseball bat', 'baseball glove',
	'skateboard', 'surfboard', 'tennis racket', 'bottle', 'N/A', 'wine glass',
	'cup', 'fork', 'knife', 'spoon', 'bowl', 'banana', 'apple', 'sandwich',
	'orange', 'broccoli', 'carrot', 'hot dog', 'pizza', 'donut', 'cake',
	'chair', 'couch', 'potted plant', 'bed', 'N/A', 'dining table', 'N/A',
	'N/A', 'toilet', 'N/A', 'tv', 'laptop', 'mouse', 'remote', 'keyboard',
	'cell phone', 'microwave', 'oven', 'toaster', 'sink', 'refrigerator', 'N/A',
	'book', 'clock', 'vase', 'scissors', 'teddy bear', 'hair drier',
	'toothbrush'
]

# colors for visualization
COLORS = [[0.000, 0.447, 0.741], [0.850, 0.325, 0.098], [0.929, 0.694, 0.125],
		  [0.494, 0.184, 0.556], [0.466, 0.674, 0.188], [0.301, 0.745, 0.933]]

transform = T.Compose([
	T.Resize(800),
	T.ToTensor(),
	T.Normalize([0.485, 0.456, 0.406], [0.229, 0.224, 0.225])
])

# for output bounding box post-processing
def box_cxcywh_to_xyxy(x):
	x_c, y_c, w, h = x.unbind(1)
	b = [(x_c - 0.5 * w), (y_c - 0.5 * h),
		 (x_c + 0.5 * w), (y_c + 0.5 * h)]
	return torch.stack(b, dim=1)

def rescale_bboxes(out_bbox, size):
	img_w, img_h = size
	b = box_cxcywh_to_xyxy(out_bbox)
	b = b * torch.tensor([img_w, img_h, img_w, img_h], dtype=torch.float32)
	return b

def plot_results(pil_img, prob, boxes):
	plt.figure(figsize=(16,10))
	plt.imshow(pil_img)
	ax = plt.gca()
	colors = COLORS * 100
	for p, (xmin, ymin, xmax, ymax), c in zip(prob, boxes.tolist(), colors):
		ax.add_patch(plt.Rectangle((xmin, ymin), xmax - xmin, ymax - ymin,
								   fill=False, color=c, linewidth=3))
		# cl = p.argmax()
		# text = f'{CLASSES[cl]}: {p[cl]:0.2f}'
		# ax.text(xmin, ymin, text, fontsize=15,
		#         bbox=dict(facecolor='yellow', alpha=0.5))
	plt.axis('off')
	plt.show()


model = torch.hub.load('facebookresearch/detr', 'detr_resnet50_panoptic', pretrained=True)
model.eval()

url = 'http://images.cocodataset.org/val2017/000000039769.jpg'
im = Image.open(requests.get(url, stream=True).raw)

# mean-std normalize the input image (batch-size: 1)
img = transform(im).unsqueeze(0)

# propagate through the model
outputs = model(img)

# show result of detection
# keep only predictions with 0.7+ confidence
probas = outputs['pred_logits'].softmax(-1)[0, :, :-1]
keep = probas.max(-1).values > 0.9
# convert boxes from [0; 1] to image scales
bboxes_scaled = rescale_bboxes(outputs['pred_boxes'][0, keep], im.size)
plot_results(im, probas[keep], bboxes_scaled)


# show segmentation
# compute the scores, excluding the "no-object" class (the last one)
scores = outputs['pred_logits']
scores = scores.softmax(dim=-1)
scores = scores[..., :-1]
scores_onehot = scores.max(-1)
scores_onehot = scores_onehot[0]
# threshold the confidence
keep = scores_onehot > 0.85

scores_selected = scores[keep]
labels = torch.argmax(scores_selected, dim=-1)

masks = outputs['pred_masks'][keep].detach().cpu().numpy()
mask_i = masks[0, :, :]

# plt.imshow(mask_i, cmap="viridis")
# plt.show()

# ## Plot all the remaining masks
ncols = 5
fig, axs = plt.subplots(ncols=ncols, nrows=math.ceil(keep.sum().item() / ncols), figsize=(18, 10))
for line in axs:
	for a in line:
		a.axis('off')
for i, mask in enumerate(outputs['pred_masks'][keep].detach().cpu().numpy()):
	ax = axs[i // ncols, i % ncols]
	ax.imshow(mask, cmap="cividis")
	ax.text(0, 0, labels[i].cpu().numpy().item(0))
	ax.axis('off')
fig.tight_layout()

plt.show()

mask_pred = outputs['pred_masks'].sigmoid()
mask_pred = F.interpolate(mask_pred, size=(480, 640), mode='bilinear', align_corners=False)

semseg = torch.einsum("bqc,bqhw->bchw", scores, mask_pred)
result = torch.argmax(semseg, dim=1)


plt.figure(figsize=(12, 8))
# 第一个子图
plt.subplot(1, 1, 1)
# image1_rgb = cv2.cvtColor(img_color, cv2.COLOR_BGR2RGB)
plt.imshow(result[0, :, :].to("cpu").numpy())
plt.title('Image 1')
plt.axis('off')

plt.show()
解释一下上面的代码,
plot_results(im, probas[keep], bboxes_scaled)是把detection的结果可视化出来,本文略过的detection部分的内容。 plot_results() 下面的代码就是segmentation内容结果的可视化。模型的输出包括三个内容
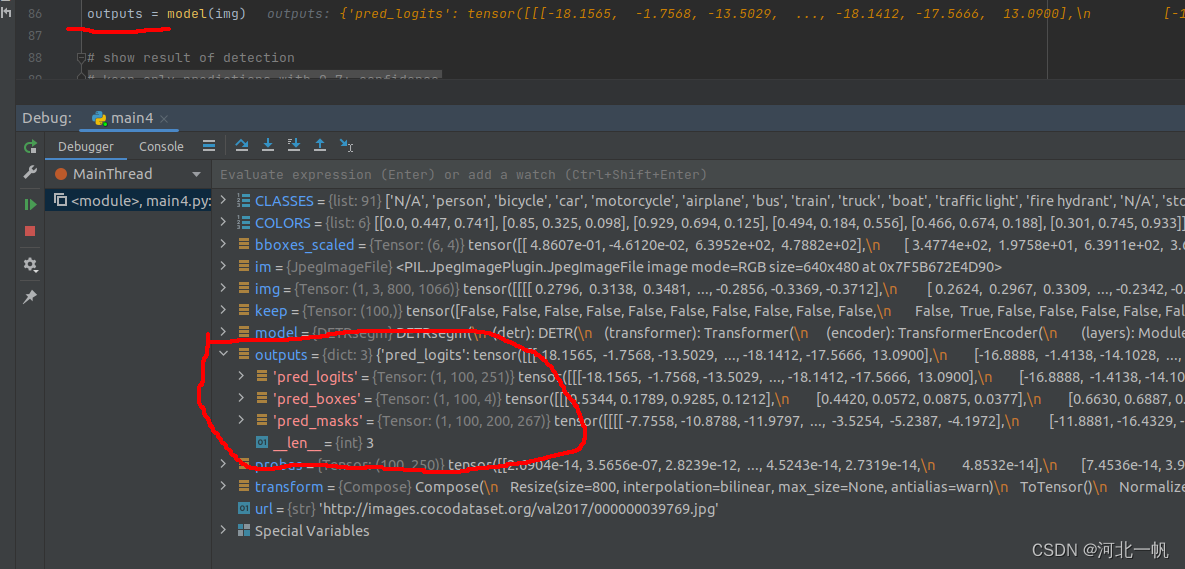
pred_logits(1, 100, 251)中三个数字的含义是:1是batchsize,100是query的个数,251是分类数,去掉最后一个no-object不要,实际是250个类。可以这样理解,每一个query都会进入网络,但不是每一个query都能从图片找到东西,而找到东西的query,找到的instance所属于的类就是这个query所在的那一行中,最大的数所在列的index。如果一个图片里有两只猫,那结果就是有两个query,分别各自找到一只猫(也就是一个instance),这样也就实现了全景分割的功能。所以说DETR的结构是Mask2Former实现全景分割功能的基础。
pred_boxes是query所找到的instance对应的box。
pred_masks是query所找到的instance所在的像素。
这段代码:
# ## Plot all the remaining masks
ncols = 5
fig, axs = plt.subplots(ncols=ncols, nrows=math.ceil(keep.sum().item() / ncols), figsize=(18, 10))
for line in axs:
	for a in line:
		a.axis('off')
for i, mask in enumerate(outputs['pred_masks'][keep].detach().cpu().numpy()):
	ax = axs[i // ncols, i % ncols]
	ax.imshow(mask, cmap="cividis")
	ax.text(0, 0, labels[i].cpu().numpy().item(0))
	ax.axis('off')
fig.tight_layout()

plt.show()
会画出这样的图像:

有94个query没有找到instance,有6个query找到了instance,2个query找到了猫,也就是250列的17列,两个query找到了遥控器(250列的74列)。
好了,现在DETR-seg的输出我们弄清楚了,接下来进到DETR内部去看看,这个模型封装在了torch.hub中,进入内部的正确方法,说实话笔者也不知道,这里笔者耍了一个不正经的小trick:
import torch

model = torch.hub.load('facebookresearch/detr', 'detr_resnet50_panoptic', pretrained=True)

from models.segmentation import DETRsegm

model = DETRsegm(model)
上面的代码中,models.segmentation文件是DETR的github repository下载下来,里面有的内容,运行上面的代码,会报错
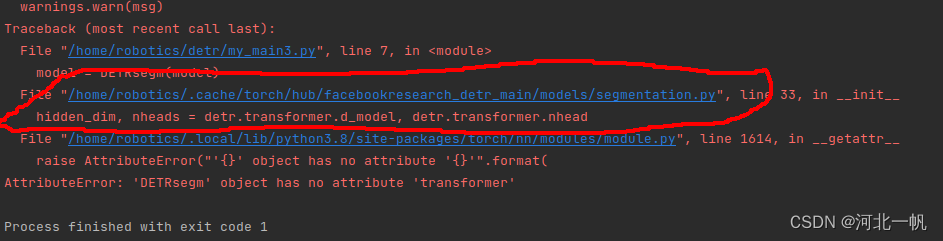
但是通过这个报错,我们可以找到torch.hub中DETR的源代码。这样就可以在源代码里打断点,看DETR 内部了。进入源代码,我们能看到这样的内容,注释的代码是笔者加进去的,不是torch自带的。

self.detr.backbone是resnet18。 这里,我们打开DETR的github代码——detr/models/backbone.py 找到 class BackboneBase 这个类。

这里的 def forward 中的out,就是 DETRsegm 中的 features
features, pos = self.detr.backbone(samples)pos是正弦函数的 position embeding,就是输入transformer的encoder的位置编码。
在获取features时,DETR detection和Segmentation的区别在与,detection只拿resnet第四层的输出,而segmentation将每层的输出都拿出来。通过这段代码实现(缩进乱了,忽略)。
if return_interm_layers:
            return_layers = {"layer1": "0", "layer2": "1", "layer3": "2", "layer4": "3"}
        else:
            return_layers = {'layer4': "0"}
        self.body = IntermediateLayerGetter(backbone, return_layers=return_layers)
这里扯远一点,复习一下resnet18 resnet18在torch中也有集成,通过下面的代码得到,
import torch
import torchvision.models as models
from torchvision.models._utils import IntermediateLayerGetter
import cv2
import numpy as np


# 加载一个预训练的 ResNet 模型
model = models.resnet18(pretrained=True)
model.to("cuda")

# 定义要获取的中间层
layers = {'layer1': 'layer1', 'layer2': 'layer2', 'layer3': 'layer3', 'layer4': 'layer4'}

# 创建 IntermediateLayerGetter
intermediate_layers = IntermediateLayerGetter(model, layers)

image0 = cv2.imread("/home/robotics/dino/img/kitaku/002.jpg")
height0, width0, channels = image0.shape
image = cv2.resize(image0, (640, 480), interpolation=cv2.INTER_AREA)
image = cv2.cvtColor(image, cv2.COLOR_BGR2RGB)

mean = np.array([0.485, 0.456, 0.406]) * 255
std = np.array([0.229, 0.224, 0.225]) * 255
image = image.astype(float)
for i in range(3):
	image[:, :, i] = (image[:, :, i] - mean[i]) / std[i]

input_data = torch.from_numpy(image).permute(2, 0, 1).unsqueeze(dim=0).to(torch.float32).to("cuda")

# 获取中间层的输出
outputs = intermediate_layers(input_data)

# 打印输出
for key, value in outputs.items():
	print(f"{key}: {value.shape}")


from torchview import draw_graph
model_graph = draw_graph(model, input_size=(1, 3, 480, 640))
model_graph.resize_graph(scale=5.0)
model_graph.visual_graph.render(format='svg')
通过draw_graph得到一个网络结构可视化图,格式是svg,如下图所示

也可以自己写代码,构建一个resnet18
import torch
import torch.nn as nn
from torch.nn import functional as F


class RestNetBasicBlock(nn.Module):
	def __init__(self, in_channels, out_channels, stride):
		super(RestNetBasicBlock, self).__init__()
		self.conv1 = nn.Conv2d(in_channels, out_channels, kernel_size=3, stride=stride, padding=1)
		self.bn1 = nn.BatchNorm2d(out_channels)
		self.conv2 = nn.Conv2d(out_channels, out_channels, kernel_size=3, stride=stride, padding=1)
		self.bn2 = nn.BatchNorm2d(out_channels)

	def forward(self, x):
		output = self.conv1(x)
		output = F.relu(self.bn1(output))
		output = self.conv2(output)
		output = self.bn2(output)
		return F.relu(x + output)


class RestNetDownBlock(nn.Module):
	def __init__(self, in_channels, out_channels, stride):
		super(RestNetDownBlock, self).__init__()
		self.conv1 = nn.Conv2d(in_channels, out_channels, kernel_size=3, stride=stride[0], padding=1)
		self.bn1 = nn.BatchNorm2d(out_channels)
		self.conv2 = nn.Conv2d(out_channels, out_channels, kernel_size=3, stride=stride[1], padding=1)
		self.bn2 = nn.BatchNorm2d(out_channels)

	def forward(self, x):
		output = self.conv1(x)
		out = F.relu(self.bn1(output))

		out = self.conv2(out)
		out = self.bn2(out)
		return F.relu(x + out)


class RestNet18(nn.Module):
	def __init__(self):
		super(RestNet18, self).__init__()
		self.conv1 = nn.Conv2d(3, 64, kernel_size=7, stride=2, padding=3)
		self.bn1 = nn.BatchNorm2d(64)
		self.maxpool = nn.MaxPool2d(kernel_size=3, stride=2, padding=1)

		self.layer1 = nn.Sequential(RestNetBasicBlock(64, 64, 1),
									RestNetBasicBlock(64, 64, 1))

		self.layer2 = nn.Sequential(RestNetDownBlock(64, 128, [2, 1]),
									RestNetBasicBlock(128, 128, 1))

		self.layer3 = nn.Sequential(RestNetDownBlock(128, 256, [2, 1]),
									RestNetBasicBlock(256, 256, 1))

		self.layer4 = nn.Sequential(RestNetDownBlock(256, 512, [2, 1]),
									RestNetBasicBlock(512, 512, 1))

		self.avgpool = nn.AdaptiveAvgPool2d(output_size=(1, 1))

		self.fc = nn.Linear(512, 10)

	def forward(self, x):
		out = self.conv1(x)
		out = self.layer1(out)
		out = self.layer2(out)
		out = self.layer3(out)
		out = self.layer4(out)
		out = self.avgpool(out)
		out = out.reshape(x.shape[0], -1)
		out = self.fc(out)
		return out


if __name__ == "__main__":
	resnet18 = RestNet18()

	from torchview import draw_graph
	model_graph = draw_graph(resnet18, input_size=(1, 3, 480, 640))
	model_graph.resize_graph(scale=5.0)
	model_graph.visual_graph.render(format='svg')
好,回到DETR,还是看torch.hub中的这段detr代码:

上面的代码中:
hs, memory = self.detr.transformer(src_proj, mask, self.detr.query_embed.weight, pos[-1])self.detr.transformer就是下图经典的transformer结构,memory是encoder的输出 hs是decoder的输出。mask对于理解detr不重要,是masked attention中用到了。

pos和query_embed.weight分别对应上图的Positional Encoding和decoder中,output上面的OutputEmbeding。
DETR中transformer的理解,可以参看下面的代码,这段代码是笔者自己写的,对于DETR本身是没有用处的,只是为了方便理解,有错误的地方(feature那里只拿出resnet18最后一层的输出,是错的,不影响大局,懒得改了),自己理解时候做一个参考就好。
import torch
from torch import nn
from torchvision.models import resnet50
from models.transformer import TransformerEncoderLayer, TransformerEncoder, TransformerDecoderLayer, TransformerDecoder
from models.segmentation import MHAttentionMap, MaskHeadSmallConv
import time


class DETR(nn.Module):
    def __init__(self, num_classes, d_model, nheads, dim_feedforward=2048,
                 num_encoder_layers=6, num_decoder_layers=6, dropout=0.9, activation='relu', normalize_before=True):
        super().__init__()
        # We take only convolutional layers from ResNet-50 model
        self.backbone = nn.Sequential(*list(resnet50(pretrained=True).children())[:-2])
        self.conv = nn.Conv2d(dim_feedforward, d_model, 1)

        encoder_layer = TransformerEncoderLayer(d_model, nheads, dim_feedforward,
                                                dropout, activation, normalize_before)
        encoder_norm = nn.LayerNorm(d_model) if normalize_before else None
        self.encoder = TransformerEncoder(encoder_layer, num_encoder_layers, encoder_norm)

        decoder_layer = TransformerDecoderLayer(d_model, nheads, dim_feedforward,
                                                dropout, activation, normalize_before)
        decoder_norm = nn.LayerNorm(d_model)
        self.decoder = TransformerDecoder(decoder_layer, num_decoder_layers, decoder_norm,
                                          return_intermediate=True)

        self.linear_class = nn.Linear(d_model, num_classes + 1)
        self.linear_bbox = nn.Linear(d_model, 4)

        num_queries = 100
        self.query_embed = nn.Embedding(num_queries, d_model)

        #position embedding
        self.row_embed = nn.Parameter(torch.rand(50, d_model // 2))
        self.col_embed = nn.Parameter(torch.rand(50, d_model // 2))

        self.bbox_attention = MHAttentionMap(d_model, d_model, nheads, dropout=0.0)
        self.mask_head = MaskHeadSmallConv(d_model + nheads, [1024, 512, 256], d_model)

    def forward(self, inputs):
        #inputs是[1,3,800,1200]
        features = self.backbone(inputs)
        #x是[1,2048,25,38]
        hh = self.conv(features)
        #hh是[1,256,25,38]
        H, W = hh.shape[-2:]
        pos = torch.cat([
            self.col_embed[:W].unsqueeze(0).repeat(H, 1, 1),
            self.row_embed[:H].unsqueeze(1).repeat(1, W, 1),
        ], dim=-1).flatten(0, 1).unsqueeze(1)

        bs, c, h, w = hh.shape

        query_embed = self.query_embed.weight.unsqueeze(1).repeat(1, bs, 1)
        tgt = torch.zeros_like(query_embed)
        src = hh.flatten(2).permute(2, 0, 1)
        memory = self.encoder(src=src, pos=pos)
        hs = self.decoder(tgt, memory, pos=pos, query_pos=query_embed)

        hs = hs.transpose(1, 2)
        memory = memory.permute(1, 2, 0).view(bs, c, h, w)
        bbox_mask = self.bbox_attention(hs[-1], memory)

        seg_masks = self.mask_head(hh, bbox_mask, [features[0], features[0], features[0]])
        outputs_seg_masks = seg_masks.view(bs, self.detr.num_queries, seg_masks.shape[-2], seg_masks.shape[-1])

        #self.query_pos是[100,256]
        #src是encoder输入,tgt是decoder输入


        #h是[100,1,256]
        return outputs_seg_masks


#coco是91个类, hidden dimension是256, 多头注意力是8, encoder,decoder layer都是6
device = torch.device("cuda")
detr = DETR(num_classes=91, d_model=256, nheads=8, num_encoder_layers=6, num_decoder_layers=6)
detr.eval().cuda()


inputs = torch.randn(1, 3, 800, 1200).cuda()

outputs_seg_masks = detr(inputs)
# print(logits, bboxes)
#logits是[100,1,92]
#bboxes是[100,1,4]
还是回到torch.hub那个detr代码,下面结合DETR论文中的那张图来理解一下这段代码
图中multi head attention部分,对应代码中
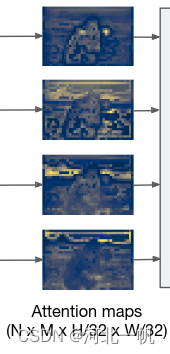
bbox_mask = self.bbox_attention(hs[-1], memory, mask=mask)hs[-1]是左侧四个不同颜色的小框,memory是Encoded image,mask可以忽略,bbox_mask的尺寸是:(batch_size,query的个数,注意力头的个数,attention map的高和宽)
        temp = bbox_mask[0][20].squeeze().cpu().numpy()
        import matplotlib.pyplot as plt
        for i in range(8):
            plt.imshow(temp[i, :, :], cmap="viridis")
            plt.show()
上面那段代码就是拿出第1个batchsize的第21个query的所有注意力头的attention map,也就是可以画出这几张图:
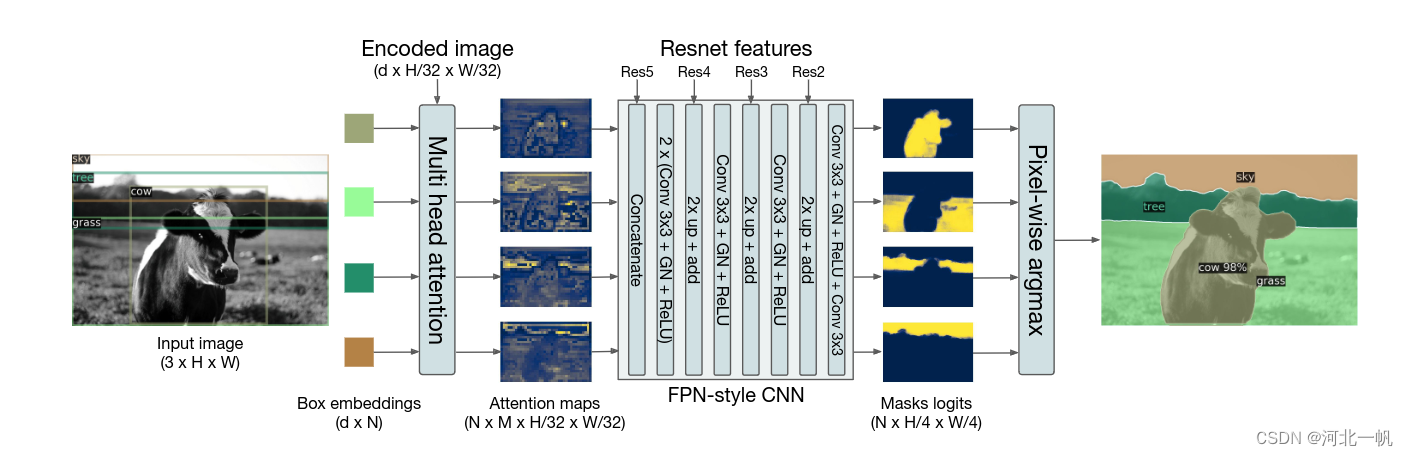
seg_masks = self.mask_head(src_proj, bbox_mask, [features[2].tensors, features[1].tensors, features[0].tensors])mask_head对应图中这个结构:
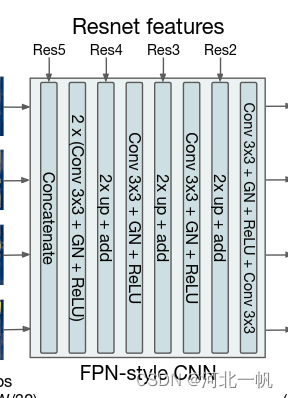
输入是多头注意力map,以及resnet18这个backbone的4层的特征。
本文先到这,下一篇写DETR的损失函数。
未完待续


![[NSSCTF Round#16 Basic] CPR](https://img-blog.csdnimg.cn/direct/806f9c55dccc4ba58f809ee984bc272e.png)