一、前言
1、本文主要内容
- 基于Decker Desktop&Docker Registry构建Docker私有镜像服务器测试
- 在CentOS 7上基于Docker Registry搭建公共Docker镜像服务器
- 修改Docker Engine配置以HTTP协议访问Docker Registry
- 修改Docker Engine配置通过域名访问Docker Registry
- 配置SSL证书以HTTPS协议访问Docker Registry
- 配置Docker Registry授权,限制通过账号密码访问
2、本文环境信息
| 环境 | 说明 |
|---|---|
| Docker | Docker CE 24.0.x |
| Docker Desktop | 4.19 |
| Windows | Windows 11 |
| curl for Windows | 7.87 |
| CentOS | 7.X |
二、本地私有仓库测试
1、创建私有仓库
官方的 registry 镜像来启动私有仓库
docker run -d \
-p 5000:5000 \
-v /d:/var/lib/registry \
--restart=always \
--name my-registry \
registry
2、将公开镜像推送至私有仓库
# 拉取公开镜像
docker pull kentalk/helloworld

# 修改标签
docker tag kentalk/helloworld:latest 127.0.0.1:5000/kentalk/helloworld:latest

# 将镜像推送至私有仓库
docker push 127.0.0.1:5000/kentalk/helloworld:latest

# 输出示例
Using default tag: latest
The push refers to repository [127.0.0.1:5000/kentalk/helloweb]
a04c71d5f650: Pushed
2639d32df775: Pushed
4e7f448c183e: Pushed
7136543384e6: Pushed
a8033c5c9e07: Pushed
c5517377aec9: Pushed
f389a469af97: Pushed
737e3d34f974: Pushed
5db8071bd6c0: Pushed
67974f604d8a: Pushed
latest: digest: sha256:acf69ac0db3a2624c95087cd5f84a62bacccad2d58c252d32c20e25b31ecc179 size: 2415
3、查看私有仓库镜像
# 查看私有仓库镜像
curl 127.0.0.1:5000/v2/_catalog

# 输出示例
{"repositories":["kentalk/helloworld"]}
4、使用私有仓库镜像
# 先删除本地镜像
docker image rm 127.0.0.1:5000/kentalk/helloworld:latest

# 从私有仓库拉取镜像
docker pull 127.0.0.1:5000/kentalk/helloworld

# 输出示例
latest: Pulling from kentalk/helloworld
b04fae59f135: Already exists
24cef00b9ad9: Pull complete
1db91b65282b: Pull complete
c4272e98011d: Pull complete
0485189e9a37: Pull complete
e48eb6dc3383: Pull complete
0557d7f26b8d: Pull complete
5fc49b27813c: Pull complete
87c0efbe1434: Pull complete
40f41d1ee375: Pull complete
Digest: sha256:acf69ac0db3a2624c95087cd5f84a62bacccad2d58c252d32c20e25b31ecc179
Status: Downloaded newer image for 127.0.0.1:5000/kentalk/helloworld:latest
127.0.0.1:5000/kentalk/helloworld:latest
5、查看本地镜像
# 查看镜像并过滤
docker images | findstr "127.0.0.1"

# 输出示例
127.0.0.1:5000/kentalk/helloworld   latest b218f7867548   6 weeks ago     747MB
三、私有仓库服务器搭建
1、服务器准备
参考 http://blog.ken.io/note/hyper-v-course-setup-centos 安装CentOS虚拟机
| 姓名 | 年龄 | 工作 |
|---|---|---|
| HostName | IP | 操作系统版本 |
| Docker-RegistryServer | 192.168.99.111 | CentOS |
关闭防火墙或者开放80、4443、5000端口
# 关闭防火墙
sudo systemctl stop firewalld
sudo systemctl disabled firewalld

# 开放端口
sudo firewall-cmd --add-port=80/tcp --permanent
sudo firewall-cmd --add-port=443/tcp --permanent
sudo firewall-cmd --add-port=5000/tcp --permanent
sudo firewall-cmd --reload
2、安装Docker环境
参考 https://ken.io/note/docker-install-and-quickstart 逐步安装Docker
2.1、安装准备
# 安装依赖
sudo yum install -y yum-utils

# 设置yum源
sudo yum-config-manager \
    --add-repo \
    https://download.docker.com/linux/centos/docker-ce.repo
2.2、安装并启动
# 安装最新版本
sudo yum -y install docker-ce docker-ce-cli containerd.io docker-compose-plugin

# 启动&开机启动
sudo systemctl start docker
sudo systemctl enable docker

# 查看Docker版本
docker --version
2.3、更换国内镜像源
# 修改Docker守护进程配置
vi /etc/docker/daemon.json

# 替换为以下内容
{
    "registry-mirrors":[
        "http://hub-mirror.c.163.com"
    ]
}

# 重启Dokcer服务
sudo systemctl daemon-reload
sudo systemctl restart docker
3、创建私有仓库
# 启动私有仓库
docker run -d \
-p 80:5000 \
-v /var:/var/lib/registry \
--restart=always \
--name my-registry \
registry
4、测试仓库
在Linux Server对Docker Registry进行基本功能测试
# 拉取公开镜像
docker pull kentalk/helloworld

# 修改标签
docker tag kentalk/helloworld:latest 127.0.0.1/kentalk/helloworld:latest

# 将镜像推送至私有仓库
docker push 127.0.0.1/kentalk/helloworld:latest

# 查询私有仓库镜像
curl 127.0.0.1/v2/_catalog
5、远程访问
Docker默认不支持以HTTP远程访问,远程访问的时候会出现类似以下报错
server gave HTTP response to HTTPS client
我们可以需要修改Docker Client配置,信任不安全的Registry,以通过HTTP协议访问
Docker Desktop修改路径:Settings -> Docker Engine
Docker Linux配置文件:/etc/docker/daemon.json
Docker Windows配置文件:C:\ProgramData\docker\config\daemon.json
5.1、增加以下配置
"insecure-registries": [
  "192.168.99.111"
]
如果配置文件是空的,需带上{},满足JSON格式要求
配置完成后需要重启服务,Docker Desktop 点击「Apply & restart」按钮即可
Linux环境下的客户端可以使用命令重启
sudo systemctl daemon-reload
sudo systemctl restart docker
5.2、远程访问测试
在自己电脑上进行访问测试
# 查询仓库镜像
curl 192.168.99.111/v2/_catalog

# 输出示例
{"repositories":["kentalk/helloworld"]}

# 获取镜像
docker pull 192.168.99.111/kentalk/helloworld

# 输出示例
Using default tag: latest
latest: Pulling from kentalk/helloworld
Digest: sha256:6646ab57d7169e9905b61b8585478a42546d384e31a785f36d4a217715cd0c0b
Status: Downloaded newer image for 192.168.99.111/kentalk/helloworld:latest
192.168.99.111/kentalk/helloworld:latest

# 查看本地镜像(macOS可用grep替代findstr)
docker images | findstr "192.168.99.111"
6、通过域名访问
使用IP配置的方式不方便记忆和输入,服务器迁移后如果IP变化也比较麻烦,这里我们可以配置使用域名:d.ken.io 访问自己的Docker仓库
6.1、增加以下配置
修改Docker Client配置,信任d.ken.io,设置完成后记得重启Docker
"insecure-registries": [
  "192.168.99.111",
  "d.ken.io"
]
6.2、修改Hosts文件
修改hosts文件,增加以下配置
192.168.99.111 d.ken.io
Windows:C:\Windows\System32\drivers\etc\hosts
macOS:/private/etc/hosts
Linux:/etc/hosts
为了方便多人使用,也可以修改域名解析的方式进行设置
6.3、访问测试
# 验证hosts配置/域名解析是否生效
ping d.ken.io

# 查询仓库镜像
curl d.ken.io/v2/_catalog

# 拉取镜像
docker pull d.ken.io/kentalk/helloworld

# 推送镜像
docker pull ubuntu
docker tag ubuntu d.ken.io/ubuntu
docker push d.ken.io/ubuntu
如果域名访问测试碰到问题,可以看一下最后一个章节,可能有你想要的答案
四、配置HTTPS访问
1、创建私有仓库
之前通过HTTP访问,把80端口直接给了registry容器,这里使用5000端口,把80端口留给Nginx
# 停用并删除原有私有仓库容器
docker stop my-registry
docker rm my-registry

# 启动私有仓库
docker run -d \
-p 5000:5000 \
-v /var:/var/lib/registry \
--restart=always \
--name my-registry \
registry
2、申请免费SSL证书
在腾讯云申请域名docker.ken.io域名免费SSL证书: https://console.cloud.tencent.com/ssl/dsc/apply
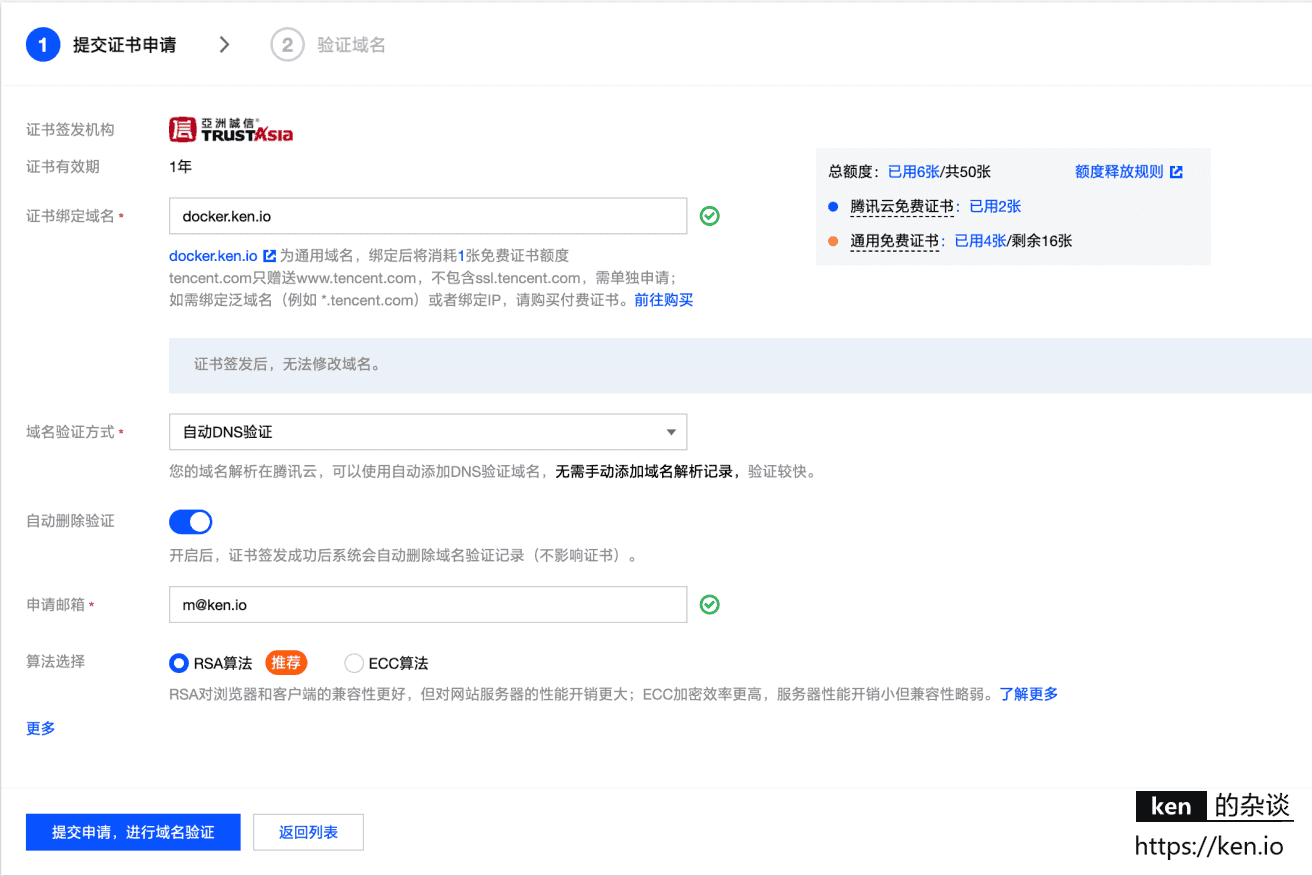
申请过程此处省略,申请完成后下载Nginx类型,因为后续要通过Nginx配置HTTPS访问
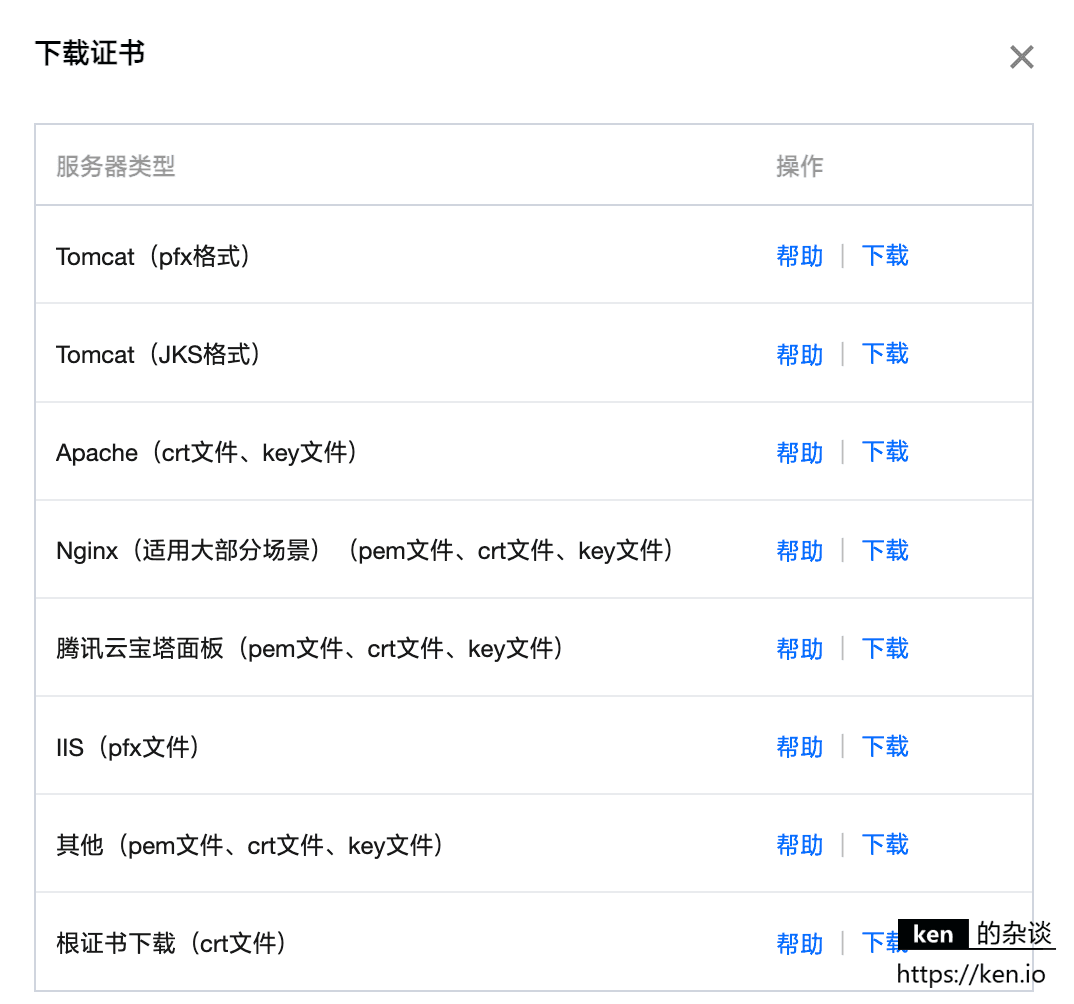
可以下载到本地,解压后通过FTP等方式把证书放在RegistryServer,或者可以抓到下载链接直接下载至服务器进行解压、配置,最终保持证书为以下路径
| 证书类型 | 路径 |
|---|---|
| 证书文件 | /var/cert/docker.ken.io_bundle.crt |
| 私钥文件 | /var/cert/docker.ken.io.key |
或者你也可以通过 https://freessl.cn/ 等平台/方式申请免费的SSL证书
3、安装Nginx并配置SSL
3.1、安装Nginx
#添加Nginx包
sudo rpm -Uvh http://nginx.org/packages/centos/7/noarch/RPMS/nginx-release-centos-7-0.el7.ngx.noarch.rpm

#安装
sudo yum -y install nginx

#启动服务&开机启动
sudo systemctl start nginx
sudo systemctl enable nginx
3.2、配置证书
新建docker.ken.io访问配置文件
vi /etc/nginx/conf.d/docker_registry.conf
写入Nginx配置内容,将访问域名docker.ken.io的HTTP以及HTTPS请求都转到Registry
server {
    listen 443;          #监听443端口
    server_name  docker.ken.io;    #监听的域名
    ssl on; #开启SSL
    ssl_certificate     /var/cert/docker.ken.io_bundle.crt;    #证书文件
    ssl_certificate_key /var/cert/docker.ken.io.key;    #私钥文件
    location / {                #转发或处理
        proxy_pass http://127.0.0.1:5000;
    }
}

server {
    listen 80;        #监听80端口
    server_name  docker.ken.io; #监听的域名
    location / {                #转发或处理
        proxy_pass http://127.0.0.1:5000;
    }
}
3.3、配置传输内容大小
Nginx默认只允许客户端传出1MB的内容,这不满足镜像的提交需求,可以修改Nginx的配置放开限制
# 修改配置文件
vi /etc/nginx/nginx.conf

# 在http配置项增加以下配置
http {

        ##省略其他配置##
        client_max_body_size 4096M;
        ##省略其他配置##

}
重新加载Nginx配置
nginx -s reload
4、访问测试
在测试之前需要配置域名docker.ken.io解析到192.168.99.111,或者在测试的电脑上修改host,此处就不赘述
4.1、查询镜像
# 查询私有仓库镜像
curl docker.ken.io/v2/_catalog

# 输出示例
{"repositories":["kentalk/helloworld","ubuntu"]}
4.2、拉取镜像
docker pull docker.ken.io/kentalk/helloworld

docker pull docker.ken.io/ubuntu
4.3、推送镜像
docker pull debian
docker tag debian docker.ken.io/debian
docker push docker.ken.io/debian
五、配置账号访问
Docker Registry仓库默认是没有权限限制的,意味着任意客户端都可以访问镜像,这是不安全的
Docker Registry可以开启授权验证并支持使用htpasswd管理账号密码,接下就逐步设置下
1、安装基础依赖
sudo yum install -y httpd-tools
2、配置账号
# 创建/更新账号密码
sudo htpasswd -Bc /var/docker/registry/htpasswd ken

# 根据提示输入两次密码
New password:
Re-type new password:

# 设置成功
Adding password for user ken
3、自定义Registry配置
创建Registry配置
sudo vi /var/docker/registry/config.yml
写入以下配置,auth部分为新增配置,其他的均为Docker Registry默认配置
version: 0.1
log:
  fields:
    service: registry
storage:
  cache:
    blobdescriptor: inmemory
  filesystem:
    rootdirectory: /var/lib/registry
http:
  addr: :5000
  headers:
    X-Content-Type-Options: [nosniff]
health:
  storagedriver:
    enabled: true
    interval: 10s
    threshold: 3
# 新增配置
auth:
  htpasswd:
    realm: basic-realm
    path: /etc/docker/registry/htpasswd
4、重建Registry仓库
删除之前的Registry容器,创建新的Registry容器,并映射配置及密码文件
# 停用并删除原有私有仓库容器
docker stop my-registry
docker rm my-registry

# 启动私有仓库,并映射htpasswd、config.yml
docker run -d \
-p 5000:5000 \
-v /var:/var/lib/registry \
-v /var/docker/registry/htpasswd:/etc/docker/registry/htpasswd \
-v /var/docker/registry/config.yml:/etc/docker/registry/config.yml \
--restart=always \
--name my-registry \
registry
5、访问测试
5.1、未登录情况下,拉取镜像
# 拉取镜像
docker pull docker.ken.io/kentalk/helloworld

# 输出示例:no basic auth credentials
Using default tag: latest
Error response from daemon: Head "https://docker.ken.io/v2/kentalk/helloworld/manifests/latest": no basic auth credentials
5.2、登录docker.ken.io
# 登录至docker.ken.io
docker login docker.ken.io

# 输入账号密码
Username: ken
Password:

# 登录成功
Login Succeeded
5.3、拉取镜像
docker pull docker.ken.io/kentalk/helloworld
5.4、推送镜像
docker pull nginx

docker tag nginx docker.ken.io/nginx

docker push docker.ken.io/nginx
5.5、查询镜像
curl -u ken:password docker.ken.io/v2/_catalog
六、备注
1、可能碰到的问题
1.1
问题:nginx: [warn] the “ssl” directive is deprecated, use the “listen … ssl” directive instead
解决方案:在listen 443后增加ssl参数,去掉ssl on参数
server {
    listen 443 ssl;          #监听443端口
    server_name  docker.ken.io;    #监听的域名
    #ssl on;
    ssl_certificate     /var/cert/docker.ken.io_bundle.crt;    #证书文件
    ssl_certificate_key /var/cert/docker.ken.io.key;    #私钥文件
    location / {                #转发或处理
        proxy_pass http://127.0.0.1:5000;
    }
}
1.2
问题:Error response from daemon: received unexpected HTTP status: 502 Bad Gateway
解决方案:关闭本地代理或者其他网络管控软件
2、相关阅读
https://docs.docker.com/registry/
https://docs.docker.com/registry/deploying/
https://docs.docker.com/registry/insecure/
来源:https://ken.io/note/docker-private-image-server-deploy
