1.MVC介绍
MVC是一种设计模式,将软件按照模型、视图、控制器来划分:
-
M:Model,模型层,指工程中的JavaBean,作用是处理数据
JavaBean分为两类:
-
一类称为数据承载Bean:专门存储业务数据的,如 Student、User 等
-
一类称为业务处理Bean:指 Service 或 Dao 对象,专门用于处理业务逻辑和数据访问。
-
-
V:View,视图层,指工程中的html或jsp等页面,作用是与用户进行交互,展示数据
-
C:Controller,控制层,指工程中的servlet,作用是接收请求和响应浏览器
MVC的工作流程:
 用户通过视图层发送请求到服务器,在服务器中请求被Controller接收,Controller调用相应的Model层处理请求,处理完毕将结果返回到Controller,Controller再根据请求处理的结果找到相应的View视图,渲染数据后最终响应给浏览器
MVC与三层架构的关系:
三层架构的分层模式是典型的上下关系,上层依赖于下层。但MVC作为表现模式是不存在上下关系的,而是相互协作关系。
三层是基于业务逻辑来分的,而mvc是基于页面来分的。
2.Spring MVC介绍
-
Spring MVC 是Spring框架的一个模块,是一个基于 MVC 设计模式的轻量级 Web 开发框架,本质上相当于 Servlet。
-
SpringMVC 是 Spring 为表示层开发提供的一整套完备的解决方案。在表述层框架历经 Strust、WebWork、Strust2 等诸多产品的历代更迭之后,目前业界普遍选择了 SpringMVC 作为 Java EE 项目表述层开发的首选方案。
3.SpringMVC 的入门
3.1环境搭建
3.1.1创建工程
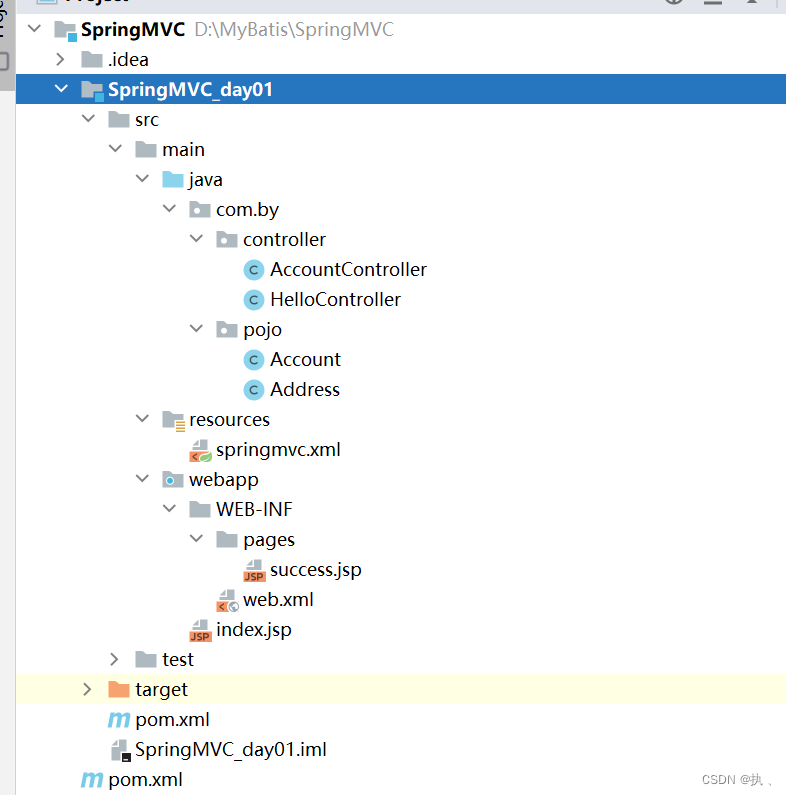 3.1.2添加web支持
1.右键项目选择Add framework support...
 2.添加web支持
 3.效果
3.效果

-
注意:
-
不要先添加打包方式
-
将web目录要拖拽到main目录下,并改名为webapp
-
3.1.3pom.xml
<?xml version="1.0" encoding="UTF-8"?>
<project xmlns="http://maven.apache.org/POM/4.0.0"
         xmlns:xsi="http://www.w3.org/2001/XMLSchema-instance"
         xsi:schemaLocation="http://maven.apache.org/POM/4.0.0 http://maven.apache.org/xsd/maven-4.0.0.xsd">
    <parent>
        <artifactId>SpringMVC</artifactId>
        <groupId>com.by</groupId>
        <version>1.0-SNAPSHOT</version>
    </parent>
    <modelVersion>4.0.0</modelVersion>

    <artifactId>SpringMVC_day01</artifactId>
    <!--打包方式-->
    <packaging>war</packaging>

    <properties>
        <maven.compiler.source>8</maven.compiler.source>
        <maven.compiler.target>8</maven.compiler.target>
    </properties>

    <dependencies>
<!--        IOC依赖-->
        <dependency>
            <groupId>org.springframework</groupId>
            <artifactId>spring-context</artifactId>
            <version>5.1.8.RELEASE</version>
        </dependency>
<!--        web依赖-->
        <dependency>
            <groupId>org.springframework</groupId>
            <artifactId>spring-web</artifactId>
            <version>5.1.8.RELEASE</version>
        </dependency>
        <dependency>
            <groupId>org.springframework</groupId>
            <artifactId>spring-webmvc</artifactId>
            <version>5.1.8.RELEASE</version>
        </dependency>
<!--servlet依赖-->
        <dependency>
            <groupId>javax.servlet</groupId>
            <artifactId>servlet-api</artifactId>
            <version>2.5</version>
            <scope>provided</scope>
        </dependency>

        <dependency>
            <groupId>javax.servlet.jsp</groupId>
            <artifactId>jsp-api</artifactId>
            <version>2.0</version>
            <scope>provided</scope>
        </dependency>
    </dependencies>
    <build>
        <plugins>
            <!-- 配置Tomcat插件 -->
            <plugin>
                <groupId>org.apache.tomcat.maven</groupId>
                <artifactId>tomcat7-maven-plugin</artifactId>
                <version>2.2</version>
                <configuration>
                    <!--端口号-->
                    <port>8080</port>
                    <!--项目名-->
                    <path>/</path>
                </configuration>
            </plugin>
        </plugins>
    </build>
</project>
3.2入门案例
3.2.1index.jsp
<%@ page contentType="text/html;charset=UTF-8" language="java" %>
<html>
  <head>
    <title>$Title$</title>
  </head>
  <body>
  <a href="/hello">hello</a>
  </body>
</html>>
3.2.2controller
@Controller
public class HelloController {

    @RequestMapping("/hello")
    public ModelAndView hello() {
        //ModelAndView对象封装了模型数据和视图名称
        ModelAndView mv = new ModelAndView();
        //添加数据,request.setAttribute(“hello”,”hello springmvc!!”)
        mv.addObject("hello", "欢迎你 springmvc");
        //设置逻辑视图路径
        mv.setViewName("success");
        //返回数据和视图
        return mv;
    }
}
3.2.3springmvc.xml
<?xml version="1.0" encoding="UTF-8"?>
<beans xmlns="http://www.springframework.org/schema/beans"
       xmlns:xsi="http://www.w3.org/2001/XMLSchema-instance" xmlns:p="http://www.springframework.org/schema/p"
       xmlns:context="http://www.springframework.org/schema/context"
       xmlns:mvc="http://www.springframework.org/schema/mvc"
       xsi:schemaLocation="http://www.springframework.org/schema/beans http://www.springframework.org/schema/beans/spring-beans.xsd
        http://www.springframework.org/schema/mvc http://www.springframework.org/schema/mvc/spring-mvc.xsd
        http://www.springframework.org/schema/context http://www.springframework.org/schema/context/spring-context.xsd">
	<!-- 配置创建 spring 容器要扫描的包 -->
    <context:component-scan base-package="com.by"></context:component-scan>

    <!-- 配置视图解析器 -->
    <bean class="org.springframework.web.servlet.view.InternalResourceViewResolver">
        <property name="prefix" value="/WEB-INF/pages/"></property>
        <property name="suffix" value=".jsp"></property>
    </bean>

    <!--开启springmvc注解支持:配置HandlerMapping和HandlerAdapter-->
    <mvc:annotation-driven></mvc:annotation-driven>
</beans>
3.2.4 success.jsp

<%@ page contentType="text/html;charset=UTF-8" language="java" %>
<html>
<head>
    <title>Title</title>
</head>
<body>
	<h2>${msg}</h2>
</body>
</html>
3.2.5web.xml
<?xml version="1.0" encoding="UTF-8"?>
<web-app xmlns="http://xmlns.jcp.org/xml/ns/javaee"
         xmlns:xsi="http://www.w3.org/2001/XMLSchema-instance"
         xsi:schemaLocation="http://xmlns.jcp.org/xml/ns/javaee http://xmlns.jcp.org/xml/ns/javaee/web-app_4_0.xsd"
         version="4.0">
    <servlet>
        <servlet-name>springmvc</servlet-name>
        <servlet-class>org.springframework.web.servlet.DispatcherServlet</servlet-class>
        <!-- 配置初始化参数,用于读取 SpringMVC 的配置文件 -->
        <init-param>
            <param-name>contextConfigLocation</param-name>
            <param-value>classpath:springmvc.xml</param-value>
        </init-param>
        <!-- 表示容器在启动时立即创建servlet对象 -->
        <load-on-startup>1</load-on-startup>
    </servlet>
    <servlet-mapping>
        <servlet-name>springmvc</servlet-name>
        <url-pattern>/</url-pattern>
    </servlet-mapping>
</web-app>
3.2.6测试
访问:http://localhost:8080/hello
 4.总结
4.总结
一、Spring MVC的介绍
1、mvc设置模式的介绍
M(model):模型层,
数据模型:User、Student,装数据
业务模型:service、dao,负责处理业务
V(view):视图层,html和jsp,负责和用户交互
C(controller):控制层,servlet,负责接受请求和响应
2、springmvc的介绍
springmvc是spring框架的一个模块,是一个基于mvc设计模式的web框架,本质上相当于servlet
二、springmvc入门案例
1.index.jsp
<a href="/hello">hello</a>
2.controller
@Controller
public class HelloControler{
@RequestMapping("/hello")
public ModelAndView hello(){
ModelAndView mv = new ModelAndView();
mv.addObject("msg", "欢迎你Spring MVC");
mv.setViewName("success");
return mv;
}
}
3、配置springmvc要扫描的包
<context:component-scan base-package="com.by.controller"></context:component-scan>
4、配置视图解析器
<bean class="org.springframework.web.servlet.view.InternalResourceViewResolver">
<!--jsp的目录-->
<property name="prefix" value="/WEB-INF/pages/"></property>
<!--jsp的扩展名-->
<property name="suffix" value=".jsp"></property>
</bean>
5、web.xml
<servlet>
<servlet-name>springmvc</servlet-name>
<!--前端控制器-->
<servlet-class>org.springframework.web.servlet.DispatcherServlet</servlet-class>
<init-param>
<param-name>contextConfigLocation</param-name>
<param-value>classpath:springmvc.xml</param-value>
</init-param>
<!--tomcat启动就创建加载DispatcherServlet-->
<load-on-startup>1</load-on-startup>
</servlet>
<servlet-mapping>
<servlet-name>springmvc</servlet-name>
<!--/只能拦截路径,而 / *能够拦截路径和页面-->
<url-pattern>/</url-pattern>
</servlet-mapping>
