目录
1.Shiro自定义拦截器SpringShiroFilter
1.1 ShiroFilterFactoryBean解析
1.1.1 实现FactoryBean接口
1.1.2 实现BeanPostProcessor接口
1.2 SpringShiroFilter解析
1.2.1 OncePerRequestFilter过滤逻辑实现
1.2.2 AbstractShiroFilter过滤逻辑实现
1.2.2.1 创建Subject对象
1.2.2.2 更新Session最后访问时间
1.2.2.3 执行过滤链
1.2.2.3.1 构造过滤链
1.2.2.3.2 执行构造好的过滤链
2.SpringShiroFilter如何添加到Servlet Filter中
2.1 常见的添加Servlet Filter方式
2.1.1 方式一:显示定义FilterRegistrationBean
2.1.2 方式二:显示定义ShiroFilterFactoryBean
2.2 添加Servlet Filter方式源码解析
2.2.1 addServletContextInitializerBeans
2.2.2 addAdaptableBeans
Shiro通过添加Servlet Filter的方式,提供了登录验证(Authentication)、访问控制(Authorization)以及Session管理等功能,极大的简化了Spring项目中登录鉴权模块的开发工作。
下面通过ShiroFilterFactoryBean作为切入点,详细分析下自定义拦截器SpringShiroFilter的处理流程;并通过源码解析,跟踪SpringShiroFilter是如何添加到Servlet Filter中的;
1.Shiro自定义拦截器SpringShiroFilter
SpringShiroFilter的初始化和构造逻辑是ShiroFilterFactoryBean完成的,首先看一下ShiroFilterFactoryBean的处理逻辑;
1.1 ShiroFilterFactoryBean解析

ShiroFilterFactoryBean同时实现了FactoryBean和BeanPostProcessor接口,因此其具体实现也包含了这2部分功能,下面分别进行说明;
1.1.1 实现FactoryBean接口
    /**
     * Lazily creates and returns a {@link AbstractShiroFilter} concrete instance via the
     * {@link #createInstance} method.
     *
     * @return the application's Shiro Filter instance used to filter incoming web requests.
     * @throws Exception if there is a problem creating the {@code Filter} instance.
     */
    public Object getObject() throws Exception {
        if (instance == null) {
            instance = createInstance();
        }
        return instance;
    }

    /**
     * Returns <code>{@link org.apache.shiro.web.servlet.AbstractShiroFilter}.class</code>
     *
     * @return <code>{@link org.apache.shiro.web.servlet.AbstractShiroFilter}.class</code>
     */
    public Class getObjectType() {
        return SpringShiroFilter.class;
    }

    /**
     * Returns {@code true} always.  There is almost always only ever 1 Shiro {@code Filter} per web application.
     *
     * @return {@code true} always.  There is almost always only ever 1 Shiro {@code Filter} per web application.
     */
    public boolean isSingleton() {
        return true;
    }

    /**
     * This implementation:
     * <ol>
     * <li>Ensures the required {@link #setSecurityManager(org.apache.shiro.mgt.SecurityManager) securityManager}
     * property has been set</li>
     * <li>{@link #createFilterChainManager() Creates} a {@link FilterChainManager} instance that reflects the
     * configured {@link #setFilters(java.util.Map) filters} and
     * {@link #setFilterChainDefinitionMap(java.util.Map) filter chain definitions}</li>
     * <li>Wraps the FilterChainManager with a suitable
     * {@link org.apache.shiro.web.filter.mgt.FilterChainResolver FilterChainResolver} since the Shiro Filter
     * implementations do not know of {@code FilterChainManager}s</li>
     * <li>Sets both the {@code SecurityManager} and {@code FilterChainResolver} instances on a new Shiro Filter
     * instance and returns that filter instance.</li>
     * </ol>
     *
     * @return a new Shiro Filter reflecting any configured filters and filter chain definitions.
     * @throws Exception if there is a problem creating the AbstractShiroFilter instance.
     */
    protected AbstractShiroFilter createInstance() throws Exception {

        log.debug("Creating Shiro Filter instance.");

        SecurityManager securityManager = getSecurityManager();
        if (securityManager == null) {
            String msg = "SecurityManager property must be set.";
            throw new BeanInitializationException(msg);
        }

        if (!(securityManager instanceof WebSecurityManager)) {
            String msg = "The security manager does not implement the WebSecurityManager interface.";
            throw new BeanInitializationException(msg);
        }

        FilterChainManager manager = createFilterChainManager();

        //Expose the constructed FilterChainManager by first wrapping it in a
        // FilterChainResolver implementation. The AbstractShiroFilter implementations
        // do not know about FilterChainManagers - only resolvers:
        PathMatchingFilterChainResolver chainResolver = new PathMatchingFilterChainResolver();
        chainResolver.setFilterChainManager(manager);

        //Now create a concrete ShiroFilter instance and apply the acquired SecurityManager and built
        //FilterChainResolver.  It doesn't matter that the instance is an anonymous inner class
        //here - we're just using it because it is a concrete AbstractShiroFilter instance that accepts
        //injection of the SecurityManager and FilterChainResolver:
        return new SpringShiroFilter((WebSecurityManager) securityManager, chainResolver);
    }

    protected FilterChainManager createFilterChainManager() {

        DefaultFilterChainManager manager = new DefaultFilterChainManager();
        Map<String, Filter> defaultFilters = manager.getFilters();
        //apply global settings if necessary:
        for (Filter filter : defaultFilters.values()) {
            applyGlobalPropertiesIfNecessary(filter);
        }

        //Apply the acquired and/or configured filters:
        Map<String, Filter> filters = getFilters();
        if (!CollectionUtils.isEmpty(filters)) {
            for (Map.Entry<String, Filter> entry : filters.entrySet()) {
                String name = entry.getKey();
                Filter filter = entry.getValue();
                applyGlobalPropertiesIfNecessary(filter);
                if (filter instanceof Nameable) {
                    ((Nameable) filter).setName(name);
                }
                //'init' argument is false, since Spring-configured filters should be initialized
                //in Spring (i.e. 'init-method=blah') or implement InitializingBean:
                manager.addFilter(name, filter, false);
            }
        }

        //build up the chains:
        Map<String, String> chains = getFilterChainDefinitionMap();
        if (!CollectionUtils.isEmpty(chains)) {
            for (Map.Entry<String, String> entry : chains.entrySet()) {
                String url = entry.getKey();
                String chainDefinition = entry.getValue();
                manager.createChain(url, chainDefinition);
            }
        }

        return manager;
    }
如上,通过初始化SecurityManager,DefaultFilterChainManager以及PathMatchingFilterChainResolver,完成了SpringShiroFilter的单例构造;
1.1.2 实现BeanPostProcessor接口
    /**
     * Inspects a bean, and if it implements the {@link Filter} interface, automatically adds that filter
     * instance to the internal {@link #setFilters(java.util.Map) filters map} that will be referenced
     * later during filter chain construction.
     */
    public Object postProcessBeforeInitialization(Object bean, String beanName) throws BeansException {
        if (bean instanceof Filter) {
            log.debug("Found filter chain candidate filter '{}'", beanName);
            Filter filter = (Filter) bean;
            applyGlobalPropertiesIfNecessary(filter);
            getFilters().put(beanName, filter);
        } else {
            log.trace("Ignoring non-Filter bean '{}'", beanName);
        }
        return bean;
    }

    /**
     * Does nothing - only exists to satisfy the BeanPostProcessor interface and immediately returns the
     * {@code bean} argument.
     */
    public Object postProcessAfterInitialization(Object bean, String beanName) throws BeansException {
        return bean;
    }
在postProcessBeforeInitialization方法中,通过拦截Filter类型的bean,完成全局属性的注入,包括设置:loginUrl、successUrl、unauthorizedUrl;
1.2 SpringShiroFilter解析
SpringShiroFilter类继承结构如下,实现了顶层接口Servlet Filter,因此SpringShiroFilter作为Shiro实现的自定义Filter,可以注册到Servlet Filter中执行过滤器逻辑(第2部分进行具体说明);
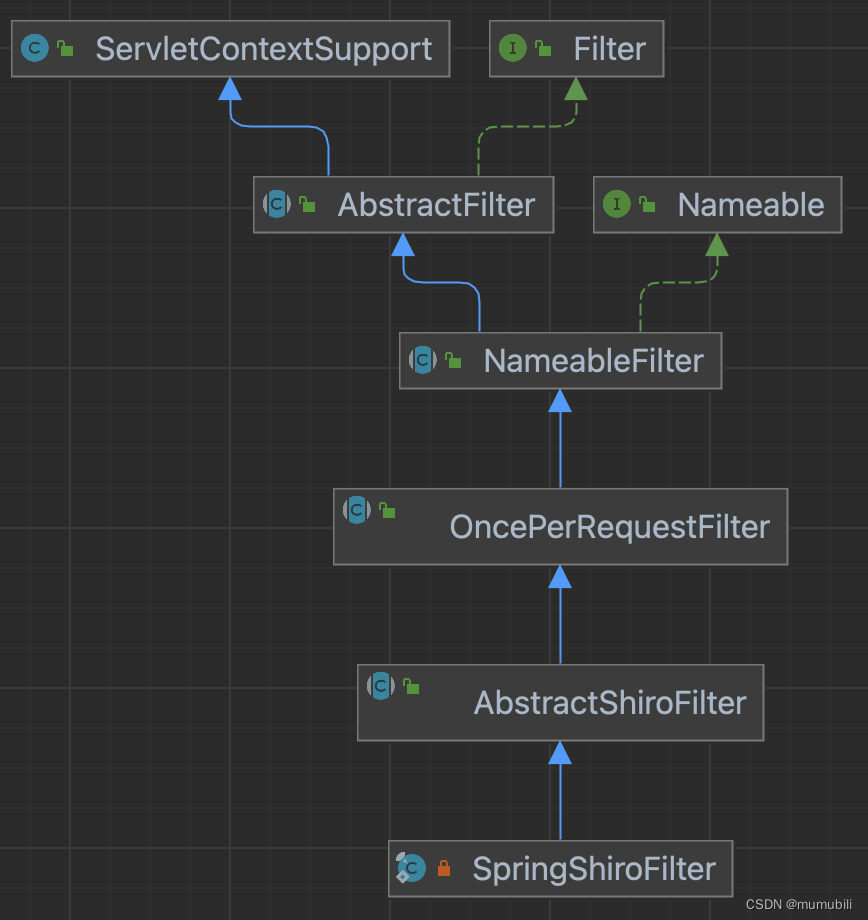
在如上的继承层次结构中:
-
Filter作为Servlet过滤器顶层接口,声明了doFilter过滤方法
    /* @param request  The request to process
     * @param response The response associated with the request
     * @param chain    Provides access to the next filter in the chain for this
     *                 filter to pass the request and response to for further
     *                 processing
     *
     * @throws IOException if an I/O error occurs during this filter's
     *                     processing of the request
     * @throws ServletException if the processing fails for any other reason
     */
    public void doFilter(ServletRequest request, ServletResponse response,
FilterChain chain) throws IOException, ServletException;- AbstractFilter抽象类支持FilterConfig初始化
- NameableFilter实现了Nameable,内部实现主要完成了过滤器name的解析
- OncePerRequestFilter见名知意,实现了“单次请求,一次过滤”的语义
- AbstractShiroFilter通过注入WebSecurityManager和FilterChainResolver完成Shiro内部的过滤处理逻辑
下面着重分析下doFilter方法在OncePerRequestFilter和AbstractShiroFilter的过滤逻辑实现;
1.2.1 OncePerRequestFilter过滤逻辑实现
为了实现“单次请求,一次过滤”的语义,OncePerRequestFilter的过滤逻辑中是通过在ServletRequest中记录标志位属性值的方式实现的:
通过判断ServletRequest中是否已经设置了属性Key为alreadyFilteredAttributeName值的方式,判断该filter是否已经执行了过滤逻辑,已执行则跳过,未执行则执行过滤;
并通过引入抽象方法doFilterInternal完成内部过滤逻辑,交由子类具体实现;
具体过滤逻辑实现如下:
/**
* This {@code doFilter} implementation stores a request attribute for
* "already filtered", proceeding without filtering again if the
* attribute is already there.
*
* @see #getAlreadyFilteredAttributeName
* @see #shouldNotFilter
* @see #doFilterInternal
*/
public final void doFilter(ServletRequest request, ServletResponse response, FilterChain filterChain)
throws ServletException, IOException {
String alreadyFilteredAttributeName = getAlreadyFilteredAttributeName();
if ( request.getAttribute(alreadyFilteredAttributeName) != null ) {
log.trace("Filter '{}' already executed. Proceeding without invoking this filter.", getName());
filterChain.doFilter(request, response);
} else //noinspection deprecation
if (/* added in 1.2: */ !isEnabled(request, response) ||
/* retain backwards compatibility: */ shouldNotFilter(request) ) {
log.debug("Filter '{}' is not enabled for the current request. Proceeding without invoking this filter.",
getName());
filterChain.doFilter(request, response);
} else {
// Do invoke this filter...
log.trace("Filter '{}' not yet executed. Executing now.", getName());
request.setAttribute(alreadyFilteredAttributeName, Boolean.TRUE);
try {
doFilterInternal(request, response, filterChain);
} finally {
// Once the request has finished, we're done and we don't
// need to mark as 'already filtered' any more.
request.removeAttribute(alreadyFilteredAttributeName);
}
}
}
/**
* Return name of the request attribute that identifies that a request has already been filtered.
* <p/>
* The default implementation takes the configured {@link #getName() name} and appends "{@code .FILTERED}".
* If the filter is not fully initialized, it falls back to the implementation's class name.
*
* @return the name of the request attribute that identifies that a request has already been filtered.
* @see #getName
* @see #ALREADY_FILTERED_SUFFIX
*/
protected String getAlreadyFilteredAttributeName() {
String name = getName();
if (name == null) {
name = getClass().getName();
}
return name + ALREADY_FILTERED_SUFFIX;
}1.2.2 AbstractShiroFilter过滤逻辑实现
继承了抽象类OncePerRequestFilter,并实现了方法doFilterInternal,完成Shiro具体过滤逻辑嵌入,具体实现如下:
    /**
     * {@code doFilterInternal} implementation that sets-up, executes, and cleans-up a Shiro-filtered request.  It
     * performs the following ordered operations:
     * <ol>
     * <li>{@link #prepareServletRequest(ServletRequest, ServletResponse, FilterChain) Prepares}
     * the incoming {@code ServletRequest} for use during Shiro's processing</li>
     * <li>{@link #prepareServletResponse(ServletRequest, ServletResponse, FilterChain) Prepares}
     * the outgoing {@code ServletResponse} for use during Shiro's processing</li>
     * <li> {@link #createSubject(javax.servlet.ServletRequest, javax.servlet.ServletResponse) Creates} a
     * {@link Subject} instance based on the specified request/response pair.</li>
     * <li>Finally {@link Subject#execute(Runnable) executes} the
     * {@link #updateSessionLastAccessTime(javax.servlet.ServletRequest, javax.servlet.ServletResponse)} and
     * {@link #executeChain(javax.servlet.ServletRequest, javax.servlet.ServletResponse, javax.servlet.FilterChain)}
     * methods</li>
     * </ol>
     * <p/>
     * The {@code Subject.}{@link Subject#execute(Runnable) execute(Runnable)} call in step #4 is used as an
     * implementation technique to guarantee proper thread binding and restoration is completed successfully.
     *
     * @param servletRequest  the incoming {@code ServletRequest}
     * @param servletResponse the outgoing {@code ServletResponse}
     * @param chain           the container-provided {@code FilterChain} to execute
     * @throws IOException                    if an IO error occurs
     * @throws javax.servlet.ServletException if an Throwable other than an IOException
     */
    protected void doFilterInternal(ServletRequest servletRequest, ServletResponse servletResponse, final FilterChain chain)
            throws ServletException, IOException {

        Throwable t = null;

        try {
            final ServletRequest request = prepareServletRequest(servletRequest, servletResponse, chain);
            final ServletResponse response = prepareServletResponse(request, servletResponse, chain);

            final Subject subject = createSubject(request, response);

            //noinspection unchecked
            subject.execute(new Callable() {
                public Object call() throws Exception {
                    updateSessionLastAccessTime(request, response);
                    executeChain(request, response, chain);
                    return null;
                }
            });
        } catch (ExecutionException ex) {
            t = ex.getCause();
        } catch (Throwable throwable) {
            t = throwable;
        }

        if (t != null) {
            if (t instanceof ServletException) {
                throw (ServletException) t;
            }
            if (t instanceof IOException) {
                throw (IOException) t;
            }
            //otherwise it's not one of the two exceptions expected by the filter method signature - wrap it in one:
            String msg = "Filtered request failed.";
            throw new ServletException(msg, t);
        }
    }
过滤逻辑主要包含了如下几部分:
- 创建Subject对象,标识系统登录用户
- 更新Session最后访问时间
- 执行过滤链
下面分别进行说明:
1.2.2.1 创建Subject对象
创建Subject对象底层是通过securityManager完成的,具体实现如下:
    public Subject buildSubject() {
        return this.securityManager.createSubject(this.subjectContext);
    }

    public Subject createSubject(SubjectContext subjectContext) {
        //create a copy so we don't modify the argument's backing map:
        SubjectContext context = copy(subjectContext);

        //ensure that the context has a SecurityManager instance, and if not, add one:
        context = ensureSecurityManager(context);

        //Resolve an associated Session (usually based on a referenced session ID), and place it in the context before
        //sending to the SubjectFactory.  The SubjectFactory should not need to know how to acquire sessions as the
        //process is often environment specific - better to shield the SF from these details:
        context = resolveSession(context);

        //Similarly, the SubjectFactory should not require any concept of RememberMe - translate that here first
        //if possible before handing off to the SubjectFactory:
        context = resolvePrincipals(context);

        Subject subject = doCreateSubject(context);

        //save this subject for future reference if necessary:
        //(this is needed here in case rememberMe principals were resolved and they need to be stored in the
        //session, so we don't constantly rehydrate the rememberMe PrincipalCollection on every operation).
        //Added in 1.2:
        save(subject);

        return subject;
    }
其中doCreateSubject方法委托给DefaultWebSubjectFactory完成Subject创建
public class DefaultWebSubjectFactory extends DefaultSubjectFactory {

    public DefaultWebSubjectFactory() {
        super();
    }

    public Subject createSubject(SubjectContext context) {
        if (!(context instanceof WebSubjectContext)) {
            return super.createSubject(context);
        }
        WebSubjectContext wsc = (WebSubjectContext) context;
        SecurityManager securityManager = wsc.resolveSecurityManager();
        Session session = wsc.resolveSession();
        boolean sessionEnabled = wsc.isSessionCreationEnabled();
        PrincipalCollection principals = wsc.resolvePrincipals();
        boolean authenticated = wsc.resolveAuthenticated();
        String host = wsc.resolveHost();
        ServletRequest request = wsc.resolveServletRequest();
        ServletResponse response = wsc.resolveServletResponse();

        return new WebDelegatingSubject(principals, authenticated, host, session, sessionEnabled,
                request, response, securityManager);
    }
1.2.2.2 更新Session最后访问时间
记录Session最后访问时间,
- 如果是HttpSession,直接返回
- 如果是Native Session,也即Shiro创建的Session,通过touch方法更新最后访问时间
    /**
     * Updates any 'native'  Session's last access time that might exist to the timestamp when this method is called.
     * If native sessions are not enabled (that is, standard Servlet container sessions are being used) or there is no
     * session ({@code subject.getSession(false) == null}), this method does nothing.
     * <p/>This method implementation merely calls
     * <code>Session.{@link org.apache.shiro.session.Session#touch() touch}()</code> on the session.
     *
     * @param request  incoming request - ignored, but available to subclasses that might wish to override this method
     * @param response outgoing response - ignored, but available to subclasses that might wish to override this method
     * @since 1.0
     */
    @SuppressWarnings({"UnusedDeclaration"})
    protected void updateSessionLastAccessTime(ServletRequest request, ServletResponse response) {
        if (!isHttpSessions()) { //'native' sessions
            Subject subject = SecurityUtils.getSubject();
            //Subject should never _ever_ be null, but just in case:
            if (subject != null) {
                Session session = subject.getSession(false);
                if (session != null) {
                    try {
                        session.touch();
                    } catch (Throwable t) {
                        log.error("session.touch() method invocation has failed.  Unable to update" +
                                "the corresponding session's last access time based on the incoming request.", t);
                    }
                }
            }
        }
    }
1.2.2.3 执行过滤链
该部分具体实现如下,其主要包含了2个步骤:
- 构造过滤链
- 执行构造好的过滤链
下面分别进行说明
    /**
     * Executes a {@link FilterChain} for the given request.
     * <p/>
     * This implementation first delegates to
     * <code>{@link #getExecutionChain(javax.servlet.ServletRequest, javax.servlet.ServletResponse, javax.servlet.FilterChain) getExecutionChain}</code>
     * to allow the application's Shiro configuration to determine exactly how the chain should execute.  The resulting
     * value from that call is then executed directly by calling the returned {@code FilterChain}'s
     * {@link FilterChain#doFilter doFilter} method.  That is:
     * <pre>
     * FilterChain chain = {@link #getExecutionChain}(request, response, origChain);
     * chain.{@link FilterChain#doFilter doFilter}(request,response);</pre>
     *
     * @param request   the incoming ServletRequest
     * @param response  the outgoing ServletResponse
     * @param origChain the Servlet Container-provided chain that may be wrapped further by an application-configured
     *                  chain of Filters.
     * @throws IOException      if the underlying {@code chain.doFilter} call results in an IOException
     * @throws ServletException if the underlying {@code chain.doFilter} call results in a ServletException
     * @since 1.0
     */
    protected void executeChain(ServletRequest request, ServletResponse response, FilterChain origChain)
            throws IOException, ServletException {
        FilterChain chain = getExecutionChain(request, response, origChain);
        chain.doFilter(request, response);
    }
1.2.2.3.1 构造过滤链
构造过滤链的逻辑如下:
    /**
     * Returns the {@code FilterChain} to execute for the given request.
     * <p/>
     * The {@code origChain} argument is the
     * original {@code FilterChain} supplied by the Servlet Container, but it may be modified to provide
     * more behavior by pre-pending further chains according to the Shiro configuration.
     * <p/>
     * This implementation returns the chain that will actually be executed by acquiring the chain from a
     * {@link #getFilterChainResolver() filterChainResolver}.  The resolver determines exactly which chain to
     * execute, typically based on URL configuration.  If no chain is returned from the resolver call
     * (returns {@code null}), then the {@code origChain} will be returned by default.
     *
     * @param request   the incoming ServletRequest
     * @param response  the outgoing ServletResponse
     * @param origChain the original {@code FilterChain} provided by the Servlet Container
     * @return the {@link FilterChain} to execute for the given request
     * @since 1.0
     */
    protected FilterChain getExecutionChain(ServletRequest request, ServletResponse response, FilterChain origChain) {
        FilterChain chain = origChain;

        FilterChainResolver resolver = getFilterChainResolver();
        if (resolver == null) {
            log.debug("No FilterChainResolver configured.  Returning original FilterChain.");
            return origChain;
        }

        FilterChain resolved = resolver.getChain(request, response, origChain);
        if (resolved != null) {
            log.trace("Resolved a configured FilterChain for the current request.");
            chain = resolved;
        } else {
            log.trace("No FilterChain configured for the current request.  Using the default.");
        }

        return chain;
    }
这里首先获取FilterChainResolver过滤链解析器,并调用getChain获取解析后的过滤链,getChain方法实现如下:
    public FilterChain getChain(ServletRequest request, ServletResponse response, FilterChain originalChain) {
        FilterChainManager filterChainManager = getFilterChainManager();
        if (!filterChainManager.hasChains()) {
            return null;
        }

        String requestURI = getPathWithinApplication(request);

        //the 'chain names' in this implementation are actually path patterns defined by the user.  We just use them
        //as the chain name for the FilterChainManager's requirements
        for (String pathPattern : filterChainManager.getChainNames()) {

            // If the path does match, then pass on to the subclass implementation for specific checks:
            if (pathMatches(pathPattern, requestURI)) {
                if (log.isTraceEnabled()) {
                    log.trace("Matched path pattern [" + pathPattern + "] for requestURI [" + requestURI + "].  " +
                            "Utilizing corresponding filter chain...");
                }
                return filterChainManager.proxy(originalChain, pathPattern);
            }
        }

        return null;
    }
这里首先获取请求的Url(requestURI),然后和配置好的过滤链进行路径匹配,得到匹配成功的过滤链后,调用filterChainManager的proxy代理方法进行代理,返回代理后的过滤链;
具体代理逻辑如下:
    public FilterChain proxy(FilterChain original, String chainName) {
        NamedFilterList configured = getChain(chainName);
        if (configured == null) {
            String msg = "There is no configured chain under the name/key [" + chainName + "].";
            throw new IllegalArgumentException(msg);
        }
        return configured.proxy(original);
    }
public FilterChain proxy(FilterChain orig) {
return new ProxiedFilterChain(orig, this);
}public class ProxiedFilterChain implements FilterChain {
//TODO - complete JavaDoc
private static final Logger log = LoggerFactory.getLogger(ProxiedFilterChain.class);
private FilterChain orig;
private List<Filter> filters;
private int index = 0;
public ProxiedFilterChain(FilterChain orig, List<Filter> filters) {
if (orig == null) {
throw new NullPointerException("original FilterChain cannot be null.");
}
this.orig = orig;
this.filters = filters;
this.index = 0;
}
public void doFilter(ServletRequest request, ServletResponse response) throws IOException, ServletException {
if (this.filters == null || this.filters.size() == this.index) {
//we've reached the end of the wrapped chain, so invoke the original one:
if (log.isTraceEnabled()) {
log.trace("Invoking original filter chain.");
}
this.orig.doFilter(request, response);
} else {
if (log.isTraceEnabled()) {
log.trace("Invoking wrapped filter at index [" + this.index + "]");
}
this.filters.get(this.index++).doFilter(request, response, this);
}
}
}通过过滤链代理类ProxiedFilterChain完成了代码配置好的过滤器链与Sevlet容器中的origin过滤器链的串接,并指定了串接后的过滤器执行顺序;
1.2.2.3.2 执行构造好的过滤链
执行构造好的过滤器链,就是调用上面的过滤链代理类ProxiedFilterChain的doFilter方法,进而完整调用所有相关的过滤器,包括根据Url路径匹配成功的过滤器以及Servlet容器定义的过滤器;
如下是项目中过滤器链常见的配置方式:
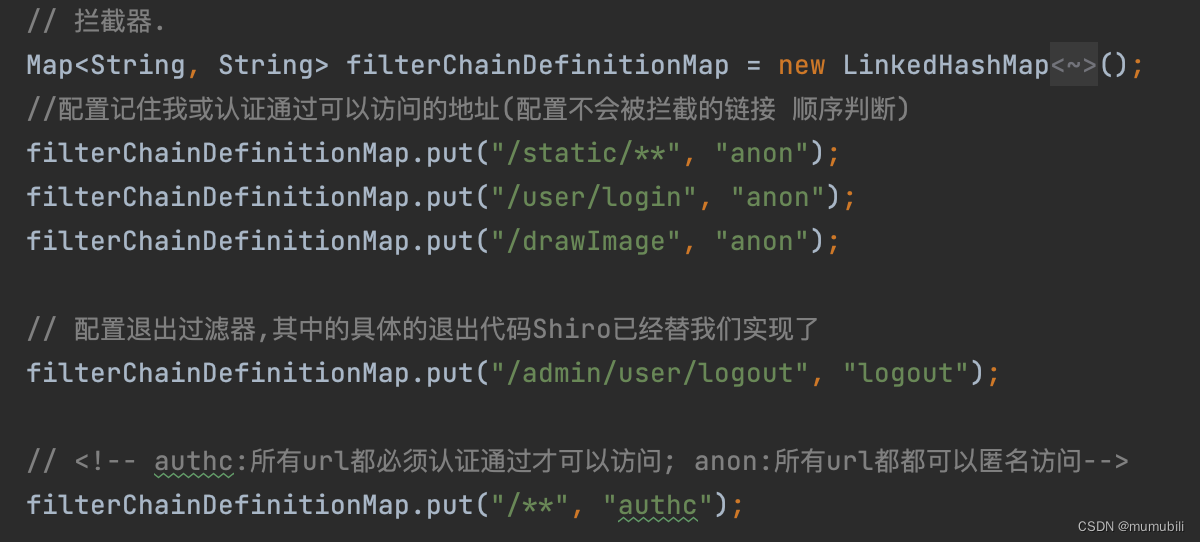
后续就是执行匹配成功的过滤器链的过滤逻辑了,由于本文篇幅较大,这点放到后面文章进行解析;
2.SpringShiroFilter如何添加到Servlet Filter中
这部分章节首先介绍下常见的添加Servlet Filter的方式,然后从源码解析的角度进行阐释说明;
2.1 常见的添加Servlet Filter方式
2.1.1 方式一:显示定义FilterRegistrationBean
    @Bean
    public FilterRegistrationBean filterRegistrationBean() {
        FilterRegistrationBean filterRegistration = new FilterRegistrationBean();
        filterRegistration.setFilter(new DelegatingFilterProxy("shiroFilter"));
        filterRegistration.addInitParameter("targetFilterLifecycle", "true");
        filterRegistration.setEnabled(true);
        filterRegistration.addUrlPatterns("/*");
        return filterRegistration;
    }
2.1.2 方式二:显示定义ShiroFilterFactoryBean
@Configuration
public class ShiroWebFilterConfiguration {

    @Autowired
    protected SecurityManager securityManager;

    @Autowired
    protected ShiroFilterChainDefinition shiroFilterChainDefinition;

    @Value("#{ @environment['shiro.loginUrl'] ?: '/login.jsp' }")
    protected String loginUrl;

    @Value("#{ @environment['shiro.successUrl'] ?: '/' }")
    protected String successUrl;

    @Value("#{ @environment['shiro.unauthorizedUrl'] ?: null }")
    protected String unauthorizedUrl;

    @Bean
    public ShiroFilterFactoryBean shiroFilterFactoryBean() {
        ShiroFilterFactoryBean filterFactoryBean = new ShiroFilterFactoryBean();

        filterFactoryBean.setLoginUrl(loginUrl);
        filterFactoryBean.setSuccessUrl(successUrl);
        filterFactoryBean.setUnauthorizedUrl(unauthorizedUrl);

        filterFactoryBean.setSecurityManager(securityManager);
        filterFactoryBean.setFilterChainDefinitionMap(shiroFilterChainDefinition.getFilterChainMap());

        return filterFactoryBean;
    }
}
2.2 添加Servlet Filter方式源码解析
添加Servlet Filter的逻辑是在EmbeddedWebApplicationContext容器中实现的,具体如下:
在容器启动时,会调用onRefresh方法,如下:
	@Override
	protected void onRefresh() {
		super.onRefresh();
		try {
			createEmbeddedServletContainer();
		}
		catch (Throwable ex) {
			throw new ApplicationContextException("Unable to start embedded container",
					ex);
		}
	}

	private void createEmbeddedServletContainer() {
		EmbeddedServletContainer localContainer = this.embeddedServletContainer;
		ServletContext localServletContext = getServletContext();
		if (localContainer == null && localServletContext == null) {
			EmbeddedServletContainerFactory containerFactory = getEmbeddedServletContainerFactory();
			this.embeddedServletContainer = containerFactory
					.getEmbeddedServletContainer(getSelfInitializer());
		}
		else if (localServletContext != null) {
			try {
				getSelfInitializer().onStartup(localServletContext);
			}
			catch (ServletException ex) {
				throw new ApplicationContextException("Cannot initialize servlet context",
						ex);
			}
		}
		initPropertySources();
	}
如上会调用onStartup方法:
	private org.springframework.boot.web.servlet.ServletContextInitializer getSelfInitializer() {
		return new ServletContextInitializer() {
			@Override
			public void onStartup(ServletContext servletContext) throws ServletException {
				selfInitialize(servletContext);
			}
		};
	}

	private void selfInitialize(ServletContext servletContext) throws ServletException {
		prepareEmbeddedWebApplicationContext(servletContext);
		ConfigurableListableBeanFactory beanFactory = getBeanFactory();
		ExistingWebApplicationScopes existingScopes = new ExistingWebApplicationScopes(
				beanFactory);
		WebApplicationContextUtils.registerWebApplicationScopes(beanFactory,
				getServletContext());
		existingScopes.restore();
		WebApplicationContextUtils.registerEnvironmentBeans(beanFactory,
				getServletContext());
		for (ServletContextInitializer beans : getServletContextInitializerBeans()) {
			beans.onStartup(servletContext);
		}
	}

	/**
	 * Returns {@link ServletContextInitializer}s that should be used with the embedded
	 * Servlet context. By default this method will first attempt to find
	 * {@link ServletContextInitializer}, {@link Servlet}, {@link Filter} and certain
	 * {@link EventListener} beans.
	 * @return the servlet initializer beans
	 */
	protected Collection<ServletContextInitializer> getServletContextInitializerBeans() {
		return new ServletContextInitializerBeans(getBeanFactory());
	}
如上会创建ServletContextInitializerBeans,其构造方法如下:
	public ServletContextInitializerBeans(ListableBeanFactory beanFactory) {
		this.initializers = new LinkedMultiValueMap<Class<?>, ServletContextInitializer>();
		addServletContextInitializerBeans(beanFactory);
		addAdaptableBeans(beanFactory);
		List<ServletContextInitializer> sortedInitializers = new ArrayList<ServletContextInitializer>();
		for (Map.Entry<?, List<ServletContextInitializer>> entry : this.initializers
				.entrySet()) {
			AnnotationAwareOrderComparator.sort(entry.getValue());
			sortedInitializers.addAll(entry.getValue());
		}
		this.sortedList = Collections.unmodifiableList(sortedInitializers);
	}
这里主要包含了2部分内容:
- 方法addServletContextInitializerBeans完成ServletContextInitializer类型bean的处理
- 方法addAdaptableBeans完成Filter类型bean的处理
下面分别对这2部分进行分析;
2.2.1 addServletContextInitializerBeans
方法具体实现如下:
	private void addServletContextInitializerBeans(ListableBeanFactory beanFactory) {
		for (Entry<String, ServletContextInitializer> initializerBean : getOrderedBeansOfType(
				beanFactory, ServletContextInitializer.class)) {
			addServletContextInitializerBean(initializerBean.getKey(),
					initializerBean.getValue(), beanFactory);
		}
	}
这里获取Spring容器中类型为ServletContextInitializer的bean,然后调用addServletContextInitializerBean进行注册:
	private void addServletContextInitializerBean(String beanName,
			ServletContextInitializer initializer, ListableBeanFactory beanFactory) {
		if (initializer instanceof ServletRegistrationBean) {
			Servlet source = ((ServletRegistrationBean) initializer).getServlet();
			addServletContextInitializerBean(Servlet.class, beanName, initializer,
					beanFactory, source);
		}
		else if (initializer instanceof FilterRegistrationBean) {
			Filter source = ((FilterRegistrationBean) initializer).getFilter();
			addServletContextInitializerBean(Filter.class, beanName, initializer,
					beanFactory, source);
		}
		else if (initializer instanceof DelegatingFilterProxyRegistrationBean) {
			String source = ((DelegatingFilterProxyRegistrationBean) initializer)
					.getTargetBeanName();
			addServletContextInitializerBean(Filter.class, beanName, initializer,
					beanFactory, source);
		}
		else if (initializer instanceof ServletListenerRegistrationBean) {
			EventListener source = ((ServletListenerRegistrationBean<?>) initializer)
					.getListener();
			addServletContextInitializerBean(EventListener.class, beanName, initializer,
					beanFactory, source);
		}
		else {
			addServletContextInitializerBean(ServletContextInitializer.class, beanName,
					initializer, beanFactory, initializer);
		}
	}
这里可以看到FilterRegistrationBean(实现了ServletContextInitializer接口)类型的具体处理逻辑,将FilterRegistrationBean类型的bean注册到initializers中,也即完成了Servlet Filter的注册,
支持了方式一中通过显示定义FilterRegistrationBean完成Servlet Filter的注册;
	private void addServletContextInitializerBean(Class<?> type, String beanName,
			ServletContextInitializer initializer, ListableBeanFactory beanFactory,
			Object source) {
		this.initializers.add(type, initializer);
		if (source != null) {
			// Mark the underlying source as seen in case it wraps an existing bean
			this.seen.add(source);
		}
		if (ServletContextInitializerBeans.logger.isDebugEnabled()) {
			String resourceDescription = getResourceDescription(beanName, beanFactory);
			int order = getOrder(initializer);
			ServletContextInitializerBeans.logger.debug("Added existing "
					+ type.getSimpleName() + " initializer bean '" + beanName
					+ "'; order=" + order + ", resource=" + resourceDescription);
		}
	}
2.2.2 addAdaptableBeans
方法体具体实现如下:
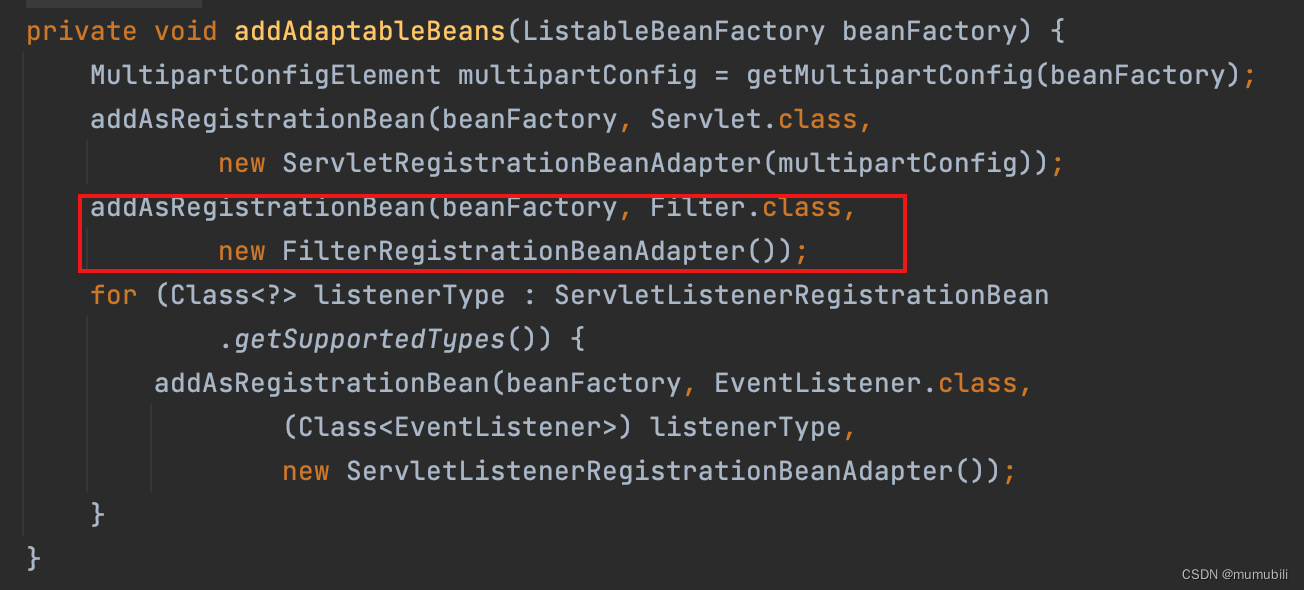
这里可以看到针对Filter类型的处理,展开具体实现如下:
	private <T, B extends T> void addAsRegistrationBean(ListableBeanFactory beanFactory,
			Class<T> type, Class<B> beanType, RegistrationBeanAdapter<T> adapter) {
		List<Map.Entry<String, B>> beans = getOrderedBeansOfType(beanFactory, beanType,
				this.seen);
		for (Entry<String, B> bean : beans) {
			if (this.seen.add(bean.getValue())) {
				int order = getOrder(bean.getValue());
				String beanName = bean.getKey();
				// One that we haven't already seen
				RegistrationBean registration = adapter.createRegistrationBean(beanName,
						bean.getValue(), beans.size());
				registration.setName(beanName);
				registration.setOrder(order);
				this.initializers.add(type, registration);
				if (ServletContextInitializerBeans.logger.isDebugEnabled()) {
					ServletContextInitializerBeans.logger.debug(
							"Created " + type.getSimpleName() + " initializer for bean '"
									+ beanName + "'; order=" + order + ", resource="
									+ getResourceDescription(beanName, beanFactory));
				}
			}
		}
	}
/**
* {@link RegistrationBeanAdapter} for {@link Filter} beans.
*/
private static class FilterRegistrationBeanAdapter
implements RegistrationBeanAdapter<Filter> {
@Override
public RegistrationBean createRegistrationBean(String name, Filter source,
int totalNumberOfSourceBeans) {
return new FilterRegistrationBean(source);
}
}这里通过createRegistrationBean完成了Shiro自定义Filter(SpringShiroFilter)构造为FilterRegistrationBean的逻辑,并添加到initializers中完成Servlet Filter的注册。
