导出onnx文件
直接使用脚本
import torch
import torch.nn.functional as F
from mmdet.apis import init_detector


config_file = './configs/centernet/centernet_r18_8xb16-crop512-140e_coco.py'
checkpoint_file = '../checkpoints/centernet_resnet18_140e_coco_20210705_093630-bb5b3bf7.pth'
model = init_detector(config_file, checkpoint_file, device='cpu')  # or device='cuda:0
torch.onnx.export(model, (torch.zeros(1, 3, 512, 512)), "centernet.onnx", opset_version=11)
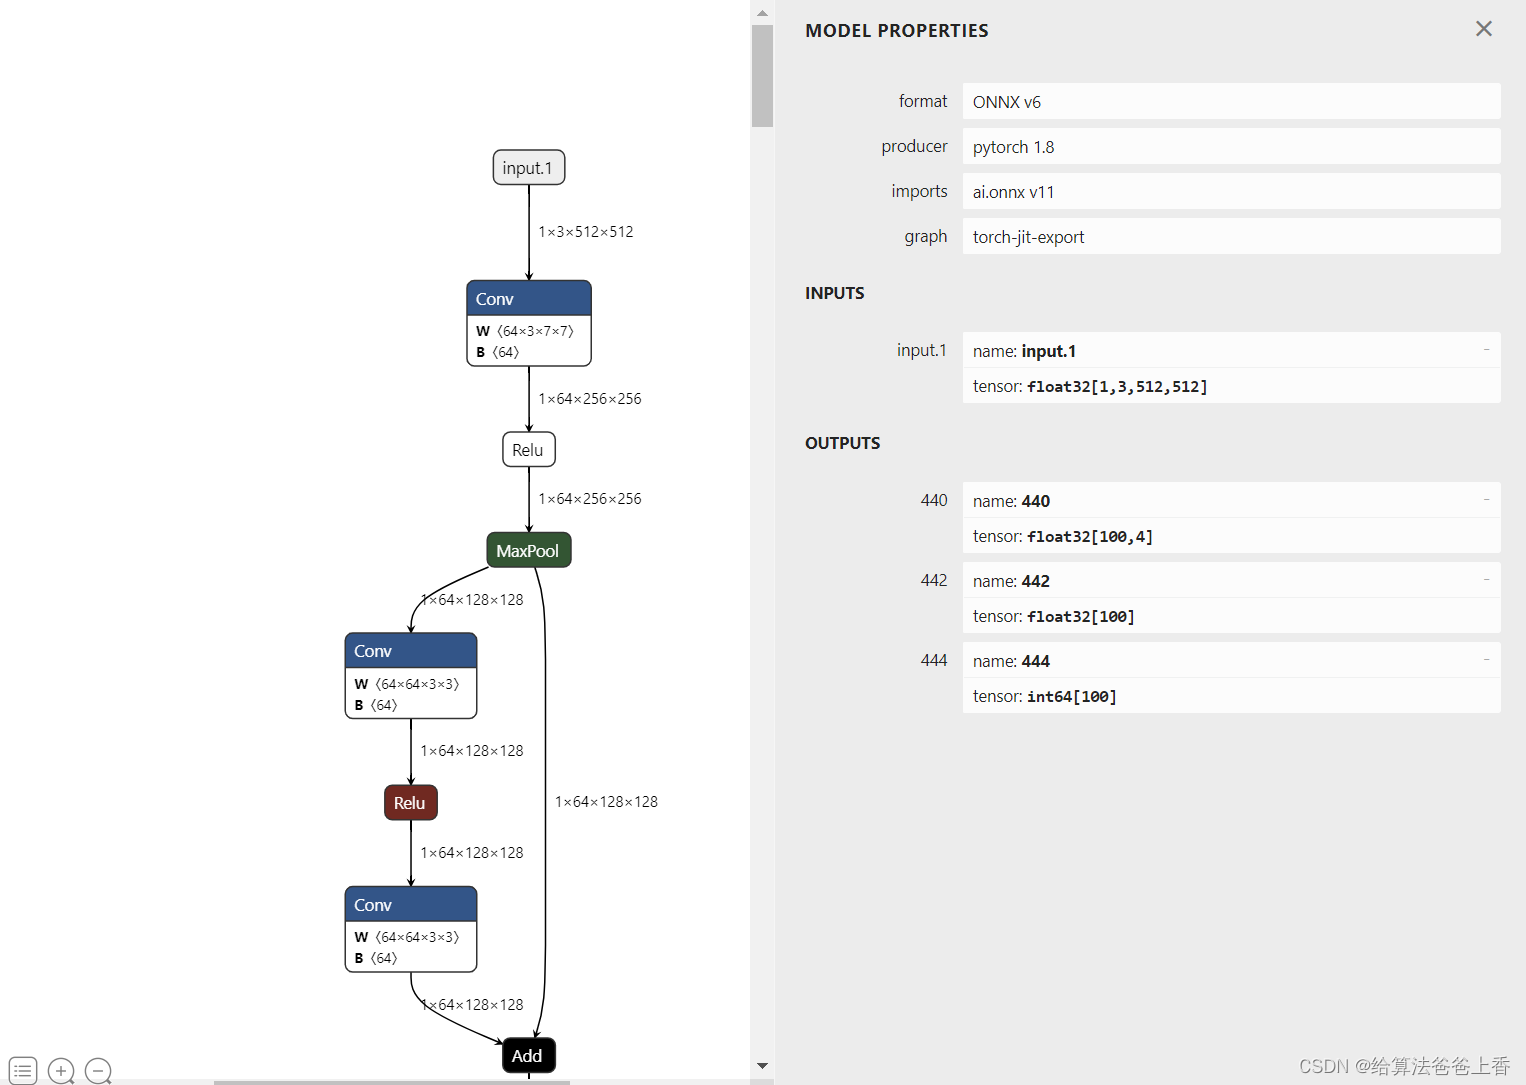
导出的onnx结构如下:

修改脚本如下:
import torch
import torch.nn.functional as F
from mmdet.apis import init_detector


config_file = './configs/centernet/centernet_r18_8xb16-crop512-140e_coco.py'
checkpoint_file = '../checkpoints/centernet_resnet18_140e_coco_20210705_093630-bb5b3bf7.pth'


class CenterNet(torch.nn.Module):
    def __init__(self):
        super().__init__()
        self.model = init_detector(config_file, checkpoint_file, device='cpu')

    def get_local_maximum(self, heat, kernel=3):
        pad = (kernel - 1) // 2
        hmax = F.max_pool2d(heat, kernel, stride=1, padding=pad)
        keep = (hmax == heat).float()
        return heat * keep

    def get_topk_from_heatmap(self, scores, k=20):
        batch, _, height, width = scores.size()
        topk_scores, topk_inds = torch.topk(scores.view(batch, -1), k)
        topk_clses = topk_inds // (height * width)
        topk_inds = topk_inds % (height * width)
        topk_ys = topk_inds // width
        topk_xs = (topk_inds % width).int().float()
        return topk_scores, topk_inds, topk_clses, topk_ys, topk_xs

    def gather_feat(self, feat, ind, mask=None):
        dim = feat.size(2)
        ind = ind.unsqueeze(2).repeat(1, 1, dim)
        feat = feat.gather(1, ind)
        if mask is not None:
            mask = mask.unsqueeze(2).expand_as(feat)
            feat = feat[mask]
            feat = feat.view(-1, dim)
        return feat

    def transpose_and_gather_feat(self, feat, ind):
        feat = feat.permute(0, 2, 3, 1).contiguous()
        feat = feat.view(feat.size(0), -1, feat.size(3))
        feat = self.gather_feat(feat, ind)
        return feat

    def _decode_heatmap(self, center_heatmap_pred, wh_pred, offset_pred, img_shape, k, kernel):
        height, width = center_heatmap_pred.shape[2:]
        inp_h, inp_w = img_shape

        center_heatmap_pred = self.get_local_maximum(center_heatmap_pred, kernel=kernel)

        *batch_dets, topk_ys, topk_xs = self.get_topk_from_heatmap(center_heatmap_pred, k=k)
        batch_scores, batch_index, batch_topk_labels = batch_dets

        wh = self.transpose_and_gather_feat(wh_pred, batch_index)
        offset = self.transpose_and_gather_feat(offset_pred, batch_index)
        topk_xs = topk_xs + offset[..., 0]
        topk_ys = topk_ys + offset[..., 1]
        tl_x = (topk_xs - wh[..., 0] / 2) * (inp_w / width)
        tl_y = (topk_ys - wh[..., 1] / 2) * (inp_h / height)
        br_x = (topk_xs + wh[..., 0] / 2) * (inp_w / width)
        br_y = (topk_ys + wh[..., 1] / 2) * (inp_h / height)

        batch_bboxes = torch.stack([tl_x, tl_y, br_x, br_y], dim=2)
        batch_bboxes = torch.cat((batch_bboxes, batch_scores[..., None]), dim=-1)
        return batch_bboxes, batch_topk_labels

    def forward(self, x):
        x = self.model.backbone(x)
        x = self.model.neck(x)
        center_heatmap_pred, wh_pred, offset_pred  = self.model.bbox_head(x)

        batch_det_bboxes, batch_labels = self._decode_heatmap(center_heatmap_pred[0], wh_pred[0], offset_pred[0], img_shape=(512,512), k=100, kernel=3)
        det_bboxes = batch_det_bboxes.view([-1, 5])
        bboxes = det_bboxes[..., :4]
        scores = det_bboxes[..., 4]
        labels = batch_labels.view(-1)
        return bboxes, scores, labels


model = CenterNet().eval()
input = torch.zeros(1, 3, 512, 512, device='cpu')
torch.onnx.export(model, input, "centernet.onnx", opset_version=11)

import onnx
from onnxsim import simplify
onnx_model = onnx.load("centernet.onnx")  # load onnx model
model_simp, check = simplify(onnx_model)
assert check, "Simplified ONNX model could not be validated"
onnx.save(model_simp, "centernet_sim.onnx")
导出的onnx结构如下:
则三个输出分别为boxes、scores、class_ids。
安装mmdeploy的话,可以通过下面脚本导出onnx模型:
from mmdeploy.apis import torch2onnx
from mmdeploy.backend.sdk.export_info import export2SDK


img = 'demo.JPEG'
work_dir = './work_dir/onnx/centernet'
save_file = './end2end.onnx'
deploy_cfg = 'mmdeploy/configs/mmdet/detection/detection_onnxruntime_dynamic.py'
model_cfg = 'mmdetection/configs/centernet/centernet_r18_8xb16-crop512-140e_coco.py'
model_checkpoint = 'checkpoints/centernet_resnet18_140e_coco_20210705_093630-bb5b3bf7.pth'
device = 'cpu'

# 1. convert model to onnx
torch2onnx(img, work_dir, save_file, deploy_cfg, model_cfg, model_checkpoint, device)

# 2. extract pipeline info for sdk use (dump-info)
export2SDK(deploy_cfg, model_cfg, work_dir, pth=model_checkpoint, device=device)
onnx模型的结构如下: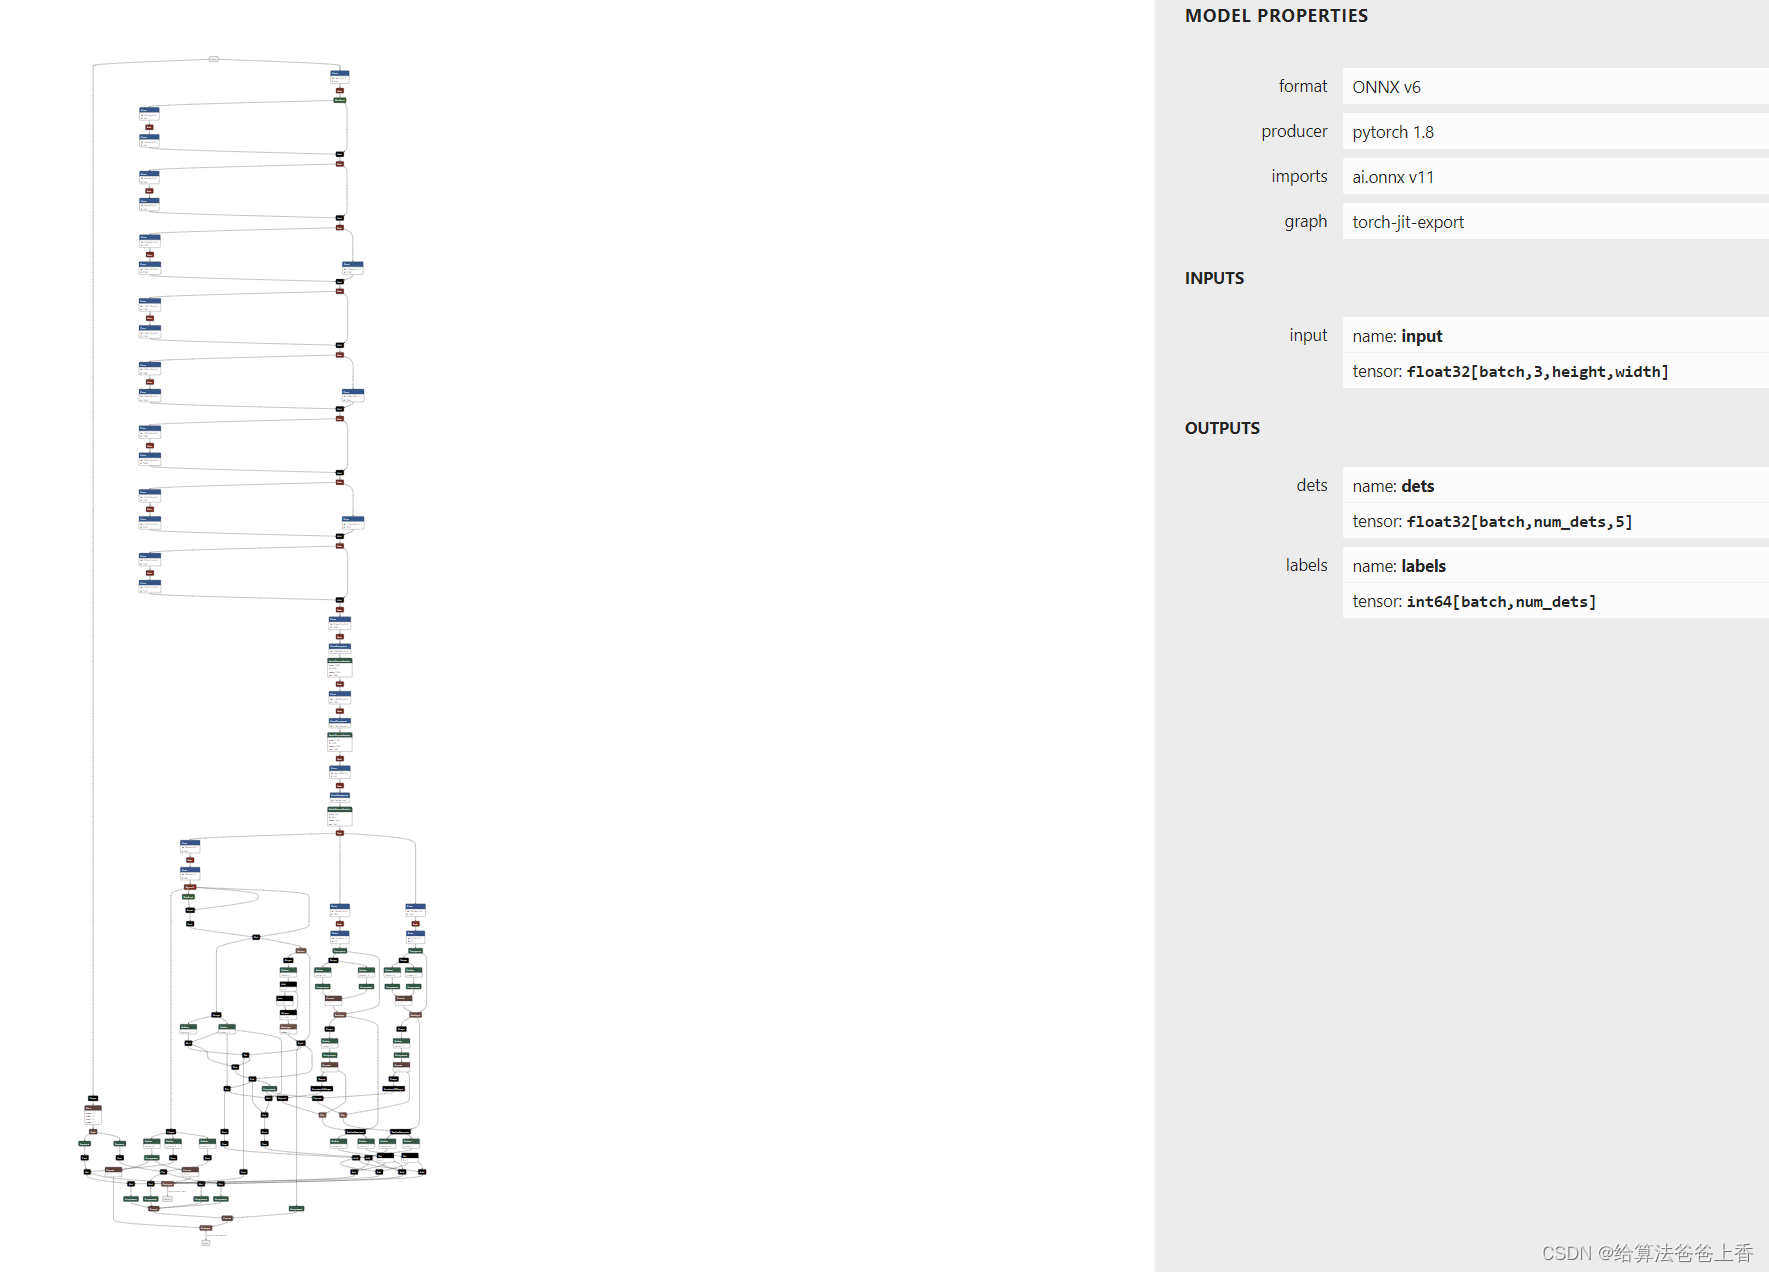
onnxruntime推理
手动导出的onnx模型使用onnxruntime推理:
import cv2
import numpy as np
import onnxruntime


class_names = ['person', 'bicycle', 'car', 'motorcycle', 'airplane', 'bus', 'train', 'truck', 'boat', 'traffic light',
        'fire hydrant', 'stop sign', 'parking meter', 'bench', 'bird', 'cat', 'dog', 'horse', 'sheep', 'cow',
        'elephant', 'bear', 'zebra', 'giraffe', 'backpack', 'umbrella', 'handbag', 'tie', 'suitcase', 'frisbee',
        'skis', 'snowboard', 'sports ball', 'kite', 'baseball bat', 'baseball glove', 'skateboard', 'surfboard',
        'tennis racket', 'bottle', 'wine glass', 'cup', 'fork', 'knife', 'spoon', 'bowl', 'banana', 'apple',
        'sandwich', 'orange', 'broccoli', 'carrot', 'hot dog', 'pizza', 'donut', 'cake', 'chair', 'couch',
        'potted plant', 'bed', 'dining table', 'toilet', 'tv', 'laptop', 'mouse', 'remote', 'keyboard', 'cell phone',
        'microwave', 'oven', 'toaster', 'sink', 'refrigerator', 'book', 'clock', 'vase', 'scissors', 'teddy bear',
        'hair drier', 'toothbrush'] #coco80类别
input_shape = (512, 512)
score_threshold = 0.2
nms_threshold = 0.5
confidence_threshold = 0.2


def nms(boxes, scores, score_threshold, nms_threshold):
    x1 = boxes[:, 0]
    y1 = boxes[:, 1]
    x2 = boxes[:, 2]
    y2 = boxes[:, 3]
    areas = (y2 - y1 + 1) * (x2 - x1 + 1)
    keep = []
    index = scores.argsort()[::-1]

    while index.size > 0:
        i = index[0]
        keep.append(i)
        x11 = np.maximum(x1[i], x1[index[1:]])
        y11 = np.maximum(y1[i], y1[index[1:]])
        x22 = np.minimum(x2[i], x2[index[1:]])
        y22 = np.minimum(y2[i], y2[index[1:]])
        w = np.maximum(0, x22 - x11 + 1)
        h = np.maximum(0, y22 - y11 + 1)
        overlaps = w * h
        ious = overlaps / (areas[i] + areas[index[1:]] - overlaps)
        idx = np.where(ious <= nms_threshold)[0]
        index = index[idx + 1]
    return keep


def xywh2xyxy(x):
    y = np.copy(x)
    y[:, 0] = x[:, 0] - x[:, 2] / 2
    y[:, 1] = x[:, 1] - x[:, 3] / 2
    y[:, 2] = x[:, 0] + x[:, 2] / 2
    y[:, 3] = x[:, 1] + x[:, 3] / 2
    return y


def filter_box(outputs):
    outputs0, outputs1, outputs2 = outputs
    flag = outputs1 > confidence_threshold
    output0 = outputs0[flag].reshape(-1, 4)
    output1 = outputs1[flag].reshape(-1, 1)
    outputs2 = outputs2[flag].reshape(-1, 1)
    outputs = np.concatenate((output0, output1, outputs2), axis=1)

    boxes = []
    scores = []
    class_ids = []
    for i in range(len(outputs)):
        outputs[i][4] = output1[i]
        outputs[i][5] = outputs2[i]
        if outputs[i][4] > score_threshold:
            boxes.append(outputs[i][:6])
            scores.append(outputs[i][4])
            class_ids.append(outputs[i][5])

    boxes = np.array(boxes)
    scores = np.array(scores)
    indices = nms(boxes, scores, score_threshold, nms_threshold)
    output = boxes[indices]
    return output


def letterbox(im, new_shape=(416, 416), color=(114, 114, 114)):
    # Resize and pad image while meeting stride-multiple constraints
    shape = im.shape[:2]  # current shape [height, width]

    # Scale ratio (new / old)
    r = min(new_shape[0] / shape[0], new_shape[1] / shape[1])

    # Compute padding
    new_unpad = int(round(shape[1] * r)), int(round(shape[0] * r))
    dw, dh = (new_shape[1] - new_unpad[0])/2, (new_shape[0] - new_unpad[1])/2  # wh padding
    top, bottom = int(round(dh - 0.1)), int(round(dh + 0.1))
    left, right = int(round(dw - 0.1)), int(round(dw + 0.1))

    if shape[::-1] != new_unpad:  # resize
        im = cv2.resize(im, new_unpad, interpolation=cv2.INTER_LINEAR)
    im = cv2.copyMakeBorder(im, top, bottom, left, right, cv2.BORDER_CONSTANT, value=color)  # add border
    return im


def scale_boxes(boxes, shape):
    # Rescale boxes (xyxy) from input_shape to shape
    gain = min(input_shape[0] / shape[0], input_shape[1] / shape[1])  # gain  = old / new
    pad = (input_shape[1] - shape[1] * gain) / 2, (input_shape[0] - shape[0] * gain) / 2  # wh padding
    boxes[..., [0, 2]] -= pad[0]  # x padding
    boxes[..., [1, 3]] -= pad[1]  # y padding
    boxes[..., :4] /= gain
    boxes[..., [0, 2]] = boxes[..., [0, 2]].clip(0, shape[1])  # x1, x2
    boxes[..., [1, 3]] = boxes[..., [1, 3]].clip(0, shape[0])  # y1, y2
    return boxes


def draw(image, box_data):
    box_data = scale_boxes(box_data, image.shape)
    boxes = box_data[...,:4].astype(np.int32)
    scores = box_data[...,4]
    classes = box_data[...,5].astype(np.int32)

    for box, score, cl in zip(boxes, scores, classes):
        top, left, right, bottom = box
        cv2.rectangle(image, (top, left), (right, bottom), (255, 0, 0), 1)
        cv2.putText(image, '{0} {1:.2f}'.format(class_names[cl], score), (top, left), cv2.FONT_HERSHEY_SIMPLEX, 0.6, (0, 0, 255), 1)


if __name__=="__main__":
    image = cv2.imread('bus.jpg')
    input = letterbox(image, input_shape)
    input = input[:, :, ::-1].transpose(2, 0, 1).astype(dtype=np.float32)  #BGR2RGB和HWC2CHW
    input[0,:] = (input[0,:] - 123.675) / 58.395
    input[1,:] = (input[1,:] - 116.28) / 57.12
    input[2,:] = (input[2,:] - 103.53) / 57.375
    input = np.expand_dims(input, axis=0)

    onnx_session = onnxruntime.InferenceSession('centernet_sim.onnx', providers=['CPUExecutionProvider'])

    input_name = []
    for node in onnx_session.get_inputs():
        input_name.append(node.name)

    output_name = []
    for node in onnx_session.get_outputs():
        output_name.append(node.name)

    inputs = {}
    for name in input_name:
        inputs[name] = input

    outputs = onnx_session.run(None, inputs)

    boxes = filter_box(outputs)
    draw(image, boxes)
    cv2.imwrite('result.jpg', image)
mmdeploy导出的onnx模型使用onnxruntime推理:
import cv2
import numpy as np
import onnxruntime


class_names = ['person', 'bicycle', 'car', 'motorcycle', 'airplane', 'bus', 'train', 'truck', 'boat', 'traffic light',
        'fire hydrant', 'stop sign', 'parking meter', 'bench', 'bird', 'cat', 'dog', 'horse', 'sheep', 'cow',
        'elephant', 'bear', 'zebra', 'giraffe', 'backpack', 'umbrella', 'handbag', 'tie', 'suitcase', 'frisbee',
        'skis', 'snowboard', 'sports ball', 'kite', 'baseball bat', 'baseball glove', 'skateboard', 'surfboard',
        'tennis racket', 'bottle', 'wine glass', 'cup', 'fork', 'knife', 'spoon', 'bowl', 'banana', 'apple',
        'sandwich', 'orange', 'broccoli', 'carrot', 'hot dog', 'pizza', 'donut', 'cake', 'chair', 'couch',
        'potted plant', 'bed', 'dining table', 'toilet', 'tv', 'laptop', 'mouse', 'remote', 'keyboard', 'cell phone',
        'microwave', 'oven', 'toaster', 'sink', 'refrigerator', 'book', 'clock', 'vase', 'scissors', 'teddy bear',
        'hair drier', 'toothbrush'] #coco80类别
input_shape = (512, 512)
confidence_threshold = 0.2


def filter_box(outputs): #删除置信度小于confidence_threshold的BOX
    flag = outputs[0][..., 4] > confidence_threshold
    boxes = outputs[0][flag]
    class_ids = outputs[1][flag].reshape(-1, 1)
    output = np.concatenate((boxes, class_ids), axis=1)
    return output


def letterbox(im, new_shape=(416, 416), color=(114, 114, 114)):
    # Resize and pad image while meeting stride-multiple constraints
    shape = im.shape[:2]  # current shape [height, width]

    # Scale ratio (new / old)
    r = min(new_shape[0] / shape[0], new_shape[1] / shape[1])

    # Compute padding
    new_unpad = int(round(shape[1] * r)), int(round(shape[0] * r))
    dw, dh = (new_shape[1] - new_unpad[0])/2, (new_shape[0] - new_unpad[1])/2  # wh padding
    top, bottom = int(round(dh - 0.1)), int(round(dh + 0.1))
    left, right = int(round(dw - 0.1)), int(round(dw + 0.1))

    if shape[::-1] != new_unpad:  # resize
        im = cv2.resize(im, new_unpad, interpolation=cv2.INTER_LINEAR)
    im = cv2.copyMakeBorder(im, top, bottom, left, right, cv2.BORDER_CONSTANT, value=color)  # add border
    return im


def scale_boxes(input_shape, boxes, shape):
    # Rescale boxes (xyxy) from input_shape to shape
    gain = min(input_shape[0] / shape[0], input_shape[1] / shape[1])  # gain  = old / new
    pad = (input_shape[1] - shape[1] * gain) / 2, (input_shape[0] - shape[0] * gain) / 2  # wh padding

    boxes[..., [0, 2]] -= pad[0]  # x padding
    boxes[..., [1, 3]] -= pad[1]  # y padding
    boxes[..., :4] /= gain
    boxes[..., [0, 2]] = boxes[..., [0, 2]].clip(0, shape[1])  # x1, x2
    boxes[..., [1, 3]] = boxes[..., [1, 3]].clip(0, shape[0])  # y1, y2
    return boxes


def draw(image, box_data):
    box_data = scale_boxes(input_shape, box_data, image.shape)
    boxes = box_data[...,:4].astype(np.int32)
    scores = box_data[...,4]
    classes = box_data[...,5].astype(np.int32)

    for box, score, cl in zip(boxes, scores, classes):
        top, left, right, bottom = box
        cv2.rectangle(image, (top, left), (right, bottom), (255, 0, 0), 1)
        cv2.putText(image, '{0} {1:.2f}'.format(class_names[cl], score), (top, left), cv2.FONT_HERSHEY_SIMPLEX, 0.6, (0, 0, 255), 1)


if __name__=="__main__":
    image = cv2.imread('bus.jpg')
    input = letterbox(image, input_shape)
    input = input[:, :, ::-1].transpose(2, 0, 1).astype(dtype=np.float32)  #BGR2RGB和HWC2CHW
    input[0,:] = (input[0,:] - 123.675) / 58.395
    input[1,:] = (input[1,:] - 116.28) / 57.12
    input[2,:] = (input[2,:] - 103.53) / 57.375
    input = np.expand_dims(input, axis=0)

    onnx_session = onnxruntime.InferenceSession('../work_dir/onnx/centernet/end2end.onnx', providers=['CPUExecutionProvider'])

    input_name = []
    for node in onnx_session.get_inputs():
        input_name.append(node.name)

    output_name=[]
    for node in onnx_session.get_outputs():
        output_name.append(node.name)

    inputs = {}
    for name in input_name:
        inputs[name] = input

    outputs = onnx_session.run(None, inputs)

    boxes = filter_box(outputs)
    draw(image, boxes)
    cv2.imwrite('result.jpg', image)
直接使用mmdeploy的api推理:
from mmdeploy.apis import inference_model


model_cfg = 'mmdetection/configs/centernet/centernet_r18_8xb16-crop512-140e_coco.py'
deploy_cfg = 'mmdeploy/configs/mmdet/detection/detection_onnxruntime_dynamic.py'
img = 'mmdetection/demo/demo.jpg'
backend_files = ['work_dir/onnx/centernet/end2end.onnx']
device = 'cpu'

result = inference_model(model_cfg, deploy_cfg, backend_files, img, device)
print(result)
或者
from mmdeploy_runtime import Detector
import cv2

# 读取图片
img = cv2.imread('mmdetection/demo/demo.jpg')

# 创建检测器
detector = Detector(model_path='work_dir/onnx/centernet', device_name='cpu')

# 执行推理
bboxes, labels, _ = detector(img)
# 使用阈值过滤推理结果,并绘制到原图中
indices = [i for i in range(len(bboxes))]
for index, bbox, label_id in zip(indices, bboxes, labels):
  [left, top, right, bottom], score = bbox[0:4].astype(int),  bbox[4]
  if score < 0.3:
      continue
  cv2.rectangle(img, (left, top), (right, bottom), (0, 255, 0))
cv2.imwrite('output_detection.png', img)
导出engine文件
方法一:通过trtexec转换onnx文件,LZ的版本是TensorRT-8.2.1.8。
./trtexec.exe --onnx=centernet.onnx --saveEngine=centernet.engine --workspace=20480
方法二:通过mmdeploy导出engine文件。
from mmdeploy.apis import torch2onnx
from mmdeploy.backend.tensorrt.onnx2tensorrt import onnx2tensorrt
from mmdeploy.backend.sdk.export_info import export2SDK
import os


img = 'demo.JPEG'
work_dir = './work_dir/trt/centernet'
save_file = './end2end.onnx'
deploy_cfg = 'mmdeploy/configs/mmdet/detection/detection_tensorrt_dynamic-320x320-1344x1344.py'
model_cfg = 'mmdetection/configs/centernet/centernet_r18_8xb16-crop512-140e_coco.py'
model_checkpoint = 'checkpoints/centernet_resnet18_140e_coco_20210705_093630-bb5b3bf7.pth'
device = 'cuda'

# 1. convert model to IR(onnx)
torch2onnx(img, work_dir, save_file, deploy_cfg, model_cfg, model_checkpoint, device)

# 2. convert IR to tensorrt
onnx_model = os.path.join(work_dir, save_file)
save_file = 'end2end.engine'
model_id = 0
device = 'cuda'
onnx2tensorrt(work_dir, save_file, model_id, deploy_cfg, onnx_model, device)

# 3. extract pipeline info for sdk use (dump-info)
export2SDK(deploy_cfg, model_cfg, work_dir, pth=model_checkpoint, device=device)
tensorrt推理
trtexec导出的模型使用tensorrt推理:
import cv2
import numpy as np
import tensorrt as trt
import pycuda.autoinit
import pycuda.driver as cuda


class_names = ['person', 'bicycle', 'car', 'motorcycle', 'airplane', 'bus', 'train', 'truck', 'boat', 'traffic light',
        'fire hydrant', 'stop sign', 'parking meter', 'bench', 'bird', 'cat', 'dog', 'horse', 'sheep', 'cow',
        'elephant', 'bear', 'zebra', 'giraffe', 'backpack', 'umbrella', 'handbag', 'tie', 'suitcase', 'frisbee',
        'skis', 'snowboard', 'sports ball', 'kite', 'baseball bat', 'baseball glove', 'skateboard', 'surfboard',
        'tennis racket', 'bottle', 'wine glass', 'cup', 'fork', 'knife', 'spoon', 'bowl', 'banana', 'apple',
        'sandwich', 'orange', 'broccoli', 'carrot', 'hot dog', 'pizza', 'donut', 'cake', 'chair', 'couch',
        'potted plant', 'bed', 'dining table', 'toilet', 'tv', 'laptop', 'mouse', 'remote', 'keyboard', 'cell phone',
        'microwave', 'oven', 'toaster', 'sink', 'refrigerator', 'book', 'clock', 'vase', 'scissors', 'teddy bear',
        'hair drier', 'toothbrush'] #coco80类别
input_shape = (512, 512)
score_threshold = 0.2
nms_threshold = 0.5
confidence_threshold = 0.2


def nms(boxes, scores, score_threshold, nms_threshold):
    x1 = boxes[:, 0]
    y1 = boxes[:, 1]
    x2 = boxes[:, 2]
    y2 = boxes[:, 3]
    areas = (y2 - y1 + 1) * (x2 - x1 + 1)
    keep = []
    index = scores.argsort()[::-1]

    while index.size > 0:
        i = index[0]
        keep.append(i)
        x11 = np.maximum(x1[i], x1[index[1:]])
        y11 = np.maximum(y1[i], y1[index[1:]])
        x22 = np.minimum(x2[i], x2[index[1:]])
        y22 = np.minimum(y2[i], y2[index[1:]])
        w = np.maximum(0, x22 - x11 + 1)
        h = np.maximum(0, y22 - y11 + 1)
        overlaps = w * h
        ious = overlaps / (areas[i] + areas[index[1:]] - overlaps)
        idx = np.where(ious <= nms_threshold)[0]
        index = index[idx + 1]
    return keep


def xywh2xyxy(x):
    y = np.copy(x)
    y[:, 0] = x[:, 0] - x[:, 2] / 2
    y[:, 1] = x[:, 1] - x[:, 3] / 2
    y[:, 2] = x[:, 0] + x[:, 2] / 2
    y[:, 3] = x[:, 1] + x[:, 3] / 2
    return y


def filter_box(outputs):
    outputs0, outputs1, outputs2 = outputs
    flag = outputs1 > confidence_threshold
    output0 = outputs0[flag].reshape(-1, 4)
    output1 = outputs1[flag].reshape(-1, 1)
    outputs2 = outputs2[flag].reshape(-1, 1)
    outputs = np.concatenate((output0, output1, outputs2), axis=1)

    boxes = []
    scores = []
    class_ids = []
    for i in range(len(outputs)):
        outputs[i][4] = output1[i]
        outputs[i][5] = outputs2[i]
        if outputs[i][4] > score_threshold:
            boxes.append(outputs[i][:6])
            scores.append(outputs[i][4])
            class_ids.append(outputs[i][5])

    boxes = np.array(boxes)
    scores = np.array(scores)
    indices = nms(boxes, scores, score_threshold, nms_threshold)
    output = boxes[indices]
    return output


def letterbox(im, new_shape=(416, 416), color=(114, 114, 114)):
    # Resize and pad image while meeting stride-multiple constraints
    shape = im.shape[:2]  # current shape [height, width]

    # Scale ratio (new / old)
    r = min(new_shape[0] / shape[0], new_shape[1] / shape[1])

    # Compute padding
    new_unpad = int(round(shape[1] * r)), int(round(shape[0] * r))
    dw, dh = (new_shape[1] - new_unpad[0])/2, (new_shape[0] - new_unpad[1])/2  # wh padding
    top, bottom = int(round(dh - 0.1)), int(round(dh + 0.1))
    left, right = int(round(dw - 0.1)), int(round(dw + 0.1))

    if shape[::-1] != new_unpad:  # resize
        im = cv2.resize(im, new_unpad, interpolation=cv2.INTER_LINEAR)
    im = cv2.copyMakeBorder(im, top, bottom, left, right, cv2.BORDER_CONSTANT, value=color)  # add border
    return im


def scale_boxes(boxes, shape):
    # Rescale boxes (xyxy) from input_shape to shape
    gain = min(input_shape[0] / shape[0], input_shape[1] / shape[1])  # gain  = old / new
    pad = (input_shape[1] - shape[1] * gain) / 2, (input_shape[0] - shape[0] * gain) / 2  # wh padding
    boxes[..., [0, 2]] -= pad[0]  # x padding
    boxes[..., [1, 3]] -= pad[1]  # y padding
    boxes[..., :4] /= gain
    boxes[..., [0, 2]] = boxes[..., [0, 2]].clip(0, shape[1])  # x1, x2
    boxes[..., [1, 3]] = boxes[..., [1, 3]].clip(0, shape[0])  # y1, y2
    return boxes


def draw(image, box_data):
    box_data = scale_boxes(box_data, image.shape)
    boxes = box_data[...,:4].astype(np.int32)
    scores = box_data[...,4]
    classes = box_data[...,5].astype(np.int32)

    for box, score, cl in zip(boxes, scores, classes):
        top, left, right, bottom = box
        cv2.rectangle(image, (top, left), (right, bottom), (255, 0, 0), 1)
        cv2.putText(image, '{0} {1:.2f}'.format(class_names[cl], score), (top, left), cv2.FONT_HERSHEY_SIMPLEX, 0.6, (0, 0, 255), 1)


if __name__=="__main__":
    logger = trt.Logger(trt.Logger.WARNING)
    with open("centernet.engine", "rb") as f, trt.Runtime(logger) as runtime:
        engine = runtime.deserialize_cuda_engine(f.read())
    context = engine.create_execution_context()
    h_input = cuda.pagelocked_empty(trt.volume(context.get_binding_shape(0)), dtype=np.float32)
    h_output0 = cuda.pagelocked_empty(trt.volume(context.get_binding_shape(1)), dtype=np.float32)
    h_output1 = cuda.pagelocked_empty(trt.volume(context.get_binding_shape(2)), dtype=np.float32)
    h_output2 = cuda.pagelocked_empty(trt.volume(context.get_binding_shape(3)), dtype=np.float32)
    d_input = cuda.mem_alloc(h_input.nbytes)
    d_output0 = cuda.mem_alloc(h_output0.nbytes)
    d_output1 = cuda.mem_alloc(h_output1.nbytes)
    d_output2 = cuda.mem_alloc(h_output2.nbytes)
    stream = cuda.Stream()

    image = cv2.imread('bus.jpg')
    input = letterbox(image, input_shape)
    input = input[:, :, ::-1].transpose(2, 0, 1).astype(dtype=np.float32)  #BGR2RGB和HWC2CHW
    input[0,:] = (input[0,:] - 123.675) / 58.395
    input[1,:] = (input[1,:] - 116.28) / 57.12
    input[2,:] = (input[2,:] - 103.53) / 57.375
    input = np.expand_dims(input, axis=0)
    np.copyto(h_input, input.ravel())

    with engine.create_execution_context() as context:
        cuda.memcpy_htod_async(d_input, h_input, stream)
        context.execute_async_v2(bindings=[int(d_input), int(d_output0), int(d_output1), int(d_output2)], stream_handle=stream.handle)
        cuda.memcpy_dtoh_async(h_output0, d_output0, stream)
        cuda.memcpy_dtoh_async(h_output1, d_output1, stream)
        cuda.memcpy_dtoh_async(h_output2, d_output2, stream)
        stream.synchronize()
        h_output = []
        h_output.append(h_output0.reshape(100, 4))
        h_output.append(h_output1.reshape(100))
        h_output.append(h_output2.reshape(100, 1).astype(np.int32))
        boxes = filter_box(h_output)
        draw(image, boxes)
        cv2.imwrite('result.jpg', image)
使用mmdeploy的api推理:
from mmdeploy.apis import inference_model

model_cfg = 'mmdetection/configs/centernet/centernet_r18_8xb16-crop512-140e_coco.py'
deploy_cfg = 'mmdeploy/configs/mmdet/detection/detection_tensorrt_dynamic-300x300-512x512.py'
img = 'mmdetection/demo/demo.jpg'
backend_files = ['work_dir/trt/centernet/end2end.engine']
device = 'cuda'

result = inference_model(model_cfg, deploy_cfg, backend_files, img, device)
print(result)
或者
from mmdeploy_runtime import Detector
import cv2

# 读取图片
img = cv2.imread('mmdetection/demo/demo.jpg')

# 创建检测器
detector = Detector(model_path='work_dir/trt/centernet', device_name='cuda')

# 执行推理
bboxes, labels, _ = detector(img)
# 使用阈值过滤推理结果,并绘制到原图中
indices = [i for i in range(len(bboxes))]
for index, bbox, label_id in zip(indices, bboxes, labels):
  [left, top, right, bottom], score = bbox[0:4].astype(int),  bbox[4]
  if score < 0.3:
      continue
  cv2.rectangle(img, (left, top), (right, bottom), (0, 255, 0))
cv2.imwrite('output_detection.png', img)

