学更好的别人,
做更好的自己。
——《微卡智享》

本文长度为4239字,预计阅读12分钟
前言
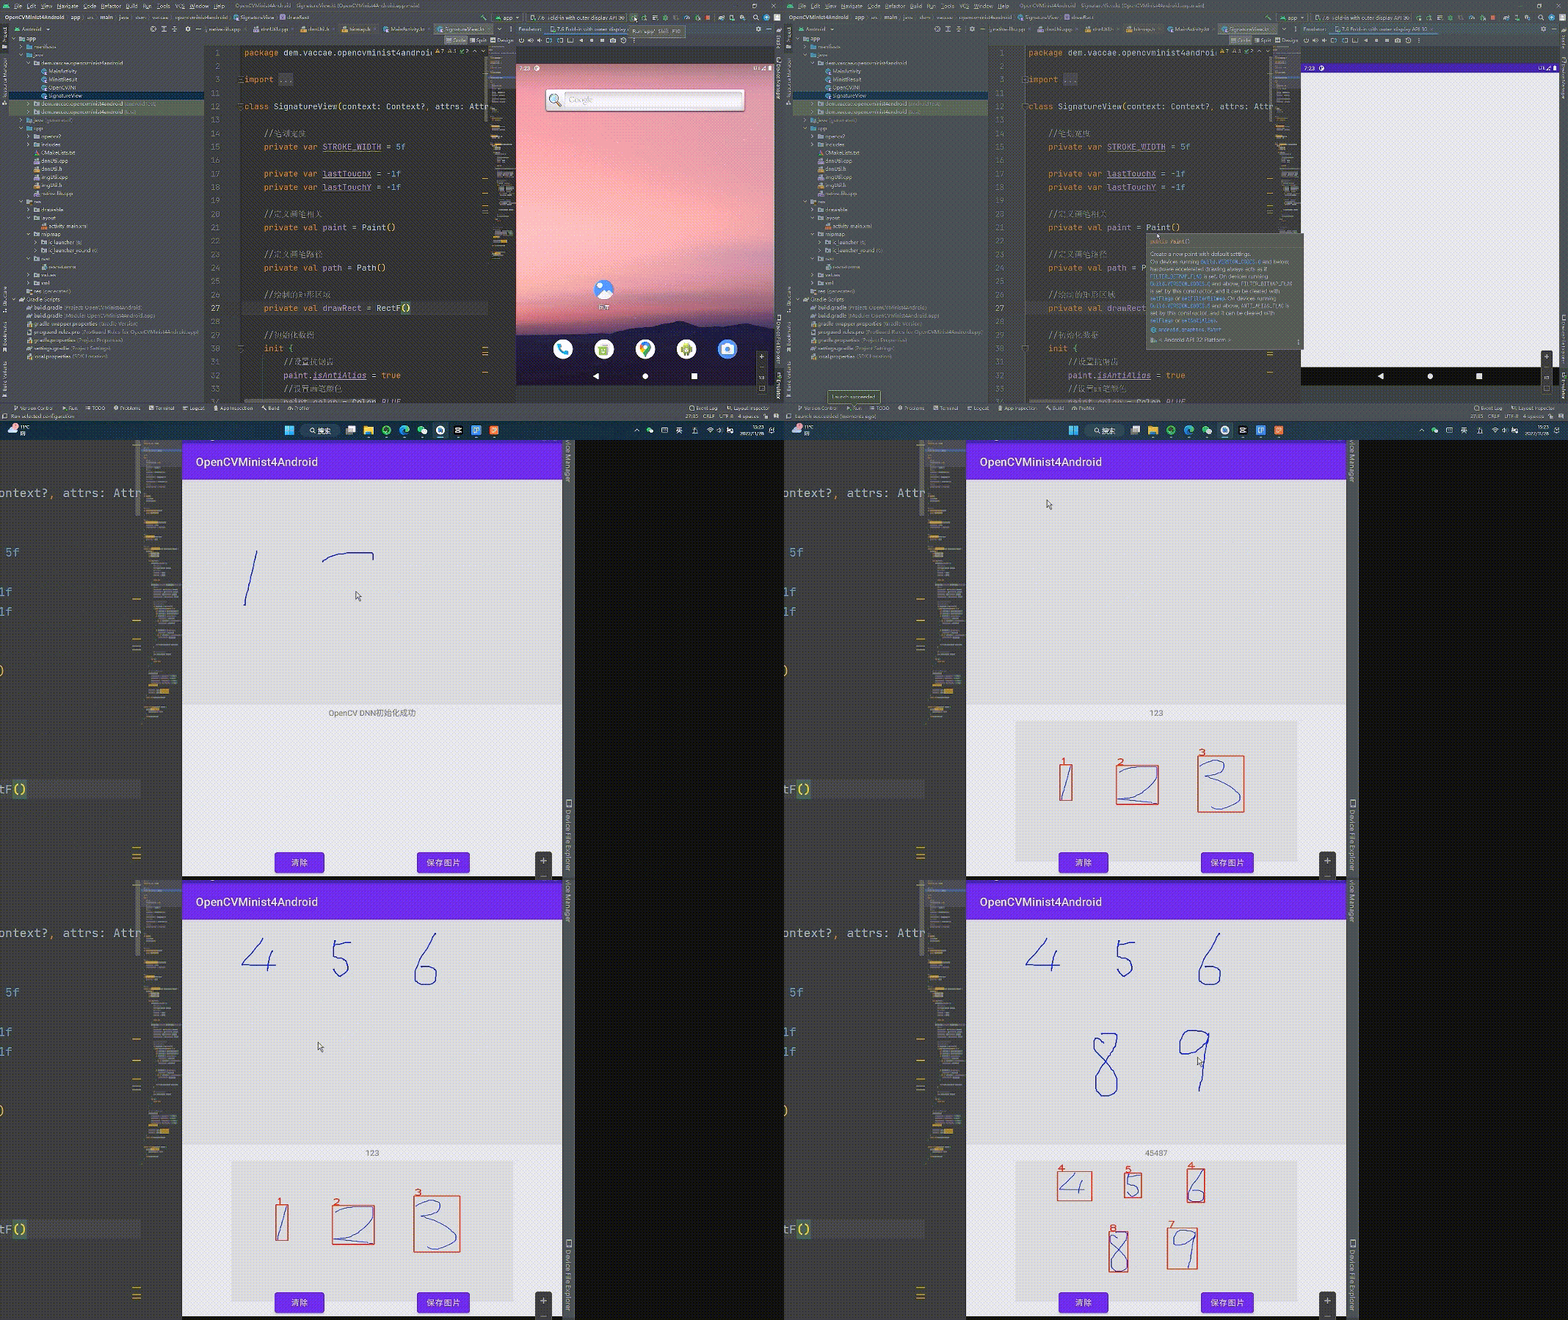
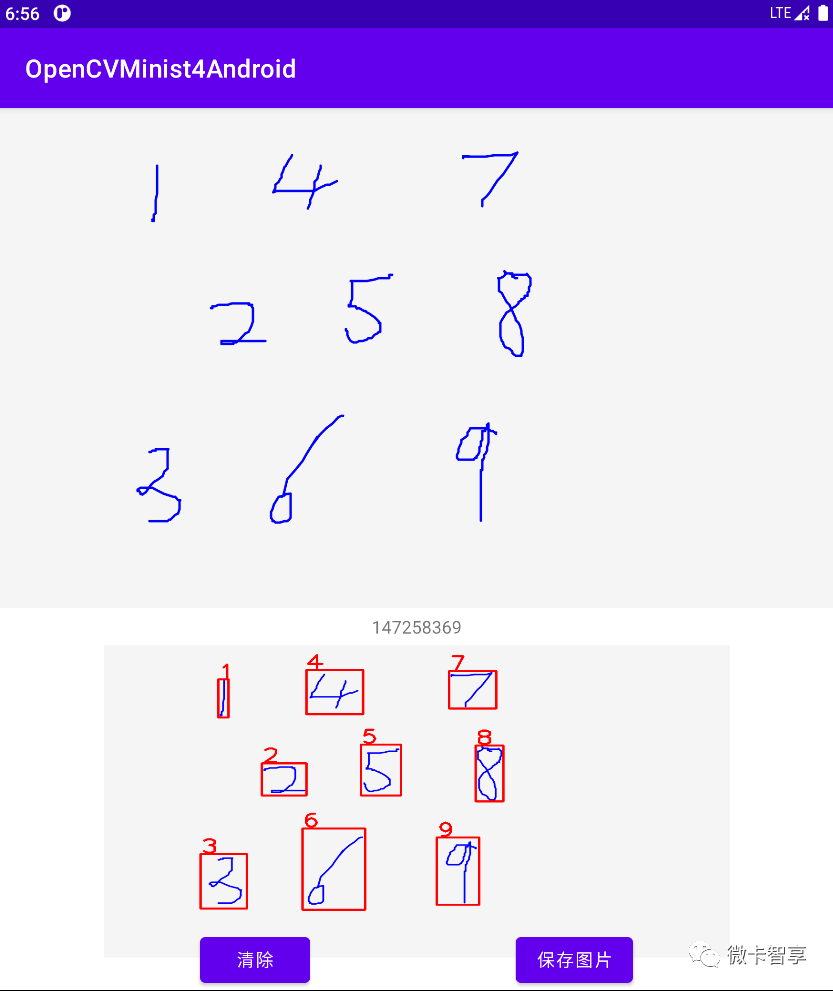
前面几篇文章实现了pyTorch训练模型,然后在Windows平台用C++ OpenCV DNN推理都实现了,这篇就来看看在Android端直接实现一个手写数字识别的功能。本篇最后会放出源码地址。

实现效果
代码实现

微卡智享
实现Android端后写数字识别,一个是项目的OpenCV的环境搭建,详细的搭建可以看《OpenCV4Android中NDK开发(一)--- OpenCV4.1.0环境搭建》,这里只做一下简单介绍了。另一个就是手写板的实现,手写板在前面的《Android Kotlin制作签名白板并保存图片》中已经完成,这次直接将里面现成的类拿过来用即可。
01
项目配置
创建的项目是Native C++的项目,所以cpp文件夹这些都已经创建好了。OpenCV是从官网直接下载的Andorid版本,用的是最新的4.6版本
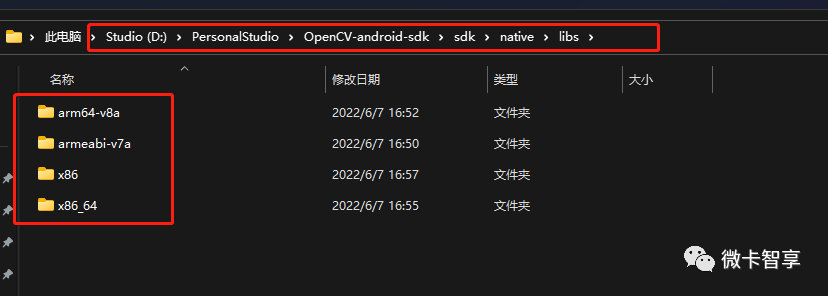
下载好的OpenCV4.6 Android SDK

将里面动态库拷贝到项目目录下的libs下,这里我只拷了3个CPU架构的,因为用虚拟机,所以加上了x86


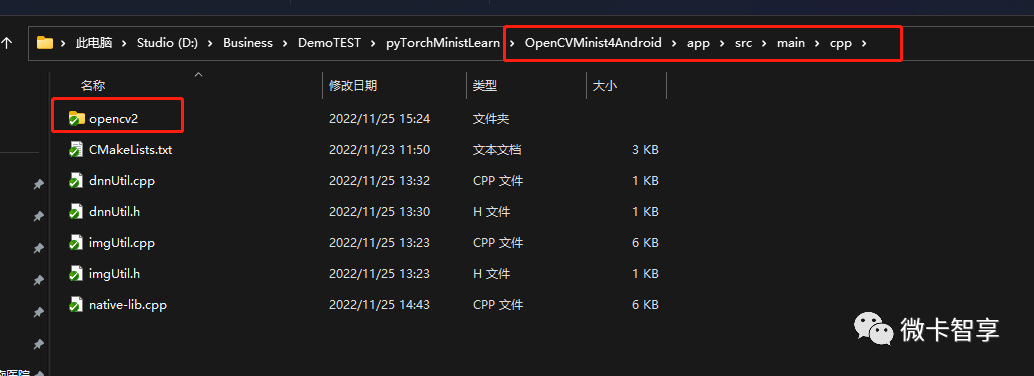
然后将OpenCV Android SDK里面的OpenCV头文件复制到程序目录的cpp文件夹下
配置CMakeLists
# For more information about using CMake with Android Studio, read the
# documentation: https://d.android.com/studio/projects/add-native-code.html


# Sets the minimum version of CMake required to build the native library.


cmake_minimum_required(VERSION 3.18.1)


# Declares and names the project.


project("opencvminist4android")


#定义变量opencvlibs使后面的命令可以使用定位具体的库文件
set(opencvlibs ${CMAKE_CURRENT_SOURCE_DIR}/../../../libs)


#调用头文件的具体路径
include_directories(${CMAKE_CURRENT_SOURCE_DIR})


#增加OpenCV的动态库
add_library(libopencv_java4 SHARED IMPORTED)


#建立链接
set_target_properties(libopencv_java4 PROPERTIES IMPORTED_LOCATION
        "${opencvlibs}/${ANDROID_ABI}/libopencv_java4.so")


# Creates and names a library, sets it as either STATIC
# or SHARED, and provides the relative paths to its source code.
# You can define multiple libraries, and CMake builds them for you.
# Gradle automatically packages shared libraries with your APK.


file(GLOB native_srcs "*.cpp")


add_library( # Sets the name of the library.
        opencvminist4android


        # Sets the library as a shared library.
        SHARED


        # Provides a relative path to your source file(s).
        ${native_srcs})


# Searches for a specified prebuilt library and stores the path as a
# variable. Because CMake includes system libraries in the search path by
# default, you only need to specify the name of the public NDK library
# you want to add. CMake verifies that the library exists before
# completing its build.


find_library( # Sets the name of the path variable.
        log-lib


        # Specifies the name of the NDK library that
        # you want CMake to locate.
        log)


# Specifies libraries CMake should link to your target library. You
# can link multiple libraries, such as libraries you define in this
# build script, prebuilt third-party libraries, or system libraries.


target_link_libraries( # Specifies the target library.
        opencvminist4android
        jnigraphics
        libopencv_java4


        # Links the target library to the log library
        # included in the NDK.
        ${log-lib})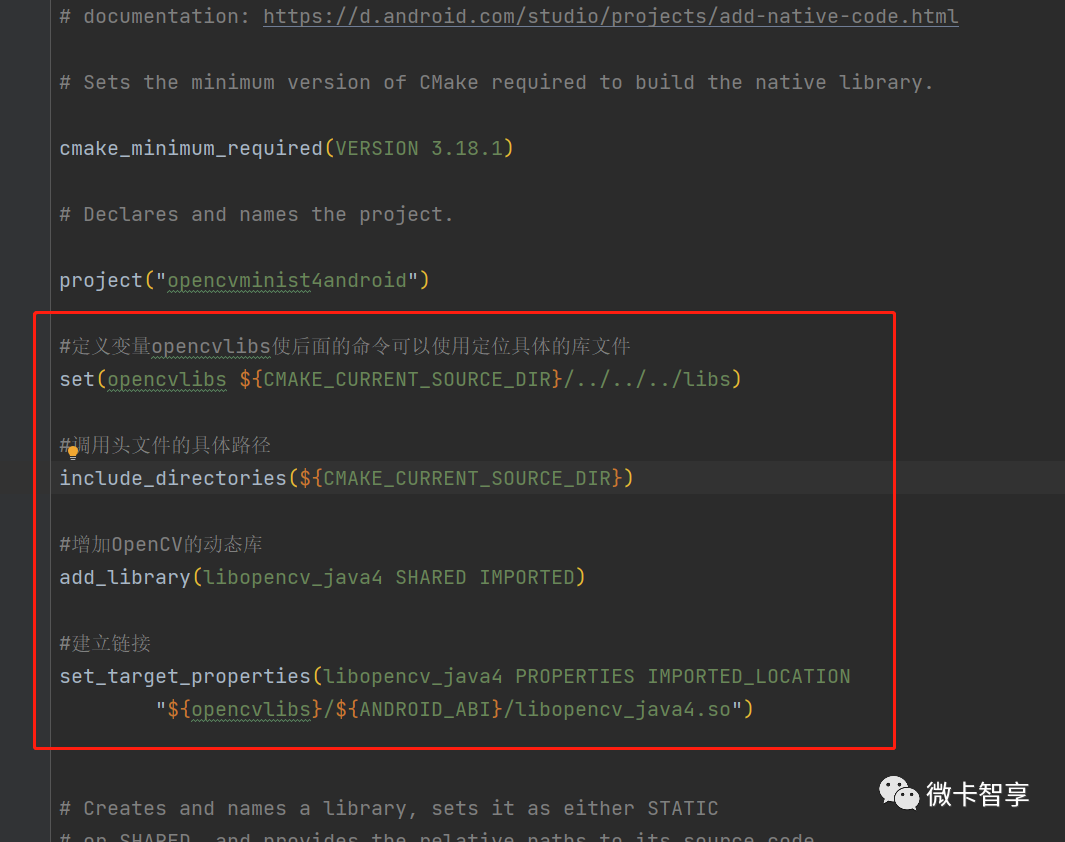
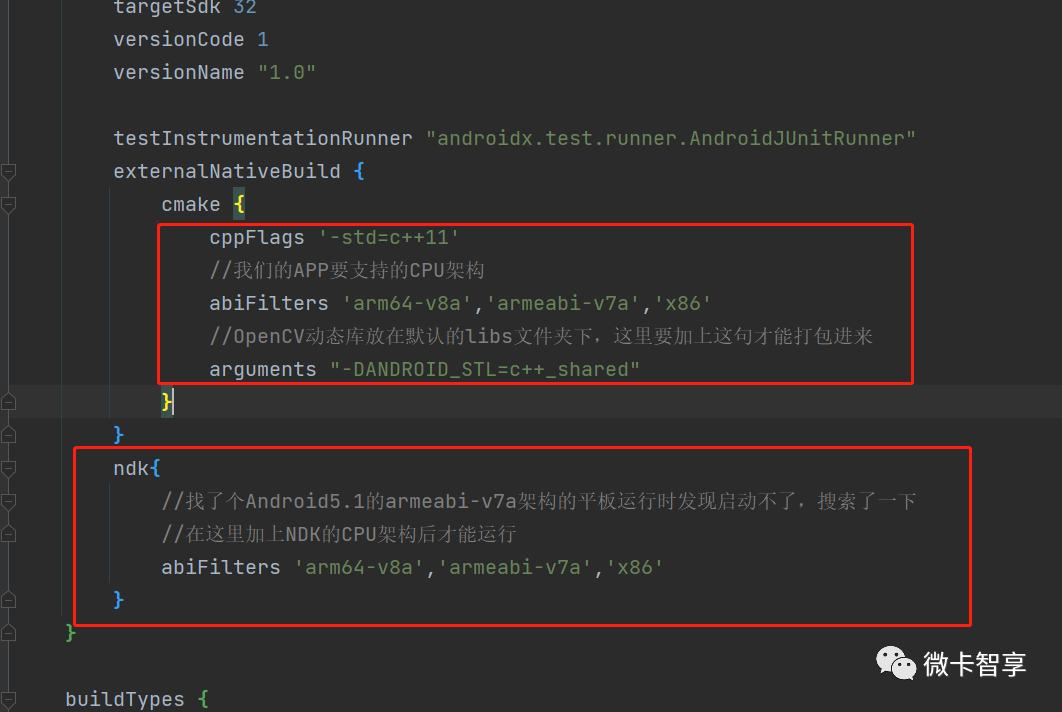
build.gradle中要加入相关的配置
02
C++中的代码处理
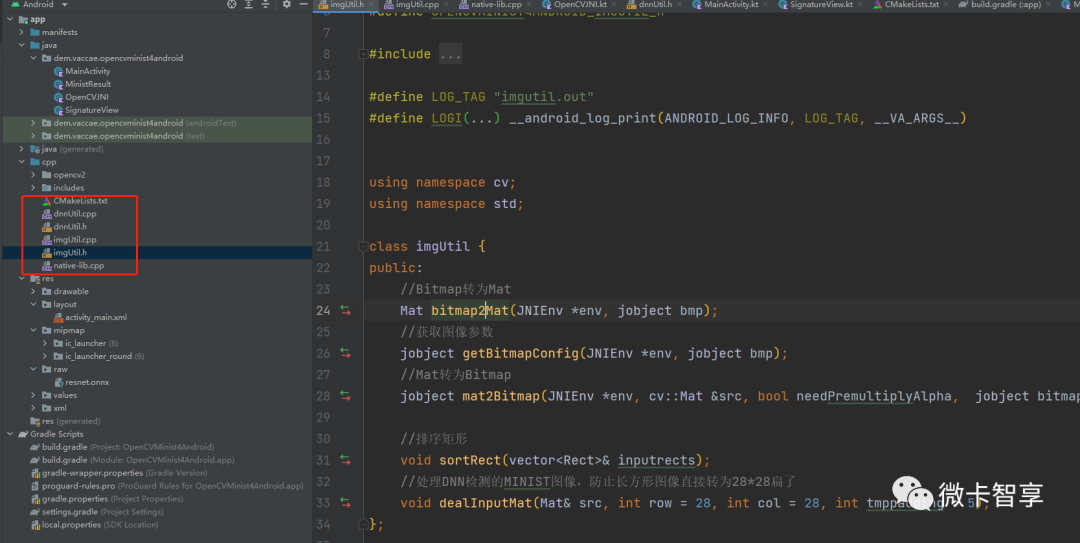
图中看到native-lib.cpp是JNI中的入口,而这里创建了两个C++的类imgUtil和dnnUtil,一个是图像的处理,一个是DNN推理用的类。
imgUtil类
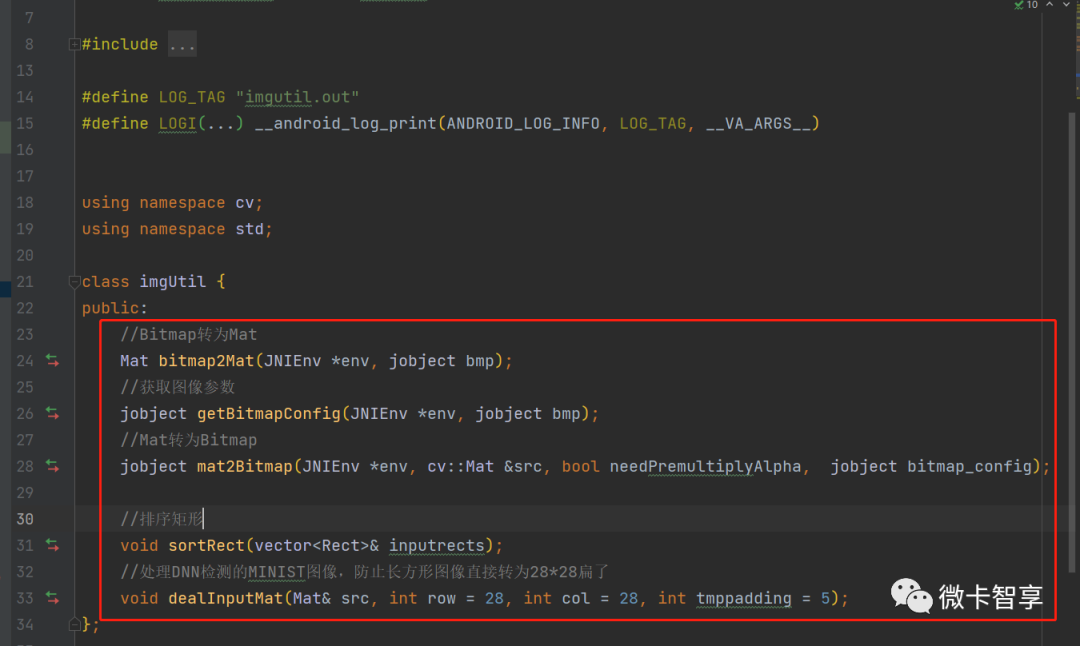
几个函数中下面的sortRect和dealInputMat这两个函数就是前面章里面用到的函数,这里将他们放到这个类里面了。而Android中保存的bitmap图像在OpenCV中需要进行转换处理,所以上面的三个函数是bitmap和Mat之间相互转换用的。
#include "imgUtil.h"


//Bitmap转为Mat
Mat imgUtil::bitmap2Mat(JNIEnv *env, jobject bmp) {


    Mat src;
    AndroidBitmapInfo bitmapInfo;
    void *pixelscolor;
    int ret;
    try {
        //获取图像信息,如果返回值小于0就是执行失败
        if ((ret = AndroidBitmap_getInfo(env, bmp, &bitmapInfo)) < 0) {
            LOGI("AndroidBitmap_getInfo failed! error-%d", ret);
            return src;
        }


        //判断图像类型是不是RGBA_8888类型
        if (bitmapInfo.format != ANDROID_BITMAP_FORMAT_RGBA_8888) {
            LOGI("BitmapInfoFormat error");
            return src;
        }


        //获取图像像素值
        if ((ret = AndroidBitmap_lockPixels(env, bmp, &pixelscolor)) < 0) {
            LOGI("AndroidBitmap_lockPixels() failed ! error=%d", ret);
            return src;
        }


        //生成源图像
        src = Mat(bitmapInfo.height, bitmapInfo.width, CV_8UC4, pixelscolor);


        return src;
    } catch (Exception e) {
        jclass je = env->FindClass("java/lang/Exception");
        env->ThrowNew(je, e.what());
        return src;
    } catch (...) {
        jclass je = env->FindClass("java/lang/Exception");
        env->ThrowNew(je, "Unknown exception in JNI code {bitmap2Mat}");
        return src;
    }
}


//获取Bitmap的参数
jobject imgUtil::getBitmapConfig(JNIEnv *env, jobject bmp) {
    //获取原图片的参数
    jclass java_bitmap_class = (jclass) env->FindClass("android/graphics/Bitmap");
    jmethodID mid = env->GetMethodID(java_bitmap_class, "getConfig",
                                     "()Landroid/graphics/Bitmap$Config;");
    jobject bitmap_config = env->CallObjectMethod(bmp, mid);
    return bitmap_config;
}


//Mat转为Bitmap
jobject
imgUtil::mat2Bitmap(JNIEnv *env, Mat &src, bool needPremultiplyAlpha, jobject bitmap_config) {


    jclass java_bitmap_class = (jclass) env->FindClass("android/graphics/Bitmap");
    jmethodID mid = env->GetStaticMethodID(java_bitmap_class, "createBitmap",
                                           "(IILandroid/graphics/Bitmap$Config;)Landroid/graphics/Bitmap;");
    jobject bitmap = env->CallStaticObjectMethod(java_bitmap_class,
                                                 mid, src.size().width, src.size().height,
                                                 bitmap_config);
    AndroidBitmapInfo info;
    void *pixels = 0;


    try {
        CV_Assert(AndroidBitmap_getInfo(env, bitmap, &info) >= 0);
        CV_Assert(src.type() == CV_8UC1 || src.type() == CV_8UC3 || src.type() == CV_8UC4);
        CV_Assert(AndroidBitmap_lockPixels(env, bitmap, &pixels) >= 0);
        CV_Assert(pixels);


        if (info.format == ANDROID_BITMAP_FORMAT_RGBA_8888) {
            cv::Mat tmp(info.height, info.width, CV_8UC4, pixels);
            if (src.type() == CV_8UC1) {
                cvtColor(src, tmp, cv::COLOR_GRAY2RGBA);
            } else if (src.type() == CV_8UC3) {
                cvtColor(src, tmp, cv::COLOR_RGB2BGRA);
            } else if (src.type() == CV_8UC4) {
                if (needPremultiplyAlpha) {
                    cvtColor(src, tmp, cv::COLOR_RGBA2mRGBA);
                } else {
                    src.copyTo(tmp);
                }
            }
        } else {
            // info.format == ANDROID_BITMAP_FORMAT_RGB_565
            cv::Mat tmp(info.height, info.width, CV_8UC2, pixels);
            if (src.type() == CV_8UC1) {
                cvtColor(src, tmp, cv::COLOR_GRAY2BGR565);
            } else if (src.type() == CV_8UC3) {
                cvtColor(src, tmp, cv::COLOR_RGB2BGR565);
            } else if (src.type() == CV_8UC4) {
                cvtColor(src, tmp, cv::COLOR_RGBA2BGR565);
            }
        }
        AndroidBitmap_unlockPixels(env, bitmap);
        return bitmap;
    } catch (Exception e) {
        AndroidBitmap_unlockPixels(env, bitmap);
        jclass je = env->FindClass("java/lang/Exception");
        env->ThrowNew(je, e.what());
        return bitmap;
    } catch (...) {
        AndroidBitmap_unlockPixels(env, bitmap);
        jclass je = env->FindClass("java/lang/Exception");
        env->ThrowNew(je, "Unknown exception in JNI code {nMatToBitmap}");
        return bitmap;
    }
}


//排序矩形
void imgUtil::sortRect(vector<Rect> &inputrects) {
    for (int i = 0; i < inputrects.size(); ++i) {
        for (int j = i; j < inputrects.size(); ++j) {
            //说明顺序在上方,这里不用变
            if (inputrects[i].y + inputrects[i].height < inputrects[i].y) {


            }
                //同一排
            else if (inputrects[i].y <= inputrects[j].y + inputrects[j].height) {
                if (inputrects[i].x > inputrects[j].x) {
                    swap(inputrects[i], inputrects[j]);
                }
            }
                //下一排
            else if (inputrects[i].y > inputrects[j].y + inputrects[j].height) {
                swap(inputrects[i], inputrects[j]);
            }
        }
    }
}


//处理DNN检测的MINIST图像,防止长方形图像直接转为28*28扁了
void imgUtil::dealInputMat(Mat &src, int row, int col, int tmppadding) {
    int w = src.cols;
    int h = src.rows;
    //看图像的宽高对比,进行处理,先用padding填充黑色,保证图像接近正方形,这样缩放28*28比例不会失衡
    if (w > h) {
        int tmptopbottompadding = (w - h) / 2 + tmppadding;
        copyMakeBorder(src, src, tmptopbottompadding, tmptopbottompadding, tmppadding, tmppadding,
                       BORDER_CONSTANT, Scalar(0));
    }
    else {
        int tmpleftrightpadding = (h - w) / 2 + tmppadding;
        copyMakeBorder(src, src, tmppadding, tmppadding, tmpleftrightpadding, tmpleftrightpadding,
                       BORDER_CONSTANT, Scalar(0));


    }
    resize(src, src, Size(row, col));
}
dnnUtil类
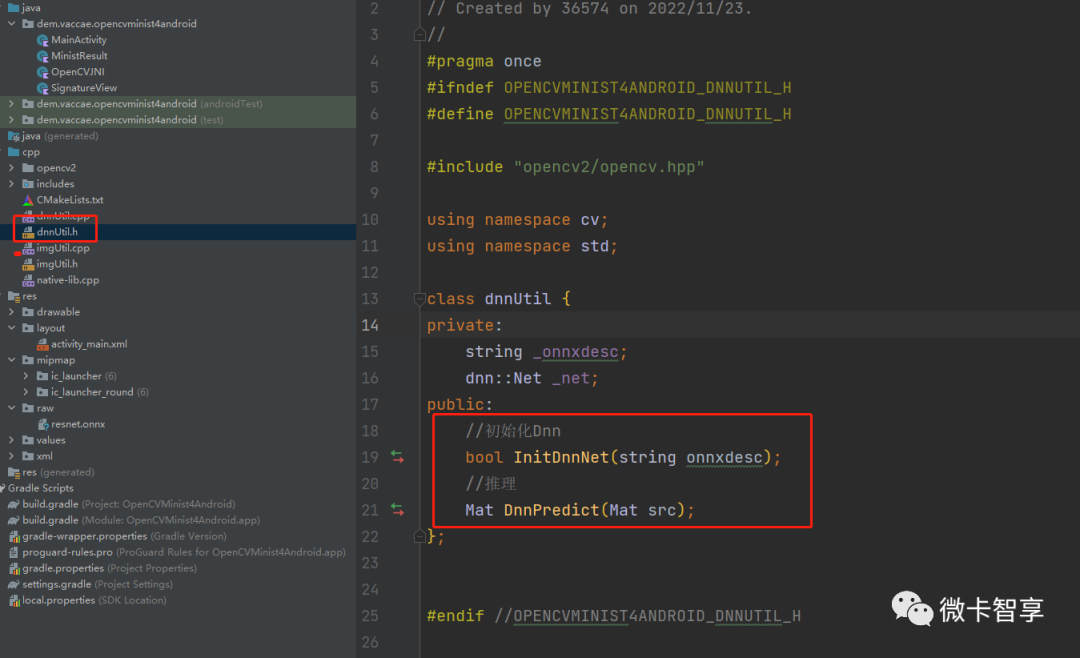
Dnn推理类中,只有两个函数,一个是初始化,也就是加载模型,需要读取本地的模型文件加载进来。另一个就是推理的函数。
关于模型文件
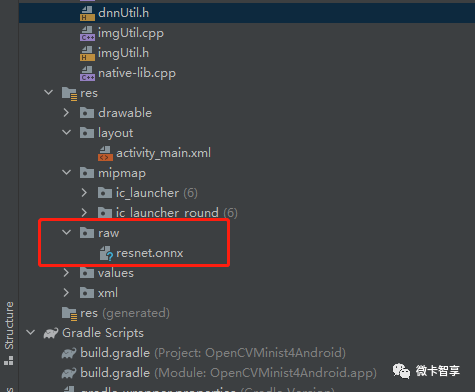
上图中可以看到,模型文件选择我们在训练中识别率最高的ResNet的模型,将模型文件直接复制进了raw资源下,注意原来创建时文件名有大写,在这里面要全部改为小写。在Android端程序启动的时候先读取资源文件,再将模型拷贝到本地,把路径通过JNI传递到C++里面,初始化即可。
#include "dnnUtil.h"


bool dnnUtil::InitDnnNet(string onnxdesc) {
    _onnxdesc = onnxdesc;


    _net = dnn::readNetFromONNX(_onnxdesc);
    _net.setPreferableTarget(dnn::DNN_TARGET_CPU);


    return !_net.empty();
}


Mat dnnUtil::DnnPredict(Mat src) {
    Mat inputBlob = dnn::blobFromImage(src, 1, Size(28, 28), Scalar(), false, false);


    //输入参数值
    _net.setInput(inputBlob, "input");
    //预测结果
    Mat output = _net.forward("output");


    return output;
}
JNI入口及native-lib.cpp
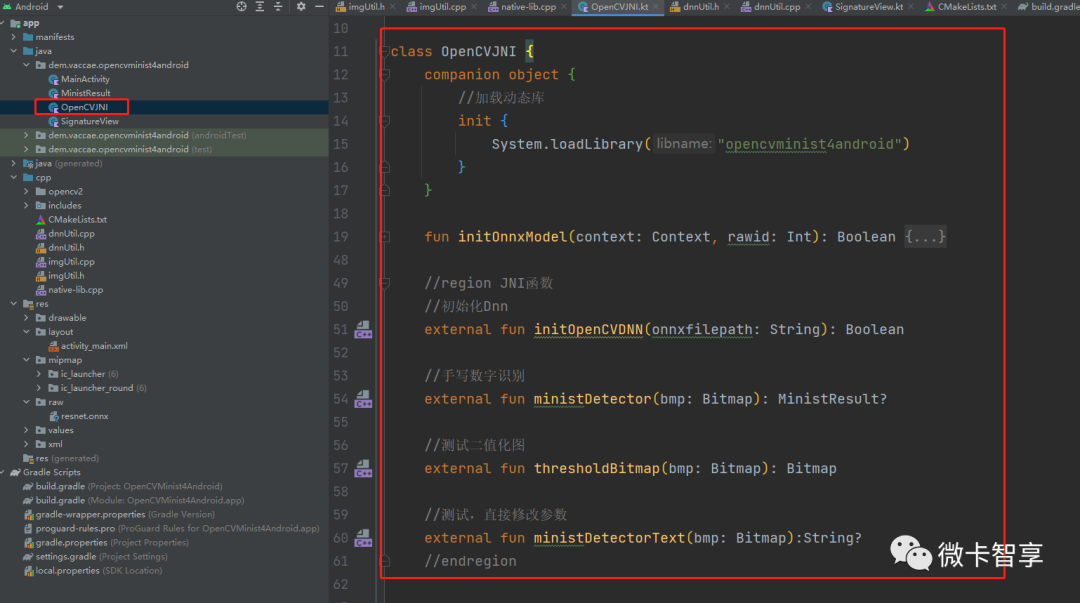
在Android端创建了一个OpenCVJNI的类,入口的函数写了4个,一个初始化DNN,两个识别的函数,还有一个测试用的。
上面说的将资源文件读取拷贝出来,再进行DNN的初始化就是initOnnxModel这个函数实现的,代码如下:
fun initOnnxModel(context: Context, rawid: Int): Boolean {
        try {
            val onnxDir: File = File(context.filesDir, "onnx")
            if (!onnxDir.exists()) {
                onnxDir.mkdirs()
            }
            //判断模型是否存在是否存在,不存在复制过来
            val onnxfile: File = File(onnxDir, "dnnNet.onnx")
            if (onnxfile.exists()){
                return initOpenCVDNN(onnxfile.absolutePath)
            }else {
                // load cascade file from application resources
                val inputStream = context.resources.openRawResource(rawid)


                val os: FileOutputStream = FileOutputStream(onnxfile)
                val buffer = ByteArray(4096)
                var bytesRead: Int
                while (inputStream.read(buffer).also { bytesRead = it } != -1) {
                    os.write(buffer, 0, bytesRead)
                }
                inputStream.close()
                os.close()
                return initOpenCVDNN(onnxfile.absolutePath)
            }
        } catch (e: Exception) {
            e.printStackTrace()
            return false
        }
    }
external对应到native-lib.cpp中,即下面的源码
#pragma once


#include <jni.h>
#include <string>
#include <android/log.h>
#include <opencv2/opencv.hpp>
#include "dnnUtil.h"
#include "imgUtil.h"


#define LOG_TAG "System.out"
#define LOGI(...) __android_log_print(ANDROID_LOG_INFO, LOG_TAG, __VA_ARGS__)


using namespace cv;
using namespace std;


dnnUtil _dnnUtil;
imgUtil _imgUtil = imgUtil();


extern "C"
JNIEXPORT jboolean JNICALL
Java_dem_vaccae_opencvminist4android_OpenCVJNI_initOpenCVDNN(JNIEnv *env, jobject thiz,
                                                             jstring onnxfilepath) {
    try {
        string onnxfile = env->GetStringUTFChars(onnxfilepath, 0);
        //初始化DNN
        _dnnUtil = dnnUtil();
        jboolean res = _dnnUtil.InitDnnNet(onnxfile);


        return res;
    } catch (Exception e) {
        jclass je = env->FindClass("java/lang/Exception");
        env->ThrowNew(je, e.what());
    } catch (...) {
        jclass je = env->FindClass("java/lang/Exception");
        env->ThrowNew(je, "Unknown exception in JNI code {initOpenCVDNN}");
    }
}
extern "C"
JNIEXPORT jobject JNICALL
Java_dem_vaccae_opencvminist4android_OpenCVJNI_ministDetector(JNIEnv *env, jobject thiz,
                                                              jobject bmp) {
    try {
        jobject bitmapcofig = _imgUtil.getBitmapConfig(env, bmp);


        string resstr = "";


        Mat src = _imgUtil.bitmap2Mat(env, bmp);
        //备份源图
        Mat backsrc;
        //将备份的图片从BGRA转为RGB,防止颜色不对
        cvtColor(src, backsrc, COLOR_BGRA2RGB);


        cvtColor(src, src, COLOR_BGRA2GRAY);
        GaussianBlur(src, src, Size(3, 3), 0.5, 0.5);
        //二值化图片,注意用THRESH_BINARY_INV改为黑底白字,对应MINIST
        threshold(src, src, 0, 255, THRESH_BINARY_INV | THRESH_OTSU);


        //做彭账处理,防止手写的数字没有连起来,这里做了3次膨胀处理
        Mat kernel = getStructuringElement(MORPH_RECT, Size(3, 3));
        //加入开运算先去燥点
        morphologyEx(src, src, MORPH_OPEN, kernel, Point(-1, -1));
        morphologyEx(src, src, MORPH_DILATE, kernel, Point(-1, -1), 3);


        vector<vector<Point>> contours;
        vector<Vec4i> hierarchy;
        vector<Rect> rects;


        //查找轮廓
        findContours(src, contours, hierarchy, RETR_EXTERNAL, CHAIN_APPROX_NONE);
        for (int i = 0; i < contours.size(); ++i) {
            RotatedRect rect = minAreaRect(contours[i]);
            Rect outrect = rect.boundingRect();
            //插入到矩形列表中
            rects.push_back(outrect);
        }


        //按从左到右,从上到下排序
        _imgUtil.sortRect(rects);
        //要输出的图像参数
        for (int i = 0; i < rects.size(); ++i) {
            Mat tmpsrc = src(rects[i]);
            _imgUtil.dealInputMat(tmpsrc);
            //预测结果
            Mat output = _dnnUtil.DnnPredict(tmpsrc);


            //查找出结果中推理的最大值
            Point maxLoc;
            minMaxLoc(output, NULL, NULL, NULL, &maxLoc);


            //返回字符串值
            resstr += to_string(maxLoc.x);


            //画出截取图像位置,并显示识别的数字
            rectangle(backsrc, rects[i], Scalar(0, 0, 255), 5);
            putText(backsrc, to_string(maxLoc.x), Point(rects[i].x, rects[i].y), FONT_HERSHEY_PLAIN,
                    5, Scalar(0, 0, 255), 5, -1);


        }


        jobject resbmp = _imgUtil.mat2Bitmap(env, backsrc, false, bitmapcofig);


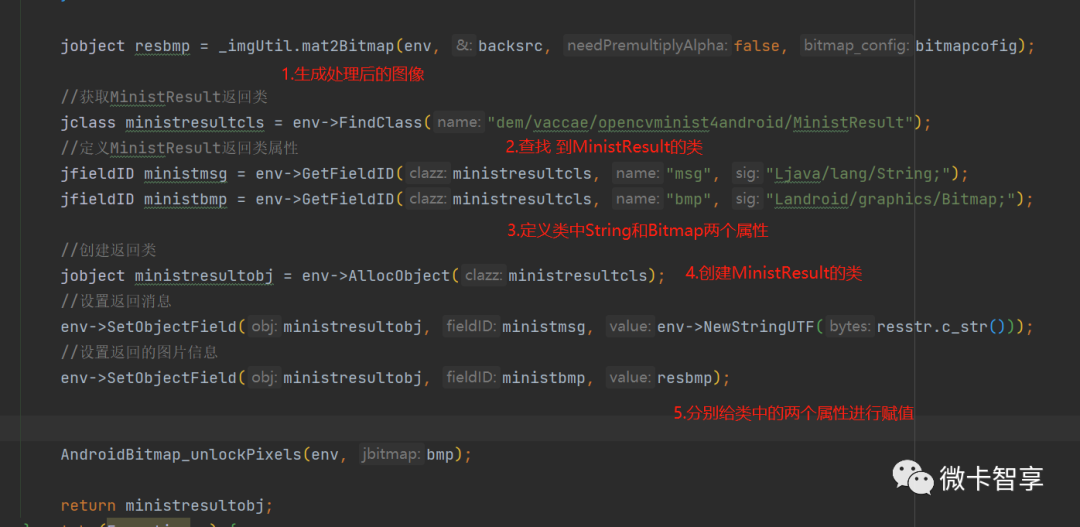
        //获取MinistResult返回类
        jclass ministresultcls = env->FindClass("dem/vaccae/opencvminist4android/MinistResult");
        //定义MinistResult返回类属性
        jfieldID ministmsg = env->GetFieldID(ministresultcls, "msg", "Ljava/lang/String;");
        jfieldID ministbmp = env->GetFieldID(ministresultcls, "bmp", "Landroid/graphics/Bitmap;");


        //创建返回类
        jobject ministresultobj = env->AllocObject(ministresultcls);
        //设置返回消息
        env->SetObjectField(ministresultobj, ministmsg, env->NewStringUTF(resstr.c_str()));
        //设置返回的图片信息
        env->SetObjectField(ministresultobj, ministbmp, resbmp);


        AndroidBitmap_unlockPixels(env, bmp);


        return ministresultobj;
    } catch (Exception e) {
        jclass je = env->FindClass("java/lang/Exception");
        env->ThrowNew(je, e.what());
    } catch (...) {
        jclass je = env->FindClass("java/lang/Exception");
        env->ThrowNew(je, "Unknown exception in JNI code {bitmap2Mat}");
    }
}


extern "C"
JNIEXPORT jobject JNICALL
Java_dem_vaccae_opencvminist4android_OpenCVJNI_thresholdBitmap(JNIEnv *env, jobject thiz,
                                                               jobject bmp) {
    try {
        jobject bitmapcofig = _imgUtil.getBitmapConfig(env, bmp);


        Mat src = _imgUtil.bitmap2Mat(env, bmp);
        cvtColor(src, src, COLOR_BGRA2GRAY);
        threshold(src, src, 0, 255, THRESH_BINARY_INV | THRESH_OTSU);


        jobject resbmp = _imgUtil.mat2Bitmap(env, src, false, bitmapcofig);


        AndroidBitmap_unlockPixels(env, bmp);


        return resbmp;
    } catch (Exception e) {
        jclass je = env->FindClass("java/lang/Exception");
        env->ThrowNew(je, e.what());
    } catch (...) {
        jclass je = env->FindClass("java/lang/Exception");
        env->ThrowNew(je, "Unknown exception in JNI code {bitmap2Mat}");
    }
}
extern "C"
JNIEXPORT jstring JNICALL
Java_dem_vaccae_opencvminist4android_OpenCVJNI_ministDetectorText(JNIEnv *env, jobject thiz,
                                                                  jobject bmp) {
    try {
        string resstr = "";


        //获取图像转为Mat
        Mat src = _imgUtil.bitmap2Mat(env, bmp);
        //备份源图
        Mat backsrc, dst;
        //备份用于绘制图像,防止颜色有问题,将BGRA转为RGB
        cvtColor(src, dst, COLOR_BGRA2RGB);
        //灰度图,处理的图像
        cvtColor(src, backsrc, COLOR_BGRA2GRAY);
        GaussianBlur(backsrc, backsrc, Size(3, 3), 0.5, 0.5);
        //二值化图片,注意用THRESH_BINARY_INV改为黑底白字,对应MINIST
        threshold(backsrc, backsrc, 0, 255, THRESH_BINARY_INV | THRESH_OTSU);


        //做彭账处理,防止手写的数字没有连起来,这里做了3次膨胀处理
        Mat kernel = getStructuringElement(MORPH_RECT, Size(3, 3));
        //加入开运算先去燥点
        morphologyEx(backsrc, backsrc, MORPH_OPEN, kernel, Point(-1, -1));
        morphologyEx(backsrc, backsrc, MORPH_DILATE, kernel, Point(-1, -1), 3);


        vector<vector<Point>> contours;
        vector<Vec4i> hierarchy;
        vector<Rect> rects;


        //查找轮廓
        findContours(backsrc, contours, hierarchy, RETR_EXTERNAL, CHAIN_APPROX_NONE);
        for (int i = 0; i < contours.size(); ++i) {
            RotatedRect rect = minAreaRect(contours[i]);
            Rect outrect = rect.boundingRect();
            //插入到矩形列表中
            rects.push_back(outrect);
        }


        //按从左到右,从上到下排序
        _imgUtil.sortRect(rects);
        //要输出的图像参数
        for (int i = 0; i < rects.size(); ++i) {
            Mat tmpsrc = backsrc(rects[i]);
            _imgUtil.dealInputMat(tmpsrc);
            //预测结果
            Mat output = _dnnUtil.DnnPredict(tmpsrc);


            //查找出结果中推理的最大值
            Point maxLoc;
            minMaxLoc(output, NULL, NULL, NULL, &maxLoc);


            //返回字符串值
            resstr += to_string(maxLoc.x);


            //画出截取图像位置,并显示识别的数字
            rectangle(dst, rects[i], Scalar(0, 0, 255), 5);
            putText(dst, to_string(maxLoc.x), Point(rects[i].x, rects[i].y), FONT_HERSHEY_PLAIN,
                    5, Scalar(0, 0, 255), 5, -1);


        }


        //用RGB处理完后的图像,需要转为BGRA再覆盖原来的SRC,这样直接就可以修改源图了
        cvtColor(dst, dst, COLOR_RGB2BGRA);
        dst.copyTo(src);


        AndroidBitmap_unlockPixels(env, bmp);


        return env->NewStringUTF(resstr.c_str());
    } catch (Exception e) {
        jclass je = env->FindClass("java/lang/Exception");
        env->ThrowNew(je, e.what());
    } catch (...) {
        jclass je = env->FindClass("java/lang/Exception");
        env->ThrowNew(je, "Unknown exception in JNI code {bitmap2Mat}");
    }
}
03
Android代码
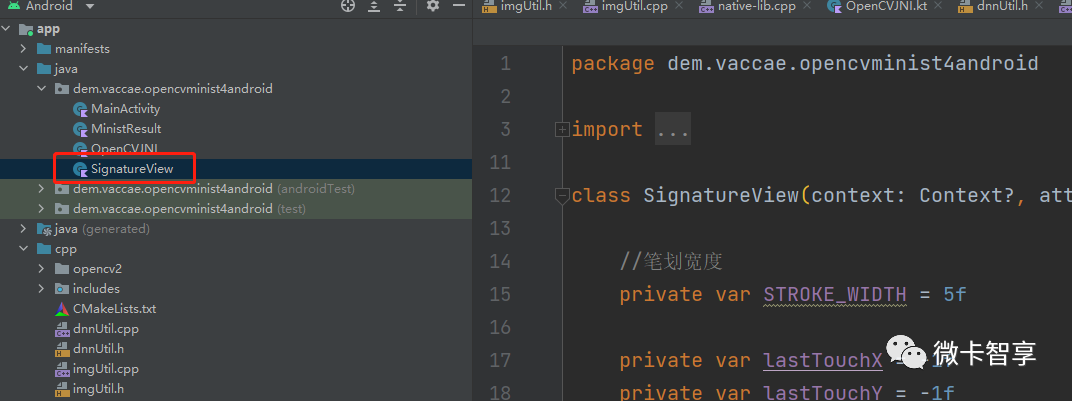
SignatureView是手写板的类,直接从原来那个Demo中拷贝过来了
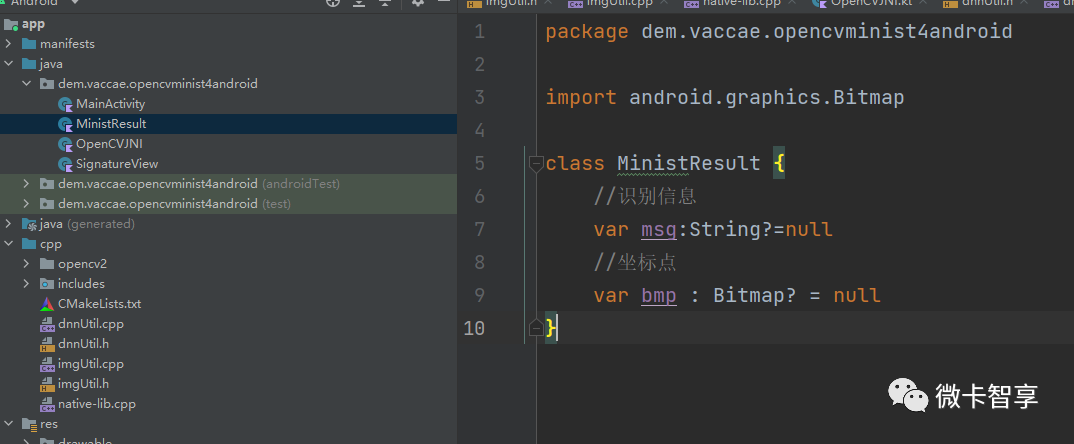
MinistResult类只有两个属性,一个String和一个Bitmap,就是返回的处理后图像和识别的字符串。其实可以直接在原来的Bitmap中修改图像显示,不需要返回类了,那个在JNI中也有实现,只不过既然是练习Demo,就多掌握点知识,直接在NDK中实现返回类的效果。
MainActivity中代码,主要是实现手写即显示的效果,这里直接贴上代码:
package dem.vaccae.opencvminist4android


import android.Manifest
import android.content.pm.PackageManager
import android.graphics.Bitmap
import android.graphics.Color
import androidx.appcompat.app.AppCompatActivity
import android.os.Bundle
import android.widget.ImageView
import android.widget.TextView
import android.widget.Toast
import androidx.core.app.ActivityCompat
import androidx.core.content.ContextCompat
import androidx.core.graphics.createBitmap
import dem.vaccae.opencvminist4android.databinding.ActivityMainBinding
import java.io.File


class MainActivity : AppCompatActivity() {


    private lateinit var binding: ActivityMainBinding
    private var isInitDNN: Boolean = false


    override fun onCreate(savedInstanceState: Bundle?) {
        super.onCreate(savedInstanceState)


        binding = ActivityMainBinding.inflate(layoutInflater)
        setContentView(binding.root)


        //初始化DNN
        isInitDNN = try {
            val jni = OpenCVJNI()
            val res = jni.initOnnxModel(this, R.raw.resnet)
            binding.tvshow.text = if(res){
                "OpenCV DNN初始化成功"
            }else{
                "OpenCV DNN初始化失败"
            }
            res
        } catch (e: Exception) {
            binding.tvshow.text = e.message
            false
        }


        binding.signatureView.setBackgroundColor(Color.rgb(245, 245, 245))


        binding.btnclear.setOnClickListener {
            binding.signatureView.clear()
        }


        binding.btnSave.setOnClickListener {
            if(!isInitDNN) return@setOnClickListener
            val bmp = binding.signatureView.getBitmapFromView()
            //处理图像
            val ministres:MinistResult? = try{
                val jni = OpenCVJNI()
                jni.ministDetector(bmp)
            }catch (e:Exception){
                binding.tvshow.text = e.message
                null
            }


            ministres?.let {
                binding.tvshow.text = it.msg
                binding.imgv.scaleType = ImageView.ScaleType.FIT_XY
                binding.imgv.setImageBitmap(it.bmp)
            }


//            val strres = try{
//                val jni = OpenCVJNI()
//                jni.ministDetectorText(bmp)
//            }catch (e:Exception){
//                binding.tvshow.text = e.message
//                null
//            }
//
//            strres?.let {
//                binding.tvshow.text = it
//                binding.imgv.scaleType = ImageView.ScaleType.FIT_XY
//                binding.imgv.setImageBitmap(bmp)
//            }
        }


    }


}
微卡智享
划重点
关于NDK中返回类
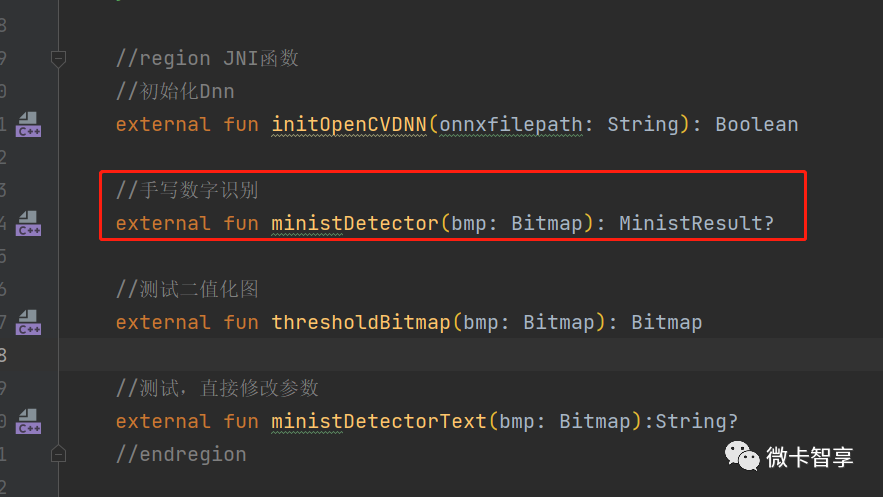
上面的JNI即返回的是MinistResult的类,在NDK中就需要进行处理了,如下图:
关于Bitmap到NDK中Mat的处理
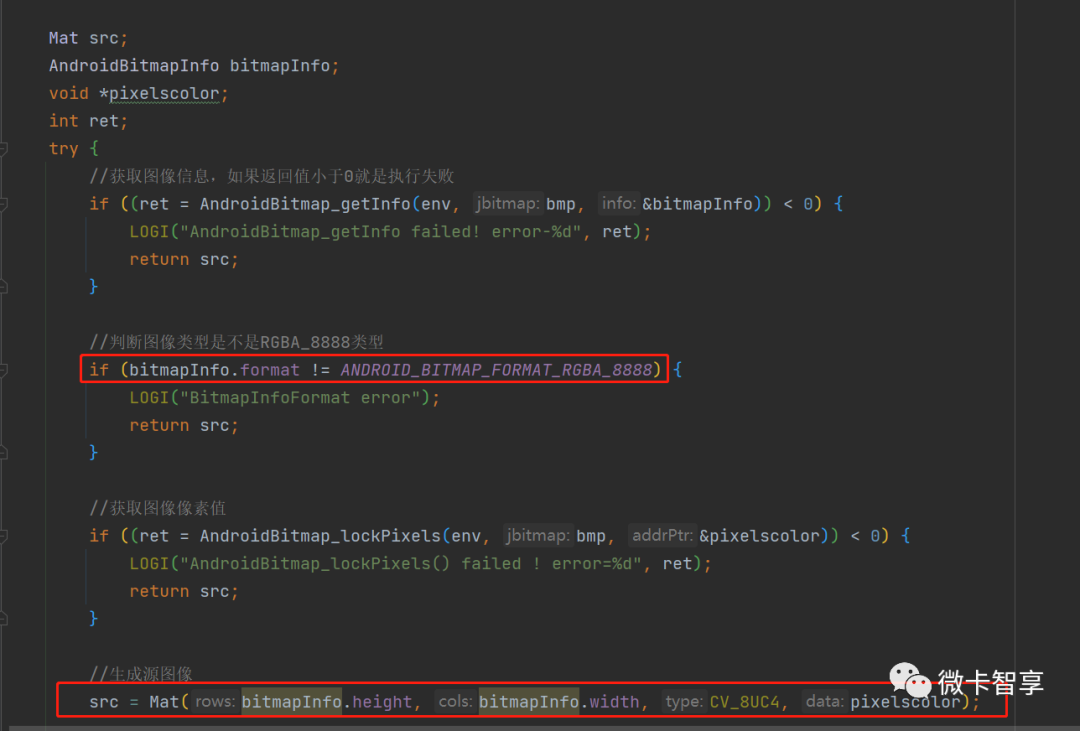
将Bitmap转为Mat,图像的类型是RGBA_8888,所以生成的Mat是8UC4,而在做图像处理的时候,OpenCV的RGB是倒过来的,即BGR,所以cvtColor时,要从BGRA进行转换,如下图:
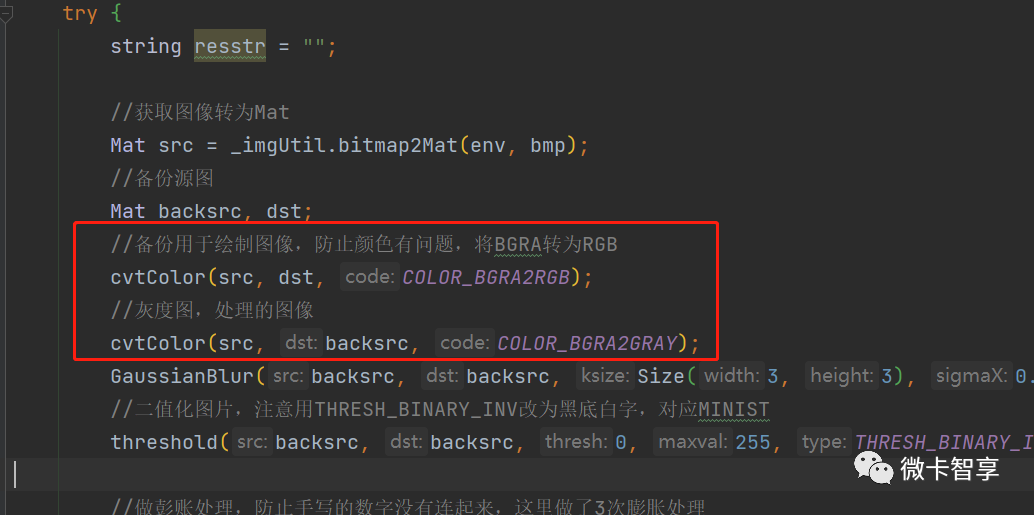
这里做了两次转换,dst从BGRA转为RGB,是用于标记出轮廓的框和识别的数字标识,如果这里不转为RGB,标出的轮廓框和字符的颜色有问题。
而backsrc中从BGRA转为GRAY灰度图,则是进行图像的正常处理了。
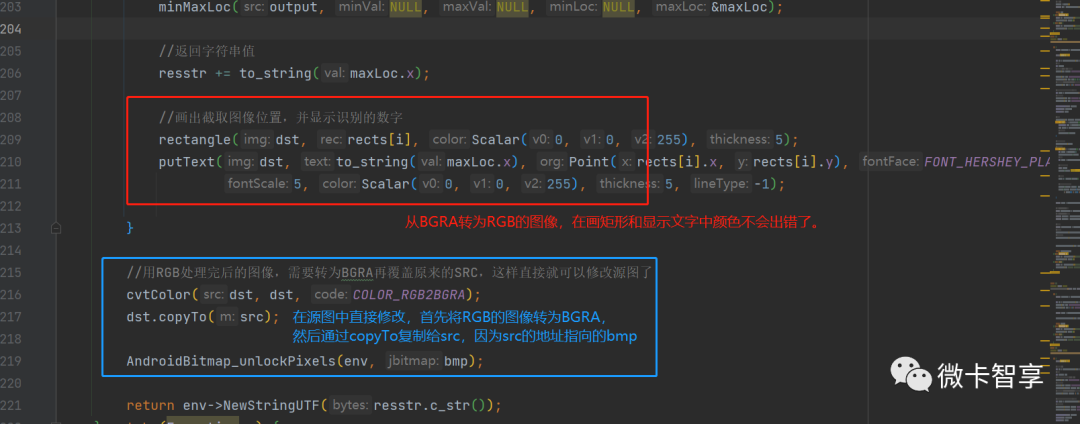
而处理完的dst图像需要先从RGB转换为BGRA,然后再通过CopyTo赋值给src,因为Src地址才是指向我们传入的bitmap,只有修改了src,原来的bitmap才会进行修改。处理完src后,需要再通过AndroidBitmap_unlockPixels供Android端继续使用。
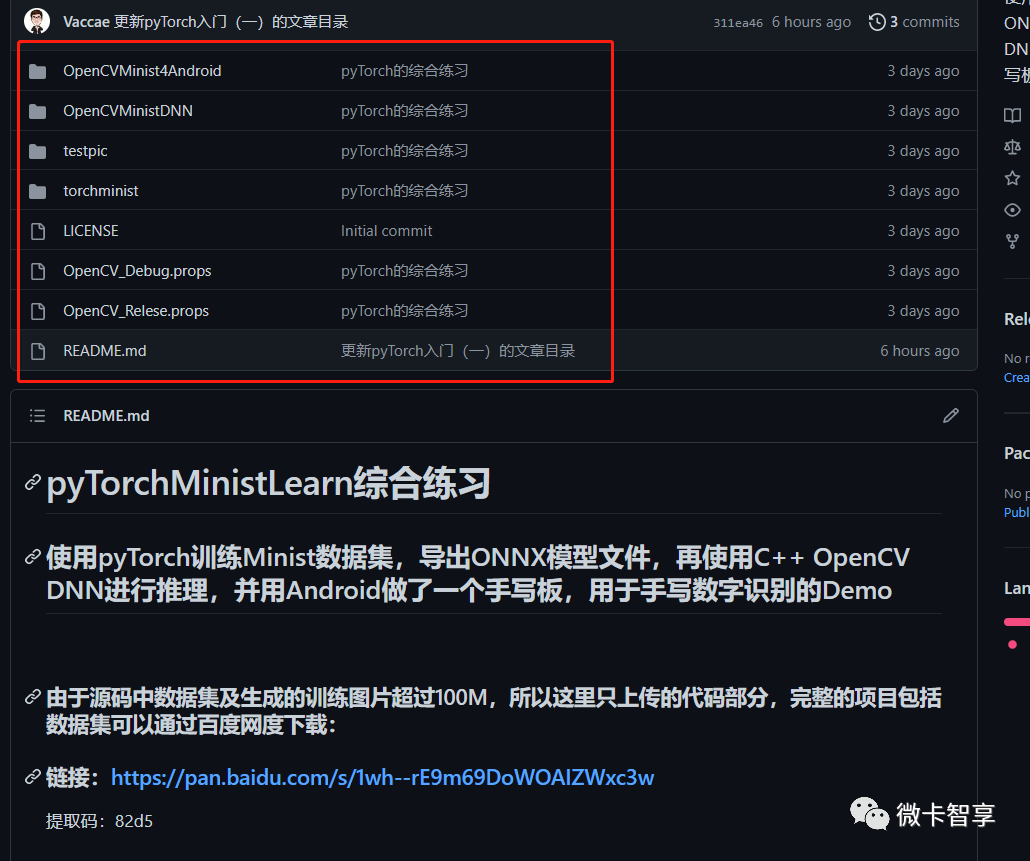
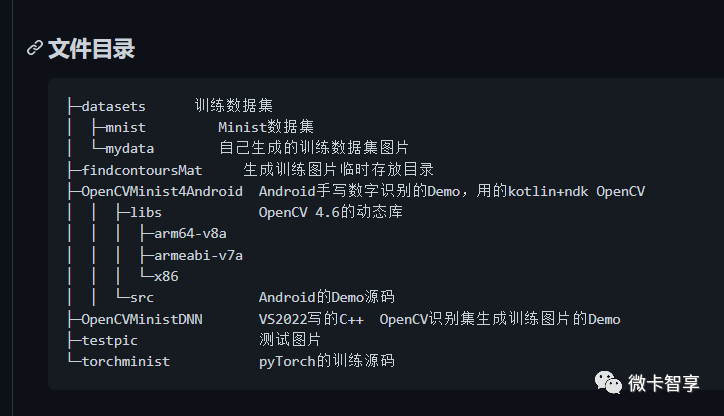
这样一个Android端的手写数字识别的Demo就完成了,文章只是说了一些重点的地方,具体的实现可以通过下载源码运行看看。源码中包括了pyTorch的训练,VS中C++ OpenCV的推理及生成训练图片,及我们现在这个Android的手写数字识别的完整Demo。
微卡智享
源码地址
https://github.com/Vaccae/pyTorchMinistLearn.git
点击阅读原文可以看到“码云”的代码地址
完


往期精彩回顾
pyTorch入门(五)——训练自己的数据集
pyTorch入门(四)——导出Minist模型,C++ OpenCV DNN进行识别
pyTorch入门(三)——GoogleNet和ResNet训练

