1 概述
在开发服务器软件项目时,经常需要处理执行时间很短并且数据巨大的请求,如果为每一个请求创建一个新的线程,则会导致性能上的瓶颈。因为JVM需要频繁地处理线程对象的创建和销毁,如果请求的执行时间很短,则有可能花在创建和销毁线程对象上的时间大于真正执行任务的时间,导致系统性能会大幅降低。
JDK5及以上版本提供了对线程池的支持,主要用于支持高并发的访问处理,并且复用线程对象,线程池核心原理是创建一个“线程池(ThreadPool)”,在池中堆线程对象进行管理,包括创建与销毁,使用池时只需要执行具体的任务即可,线程对象的处理都在池中被封装了。
线程池类ThreadPoolExecutor实现了Executors接口,该接口是学习线程池的重点,因为掌握了该接口中的方法也就大概掌握了ThreadPoolExecutor类的主要功能。
2 Executor接口介绍
Executor接口结构非常简单,仅有一个方法。
public interface Executor {

    /**
     * Executes the given command at some time in the future.  The command
     * may execute in a new thread, in a pooled thread, or in the calling
     * thread, at the discretion of the {@code Executor} implementation.
     *
     * @param command the runnable task
     * @throws RejectedExecutionException if this task cannot be
     * accepted for execution
     * @throws NullPointerException if command is null
     */
    void execute(Runnable command);
}
但Executor是接口,不能直接使用,所以还需要实现类。ExecutorService接口是Executor子接口,在内部添加了比较多的方法。

虽然ExecutorService接口添加了若干个方法的定义,但还是不能实例化,那么就要看看它的唯一子实现类AbstractExecutorService。

由于AbstractExecutorService是抽象类,所以同样不能实例化。再来看一下AbstractExecutorService类的子类ThreadPoolExecutor类。
public class ThreadPoolExecutor extends AbstractExecutorService {}
ThreadPoolExecutor类的方法列表如下:

注:方法较多,截图仅为一部分。
3 使用Executors工厂类创建线程池
Executor接口仅仅是一种规范、一种声明、一种定义,并没有实现任何的功能,所以大多数情况下,需要使用接口的实现类来完成指定的功能。比如ThreadPoolExecutor类就是Executor的实现类,但ThreadPoolExecutor类在使用上并不方便,在实例化时需要传入多个参数,还要考虑线程的并发数等与线程池运行效率相关的参数,所以官方建议使用Executors工厂类来创建线程池对象,该类对创建ThreadPoolExecutor线程池进行封装,直接调用即可。
Executors类中的方法如下图:

4 使用newCachedThreadPool()方法创建无界线程池
使用newCachedThreadPool()方法创建无界线程池,可以进行线程自动回收。所谓“无界线程池”就是池中存放线程个数是理论上的最大值,即Integer.MAX_VALUE。
public class Run1 {
    public static void main(String[] args) {
        ExecutorService executorService = Executors.newCachedThreadPool();
        executorService.execute(new Runnable() {
            @Override
            public void run() {
                try {
                    System.out.println("Runnable1 begin "+System.currentTimeMillis());
                    Thread.sleep(1000);
                    System.out.println("A");
                    System.out.println("Runnable1 end" + System.currentTimeMillis());
                }catch (InterruptedException e){
                    e.printStackTrace();
                }
            }
        });
        executorService.execute(new Runnable() {
            @Override
            public void run() {
                try {
                    System.out.println("Runnable2 begin "+System.currentTimeMillis());
                    Thread.sleep(1000);
                    System.out.println("B");
                    System.out.println("Runnable2 end" + System.currentTimeMillis());
                }catch (InterruptedException e){
                    e.printStackTrace();
                }
            }
        });
    }


}
从打印时间来看,A和B几乎是在相同的时间开始打印的,也就是创建了2个线程,而且2个线程之间是异步运行的。
public class Run2 {
    public static void main(String[] args) {
        ExecutorService executorService = Executors.newCachedThreadPool();
        for (int i = 0; i < 5; i++) {
            executorService.execute(new Runnable() {
                @Override
                public void run() {
                    System.out.println("run");
                }
            });
        }
    }
}
5 验证newCachedThreadPool()方法创建线程池和线程复用特性
前面的实验没有验证newCachedThreadPool ()方法创建的是线程池,下面会验证。
public class MyRunnable implements Runnable{
    private String username;

    public MyRunnable(String username) {
        this.username = username;
    }

    @Override
    public void run() {
        try {
            System.out.println(Thread.currentThread().getName() + "username = " + username +
                    " begin "+System.currentTimeMillis());
            Thread.sleep(2000);
            System.out.println(Thread.currentThread().getName() + "username = " + username +
                    " end "+System.currentTimeMillis());
        }catch (InterruptedException e){
            e.printStackTrace();
        }
    }
}
public class Run1 {
public static void main(String[] args) {
ExecutorService service = Executors.newCachedThreadPool();
for (int i = 0; i < 10; i++) {
service.execute(new MyRunnable((""+(i+1))));
}
}
} 
通过控制台可以看到,线程池对象创建是完全成功的,但还没有达到池中线程对象可以复用的效果,下面的实验要实现这样的效果。
public class MyRunnable1 implements Runnable{
    private String username;

    public MyRunnable1(String username) {
        this.username = username;
    }

    @Override
    public void run() {
        System.out.println(Thread.currentThread().getName() + "username = " + username +
                " begin "+System.currentTimeMillis());
        System.out.println(Thread.currentThread().getName() + "username = " + username +
                " end "+System.currentTimeMillis());
    }
}
public class Run1 {
public static void main(String[] args) throws InterruptedException {
ExecutorService service = Executors.newCachedThreadPool();
for (int i = 0; i < 5; i++) {
service.execute(new MyRunnable1((""+(i+1))));
}
Thread.sleep(1000);
System.out.println("");
System.out.println("");
for (int i = 0; i < 5; i++) {
service.execute(new MyRunnable1((""+(i+1))));
}
}
}
6 使用newCachedThreadPool()定制线程工厂
public class MyThreadFactory implements ThreadFactory {
    @Override
    public Thread newThread(Runnable r) {
        Thread thread = new Thread(r);
        thread.setName("定制池中的线程对象名称:"+Math.random());
        return thread;
    }
}
public class Run {
    public static void main(String[] args) {
        MyThreadFactory factory = new MyThreadFactory();
        ExecutorService service = Executors.newCachedThreadPool(factory);
        service.execute(new Runnable() {
            @Override
            public void run() {
                System.out.println("运行"+System.currentTimeMillis()+ " " + Thread.currentThread().getName());
            }
        });
    }
}
通过使用自定义的ThreadFactory接口实现类,实现了线程对象的定制性。 ThreadPoolExecutor、ThreadFactory和Thread之间的关系是ThreadPoolExecutor类使用了ThreadFactory方法来创建Thread对象。内部源代码如下:
    public static ExecutorService newCachedThreadPool() {
        return new ThreadPoolExecutor(0, Integer.MAX_VALUE,
                                      60L, TimeUnit.SECONDS,
                                      new SynchronousQueue<Runnable>());
    }
在源码中使用了默认线程工厂,源代码如下:
public static ExecutorService newCachedThreadPool(ThreadFactory threadFactory) {
        return new ThreadPoolExecutor(0, Integer.MAX_VALUE,
                                      60L, TimeUnit.SECONDS,
                                      new SynchronousQueue<Runnable>(),
                                      threadFactory);
    }
7 使用newCachedThreadPool方法创建无边界线程池的缺点
如果在高并发的情况下,使用newCachedThreadPool()方法创建无边界线程池极易造成内存占用率大幅升高,导致内存溢出或者系统运行效率严重下降。
public class Run1 {
    public static void main(String[] args) {
        ExecutorService service = Executors.newCachedThreadPool();
        for (int i = 0; i < 200000; i++) {
            service.execute(new Runnable() {
                @Override
                public void run() {
                    try {
                        System.out.println("runnable begin " + Thread.currentThread().getName()
                        + " " + System.currentTimeMillis());;
                        Thread.sleep(1000*60*5);
                    }catch (InterruptedException e){
                        e.printStackTrace();
                    }
                }
            });
        }
    }
}
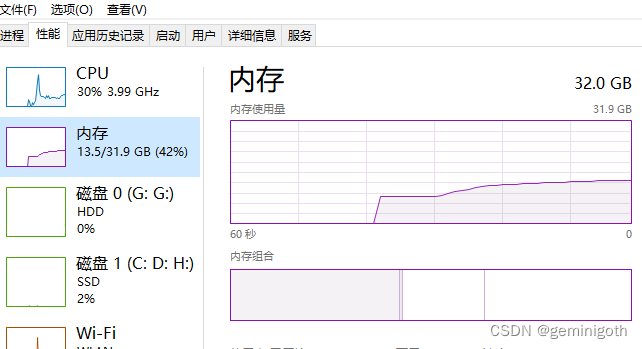
程序运行后再“任务管理器”中查看可用内存极速下降,系统运行效率大幅降低,超大的内存空间都被Thread类对象占用了,无界线程池对线程的数量没有控制,这时可以尝试使用有界线程池来限制线程池占用内存的最大空间。
8 使用newFixedThreadPool(int)方法创建有界线程池
public class MyRunnable implements Runnable{
    private String username;

    public MyRunnable(String username) {
        this.username = username;
    }

    @Override
    public void run() {
        try {
            System.out.println(Thread.currentThread().getName() + " username = " + username + " begin " + System.currentTimeMillis());
            Thread.sleep(1000);
            System.out.println(Thread.currentThread().getName() + " username = " + username + " end " + System.currentTimeMillis());
        }catch (InterruptedException e){
            e.printStackTrace();
        }
    }
}
public class Run1 {
    public static void main(String[] args) {
        ExecutorService service = Executors.newFixedThreadPool(3);
        for (int i = 0; i < 3; i++) {
            service.execute(new MyRunnable(("" + (i + 1))));
        }
        for (int i = 0; i < 3; i++) {
            service.execute(new MyRunnable(("" + (i + 1))));
        }

    }
}
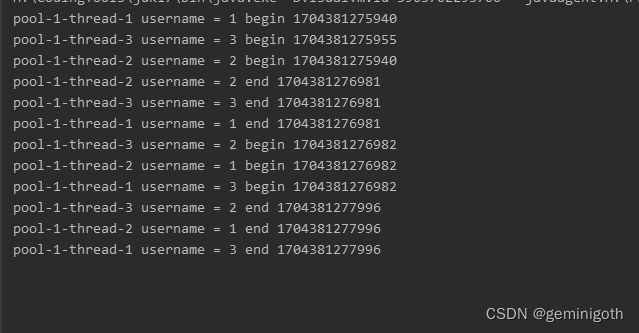
通过控制台可以看到,使用有界线程池后线程池中最多的线程个数是可控的。

