【 声明:版权所有,欢迎转载,请勿用于商业用途。 联系信箱:feixiaoxing @163.com】
如果上位机要和嵌入式设备进行打交道的话,那么串口可能就是我们遇到的第一个硬件设备。串口的物理接线很简单,基本上就是收、发、地三根线。目前大部分台式机,或者笔记本都已经没有232串口了,所以如果上位机需要和嵌入式设备进行通信的话,还需要通过usb转一下,这样才用的起来。
1、串口的应用场合
串口的传输速率不是很快,这决定了它基本上只能进行低速数据的传输。但是就算是进行低速传输,最大速度也能达到115200bit每秒。这意味着,如果传输的仅仅是一些打印、传感器、控制数据,那也是绰绰有余了。串口的应用场景很多,串口转屏幕、串口的传感器、串口的gprs,这些都是很常见的串口设备。
2、串口之上的协议
如果只是串口,的确没有什么难度。关键是,每一种串口设备都有自己的协议。对于上位机来说,它通常当成是主动请求方。而对下位机,也就是嵌入式模块来说,它一般是当成响应方来进行应答。两者之间的应答应该保持在一定的形式。举个例子来说,一个简单的协议应该包括这几个方面,
1)报文头;
2)长度;
3)命令号;
4)命令详细数据;
5)校验码。
报文头,一般用特殊的数据来表示,通常是55aa这种。长度,也就是报文的全部长度。可以用它来进行数据分割,也可以用它来计算校验码。命令号的话,根据内容的多少来设定。如果命令比较多,还有可能分成主命令和子命令。命令详细数据,这就和具体命令相关了,这里不再一一描述。最后就是校验码,为了防止数据在传输的过程中发生错误,一般需要对前面的数据做一个校验的操作。如果检验码没有问题,那么一切ok。反之,接收方一般会要求发送方重新发送数据。
3、练习串口界面设计
网上关于串口界面设计的代码,或者是开源软件很多。大家不要认为软件比较多,就没有写的必要。正因为多,所以写起来才有很多的内容可以参考。而且,别人能写,不代表自己就可以完成相关的编写工作,这完全是两码事。
4、自己编写和设计串口界面
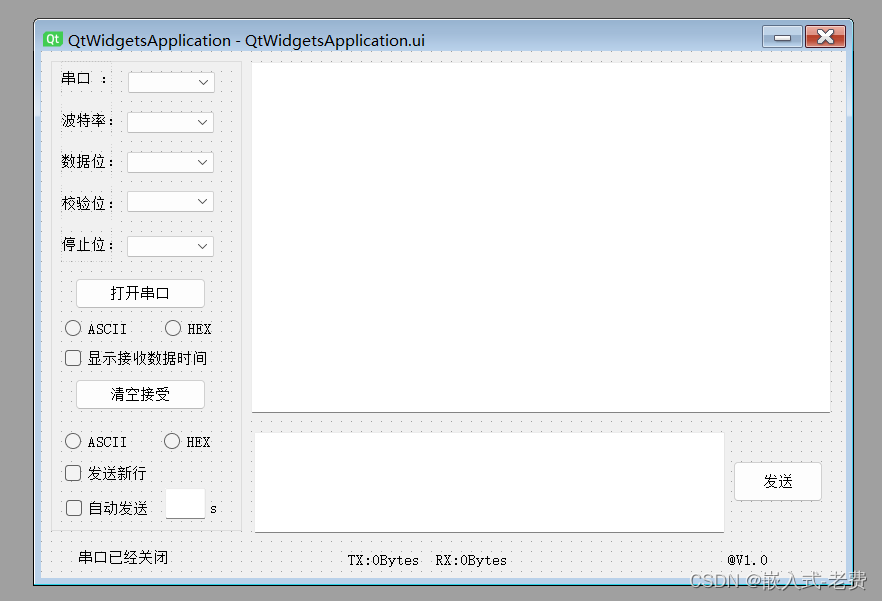
串口界面一般分成两个部分,左边是设置,右边是数据显示。设置的话,分成了串口选择、波特率、数据位选择、校验位选择、停止位选择这几个部分。有了这几个参数,我们就可以打开串口了。当然对于收到的数据,我们也可以选择用ascii码显示,还是用16进制显示。
对于数据的发送也是一样,可以通过选择ascii方式还是hex的方式,判断我们的数据应该怎么发送才对。右侧的部分一般是两个编辑框,一个是收到的数据,一个是发送的数据,在发送的数据框旁边通常包含一个发送按钮。
最后在窗口的下半部分,还会有一些状态栏的数据,比如串口状态、收发了多少字节、版本号等等。我们在用qt实现的时候,首先需要创建一个widget工程,接下来用designer进行界面设计就可以了。因为控件的数量比较多,这里就不建议大家用cpp硬编码的形式去进行界面的绘制动作了。不管怎么说,哪怕是再简单的东西,还是要动手去练一练,遇到问题了经过思考和反馈,最后才能变成自己能够真正理解的东西。
这是它对应的ui文件,
<?xml version="1.0" encoding="UTF-8"?>
<ui version="4.0">
 <class>QtWidgetsApplicationClass</class>
 <widget class="QMainWindow" name="QtWidgetsApplicationClass">
  <property name="geometry">
   <rect>
    <x>0</x>
    <y>0</y>
    <width>805</width>
    <height>527</height>
   </rect>
  </property>
  <property name="windowTitle">
   <string>QtWidgetsApplication</string>
  </property>
  <widget class="QWidget" name="centralWidget">
   <widget class="QComboBox" name="comboBox">
    <property name="geometry">
     <rect>
      <x>87</x>
      <y>21</y>
      <width>87</width>
      <height>21</height>
     </rect>
    </property>
   </widget>
   <widget class="QComboBox" name="comboBox_2">
    <property name="geometry">
     <rect>
      <x>86</x>
      <y>61</y>
      <width>87</width>
      <height>21</height>
     </rect>
    </property>
   </widget>
   <widget class="QComboBox" name="comboBox_3">
    <property name="geometry">
     <rect>
      <x>86</x>
      <y>101</y>
      <width>87</width>
      <height>21</height>
     </rect>
    </property>
   </widget>
   <widget class="QComboBox" name="comboBox_5">
    <property name="geometry">
     <rect>
      <x>86</x>
      <y>185</y>
      <width>87</width>
      <height>21</height>
     </rect>
    </property>
   </widget>
   <widget class="QPushButton" name="pushButton">
    <property name="geometry">
     <rect>
      <x>34</x>
      <y>227</y>
      <width>131</width>
      <height>31</height>
     </rect>
    </property>
    <property name="text">
     <string>打开串口</string>
    </property>
   </widget>
   <widget class="QRadioButton" name="radioButton">
    <property name="geometry">
     <rect>
      <x>24</x>
      <y>268</y>
      <width>115</width>
      <height>19</height>
     </rect>
    </property>
    <property name="text">
     <string>ASCII</string>
    </property>
   </widget>
   <widget class="QRadioButton" name="radioButton_2">
    <property name="geometry">
     <rect>
      <x>124</x>
      <y>268</y>
      <width>61</width>
      <height>19</height>
     </rect>
    </property>
    <property name="text">
     <string>HEX</string>
    </property>
   </widget>
   <widget class="QCheckBox" name="checkBox">
    <property name="geometry">
     <rect>
      <x>24</x>
      <y>298</y>
      <width>161</width>
      <height>19</height>
     </rect>
    </property>
    <property name="text">
     <string>显示接收数据时间</string>
    </property>
   </widget>
   <widget class="QPushButton" name="pushButton_2">
    <property name="geometry">
     <rect>
      <x>34</x>
      <y>328</y>
      <width>131</width>
      <height>31</height>
     </rect>
    </property>
    <property name="text">
     <string>清空接受</string>
    </property>
   </widget>
   <widget class="QRadioButton" name="radioButton_3">
    <property name="geometry">
     <rect>
      <x>24</x>
      <y>381</y>
      <width>110</width>
      <height>19</height>
     </rect>
    </property>
    <property name="text">
     <string>ASCII</string>
    </property>
   </widget>
   <widget class="QRadioButton" name="radioButton_4">
    <property name="geometry">
     <rect>
      <x>123</x>
      <y>381</y>
      <width>61</width>
      <height>19</height>
     </rect>
    </property>
    <property name="text">
     <string>HEX</string>
    </property>
   </widget>
   <widget class="QCheckBox" name="checkBox_2">
    <property name="geometry">
     <rect>
      <x>24</x>
      <y>413</y>
      <width>161</width>
      <height>19</height>
     </rect>
    </property>
    <property name="text">
     <string>发送新行</string>
    </property>
   </widget>
   <widget class="QCheckBox" name="checkBox_3">
    <property name="geometry">
     <rect>
      <x>25</x>
      <y>448</y>
      <width>91</width>
      <height>19</height>
     </rect>
    </property>
    <property name="text">
     <string>自动发送</string>
    </property>
   </widget>
   <widget class="QLineEdit" name="lineEdit">
    <property name="geometry">
     <rect>
      <x>124</x>
      <y>437</y>
      <width>41</width>
      <height>31</height>
     </rect>
    </property>
   </widget>
   <widget class="QLabel" name="label_7">
    <property name="geometry">
     <rect>
      <x>37</x>
      <y>498</y>
      <width>111</width>
      <height>16</height>
     </rect>
    </property>
    <property name="text">
     <string>串口已经关闭</string>
    </property>
   </widget>
   <widget class="QLabel" name="label_8">
    <property name="geometry">
     <rect>
      <x>307</x>
      <y>498</y>
      <width>171</width>
      <height>20</height>
     </rect>
    </property>
    <property name="text">
     <string>TX:0Bytes  RX:0Bytes</string>
    </property>
   </widget>
   <widget class="QLabel" name="label_9">
    <property name="geometry">
     <rect>
      <x>687</x>
      <y>498</y>
      <width>51</width>
      <height>20</height>
     </rect>
    </property>
    <property name="text">
     <string>@V1.0</string>
    </property>
   </widget>
   <widget class="QTextEdit" name="textEdit">
    <property name="geometry">
     <rect>
      <x>210</x>
      <y>11</y>
      <width>580</width>
      <height>351</height>
     </rect>
    </property>
   </widget>
   <widget class="QTextEdit" name="textEdit_2">
    <property name="geometry">
     <rect>
      <x>213</x>
      <y>381</y>
      <width>471</width>
      <height>101</height>
     </rect>
    </property>
   </widget>
   <widget class="QPushButton" name="pushButton_3">
    <property name="geometry">
     <rect>
      <x>692</x>
      <y>410</y>
      <width>90</width>
      <height>41</height>
     </rect>
    </property>
    <property name="text">
     <string>发送</string>
    </property>
   </widget>
   <widget class="QGroupBox" name="groupBox">
    <property name="geometry">
     <rect>
      <x>10</x>
      <y>10</y>
      <width>191</width>
      <height>471</height>
     </rect>
    </property>
    <property name="title">
     <string/>
    </property>
    <widget class="QLabel" name="label_6">
     <property name="geometry">
      <rect>
       <x>159</x>
       <y>438</y>
       <width>21</width>
       <height>16</height>
      </rect>
     </property>
     <property name="text">
      <string>s</string>
     </property>
    </widget>
    <widget class="QSplitter" name="splitter">
     <property name="geometry">
      <rect>
       <x>10</x>
       <y>0</y>
       <width>51</width>
       <height>201</height>
      </rect>
     </property>
     <property name="orientation">
      <enum>Qt::Vertical</enum>
     </property>
     <widget class="QLabel" name="label">
      <property name="text">
       <string>串口 :</string>
      </property>
     </widget>
     <widget class="QLabel" name="label_2">
      <property name="text">
       <string>波特率:</string>
      </property>
     </widget>
     <widget class="QLabel" name="label_3">
      <property name="text">
       <string>数据位:</string>
      </property>
     </widget>
     <widget class="QLabel" name="label_4">
      <property name="text">
       <string>校验位:</string>
      </property>
     </widget>
     <widget class="QLabel" name="label_5">
      <property name="text">
       <string>停止位:</string>
      </property>
     </widget>
    </widget>
    <widget class="QComboBox" name="comboBox_4">
     <property name="geometry">
      <rect>
       <x>76</x>
       <y>130</y>
       <width>87</width>
       <height>21</height>
      </rect>
     </property>
    </widget>
   </widget>
   <zorder>groupBox</zorder>
   <zorder>label</zorder>
   <zorder>label_2</zorder>
   <zorder>label_3</zorder>
   <zorder>label_4</zorder>
   <zorder>label_5</zorder>
   <zorder>comboBox</zorder>
   <zorder>comboBox_2</zorder>
   <zorder>comboBox_3</zorder>
   <zorder>comboBox_5</zorder>
   <zorder>pushButton</zorder>
   <zorder>radioButton</zorder>
   <zorder>radioButton_2</zorder>
   <zorder>checkBox</zorder>
   <zorder>pushButton_2</zorder>
   <zorder>radioButton_3</zorder>
   <zorder>radioButton_4</zorder>
   <zorder>checkBox_2</zorder>
   <zorder>checkBox_3</zorder>
   <zorder>lineEdit</zorder>
   <zorder>label_7</zorder>
   <zorder>label_8</zorder>
   <zorder>label_9</zorder>
   <zorder>textEdit</zorder>
   <zorder>textEdit_2</zorder>
   <zorder>pushButton_3</zorder>
  </widget>
 </widget>
 <layoutdefault spacing="6" margin="11"/>
 <resources>
  <include location="QtWidgetsApplication.qrc"/>
 </resources>
 <connections/>
</ui>