一、电子邮件系统简介
在电子邮件系统中,为用户收发邮件的服务器名为邮件用户代理(Mail User Agent,MUA),MTA (邮件传输代理)的工作职责是转发处理不同电子邮件服务供应商之间的邮件,把来自于 MUA 的邮件转发到合适的 MTA 服务器。
一般的网络服务程序在传输信息时就像拨打电话,需要双方同时保持在线,而在电子邮件系统中,用户发送邮件后不必等待投递工作完成即可下线。
如果对方邮件服务器(MTA)宕机或对方临时离线,则发件服务器(MTA)就会把要发送的内容自动地暂时保存到本地,等检测到对方邮件服务器恢复后会立即再次投递,期间一般无须运维人员维护处理,随后收信人(MUA)就能在自己的信箱中找到这封邮件了。
一个最基础的电子邮件系统肯定要能提供发件服务和收件服务,为此需要使用基于 SMTP的 Postfix 服务程序提供发件服务功能,并使用基于 POP3 协议的 Dovecot 服务程序提供收件服务功能,这里的 SMTP、POP3、IMAP4指的是收发邮件的协议。这样一来,用户就可以使用 Outlook Express 或 Foxmail 等客户端服务程序正常收发邮件了。

二、部署基础的电子邮件系统
1. 配置服务器主机名称
需要保证服务器主机名称与发信域名保持一致
[root@linuxprobe~]$ vim /etc/hostname
mail.xxx.com
[root@linuxprobe~]$ hostname
mail.xxx.com
修改主机名称文件后如果没有立即生效,可以重启服务器;或者再执行一条
hostnamectl set-hostname mail.xxx.com命令,立即设置主机名称。
2. 清空 iptables 防火墙默认策略
避免因防火墙中默认存在的策略阻止了客户端 DNS 解析域名及收发邮件。
[root@linuxprobe~]$ iptables -F
[root@linuxprobe~]$ iptables-save
别忘记 firewalld 防火墙,把 DNS 协议加入到 firewalld 防火墙的允许列表中。
[root@linuxprobe~]$ firewall-cmd --permanent --zone=public --add-service=dns
success
[root@linuxprobe~]$ firewall-cmd --reload
success
3. 为电子邮件系统提供域名解析
[root@linuxprobe~]$ dnf install bind-chroot
[root@linuxprobe~]$ cat /etc/named.conf
1 //
2 // named.conf
3 //
4 // Provided by Red Hat bind package to configure the BIND named DNS
5 // server as a caching only nameserver (as a localhost DNS resolver).
6 //
7 // See /usr/share/doc/bind*/sample/ for example configuration files.
8 //
9
10 options {
11 listen-on port 53 { any; };
12 listen-on-v6 port 53 { ::1; };
13 directory "/var/named";
14 dump-file "/var/named/data/cache_dump.db";
15 statistics-file "/var/named/data/named_stats.txt";
16 memstatistics-file "/var/named/data/named_mem_stats.txt";
17 secroots-file "/var/named/data/named.secroots";
18 recursing-file "/var/named/data/named.recursing";
19 allow-query { any; };
20
………………省略部分输出信息………………
[root@linuxprobe~]$ cat /etc/named.rfc1912.zones
zone "linuxprobe.com" IN {
type master;
file "linuxprobe.com.zone";
allow-update {none;};
};
建议在复制正向解析模板文件时,在 cp 命令后面追加-a 参数,以便让新文件继承原文件的属性和权限信息:
[root@linuxprobe~]$ cp -a /var/named/named.localhost /var/named/linuxprobe.com.zone
[root@linuxprobe~]$ cat /var/named/linuxprobe.com.zone
[root@linuxprobe~]$ systemctl restart named
[root@linuxprobe~]$ systemctl enable named
Created symlink /etc/systemd/system/multi-user.target.wants/named.service→ /
usr/lib/systemd/system/named.service.
修改好配置文件后记得重启 bind 服务程序,这样电子邮件系统所对应的服务器主机名即为 mail.linuxprobe.com,而邮件域为@linuxprobe.com。把服务器的 DNS 地址修改成本地 IP 地址
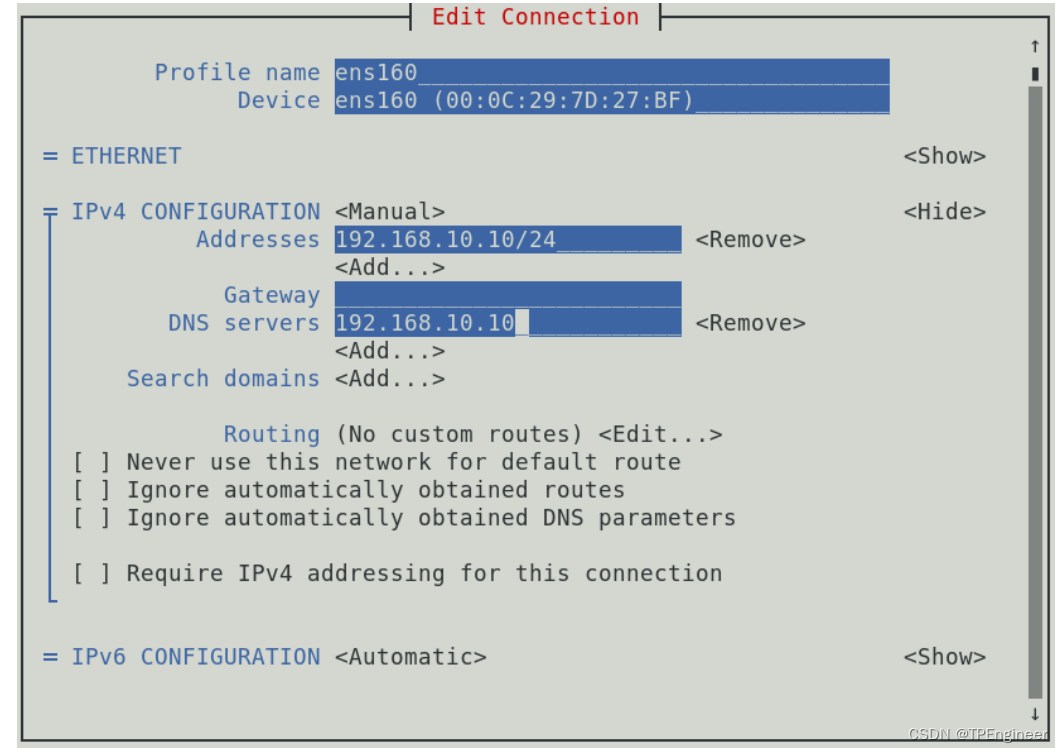
让新配置的网卡参数立即生效:
[root@linuxprobe~]$ nmcli connection up ens160
Connection successfully activated (D-Bus active path: /org/freedesktop/NetworkManager/
ActiveConnection/4)
最后,对主机名执行 ping 命令,若能 ping 通,则证明上述操作全部正确。注意,在执行
ping 操作时,也会获得主机名对应的 IP 地址,证明上述操作全部正确:
[root@linuxprobe~]$ ping -c 4 mail.linuxprobe.com
PING mail.linuxprobe.com (192.168.10.10) 56(84) bytes of data.
64 bytes from mail.linuxprobe.com (192.168.10.10): icmp_seq=1 ttl=64 time=0.040 ms
64 bytes from mail.linuxprobe.com (192.168.10.10): icmp_seq=2 ttl=64 time=0.057 ms
64 bytes from mail.linuxprobe.com (192.168.10.10): icmp_seq=3 ttl=64 time=0.037 ms
64 bytes from mail.linuxprobe.com (192.168.10.10): icmp_seq=4 ttl=64 time=0.052 ms
--- mail.linuxprobe.com ping statistics ---
4 packets transmitted, 4 received, 0% packet loss, time 45ms
rtt min/avg/max/mdev = 0.037/0.046/0.057/0.010 ms
4. 配置 Postfix 服务程序
Postfix 是一款由 IBM 资助研发的免费开源电子邮件服务程序,能够很好地兼容 Sendmail服务程序,可以方便 Sendmail 用户迁移到 Postfix 服务上。Postfix 服务程序的邮件收发能力强于 Sendmail 服务,而且能自动增加、减少进程的数量来保证电子邮件系统的高性能与稳定性。
另外,Postfix 服务程序由许多小模块组成,每个小模块都可以完成特定的功能,因此可在生产工作环境中根据需求灵活搭配。
安装 Postfix 服务程序:
[root@linuxprobe~]# dnf install postfix
Updating Subscription Management repositories.
Unable to read consumer identity
This system is not registered to Red Hat Subscription Management. You can use
subscription-manager to register.
Last metadata expiration check: 0:10:38 ago on Mon 29 Mar 2021 06:40:32 AM CST.

Installing:
postfix x86_64 2:3.3.1-8.el8 BaseOS 1.5 M

Install 1 Package
………………省略部分输出信息………………
Installed:
postfix-2:3.3.1-8.el8.x86_64
Complete!
配置 Postfix 服务程序。大家如果是首次看到 Postfix 服务程序主配置文件(/etc/
postfix/main.cf),估计会被 738 行的内容给吓到。其实不用担心,这里面绝大多数的内容依然是注释信息。刘遄老师在本书中一直强调正确学习 Linux 系统的方法,并坚信“负责任的好老师不应该是书本的搬运工,而应该是一名优质内容的提炼者”,因此在翻遍了配置参数的介绍,以及结合多年的运维经验后,最终总结出了 7 个最应该掌握的参数,如表所示。
myhostname 邮局系统的主机名
mydomain 邮局系统的域名
myorigin 从本机发出邮件的域名名称
inet_interfaces 监听的网卡接口
mydestination 可接收邮件的主机名或域名
mynetworks 设置可转发哪些主机的邮件
relay_domains 设置可转发哪些网域的邮件
在 Postfix 服务程序的主配置文件中,总计需要修改 5 处。首先是在第 95 行定义一个名为 myhostname 的变量,用来保存服务器的主机名称。请大家记住这个变量的名称,下面的参数需要调用它:
[root@linuxprobe~]# vim /etc/postfix/main.cf
86
87 # INTERNET HOST AND DOMAIN NAMES
88 #
89 # The myhostname parameter specifies the internet hostname of this
90 # mail system. The default is to use the fully-qualified domain name
91 # from gethostname(). $myhostname is used as a default value for many
92 # other configuration parameters.
93 #
94 #myhostname = host.domain.tld
95 myhostname = mail.linuxprobe.com
然后在第 102 行定义一个名为 mydomain 的变量,用来保存邮件域的名称。大家也要记住这个变量名称,下面将调用它:
96
97 # The mydomain parameter specifies the local internet domain name.
98 # The default is to use $myhostname minus the first component.
99 # $mydomain is used as a default value for many other configuration
100 # parameters.
101 #
102 mydomain = linuxprobe.com
103
在第 118 行调用前面的 mydomain 变量,用来定义发出邮件的域。调用变量的好处是避
免重复写入信息,以及便于日后统一修改:
105 #
106 # The myorigin parameter specifies the domain that locally-posted
107 # mail appears to come from. The default is to append $myhostname,
108 # which is fine for small sites. If you run a domain with multiple
109 # machines, you should (1) change this to $mydomain and (2) set up
110 # a domain-wide alias database that aliases each user to
111 # user@that.users.mailhost.
112 #
113 # For the sake of consistency between sender and recipient addresses,
114 # myorigin also specifies the default domain name that is appended
115 # to recipient addresses that have no @domain part.

116 #
117 #myorigin = $myhostname
118 myorigin = $mydomain
119
第 4 处修改是在第 135 行定义网卡监听地址。可以指定要使用服务器的哪些 IP 地址对外
提供电子邮件服务;也可以干脆写成 all,表示所有 IP 地址都能提供电子邮件服务:
121
122 # The inet_interfaces parameter specifies the network interface
123 # addresses that this mail system receives mail on. By default,
124 # the software claims all active interfaces on the machine. The
125 # parameter also controls delivery of mail to user@[ip.address].
126 #
127 # See also the proxy_interfaces parameter, for network addresses that
128 # are forwarded to us via a proxy or network address translator.
129 #
130 # Note: you need to stop/start Postfix when this parameter changes.
131 #
132 #inet_interfaces = all
133 #inet_interfaces = $myhostname
134 #inet_interfaces = $myhostname, localhost
135 inet_interfaces = all
136
最后一处修改是在第 183 行定义可接收邮件的主机名或域名列表。这里可以直接调用前
面定义好的 myhostname 和 mydomain 变量(如果不想调用变量,也可以直接调用变量中的值):
151
152 # The mydestination parameter specifies the list of domains that this
153 # machine considers itself the final destination for.
154 #
155 # These domains are routed to the delivery agent specified with the
156 # local_transport parameter setting. By default, that is the UNIX
157 # compatible delivery agent that lookups all recipients in /etc/passwd
158 # and /etc/aliases or their equivalent.
159 #
160 # The default is $myhostname + localhost.$mydomain + localhost. On
161 # a mail domain gateway, you should also include $mydomain.
162 #
163 # Do not specify the names of virtual domains - those domains are
164 # specified elsewhere (see VIRTUAL_README).
165 #
166 # Do not specify the names of domains that machine is backup MX
167 # host for. Specify those names via the relay_domains settings for
168 # the SMTP server, or use permit_mx_backup if you are lazy (see
169 # STANDARD_CONFIGURATION_README).
170 #
171 # The local machine is always the final destination for mail addressed
172 # to user@[the.net.work.address] of an interface that the mail system
173 # receives mail on (see the inet_interfaces parameter).
174 #
175 # Specify a list of host or domain names, /file/name or type:table
176 # patterns, separated by commas and/or whitespace. A /file/name
177 # pattern is replaced by its contents; a type:table is matched when
419
178 # a name matches a lookup key (the right-hand side is ignored).
179 # Continue long lines by starting the next line with whitespace.
180 #
181 # See also below, section "REJECTING MAIL FOR UNKNOWN LOCAL USERS".
182 #
183 mydestination = $myhostname, $mydomain
184 #mydestination = $myhostname, localhost.$mydomain, localhost, $mydomain
185 #mydestination = $myhostname, localhost.$mydomain, localhost, $mydomain,
186 # mail.$mydomain, www.$mydomain, ftp.$mydomain
187
创建电子邮件系统的登录账户。Postfix 与 vsftpd 服务程序一样,都可以调用本
地系统的账户和密码,因此在本地系统创建常规账户即可。最后重启配置妥当的 postfix 服务程序,并将其添加到开机启动项中。大功告成!
[root@linuxprobe~]# useradd liuchuan
[root@linuxprobe~]# echo "linuxprobe" | passwd --stdin liuchuan
Changing password for user liuchuan.
passwd: all authentication tokens updated successfully.
[root@linuxprobe~]# systemctl restart postfix
[root@linuxprobe~]# systemctl enable postfix
Created symlink /etc/systemd/system/multi-user.target.wants/postfix.service→ /
usr/lib/systemd/system/postfix.service.
5.配置 Dovecot 服务程序
Dovecot 是一款能够为 Linux 系统提供 IMAP 和 POP3 电子邮件服务的开源服务程序,安全性极高,配置简单,执行速度快,而且占用的服务器硬件资源也较少,因此是一款值得推荐的收件服务程序。
安装 Dovecot 服务程序软件包。
[root@linuxprobe~]# dnf install -y dovecot
Updating Subscription Management repositories.
Unable to read consumer identity
This system is not registered to Red Hat Subscription Management. You can use
subscription-manager to register.
Last metadata expiration check: 0:49:52 ago on Mon 29 Mar 2021 06:40:32 AM CST.

Installing:
dovecot x86_64 1:2.2.36-5.el8 AppStream 4.6 M
Installing dependencies:
clucene-core x86_64 2.3.3.4-31. e8e3d20git.el8 AppStream 590 k

Install 2 Packages
使用 Postfix 与 Dovecot 部署邮件系统
420
………………省略部分输出信息………………
Installed:
dovecot-1:2.2.36-5.el8.x86_64
clucene-core-2.3.3.4-31.20130812.e8e3d20git.el8.x86_64
Complete!
配置部署 Dovecot 服务程序。在 Dovecot 服务程序的主配置文件中进行如下修
改。首先是第 24 行,把 Dovecot 服务程序支持的电子邮件协议修改为 imap、pop3 和 lmtp。然后在这一行下面添加一行参数,允许用户使用明文进行密码验证。之所以这样操作,是因为 Dovecot 服务程序为了保证电子邮件系统的安全而默认强制用户使用加密方式进行登录,而由于当前还没有加密系统,因此需要添加该参数来允许用户的明文登录。
[root@linuxprobe~]$ vim /etc/dovecot/dovecot.conf
………………省略部分输出信息………………

# Protocols we want to be serving.
protocols = imap pop3 lmtp
disable_plaintext_auth = no
………………省略部分输出信息………………
在主配置文件的第 49 行,设置允许登录的网段地址,也就是说我们可以在这里限制只有来自于某个网段的用户才能使用电子邮件系统。如果想允许所有人都能使用,则不用修改本参数:
# Space separated list of trusted network ranges. Connections from these
# IPs are allowed to override their IP addresses and ports (logging and
# for authentication checks). disable_plaintext_auth is also ignored for
# these networks. Typically you'd specify your IMAP proxy servers here.
login_trusted_networks = 192.168.10.0/24
配置邮件格式与存储路径。在 Dovecot 服务程序单独的子配置文件中,定义一
个路径,用于指定要将收到的邮件存放到服务器本地的哪个位置。这个路径默认已经定义好了,只需要将该配置文件中第 25 行前面的井号(#)删除即可。
[root@linuxprobe~]$ vim /etc/dovecot/conf.d/10-mail.conf
1 ##
2 ## Mailbox locations and namespaces
3 ##
4
5 # Location for users' mailboxes. The default is empty, which means that Dovecot
6 # tries to find the mailboxes automatically. This won't work if the user
7 # doesn't yet have any mail, so you should explicitly tell Dovecot the full
8 # location.
9 #
10 # If you're using mbox, giving a path to the INBOX file (eg. /var/mail/%u)
421
11 # isn't enough. You'll also need to tell Dovecot where the other mailboxes are
12 # kept. This is called the "root mail directory", and it must be the first
13 # path given in the mail_location setting.
14 #
15 # There are a few special variables you can use, eg.:
16 #
17 # %u - username
18 # %n - user part in user@domain, same as %u if there's no domain
19 # %d - domain part in user@domain, empty if there's no domain
20 # %h - home directory
21 #
22 # See doc/wiki/Variables.txt for full list. Some examples:
23 #
24 # mail_location = maildir:~/Maildir
25 mail_location = mbox:~/mail:INBOX=/var/mail/%u
26 # mail_location = mbox:/var/mail/%d/%1n/%n:INDEX=/var/indexes/%d/%1n/%n
27 #
………………省略部分输出信息………………
然后切换到配置 Postfix 服务程序时创建的 boss 账户,并在家目录中建立用于保存邮件的目录。记得要重启 Dovecot 服务并将其添加到开机启动项中。至此,对 Dovecot 服务程序的配置部署步骤全部结束。
[root@linuxprobe~]$ su - liuchuan
[liuchuan@linuxprobe~]$ mkdir -p mail/.imap/INBOX
[liuchuan@linuxprobe~]$ exit
logout
[root@linuxprobe~]$ systemctl restart dovecot
[root@linuxprobe~]$ systemctl enable dovecot
Created symlink /etc/systemd/system/multi-user.target.wants/dovecot.service→ /
usr/lib/systemd/system/dovecot.service.
大家肯定觉得少了点什么吧。是的,还要记得把上面提到的邮件协议在防火墙中的策略
予以放行,这样客户端就能正常访问了:
[root@linuxprobe~]$ firewall-cmd --permanent --zone=public --add-service=imap
success
[root@linuxprobe~]$ firewall-cmd --permanent --zone=public --add-service=pop3
success
[root@linuxprobe~]$ firewall-cmd --permanent --zone=public --add-service=smtp
success
[root@linuxprobe~]$ firewall-cmd --reload
success