本章概要
- 基于配置类方式管理 Bean
- 完全注解开发理解
- 实验一:配置类和扫描注解
- 实验二:@Bean定义组件
- 实验三:高级特性:@Bean注解细节
- 实验四:高级特性:@Import扩展
- 实验五:基于注解+配置类方式整合三层架构组件
4.4 基于配置类方式管理 Bean
4.4.1 完全注解开发理解
Spring 完全注解配置(Fully Annotation-based Configuration)是指通过 Java配置类 代码来配置 Spring 应用程序,使用注解来替代原本在 XML 配置文件中的配置。
相对于 XML 配置,完全注解配置具有更强的类型安全性和更好的可读性。
两种方式思维转化:

4.4.2 实验一:配置类和扫描注解
xml+注解方式
配置文件 application.xml
<?xml version="1.0" encoding="UTF-8"?>
<beans xmlns="http://www.springframework.org/schema/beans"
  xmlns:xsi="http://www.w3.org/2001/XMLSchema-instance"
  xmlns:context="http://www.springframework.org/schema/context"
  xsi:schemaLocation="http://www.springframework.org/schema/beans http://www.springframework.org/schema/beans/spring-beans.xsd http://www.springframework.org/schema/context https://www.springframework.org/schema/context/spring-context.xsd">


  <!-- 配置自动扫描的包 -->
  <!-- 1.包要精准,提高性能!
  2.会扫描指定的包和子包内容
  3.多个包可以使用,分割 例如: com.atguigu.controller,com.atguigu.service等
  -->
  <context:component-scan base-package="com.atguigu.ioc01"/>

  <!-- 引入外部配置文件-->
  <context:property-placeholder location="classpath:jdbc.properties" />
</beans>
配置文件 application.properties
atguigu.url=jdbc:mysql://localhost:3306/studb
atguigu.driver=com.mysql.cj.jdbc.Driver
atguigu.username=root
atguigu.password=root
测试创建IoC容器
// xml方式配置文件使用ClassPathXmlApplicationContext容器读取
ApplicationContext applicationContext = new ClassPathXmlApplicationContext("application.xml");
配置类+注解方式(完全注解方式)
配置类
使用 @Configuration 注解将一个普通的类标记为 Spring 的配置类。
import org.springframework.context.annotation.ComponentScan;
import org.springframework.context.annotation.Configuration;
import org.springframework.context.annotation.PropertySource;

//标注当前类是配置类,替代application.xml
@Configuration
//使用注解读取外部配置,替代 <context:property-placeholder标签
@PropertySource("classpath:jdbc.properties")
//使用@ComponentScan注解,可以配置扫描包,替代<context:component-scan标签
@ComponentScan(basePackages = {"com.atguigu.ioc01"})
public class JavaConfiguration {

}
测试创建IoC容器
// AnnotationConfigApplicationContext 根据配置类创建 IOC 容器对象
ApplicationContext iocContainerAnnotation = new AnnotationConfigApplicationContext(JavaConfiguration.class);
可以使用 no-arg 构造函数实例化 AnnotationConfigApplicationContext ,然后使用 register() 方法对其进行配置。此方法在以编程方式生成 AnnotationConfigApplicationContext 时特别有用。以下示例演示如何执行此操作:
// AnnotationConfigApplicationContext-IOC容器对象
ApplicationContext iocContainerAnnotation = new AnnotationConfigApplicationContext();
//外部设置配置类
iocContainerAnnotation.register(JavaConfiguration.class);
//刷新后方可生效!!
iocContainerAnnotation.refresh();
总结:
@Configuration指定一个类为配置类,可以添加配置注解,替代配置xml文件
@ComponentScan(basePackages = {“包”,“包”}) 替代<context:component-scan标签实现注解扫描
@PropertySource(“classpath:配置文件地址”) 替代 <context:property-placeholder标签
配合 IoC/DI 注解,可以进行完整注解开发!
4.4.3 实验二:@Bean定义组件
场景需求:将Druid连接池对象存储到 IoC 容器
需求分析:第三方 jar 包的类,添加到 ioc 容器,无法使用 @Component 等相关注解!因为源码 jar 包内容为只读模式!
xml方式实现:
<?xml version="1.0" encoding="UTF-8"?>
<beans xmlns="http://www.springframework.org/schema/beans"
  xmlns:xsi="http://www.w3.org/2001/XMLSchema-instance"
  xmlns:context="http://www.springframework.org/schema/context"
  xsi:schemaLocation="http://www.springframework.org/schema/beans http://www.springframework.org/schema/beans/spring-beans.xsd http://www.springframework.org/schema/context https://www.springframework.org/schema/context/spring-context.xsd">


  <!-- 引入外部属性文件 -->
  <context:property-placeholder location="classpath:jdbc.properties"/>

  <!-- 实验六 [重要]给bean的属性赋值:引入外部属性文件 -->
  <bean id="druidDataSource" class="com.alibaba.druid.pool.DruidDataSource">
    <property name="url" value="${jdbc.url}"/>
    <property name="driverClassName" value="${jdbc.driver}"/>
    <property name="username" value="${jdbc.user}"/>
    <property name="password" value="${jdbc.password}"/>
  </bean>

</beans>
配置类方式实现:
@Bean 注释用于指示方法实例化、配置和初始化要由 Spring IoC 容器管理的新对象。对于那些熟悉 Spring 的 XML 配置的人来说, @Bean 注释与 元素起着相同的作用。
//标注当前类是配置类,替代application.xml
@Configuration
//引入jdbc.properties文件
@PropertySource({"classpath:jdbc.properties"})
@ComponentScan(basePackages = {"com.atguigu.ioc01"})
public class JavaConfiguration {

    //如果第三方类进行IoC管理,无法直接使用@Component相关注解
    //解决方案: xml方式可以使用<bean标签
    //解决方案: 配置类方式,可以使用方法返回值+@Bean注解
    @Bean
    public DataSource createDataSource(@Value("${jdbc.user}") String username,
                                       @Value("${jdbc.password}")String password,
                                       @Value("${jdbc.url}")String url,
                                       @Value("${jdbc.driver}")String driverClassName){
        //使用Java代码实例化
        DruidDataSource dataSource = new DruidDataSource();
        dataSource.setUsername(username);
        dataSource.setPassword(password);
        dataSource.setUrl(url);
        dataSource.setDriverClassName(driverClassName);
        //返回结果即可
        return dataSource;
    }
}
4.4.4 实验三:高级特性:@Bean注解细节
- @Bean生成BeanName问题
@Bean注解源码:
public @interface Bean {
    //前两个注解可以指定Bean的标识
    @AliasFor("name")
    String[] value() default {};
    @AliasFor("value")
    String[] name() default {};

    //autowireCandidate 属性来指示该 Bean 是否候选用于自动装配。
    //autowireCandidate 属性默认值为 true,表示该 Bean 是一个默认的装配目标,
    //可被候选用于自动装配。如果将 autowireCandidate 属性设置为 false,则说明该 Bean 不是默认的装配目标,不会被候选用于自动装配。
    boolean autowireCandidate() default true;

    //指定初始化方法
    String initMethod() default "";
    //指定销毁方法
    String destroyMethod() default "(inferred)";
}
指定@Bean的名称:
@Configuration
public class AppConfig {

    @Bean("myThing") //指定名称
    public Thing thing() {
        return new Thing();
    }
}
@Bean 注释注释方法。使用此方法在指定为方法返回值的类型的 ApplicationContext 中注册 Bean 定义。缺省情况下,Bean 名称与方法名称相同。下面的示例演示 @Bean 方法声明:
@Configuration
public class AppConfig {

    @Bean
    public TransferServiceImpl transferService() {
        return new TransferServiceImpl();
    }
}
前面的配置完全等同于下面的Spring XML:
<beans>
  <bean id="transferService" class="com.acme.TransferServiceImpl"/>
</beans>
- @Bean 初始化和销毁方法指定
@Bean 注解支持指定任意初始化和销毁回调方法,非常类似于 Spring XML 在 bean 元素上的 init-method 和 destroy-method 属性,如以下示例所示:
public class BeanOne {

    public void init() {
        // initialization logic
    }
}

public class BeanTwo {

    public void cleanup() {
        // destruction logic
    }
}

@Configuration
public class AppConfig {

    @Bean(initMethod = "init")
    public BeanOne beanOne() {
        return new BeanOne();
    }

    @Bean(destroyMethod = "cleanup")
    public BeanTwo beanTwo() {
        return new BeanTwo();
    }
}
- @Bean Scope作用域
可以指定使用 @Bean 注释定义的 bean 应具有特定范围。您可以使用在 Bean 作用域部分中指定的任何标准作用域。默认作用域为 singleton ,但您可以使用 @Scope 注释覆盖此范围,如以下示例所示:
@Configuration
public class JavaConfiguration {

    @Bean
    @Scope("prototype")
    public Encryptor encryptor() {
        // ...
    }
}
- @Bean方法之间依赖
准备组件
public class HappyMachine {

    private String machineName;

    public String getMachineName() {
        return machineName;
    }

    public void setMachineName(String machineName) {
        this.machineName = machineName;
    }
}
public class HappyComponent {
    //引用新组件
    private HappyMachine happyMachine;

    public HappyMachine getHappyMachine() {
        return happyMachine;
    }

    public void setHappyMachine(HappyMachine happyMachine) {
        this.happyMachine = happyMachine;
    }

    public void doWork() {
        System.out.println("HappyComponent.doWork");
    }

}
Java配置类实现:
方案1:直接调用方法返回 Bean 实例:在一个 @Bean 方法中直接调用其他 @Bean 方法来获取 Bean 实例,虽然是方法调用,也是通过IoC容器获取对应的Bean,例如:
@Configuration
public class JavaConfiguration {

    @Bean
    public HappyMachine happyMachine(){
        return new HappyMachine();
    }

    @Bean
    public HappyComponent happyComponent(){
        HappyComponent happyComponent = new HappyComponent();
        //直接调用方法即可!
        happyComponent.setHappyMachine(happyMachine());
        return happyComponent;
    }

}
方案2:参数引用法:通过方法参数传递 Bean 实例的引用来解决 Bean 实例之间的依赖关系,例如:
package com.atguigu.config;

import com.atguigu.ioc.HappyComponent;
import com.atguigu.ioc.HappyMachine;
import org.springframework.context.annotation.Bean;
import org.springframework.context.annotation.Configuration;

/**
 * projectName: com.atguigu.config
 * description: 配置HappyComponent和HappyMachine关系
 */

@Configuration
public class JavaConfiguration {

    @Bean
    public HappyMachine happyMachine(){
        return new HappyMachine();
    }

    /**
     * 可以直接在形参列表接收IoC容器中的Bean!
     *    情况1: 直接指定类型即可
     *    情况2: 如果有多个bean,(HappyMachine 名称 ) 形参名称等于要指定的bean名称!
     *           例如:
     *               @Bean
     *               public Foo foo1(){
     *                   return new Foo();
     *               }
     *               @Bean
     *               public Foo foo2(){
     *                   return new Foo()
     *               }
     *               @Bean
     *               public Component component(Foo foo1 / foo2 通过此处指定引入的bean)
     */
    @Bean
    public HappyComponent happyComponent(HappyMachine happyMachine){
        HappyComponent happyComponent = new HappyComponent();
        //赋值
        happyComponent.setHappyMachine(happyMachine);
        return happyComponent;
    }

}
4.4.5 实验四:高级特性:@Import扩展
@Import 注释允许从另一个配置类加载 @Bean 定义,如以下示例所示:
@Configuration
public class ConfigA {

    @Bean
    public A a() {
        return new A();
    }
}

@Configuration
@Import(ConfigA.class)
public class ConfigB {

    @Bean
    public B b() {
        return new B();
    }
}
现在,在实例化上下文时不需要同时指定 ConfigA.class 和 ConfigB.class ,只需显式提供 ConfigB ,如以下示例所示:
public static void main(String[] args) {
    ApplicationContext ctx = new AnnotationConfigApplicationContext(ConfigB.class);

    // now both beans A and B will be available...
    A a = ctx.getBean(A.class);
    B b = ctx.getBean(B.class);
}
此方法简化了容器实例化,因为只需要处理一个类,而不是要求您在构造期间记住可能大量的 @Configuration 类。
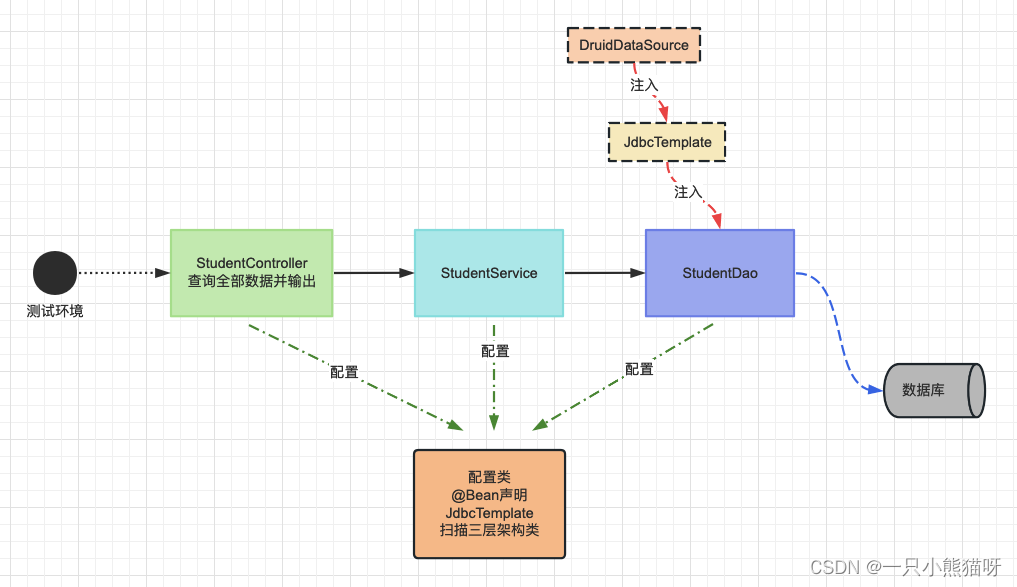
4.4.6 实验五:基于注解+配置类方式整合三层架构组件
- 需求分析
搭建一个三层架构案例,模拟查询全部学生(学生表)信息,持久层使用JdbcTemplate和Druid技术,使用注解+配置类方式进行组件管理!
- 数据库准备
create database studb;

use studb;

CREATE TABLE students (
  id INT PRIMARY KEY,
  name VARCHAR(50) NOT NULL,
  gender VARCHAR(10) NOT NULL,
  age INT,
  class VARCHAR(50)
);

INSERT INTO students (id, name, gender, age, class)
VALUES
  (1, '张三', '男', 20, '高中一班'),
  (2, '李四', '男', 19, '高中二班'),
  (3, '王五', '女', 18, '高中一班'),
  (4, '赵六', '女', 20, '高中三班'),
  (5, '刘七', '男', 19, '高中二班'),
  (6, '陈八', '女', 18, '高中一班'),
  (7, '杨九', '男', 20, '高中三班'),
  (8, '吴十', '男', 19, '高中二班');
- 项目准备
- 项目创建
spring-java-practice-06 - 依赖导入
<dependencies>
      <!--spring context依赖-->
      <!--当你引入SpringContext依赖之后,表示将Spring的基础依赖引入了-->
      <dependency>
          <groupId>org.springframework</groupId>
          <artifactId>spring-context</artifactId>
          <version>6.0.6</version>
      </dependency>

      <!-- 数据库驱动和连接池-->
      <dependency>
          <groupId>mysql</groupId>
          <artifactId>mysql-connector-java</artifactId>
          <version>8.0.25</version>
      </dependency>

      <dependency>
          <groupId>com.alibaba</groupId>
          <artifactId>druid</artifactId>
          <version>1.2.8</version>
      </dependency>

      <dependency>
            <groupId>jakarta.annotation</groupId>
            <artifactId>jakarta.annotation-api</artifactId>
            <version>2.1.1</version>
       </dependency>

      <!-- spring-jdbc -->
      <dependency>
          <groupId>org.springframework</groupId>
          <artifactId>spring-jdbc</artifactId>
          <version>6.0.6</version>
      </dependency>

</dependencies>
- 实体类准备
public class Student {

    private Integer id;
    private String name;
    private String gender;
    private Integer age;
    private String classes;

    public Integer getId() {
        return id;
    }

    public void setId(Integer id) {
        this.id = id;
    }

    public String getName() {
        return name;
    }

    public void setName(String name) {
        this.name = name;
    }

    public String getGender() {
        return gender;
    }

    public void setGender(String gender) {
        this.gender = gender;
    }

    public Integer getAge() {
        return age;
    }

    public void setAge(Integer age) {
        this.age = age;
    }

    public String getClasses() {
        return classes;
    }

    public void setClasses(String classes) {
        this.classes = classes;
    }

    @Override
    public String toString() {
        return "Student{" +
        "id=" + id +
        ", name='" + name + '\'' +
        ", gender='" + gender + '\'' +
        ", age=" + age +
        ", classes='" + classes + '\'' +
        '}';
    }
}
- 三层架构搭建和实现
- 持久层
//接口
public interface StudentDao {

    /**
     * 查询全部学生数据
     * @return
     */
    List<Student> queryAll();
}
//实现类
@Repository
public class StudentDaoImpl implements StudentDao {

    @Autowired
    private JdbcTemplate jdbcTemplate;

    /**
     * 查询全部学生数据
     * @return
     */
    @Override
    public List<Student> queryAll() {

        String sql = "select id , name , age , gender , class as classes from students ;";

        /*
          query可以返回集合!
          BeanPropertyRowMapper就是封装好RowMapper的实现,要求属性名和列名相同即可
         */
        List<Student> studentList = jdbcTemplate.query(sql, new BeanPropertyRowMapper<>(Student.class));

        return studentList;
    }
}
- 业务层
//接口
public interface StudentService {

    /**
     * 查询全部学员业务
     * @return
     */
    List<Student> findAll();

}
//实现类
@Service
public class StudentServiceImpl  implements StudentService {

    @Autowired
    private StudentDao studentDao;

    /**
     * 查询全部学员业务
     * @return
     */
    @Override
    public List<Student> findAll() {

        List<Student> studentList =  studentDao.queryAll();

        return studentList;
    }
}
- 表述层
@Controller
public class StudentController {

    @Autowired
    private StudentService studentService;

    public void  findAll(){
        List<Student> studentList =  studentService.findAll();
        System.out.println("studentList = " + studentList);
    }
}
- 三层架构IoC配置类
@Configuration
@ComponentScan(basePackages = "com.atguigu")
@PropertySource("classpath:jdbc.properties")
public class JavaConfig {

    @Value("${atguigu.url}")
    private String url;
    @Value("${atguigu.driver}")
    private String driver;
    @Value("${atguigu.username}")
    private String username;
    @Value("${atguigu.password}")
    private String password;

    @Bean(destroyMethod = "close")
    public DruidDataSource dataSource(){
        DruidDataSource dataSource = new DruidDataSource();
        dataSource.setUrl(url);
        dataSource.setDriverClassName(driver);
        dataSource.setUsername(username);
        dataSource.setPassword(password);
        return dataSource;
    }

    @Scope(ConfigurableBeanFactory.SCOPE_PROTOTYPE)
    @Bean
    public JdbcTemplate jdbcTemplate(DataSource dataSource){
        JdbcTemplate jdbcTemplate = new JdbcTemplate();
        jdbcTemplate.setDataSource(dataSource);
        return jdbcTemplate;
    }

}
- 配置文件
jdbc.properties
atguigu.url=jdbc:mysql://localhost:3306/studb
atguigu.driver=com.mysql.cj.jdbc.Driver
atguigu.username=root
atguigu.password=root
- 运行测试
public class ControllerTest {

    @Test
    public void testRun(){

        AnnotationConfigApplicationContext applicationContext = new AnnotationConfigApplicationContext(JavaConfig.class);

        StudentController studentController = applicationContext.getBean(StudentController.class);

        studentController.findAll();

    }
}

- 注解+配置类 IoC方式总结
- 完全摒弃了XML配置文件
- 自定义类使用IoC和DI注解标记
- 第三方类使用配置类声明方法+@Bean方式处理
- 完全注解方式(配置类+注解)是现在主流配置方式