目录
- 1、概述
- 2、http请求封装
- 2.1、为什么要封装Http请求?
- 2.2、封装后的网络请求
- 3、发起请求并渲染列表数据
- 第一步:准备一个目前能用的,测试API地址,如下:
- 第二步:创建对应的实体对象
- 第三步:调用请求,获取数据,渲染页面
- 小结
- 4、运行效果
- 5、参考资料:
1、概述
为了把上一节(04鸿蒙APP开发之创建一个底部菜单栏及首页列表)中的测试数据,换成网络列表数据,实现动态加载。
官方的DEMO封装得太深,看不出最简化的结构。
基于这些原因,开始写下本篇博文,内容主要包含,网络请求封装、发起请求,及页面渲染。
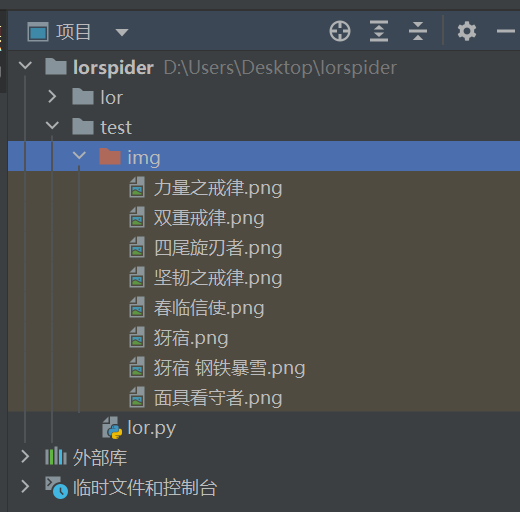
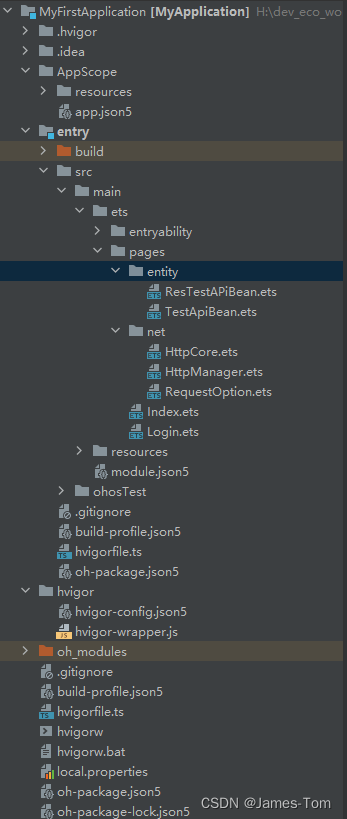
项目最新的目录结构,如下图所示:
2、http请求封装
本段内容主要参考了这篇文章,【鸿蒙应用ArkTS开发系列】- http网络库使用讲解和封装,并完善了appendQueryParams、isValidUrl这两个函数,修改回调函数名称为success、fail。
2.1、为什么要封装Http请求?
官方的Http请求,需要在各个页面每次都要写很长一段代码,为了复用,且降低使用复杂度,所以对Http请求做了二次封装。
2.2、封装后的网络请求
包含三个文件:RequestOption.ets、HttpManager.ets、HttpCore.ets,它们的作用如下:
RequestOption.ets
是一个枚举类,主要是构造一个请求所需的参数集合,包括 地址、请求方式、请求参数、返回数据类型、设置请求头信息。具体实现如下:
export interface RequestOptions {
  url?: string;
  method?: RequestMethod;
  queryParams?: Record<string, string>;
  extraData?: string | Object | ArrayBuffer;
  header?: Object;
}

export enum RequestMethod {
  OPTIONS = "OPTIONS",
  GET = "GET",
  POST = "POST",
  PUT = "PUT",
  HEAD = "HEAD",
  DELETE = "DELETE",
  TRACE = "TRACE",
  CONNECT = "CONNECT"
}
HttpManager.ets
是一个类,使用单例的方式创建实例,作为页面与Http请求类的桥梁,通过调用HttpCore.request()函数,发起请求。具体实现如下:
//注意这一行非常关键,需要别名,不然无法调用request(options)函数
import { httpCore as HttpCore } from './HttpCore';
import { RequestOptions } from './RequestOption';


export class HttpManager {
  private static mInstance: HttpManager;
  //不允许实例
  private constructor() {
  }

  static getInstance(): HttpManager {
    if (!HttpManager.mInstance) {
      HttpManager.mInstance = new HttpManager();

    }
    return HttpManager.mInstance;
  }

  request<T>(options: RequestOptions): Promise<T> {
    return HttpCore.request(options);
  }
}
HttpCore.ets
是封装原官方的Http请求,进行了回调函数扩展,方便在页面中捕捉回调,获取返回的网络数据,实现页面的状态更新。具体实现如下:
import http from '@ohos.net.http';
import { RequestOptions } from '../net/RequestOption';

export class HttpCore {
  request<T>(requestOption: RequestOptions): Promise<T> {
    return new Promise<T>((success, fail) => {
      this.sendRequest(requestOption)
        .then((response) => {
          if (typeof response.result !== 'string') {
            fail(new Error("Invalid data type"));
          } else {
            let bean: T = JSON.parse(response.result);
            if (bean) {
              success(bean);
            } else {
              fail(new Error("JSON to T failed"));
            }
          }
        })
        .catch((error) => {
          fail(error);
        })
    });
  }

  private sendRequest(requestOption: RequestOptions): Promise<http.HttpResponse> {
    let httpRequest = http.createHttp();
    let successFunction, failFunction;
    const resultPromise = new Promise<http.HttpResponse>((success, fail) => {
      successFunction = success;
      failFunction = fail;
    })

    if (!this.isValidUrl(requestOption.url)) {
      return Promise.reject(new Error("URL format error"));
    }

    let promise = httpRequest.request(this.appendQueryParams(requestOption.url, requestOption.queryParams), {
      method: requestOption.method,
      header: requestOption.header,
      extraData: requestOption.extraData,
      expectDataType: http.HttpDataType.STRING
    });

    promise.then((response) => {
      console.info('Result:' + response.result);
      console.info('code:' + response.responseCode);
      console.info('header:' + JSON.stringify(response.header));

      successFunction(response);
    }).catch((err) => {
      failFunction(err);
    }).finally(() => {
      httpRequest.destroy();
    });

    return resultPromise;
  }

  /**
   *  typescript中高级类型Record
   *  组装参数
   * @param url
   * @param queryParams
   * @returns
   */
  private appendQueryParams(url: string, queryParams: Record<string, string>): string {
    var params: string;
    var i: number = 0;
    for (const key in queryParams) {
      if (i == 0) {
        params += key + "=" + queryParams[key];
      } else {
        params += "&" + key + "=" + queryParams[key];
      }
      i++;
      console.log(key + ":" + queryParams[key]);
    }
    if (params != null) {
      return url + "?" + params
    }
    return url
  }

  /**
   * 校验url是否合法,正则
   * @param url
   * @returns
   */
  private isValidUrl(url: string): boolean {
    var regular = /^(?:http(s)?:\/\/)?[\w.-]+(?:\.[\w\.-]+)+[\w\-\._~:/?#[\]@!\$&'\*\+,;=.]+$/;
    if (regular.test(url)) {
      return true;
    }
    return false;
  }
}

//注意这一行非常关键
export const httpCore = new HttpCore();
这三段代码中用到了非常多的陌生关键字,Promise、typeof、.then、.catch、.finally、Record<string, string>、.test,它们是做什么的
,我们来逐一说明。
- Promise:是一种用于处理异步操作的对象,有三种状态:pending(进行中)、fulfilled(已完成)和rejected(已拒绝)。用于一次网络请求、一次文件读写等操作。
- .then:then方法的回调函数接收Promise对象的成功结果作为参数,并将其输出到控制台上。
- .catch:如果Promise对象进入rejected状态,则catch方法的回调函数接收错误对象作为参数,并将其输出到控制台上。
- .finally、不管promise最后的状态,在执行完then或catch指定的回调函数以后,都会执行finally方法中指定的代码。
- typeof:操作符来获取变量的类型。
- Record<string, string>:Record<string, any>
属性名必须是字符串类型,而属性值可以是任意类型。有点类似数据库存放的一行数据结构,如下例:
const myRecord:Record<string, string>={ name:'张三' , city: 'Beijing', country: 'China' }
- .test:是RegExp对象的test()函数,用来测试一个字符串是否与正则表达式匹配。
3、发起请求并渲染列表数据
第一步:准备一个目前能用的,测试API地址,如下:
https://opentdb.com/api.php?amount=10&category=23&difficulty=easy&type=multiple
此API返回的JSON数据如下:
{
	"response_code": 0,
	"results": [{
		"type": "multiple",
		"difficulty": "easy",
		"category": "History",
		"question": "Who was among those killed in the 2010 Smolensk, Russia plane crash tragedy?",
		"correct_answer": "The Polish President",
		"incorrect_answers": ["Pope John Paul II", "Bang-Ding Ow", "Albert Putin"]
	}, {
		"type": "multiple",
		"difficulty": "easy",
		"category": "History",
		"question": "What was the first sport to have been played on the moon?",
		"correct_answer": "Golf",
		"incorrect_answers": ["Football", "Tennis", "Soccer"]
	}, {
		"type": "multiple",
		"difficulty": "easy",
		"category": "History",
		"question": "Which of these countries remained neutral during World War II?",
		"correct_answer": "Switzerland",
		"incorrect_answers": ["United Kingdom", "France", "Italy"]
	}, {
		"type": "multiple",
		"difficulty": "easy",
		"category": "History",
		"question": "How many manned moon landings have there been?",
		"correct_answer": "6",
		"incorrect_answers": ["1", "3", "7"]
	}, {
		"type": "multiple",
		"difficulty": "easy",
		"category": "History",
		"question": "In what year was the M1911 pistol designed?",
		"correct_answer": "1911",
		"incorrect_answers": ["1907", "1899", "1917"]
	}, {
		"type": "multiple",
		"difficulty": "easy",
		"category": "History",
		"question": "During WWII, in 1945, the United States dropped atomic bombs on the two Japanese cities of Hiroshima and what other city?",
		"correct_answer": "Nagasaki",
		"incorrect_answers": ["Kawasaki", "Tokyo", "Kagoshima"]
	}, {
		"type": "multiple",
		"difficulty": "easy",
		"category": "History",
		"question": "These two countries held a commonwealth from the 16th to 18th century.",
		"correct_answer": "Poland and Lithuania",
		"incorrect_answers": ["Hutu and Rwanda", "North Korea and South Korea", "Bangladesh and Bhutan"]
	}, {
		"type": "multiple",
		"difficulty": "easy",
		"category": "History",
		"question": "The idea of Socialism was articulated and advanced by whom?",
		"correct_answer": "Karl Marx",
		"incorrect_answers": ["Vladimir Lenin", "Joseph Stalin", "Vladimir Putin"]
	}, {
		"type": "multiple",
		"difficulty": "easy",
		"category": "History",
		"question": "Which German field marshal was known as the `Desert Fox`?",
		"correct_answer": "Erwin Rommel",
		"incorrect_answers": ["Ernst Busch", "Wolfram Freiherr von Richthofen", "Wilhelm List"]
	}, {
		"type": "multiple",
		"difficulty": "easy",
		"category": "History",
		"question": "Which one of these was not a beach landing site in the Invasion of Normandy?",
		"correct_answer": "Silver",
		"incorrect_answers": ["Gold", "Juno", "Sword"]
	}]
}
第二步:创建对应的实体对象
主要是包含两个类TestApiBean和ResTestAPiBean。
ResTestAPiBean.ets类实现如下:
import ArrayList from '@ohos.util.ArrayList';
import { TestApiBean } from './TestApiBean';

  export class ResTestAPiBean {
  response_code?: string;
  results?: Array<TestApiBean>;
}
TestApiBean.ets类实现如下:
export class TestApiBean {
  id?:string;
  question?: string;
  correct_answer?: string;
  type?: string;

  constructor(
    id:string,
    question: string,
    correct_answer: string,
    type: string
  ) {
    this.id=id;
    this.question = question;
    this.correct_answer = correct_answer;
    this.type = type;
  }
}
第三步:调用请求,获取数据,渲染页面
Index.ets类的实现如下:
import prompt from '@ohos.promptAction'
import util from '@ohos.util';
//引入自定义类
import { HttpManager } from './net/HttpManager'
import { RequestMethod } from './net/RequestOption';
import { TestApiBean } from './entity/TestApiBean';
import { ResTestAPiBean } from './entity/ResTestAPiBean';

@Entry
@Component
struct Index {
  private tabsController = new TabsController();
  @State index: number = 0; // 选项卡下标,默认为第一个

  //组件Index自带的函数,类似于重写@Override,在build()之前就会执行
  aboutToAppear() {
    this.loadApiTestData();
  }

  //@State此时的状态就非常有用了,当你上下拉刷新UI的时候,只需要重新给此变量赋值就会自动刷新界面(UI)
  @State testApiBeanList: Array<TestApiBean> = new Array<TestApiBean>();

  /**
   * 调用封装的网络请求类,访问网络API并获取列表数据
   */
  loadApiTestData() {
    HttpManager.getInstance().request<ResTestAPiBean>({
      url: "https://opentdb.com/api.php?amount=10&category=23&difficulty=easy&type=multiple",
      method: RequestMethod.GET
    }).then((result) => {
      for (let i = 0; i < result.results.length; i++) {
        let item = result.results[i];
        this.testApiBeanList.push({
          id: util.generateRandomUUID(true),
          question: item.question,
          correct_answer: item.correct_answer,
          type: item.type
        });
      }
    }).catch((error) => {
      console.log(error);
    });
  }

  //开始构建UI
  build() {
    Column() {
      Tabs({ controller: this.tabsController }) {
        TabContent() {
          Column() {
            List({ space: 10, initialIndex: 0 }) {
              ForEach(this.testApiBeanList, (item: TestApiBean, index: number) => {
                // 循环渲染ListItem
                ListItem() {
                  Row() {
                    Column() {
                      Text(item.correct_answer).fontSize(16).fontColor($r("app.color.color_list_title"))
                      Text(item.question).fontSize(14).fontColor($r("app.color.color_list_abstract"))
                    }.width('100%').alignItems(HorizontalAlign.Start)
                  }.width('100%').justifyContent(FlexAlign.Start).padding({ left: 16, right: 16, top: 8, bottom: 8 })
                  .onClick(() => {
                    //选项单击事件
                    prompt.showToast({ message: this.testApiBeanList[index].question, duration: 2000 })
                  })
                }
              }, item => item.id)
            }.width("100%").listDirection(Axis.Vertical).scrollBar(BarState.Auto)

          }.width('100%').height('100%').justifyContent(FlexAlign.Start).backgroundColor("#eeeeee")
        }.tabBar(this.tabHome())

        TabContent() {
          Column() {
            Text("订阅内容").fontSize(32)
          }.width('100%').height('100%').justifyContent(FlexAlign.Center).backgroundColor("#eeeeee")
        }.tabBar(this.tabSub)

        TabContent() {
          Column() {
            Text("我的内容").fontSize(32)
          }.width('100%').height('100%').justifyContent(FlexAlign.Center).backgroundColor("#eeeeee")
        }.tabBar(this.tabMe)

      }.barPosition(BarPosition.End)
    }.width('100%').height('100%')
  }

  @Builder tabHome() {
    Column() {
      Image(this.index == 0 ? $r('app.media.ic_menu_home_focus') : $r('app.media.ic_menu_home_normal'))
        .size({ width: 25, height: 25 }).margin({ top: 5, bottom: 5 })
      Text("首页").fontSize(16).fontColor(this.index == 0 ? "#2a58d0" : "#6b6b6b")
    }.width('100%').height('100%').onClick(() => {
      this.index = 0;
      this.tabsController.changeIndex(this.index)
    })
  }

  @Builder tabSub() {
    Column() {
      Image(this.index == 1 ? $r('app.media.ic_menu_sub_focus') : $r('app.media.ic_menu_sub_normal'))
        .size({ width: 25, height: 25 }).margin({ top: 5, bottom: 5 })
      Text("订阅").fontSize(16).fontColor(this.index == 1 ? "#2a58d0" : "#6b6b6b")
    }.width('100%').height('100%').onClick(() => {
      this.index = 1;
      this.tabsController.changeIndex(this.index)
    })
  }

  @Builder tabMe() {
    Column() {
      Image(this.index == 2 ? $r('app.media.ic_menu_me_focus') : $r('app.media.ic_menu_me_normal'))
        .size({ width: 25, height: 25 }).margin({ top: 5, bottom: 5 })
      Text("我的").fontSize(16).fontColor(this.index == 2 ? "#2a58d0" : "#6b6b6b")
    }.width('100%').height('100%').onClick(() => {
      this.index = 2;
      this.tabsController.changeIndex(this.index)
    })
  }
}
小结
- ForEach必须要求使用Array数据类型来加载数据,Array需要使用push来放入对象数据。
- aboutToAppear(),是页面自带的函数,在Build构建之前执行,类似java重写函数,加载请求可写在此函数中。
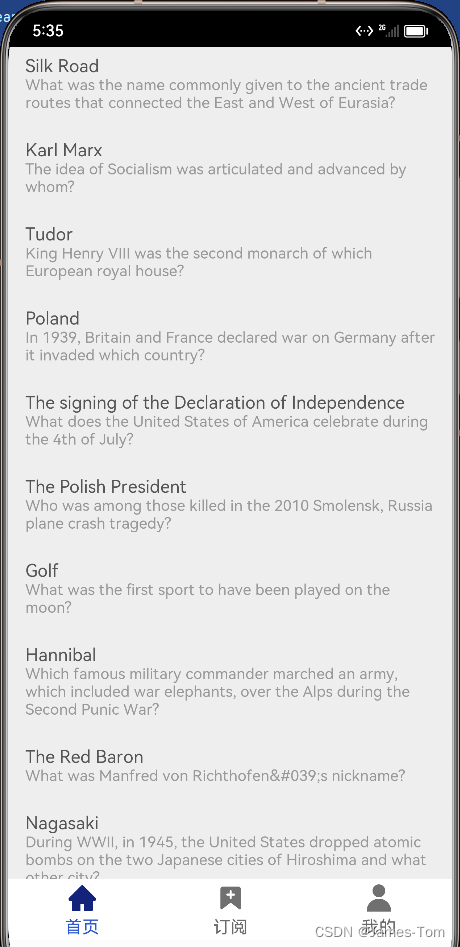
4、运行效果
如下图所示:
5、参考资料:
网络请求封装:https://blog.csdn.net/q919233914/article/details/130643452
原创不易,求个关注。

微信公众号:一粒尘埃的漫旅
里面有很多想对大家说的话,就像和朋友聊聊天。
写代码,做设计,聊生活,聊工作,聊职场。
我见到的世界是什么样子的?
搜索关注我吧。
公众号与博客的内容不同。


![[linux]进程间通信-管道pipe的实际用法(写入/读取)](https://img-blog.csdnimg.cn/direct/6c7dc967929e499aad49e76b156acbc6.png)