最终效果
文章目录
- 最终效果
- 前言
- 为什么使用CharacterController
- SimpleMove和Move如何选择?
- 1. SimpleMove
- 2. Move
- 配置CharacterController参数
- 控制相机
- 移动
- 跳跃
- 下蹲
- 处理下坡抖动问题
- 实现奔跑和不同移速控制
- 完整代码
- 完结
前言
其实一开始我是不打算写的,我感觉这种简单的功能,网上随便一搜一大堆,但是我发现网上很多都是复制粘贴,要么没有实操过,要么就是功能不全,或者毫无解释的把代码丢出来,我自以为简单的3D角色控制,我整整花了3-4天才研究明白(虽然每天只花几个小时),下面是记录我的一些思路过程,希望对你有帮助。
其实之前实战有做过FPS移动控制,只是没有说的很全面,刚兴趣可以查看之前的文章:
【用unity实现100个游戏之18】从零开始制作一个类CSGO/CS2、CF第一人称FPS射击游戏——基础篇1
为什么使用CharacterController
Unity中常用的三种角色移动方式如下:
-
使用刚体(Rigidbody)组件:这种方式将角色对象添加刚体组件,并通过力(Force)或者速度(Velocity)来控制移动。你可以使用输入控制器(例如键盘、手柄)获取移动输入,然后将对应的力或速度施加给角色刚体,从而实现移动。
-
使用Transform组件的Translate方法:这种方式直接使用Transform组件的Translate方法来移动角色。你可以通过获取输入控制器的输入,计算出移动方向和距离,然后调用Translate方法将角色移动到指定位置。
-
使用Character Controller组件:这种方式需要将角色对象添加Character Controller组件,并使用Character Controller提供的Move方法来移动角色。你可以通过输入控制器获取移动输入,然后将输入转换为移动向量,并传递给Character Controller的Move方法来实现移动。
刚体自带重力和物理效果,但是对于爬坡,走楼梯要单独处理,比较麻烦。(ps:当然,后面有机会我在研究Rigidbody如何控制人物,可以关注期待一下)
Transform呢,不带重力又不带碰撞,移动不受物理引擎控制,可能导致穿透墙壁或其他对象。不支持碰撞和重力等物理效果。所以我说直接pass的
CharacterController主要是不适用于需要处理复杂物理交互的情况,例如推动物体等。但是对于爬坡,楼梯自带了处理方式,完美解决了刚体的痛点,而如果你想推动物体也可以直接给物体一个推力即可解决
SimpleMove和Move如何选择?
而对于CharacterController有用两种移动实现方式,SimpleMove和Move。
1. SimpleMove
- 不受Y轴速度影响,自带重力效果,
无法实现跳跃功能 - 返回值为Bool,当角色接触地面返回True,反之为False。
- SimpleMove方法是CharacterController组件提供的一个用于处理角色平面移动的简化方法,它自动处理了角色与地面的碰撞* 检测和摩擦,但它不支持跳跃等垂直方向的动作
2. Move
- 无重力效果,自行实现重力,
可做跳跃功能 - 返回值(CollisionFlags对象),返回角色与物体碰撞的信息
可以看到SimpleMove看着虽好,但是最大的痛点是无法实现跳跃,所以我们只能忍痛Pass掉
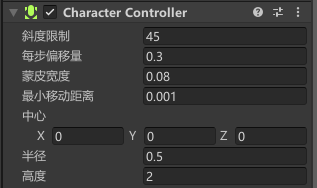
配置CharacterController参数
新增一个胶囊体,代表角色,在角色身上新增CharacterController组件,参数配置如下
控制相机
将相机拖入为玩家的子物体,放置在角色的头部位置,修改
新增MouseLook脚本,挂载在相机上,控制相机视角
public class MouseLook : MonoBehaviour
{
    // 鼠标灵敏度
    public float mouseSensitivity = 1000f;

    // 玩家的身体Transform组件,用于旋转
    public Transform playerBody;

    // x轴的旋转角度
    float xRotation = 0f;
    void Start()
    {
        // 锁定光标到屏幕中心,并隐藏光标
        Cursor.lockState = CursorLockMode.Locked;
    }

    // Update在每一帧调用
    void Update()
    {
        // 执行自由视角查看功能
        FreeLook();
    }

    // 自由视角查看功能的实现
    void FreeLook()
    {
        // 获取鼠标X轴和Y轴的移动量,乘以灵敏度和时间,得到平滑的移动速率
        float mouseX = Input.GetAxis("Mouse X") * mouseSensitivity * Time.deltaTime;
        float mouseY = Input.GetAxis("Mouse Y") * mouseSensitivity * Time.deltaTime;
        //限制旋转角度在-90到90度之间,防止过度翻转
        xRotation = Mathf.Clamp(xRotation, -90f, 90f);

        // 累计x轴上的旋转量
        xRotation -= mouseY;

        // 应用摄像头的x轴旋转
        transform.localRotation = Quaternion.Euler(xRotation, 0f, 0f);

        // 应用玩家身体的y轴旋转
        playerBody.Rotate(Vector3.up * mouseX);
    }
}
效果
移动
经过上面的分享,我们使用Move实现一下人物的移动
新增MovementScript脚本,挂载在角色身上
public class MovementScript : MonoBehaviour
{
	[Tooltip("角色控制器")] public CharacterController characterController;
	private float horizontal;
    private float vertical;

    [Header("移动")]
    [Tooltip("角色行走的速度")] public float walkSpeed = 6f;
    [Tooltip("当前速度")] private float speed;

    void Start()
    {
        speed = walkSpeed;
    }
    void Update()
    {
        horizontal = Input.GetAxis("Horizontal");
        vertical = Input.GetAxis("Vertical");
        moveDirection = transform.right * horizontal + transform.forward * vertical; // 计算移动方向
        //将该向量从局部坐标系转换为世界坐标系,得到最终的移动方向,效果和上面的一样
        // moveDirection = transform.TransformDirection(new Vector3(h, 0, v));
        moveDirection = moveDirection.normalized; // 归一化移动方向,避免斜向移动速度过快
        characterController.Move(moveDirection * Time.deltaTime * speed);
    }
}
效果
跳跃
地面检测我们就用圆形球体把,因为人物是胶囊体,这种方法最合适
[Header("地面检测")]
[Tooltip("地面检测位置")] public Transform groundCheck;
[Tooltip("地面检测半径")] public float sphereRadius = 0.4f;
[Tooltip("是否在地面")] private bool isGround;

[Header("跳跃")]
[Tooltip("角色跳跃的高度")] public float jumpHeight = 2.5f;
[Tooltip("判断是否在跳跃")] private bool isJumping;

void Update()
{
	//地面检测
	isGround = IsGrounded();
	SetJump();
}

//控制跳跃
void SetJump()
{
    if (Input.GetButtonDown("Jump") && isGround)
    {
        isJump = true;
        moveDirection.y = jumpHeight;
    }
    moveDirection.y -= Gravity * Time.deltaTime;
    characterController.Move(moveDirection * Time.deltaTime * speed);

    isJump = false;
}

//是否在地面
bool IsGrounded()
{
    Collider[] colliders = Physics.OverlapSphere(groundCheck.position, sphereRadius);
    foreach (Collider collider in colliders)
    {
        if (collider.gameObject != gameObject && !IsChildOf(collider.transform, transform)) // 忽略角色自身和所有子集碰撞体
        {
            return true;
        }
    }
    return false;
}

//判断child是否是parent的子集
bool IsChildOf(Transform child, Transform parent)
{
    while (child != null)
    {
        if (child == parent)
        {
            return true;
        }
        child = child.parent;
    }
    return false;
}

//在场景视图显示检测,方便调试
private void OnDrawGizmos()
{
    Gizmos.color = Color.red;

    //地面检测可视化
    Gizmos.DrawWireSphere(groundCheck.position, sphereRadius);
}
配置地面检测点位置
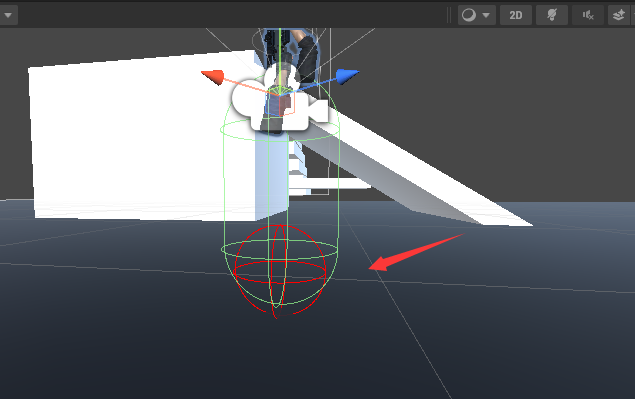
效果
下蹲
下蹲的逻辑就是让CharacterController 的高度减半,还有中心点的位置也跟着减半,当然还有摄像机的高度,还需要注意的是人物如果头顶有东西的时候我们是不允许他起立的,不然会穿模,所以还需要一个头顶检测,头顶我们使用盒子检测最好,可以覆盖整个头部
[Header("相机")]
[Tooltip("摄像机相机")] public Transform mainCamera;
[Tooltip("摄像机高度变化的平滑值")] public float interpolationSpeed = 10f;
[Tooltip("当前摄像机的位置")] private Vector3 cameraLocalPosition;
[Tooltip("当前摄像机的高度")] private float height;

[Header("头顶检测")]
[Tooltip("头顶检测位置")] public Transform headCheck;
[Tooltip("盒子半长、半宽、半高")] public Vector3 halfExtents = new Vector3(0.4f, 0.5f, 0.4f);
[Tooltip("判断玩家是否可以站立")] private bool isCanStand;

[Header("下蹲")]
[Tooltip("下蹲时候的玩家高度")] private float crouchHeight;
[Tooltip("判断玩家是否在下蹲")] private bool isCrouching;
[Tooltip("正常站立时玩家高度")] private float standHeight;

void Start()
{
    standHeight = characterController.height;
    crouchHeight = standHeight / 2;
    cameraLocalPosition = mainCamera.localPosition;
    speed = walkSpeed;
}

void Update()
{
    //头顶检测
    isCanStand = CanStand();

    SetCrouch();
}

//控制下蹲
void SetCrouch()
{
    if (Input.GetKey(KeyCode.LeftControl))
    {
        Crouch(true);
    }
    else
    {
        Crouch(false);
    }
}

//newCrouching控制下蹲起立
public void Crouch(bool newCrouching)
{
    if (!newCrouching && !isCanStand) return; //准备起立时且头顶有东西,不能进行站立
    isCrouching = newCrouching;
    float targetHeight = isCrouching ? crouchHeight : standHeight;
    characterController.height = targetHeight; //根据下蹲状态设置下蹲时候的高度和站立的高度
    characterController.center = new Vector3(0, targetHeight / 2, 0); //将角色控制器的中心位置Y,从头顶往下减少1半的高度

	// 设置下蹲站立时候的摄像机高度
    float heightTarget = isCrouching ? cameraLocalPosition.y / 2 + characterController.center.y : cameraLocalPosition.y;
    height = Mathf.Lerp(height, heightTarget, interpolationSpeed * Time.deltaTime);//平滑过渡
    mainCamera.localPosition = new Vector3(cameraLocalPosition.x, height, cameraLocalPosition.z);
}

//是否可以起立,及头顶是否有物品
bool CanStand()
{
    Collider[] colliders = Physics.OverlapBox(headCheck.position, halfExtents);
    foreach (Collider collider in colliders)
    {
        //忽略角色自身和所有子集碰撞体
        if (collider.gameObject != gameObject && !IsChildOf(collider.transform, transform))
        {
            return false;
        }
    }
    return true;
}

//在场景视图显示检测,方便调试
private void OnDrawGizmos()
{
    Gizmos.color = Color.red;

    //头顶检测可视化
    Gizmos.DrawWireCube(headCheck.position, halfExtents * 2f);
}
配置头顶检测
效果
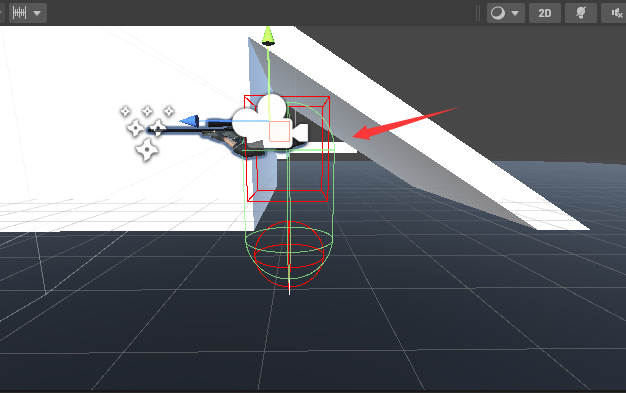
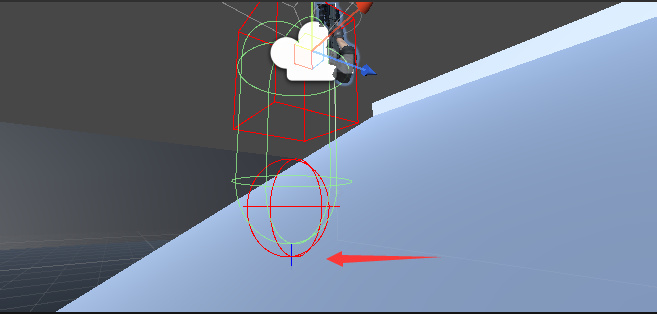
处理下坡抖动问题
你的人物在下斜坡时可能会出现一个问题,人物下坡出现抖动,抖动其实本身可以理解,但是这个下坡抖动会影响地面检测准度,导致我们移动下坡时可能跳不起来,当然这不是我们想要的,具体的处理思路就是当我们判断在斜面时,给人物一个向下的压力,让人物没那么容易离地,而判断在斜面的方法就从人物向下打一条射线,判断射线和地面的法线如果非90度就是在斜面了
[Header("斜坡检测")]
[Tooltip("斜坡射线长度")] public float slopeForceRayLength = 0.2f;
[Tooltip("是否在斜坡")] private bool isSlope;

[Header("斜坡")]
[Tooltip("走斜坡时向下施加的力度")] public float slopeForce = 6.0f;

void Update()
{
	//斜坡检测
	isSlope = OnSlope();
	SetJump();
}

//控制跳跃
void SetJump()
{
    //。。。

	//为了不影响跳跃,一定要在isJumping = false之前加力
    SetSlope();

    isJumping = false;
}

//控制斜坡
public void SetSlope()
{
    //如果处于斜坡
    if (isSlope && !isJumping)
    {
        //向下增加力
        moveDirection.y = characterController.height / 2 * slopeForceRayLength;
        characterController.Move(Vector3.down * characterController.height / 2 * slopeForce * Time.deltaTime);
    }
}

//是否在斜面
public bool OnSlope()
{
    RaycastHit hit;

    // 向下打出射线(检测是否在斜坡上)
    if (Physics.Raycast(transform.position + characterController.height / 2 * Vector3.down, Vector3.down, out hit, characterController.height / 2 * slopeForceRayLength))
    {
        // 如果接触到的点的法线,不在(0,1,0)的方向上,那么人物就在斜坡上
        if (hit.normal != Vector3.up)
            return true;
    }
    return false;
}

//在场景视图显示检测,方便调试
private void OnDrawGizmos()
{
    Gizmos.color = Color.red;

    //斜坡检测可视化
    Debug.DrawRay(transform.position + characterController.height / 2 * Vector3.down, Vector3.down * characterController.height / 2 * slopeForceRayLength, Color.blue);
}
斜坡检测线
效果
实现奔跑和不同移速控制
[Header("移动")]
[Tooltip("角色行走的速度")] public float walkSpeed = 6f;
[Tooltip("角色奔跑的速度")] public float runSpeed = 9f;
[Tooltip("角色下蹲的速度")] public float crouchSpeed = 3f;
[Tooltip("角色移动的方向")] private Vector3 moveDirection;
[Tooltip("当前速度")] private float speed;
[Tooltip("是否奔跑")] private bool isRun;

//速度设置
void SetSpeed()
{
    if (isRun)
    {
        speed = runSpeed;
    }
    else if (isCrouching)
    {
        speed = crouchSpeed;
    }
    else
    {
        speed = walkSpeed;
    }
}

//控制奔跑
void SetRun()
{
    if (Input.GetKey(KeyCode.LeftShift) && !isCrouching)
    {
        isRun = true;
    }
    else
    {
        isRun = false;
    }
}
效果
完整代码
注意:代码的参数都是经过我测试过的,复制即可使用,并不推荐大家修改,除非你知道自己在干什么
[RequireComponent(typeof(CharacterController))]
public class MovementScript : MonoBehaviour
{
    [Tooltip("角色控制器")] public CharacterController characterController;
    [Tooltip("重力加速度")] private float Gravity = 9.8f;
    private float horizontal;
    private float vertical;

    [Header("相机")]
    [Tooltip("摄像机相机")] public Transform mainCamera;
    [Tooltip("摄像机高度变化的平滑值")] public float interpolationSpeed = 10f;
    [Tooltip("当前摄像机的位置")] private Vector3 cameraLocalPosition;
    [Tooltip("当前摄像机的高度")] private float height;

    [Header("移动")]
    [Tooltip("角色行走的速度")] public float walkSpeed = 6f;
    [Tooltip("角色奔跑的速度")] public float runSpeed = 9f;
    [Tooltip("角色下蹲的速度")] public float crouchSpeed = 3f;
    [Tooltip("角色移动的方向")] private Vector3 moveDirection;
    [Tooltip("当前速度")] private float speed;
    [Tooltip("是否奔跑")] private bool isRun;

    [Header("地面检测")]
    [Tooltip("地面检测位置")] public Transform groundCheck;
    [Tooltip("地面检测半径")] public float sphereRadius = 0.4f;
    [Tooltip("是否在地面")] private bool isGround;

    [Header("头顶检测")]
    [Tooltip("头顶检测位置")] public Transform headCheck;
    [Tooltip("盒子半长、半宽、半高")] public Vector3 halfExtents = new Vector3(0.4f, 0.5f, 0.4f);
    [Tooltip("判断玩家是否可以站立")] private bool isCanStand;

    [Header("斜坡检测")]
    [Tooltip("斜坡射线长度")] public float slopeForceRayLength = 0.2f;
    [Tooltip("是否在斜坡")] private bool isSlope;

    [Header("跳跃")]
    [Tooltip("角色跳跃的高度")] public float jumpHeight = 2.5f;
    [Tooltip("判断是否在跳跃")] private bool isJumping;

    [Header("下蹲")]
    [Tooltip("下蹲时候的玩家高度")] private float crouchHeight;
    [Tooltip("判断玩家是否在下蹲")] private bool isCrouching;
    [Tooltip("正常站立时玩家高度")] private float standHeight;

    [Header("斜坡")]
    [Tooltip("走斜坡时施加的力度")] public float slopeForce = 6.0f;

    void Start()
    {
        standHeight = characterController.height;
        crouchHeight = standHeight / 2;
        cameraLocalPosition = mainCamera.localPosition;
        speed = walkSpeed;
    }

    void Update()
    {
        horizontal = Input.GetAxis("Horizontal");
        vertical = Input.GetAxis("Vertical");

        //地面检测
        isGround = IsGrounded();

        //头顶检测
        isCanStand = CanStand();

        //斜坡检测
        isSlope = OnSlope();

        SetSpeed();

        SetRun();

        SetCrouch();

        SetMove();

        SetJump();
    }

    //速度设置
    void SetSpeed()
    {
        if (isRun)
        {
            speed = runSpeed;
        }
        else if (isCrouching)
        {
            speed = crouchSpeed;
        }
        else
        {
            speed = walkSpeed;
        }
    }

    //控制奔跑
    void SetRun()
    {
        if (Input.GetKey(KeyCode.LeftShift) && !isCrouching)
        {
            isRun = true;
        }
        else
        {
            isRun = false;
        }
    }

    //控制下蹲
    void SetCrouch()
    {
        if (Input.GetKey(KeyCode.LeftControl))
        {
            Crouch(true);
        }
        else
        {
            Crouch(false);
        }
    }

    //控制移动
    void SetMove()
    {
        if (isGround)
        {
            moveDirection = transform.right * horizontal + transform.forward * vertical; // 计算移动方向
            //将该向量从局部坐标系转换为世界坐标系,得到最终的移动方向
            // moveDirection = transform.TransformDirection(new Vector3(h, 0, v));
            moveDirection = moveDirection.normalized; // 归一化移动方向,避免斜向移动速度过快
        }
    }

    //控制跳跃
    void SetJump()
    {
        if (Input.GetButtonDown("Jump") && isGround)
        {
            isJumping = true;
            moveDirection.y = jumpHeight;
        }
        moveDirection.y -= Gravity * Time.deltaTime;
        characterController.Move(moveDirection * Time.deltaTime * speed);

        //为了不影响跳跃,一定要在isJumping = false之前加力
        SetSlope();

        isJumping = false;
    }

    //控制斜坡
    public void SetSlope()
    {
        //如果处于斜坡
        if (isSlope && !isJumping)
        {
            //向下增加力
            moveDirection.y = characterController.height / 2 * slopeForceRayLength;
            characterController.Move(Vector3.down * characterController.height / 2 * slopeForce * Time.deltaTime);
        }
    }

    //newCrouching控制下蹲起立
    public void Crouch(bool newCrouching)
    {
        if (!newCrouching && !isCanStand) return; //准备起立时且头顶有东西,不能进行站立
        isCrouching = newCrouching;
        float targetHeight = isCrouching ? crouchHeight : standHeight;
        float heightChange = targetHeight - characterController.height; //计算高度变化
        characterController.height = targetHeight; //根据下蹲状态设置下蹲时候的高度和站立的高度
        characterController.center += new Vector3(0, heightChange / 2, 0); //根据高度变化调整中心位置

        // 设置下蹲站立时候的摄像机高度
        float heightTarget = isCrouching ? cameraLocalPosition.y / 2 + characterController.center.y : cameraLocalPosition.y;
        height = Mathf.Lerp(height, heightTarget, interpolationSpeed * Time.deltaTime);
        mainCamera.localPosition = new Vector3(cameraLocalPosition.x, height, cameraLocalPosition.z);
    }

    //是否可以起立,及头顶是否有物品
    bool CanStand()
    {
        Collider[] colliders = Physics.OverlapBox(headCheck.position, halfExtents);
        foreach (Collider collider in colliders)
        {
            //忽略角色自身和所有子集碰撞体
            if (collider.gameObject != gameObject && !IsChildOf(collider.transform, transform))
            {
                return false;
            }
        }
        return true;
    }

    //是否在地面
    bool IsGrounded()
    {
        Collider[] colliders = Physics.OverlapSphere(groundCheck.position, sphereRadius);
        foreach (Collider collider in colliders)
        {
            if (collider.gameObject != gameObject && !IsChildOf(collider.transform, transform)) // 忽略角色自身和所有子集碰撞体
            {
                return true;
            }
        }
        return false;
    }

    //是否在斜面
    public bool OnSlope()
    {
        RaycastHit hit;

        // 向下打出射线(检测是否在斜坡上)
        if (Physics.Raycast(transform.position + characterController.height / 2 * Vector3.down, Vector3.down, out hit, characterController.height / 2 * slopeForceRayLength))
        {
            // 如果接触到的点的法线,不在(0,1,0)的方向上,那么人物就在斜坡上
            if (hit.normal != Vector3.up)
                return true;
        }
        return false;
    }

    //判断child是否是parent的子集
    bool IsChildOf(Transform child, Transform parent)
    {
        while (child != null)
        {
            if (child == parent)
            {
                return true;
            }
            child = child.parent;
        }
        return false;
    }


    //在场景视图显示检测,方便调试
    private void OnDrawGizmos()
    {
        Gizmos.color = Color.red;

        //头顶检测可视化
        Gizmos.DrawWireCube(headCheck.position, halfExtents * 2f);

        //地面检测可视化
        Gizmos.DrawWireSphere(groundCheck.position, sphereRadius);

        //斜坡检测可视化
        Debug.DrawRay(transform.position + characterController.height / 2 * Vector3.down, Vector3.down * characterController.height / 2 * slopeForceRayLength, Color.blue);
    }
}
完结
赠人玫瑰,手有余香!如果文章内容对你有所帮助,请不要吝啬你的点赞评论和关注,以便我第一时间收到反馈,你的每一次支持都是我不断创作的最大动力。当然如果你发现了文章中存在错误或者有更好的解决方法,也欢迎评论私信告诉我哦!
好了,我是向宇,https://xiangyu.blog.csdn.net
一位在小公司默默奋斗的开发者,出于兴趣爱好,最近开始自学unity,闲暇之余,边学习边记录分享,站在巨人的肩膀上,通过学习前辈们的经验总是会给我很多帮助和启发!php是工作,unity是生活!如果你遇到任何问题,也欢迎你评论私信找我, 虽然有些问题我也不一定会,但是我会查阅各方资料,争取给出最好的建议,希望可以帮助更多想学编程的人,共勉~