系列文章
【Vue】vue增加导航标签
本文链接:https://blog.csdn.net/youcheng_ge/article/details/134965353
【Vue】Element开发笔记
本文链接:https://blog.csdn.net/youcheng_ge/article/details/133947977
【Vue】vue,在Windows IIS平台部署
本文链接:https://blog.csdn.net/youcheng_ge/article/details/133859117
【Vue】vue2与WebApi跨域CORS问题
本文链接:https://blog.csdn.net/youcheng_ge/article/details/133808959
【Vue】nvm安装教程(解决npm下依赖包版本冲突)
本文链接:https://blog.csdn.net/youcheng_ge/article/details/132896207
【Vue】vue开发环境搭建教程(详细)
本文链接:https://blog.csdn.net/youcheng_ge/article/details/132689006
文章目录
- 系列文章
- 前言
- 一、技术介绍
- 二、项目源码
- 2.1 布局增加TagsView
- 2.2 components添加引用
- 2.3 layout添加引用
- 2.4 AppMain添加引用
- 2.5 AppMain样式调整
- 2.6 store中的tagsView.js
- 2.7 getters.js添加引用
- 2.8 store index.js添加引用
- 2.9 首页固钉
- 三、效果展示
- 四、异常问题
- 4.1 导航标签,刷页面报404
- 4.2 页面高度无法全屏,出现滚动条或遮挡
- 五、资源链接
前言
本专栏为【Vue】,主要介绍Vue知识点。对于刚刚进入计算机世界的大学生来说,这里普及一个知识:HTML已经不仅仅只能开发 Web,也可以开发 Android、iOS ,所以本专栏也会介绍 移动端开发。
我个人将安卓开发,分为两大方向:
①原生开发
使用安卓开发工具包(Android SDK)和Java编程语言来开发App的方式。原生开发允许开发者充分利用安卓平台的功能和特性,以及庞大的安卓开发社区资源。但是缺点就是对入门的门槛高,测试繁琐需要适配不同屏幕,对开发人员技术要求高。
②混合开发(加壳方式)
使用Web技术(网页三剑客HTML、CSS和JavaScript)开发App的方式。混合开发具有较高的开发效率和跨平台的优势,由于使用Web技术 界面渲染、不同屏幕适配(使用栅格技术)效果好。但是缺点就是对底层硬件调用库尚不完善,不过在不断完善中,常用的相机、相册、GPS、存储调用是没有问题的。
Vue是前端开发中的一个分支,学习Vue之前不可以速成,得先学会网页三剑客(HTML、CSS和JavaScript),因为Vue中依旧会使用到这些技术,Vue它不够是一种新的编程思想 组件化开发 和 MVVM(数据双向绑定)。

一、技术介绍
最初学习使用 vue Admin Template模板,后项目成型后,完善功能,需要添加头部 快捷导航标签,效果如下图:

本文介绍就是在 vue Admin Template模板基础上如何实现这一效果。
二、项目源码
2.1 布局增加TagsView
布局组件中,增加标签视图TagsView ,名字自己定义的,建议 TagsView 比较通用,官方集成版本也是这个名称。
位置:layout\components\TagsView
文件:ScrollPane.vue
<template>
  <el-scrollbar ref="scrollContainer" :vertical="false" class="scroll-container" @wheel.native.prevent="handleScroll">
    <slot />
  </el-scrollbar>
</template>

<script>
const tagAndTagSpacing = 4 // tagAndTagSpacing

export default {
  name: 'scroll-pane',
  data() {
    return {
      left: 0
    }
  },
  computed: {
    scrollWrapper() {
      return this.$refs.scrollContainer.$refs.wrap
    }
  },
  methods: {
    handleScroll(e) {
      const eventDelta = e.wheelDelta || -e.deltaY * 40
      const $scrollWrapper = this.scrollWrapper
      $scrollWrapper.scrollLeft = $scrollWrapper.scrollLeft + eventDelta / 4
    },
    moveToTarget(currentTag) {
      const $container = this.$refs.scrollContainer.$el
      const $containerWidth = $container.offsetWidth
      const $scrollWrapper = this.scrollWrapper
      const tagList = this.$parent.$refs.tag

      let firstTag = null
      let lastTag = null

      // find first tag and last tag
      if (tagList.length > 0) {
        firstTag = tagList[0]
        lastTag = tagList[tagList.length - 1]
      }

      if (firstTag === currentTag) {
        $scrollWrapper.scrollLeft = 0
      } else if (lastTag === currentTag) {
        $scrollWrapper.scrollLeft = $scrollWrapper.scrollWidth - $containerWidth
      } else {
        // find preTag and nextTag
        const currentIndex = tagList.findIndex((item) => item === currentTag)
        const prevTag = tagList[currentIndex - 1]
        const nextTag = tagList[currentIndex + 1]

        // the tag's offsetLeft after of nextTag
        const afterNextTagOffsetLeft =
          nextTag.$el.offsetLeft + nextTag.$el.offsetWidth + tagAndTagSpacing

        // the tag's offsetLeft before of prevTag
        const beforePrevTagOffsetLeft =
          prevTag.$el.offsetLeft - tagAndTagSpacing

        if (
          afterNextTagOffsetLeft >
          $scrollWrapper.scrollLeft + $containerWidth
        ) {
          $scrollWrapper.scrollLeft = afterNextTagOffsetLeft - $containerWidth
        } else if (beforePrevTagOffsetLeft < $scrollWrapper.scrollLeft) {
          $scrollWrapper.scrollLeft = beforePrevTagOffsetLeft
        }
      }
    }
  }
}
</script>

<style lang="scss" scoped>
.scroll-container {
  white-space: nowrap;
  position: relative;
  overflow: hidden;
  width: 100%;
  ::v-deep {
    .el-scrollbar__bar {
      bottom: 0px;
    }
    .el-scrollbar__wrap {
      height: 49px;
    }
  }
}
</style>
刚刚添加的文件,需要在引入(暴露)出来,所以需要增加 index.vue文件,并且添加引入。
提示:为什么一定要命名为 index,可以了解一下vue引入机制,以及 目录、*.js、*.vue优先级很好明白
位置:layout\components\TagsView
文件:index.vue
<template>
  <div id="tags-view-container" class="tags-view-container">
    <scroll-pane ref="scrollPane" class="tags-view-wrapper">
      <router-link v-for="tag in visitedViews" ref="tag" :key="tag.path" :class="isActive(tag)?'active':''" :to="{ path: tag.path, query: tag.query, fullPath: tag.fullPath }" tag="span" class="tags-view-item" @click.middle.native="closeSelectedTag(tag)" @contextmenu.prevent.native="openMenu(tag,$event)">
        {{ tag.title }}
        <span v-if="!tag.meta.affix" class="el-icon-close" @click.prevent.stop="closeSelectedTag(tag)" />
      </router-link>
    </scroll-pane>
    <ul v-show="visible" :style="{left:left+'px',top:top+'px'}" class="contextmenu">
      <li @click="refreshSelectedTag(selectedTag)">刷新</li>
      <li v-if="!(selectedTag.meta&&selectedTag.meta.affix)" @click="closeSelectedTag(selectedTag)">关闭</li>
      <li @click="closeOthersTags">关闭其他</li>
      <li @click="closeAllTags(selectedTag)">关闭全部</li>
    </ul>
  </div>
</template>

<script>
import ScrollPane from './ScrollPane'
import path from 'path'

export default {
  components: { ScrollPane },
  data() {
    return {
      visible: false,
      top: 0,
      left: 0,
      selectedTag: {},
      affixTags: []
    }
  },
  computed: {
    visitedViews() {
      return this.$store.state.tagsView.visitedViews
    },
    routes() {
      // gyc 修改此处
      // return this.$store.state.routers.routers
      return this.$router.options.routes
    }
  },
  watch: {
    $route() {
      this.addTags()
      this.moveToCurrentTag()
    },
    visible(value) {
      if (value) {
        document.body.addEventListener('click', this.closeMenu)
      } else {
        document.body.removeEventListener('click', this.closeMenu)
      }
    }
  },
  mounted() {
    this.initTags()
    this.addTags()
  },
  methods: {
    isActive(route) {
      return route.path === this.$route.path
    },
    filterAffixTags(routes, basePath = '/') {
      let tags = []
      routes.forEach(route => {
        if (route.meta && route.meta.affix) {
          const tagPath = path.resolve(basePath, route.path)
          tags.push({
            fullPath: tagPath,
            path: tagPath,
            name: route.name,
            meta: { ...route.meta }
          })
        }
        if (route.children) {
          const tempTags = this.filterAffixTags(route.children, route.path)
          if (tempTags.length >= 1) {
            tags = [...tags, ...tempTags]
          }
        }
      })
      return tags
    },
    initTags() {
      const affixTags = (this.affixTags = this.filterAffixTags(this.routes))
      for (const tag of affixTags) {
        // Must have tag name
        if (tag.name) {
          this.$store.dispatch('tagsView/addVisitedView', tag)
        }
      }
    },
    addTags() {
      const { name } = this.$route
      if (name) {
        this.$store.dispatch('tagsView/addView', this.$route)
      }
      return false
    },
    moveToCurrentTag() {
      const tags = this.$refs.tag
      this.$nextTick(() => {
        for (const tag of tags) {
          if (tag.to.path === this.$route.path) {
            this.$refs.scrollPane.moveToTarget(tag)
            // when query is different then update
            if (tag.to.fullPath !== this.$route.fullPath) {
              this.$store.dispatch('tagsView/updateVisitedView', this.$route)
            }
            break
          }
        }
      })
    },
    refreshSelectedTag(view) {
      this.$store.dispatch('tagsView/delCachedView', view).then(() => {
        const { fullPath } = view
        this.$nextTick(() => {
          this.$router.replace({
            path: '/redirect' + fullPath
          })
        })
      })
    },
    closeSelectedTag(view) {
      this.$store
        .dispatch('tagsView/delView', view)
        .then(({ visitedViews }) => {
          if (this.isActive(view)) {
            this.toLastView(visitedViews, view)
          }
        })
    },
    closeOthersTags() {
      this.$router.push(this.selectedTag)
      this.$store
        .dispatch('tagsView/delOthersViews', this.selectedTag)
        .then(() => {
          this.moveToCurrentTag()
        })
    },
    closeAllTags(view) {
      this.$store.dispatch('tagsView/delAllViews').then(({ visitedViews }) => {
        if (this.affixTags.some(tag => tag.path === view.path)) {
          return
        }
        this.toLastView(visitedViews, view)
      })
    },
    toLastView(visitedViews, view) {
      const latestView = visitedViews.slice(-1)[0]
      if (latestView) {
        this.$router.push(latestView)
      } else {
        // now the default is to redirect to the home page if there is no tags-view,
        // you can adjust it according to your needs.
        if (view.name === 'Dashboard') {
          // to reload home page
          this.$router.replace({ path: '/redirect' + view.fullPath })
        } else {
          this.$router.push('/')
        }
      }
    },
    openMenu(tag, e) {
      const menuMinWidth = 105
      const offsetLeft = this.$el.getBoundingClientRect().left // container margin left
      const offsetWidth = this.$el.offsetWidth // container width
      const maxLeft = offsetWidth - menuMinWidth // left boundary
      const left = e.clientX - offsetLeft + 15 // 15: margin right

      if (left > maxLeft) {
        this.left = maxLeft
      } else {
        this.left = left
      }

      this.top = e.clientY
      this.visible = true
      this.selectedTag = tag
    },
    closeMenu() {
      this.visible = false
    }
  }
}
</script>

<style lang="scss" scoped>
.tags-view-container {
  height: 34px;
  width: 100%;
  background: #fff;
  border-bottom: 1px solid #d8dce5;
  box-shadow: 0 1px 3px 0 rgba(0, 0, 0, 0.12), 0 0 3px 0 rgba(0, 0, 0, 0.04);
  .tags-view-wrapper {
    .tags-view-item {
      display: inline-block;
      position: relative;
      cursor: pointer;
      height: 26px;
      line-height: 26px;
      border: 1px solid #d8dce5;
      color: #495060;
      background: #fff;
      padding: 0 8px;
      font-size: 12px;
      margin-left: 5px;
      margin-top: 4px;
      &:first-of-type {
        margin-left: 15px;
      }
      &:last-of-type {
        margin-right: 15px;
      }
      &.active {
        background-color: #42b983;
        color: #fff;
        border-color: #42b983;
        &::before {
          content: '';
          background: #fff;
          display: inline-block;
          width: 8px;
          height: 8px;
          border-radius: 50%;
          position: relative;
          margin-right: 2px;
        }
      }
    }
  }
  .contextmenu {
    margin: 0;
    background: #fff;
    z-index: 3000;
    position: absolute;
    list-style-type: none;
    padding: 5px 0;
    border-radius: 4px;
    font-size: 12px;
    font-weight: 400;
    color: #333;
    box-shadow: 2px 2px 3px 0 rgba(0, 0, 0, 0.3);
    li {
      margin: 0;
      padding: 7px 16px;
      cursor: pointer;
      &:hover {
        background: #eee;
      }
    }
  }
}
</style>

<style lang="scss">
//reset element css of el-icon-close
.tags-view-wrapper {
  .tags-view-item {
    .el-icon-close {
      width: 16px;
      height: 16px;
      vertical-align: 2px;
      border-radius: 50%;
      text-align: center;
      transition: all 0.3s cubic-bezier(0.645, 0.045, 0.355, 1);
      transform-origin: 100% 50%;
      &:before {
        transform: scale(0.6);
        display: inline-block;
        vertical-align: -3px;
      }
      &:hover {
        background-color: #b4bccc;
        color: #fff;
      }
    }
  }
}
</style>
路由需要稍加修改,由于我项目没有使用动态路由,所以也没有promise权限验证、也没有在store缓存,所以需要改成如下图:

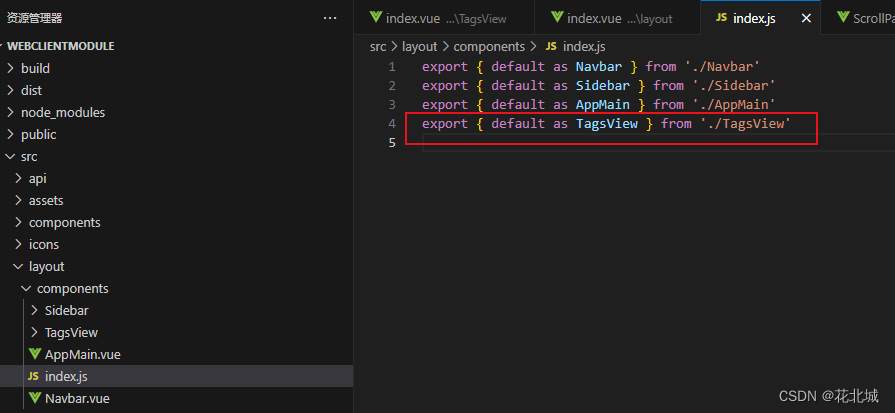
2.2 components添加引用
位置:src\layout\components\index.js
代码:export { default as TagsView } from ‘./TagsView’
2.3 layout添加引用
位置:src\layout\index.vue
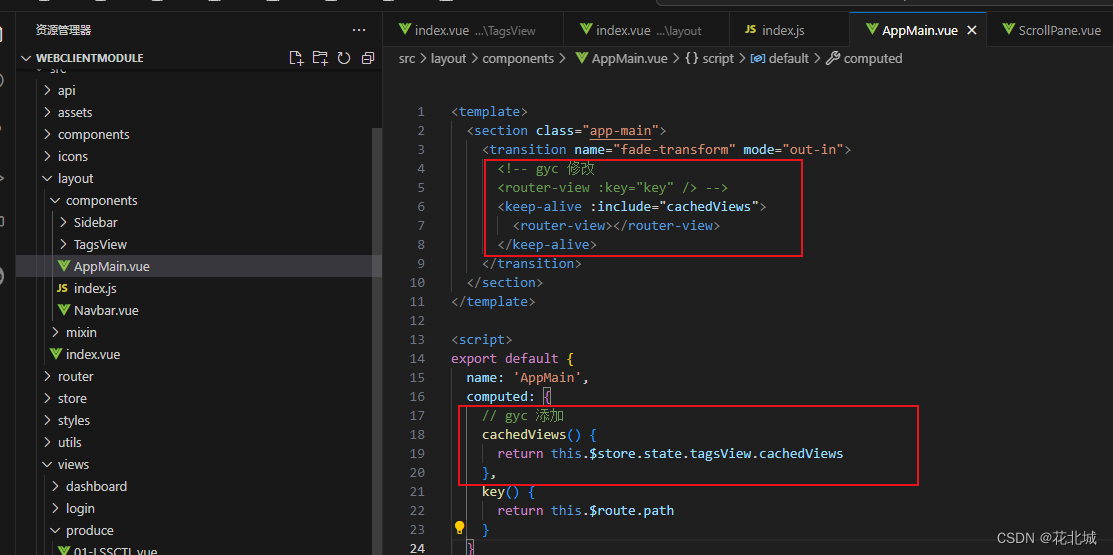
2.4 AppMain添加引用
位置:src\layout\components\AppMain.vue
代码:
   <keep-alive :include="cachedViews">
     <router-view></router-view>
   </keep-alive>

 // gyc 添加
 cachedViews() {
   return this.$store.state.tagsView.cachedViews
 },
2.5 AppMain样式调整
问题原因:由于我们布局上增加了一行
导航标签,会导致整个页面下移、或者遮挡。
这很好理解,比如说:原本 高度1080像素的页面,全屏显示正好,你增加了34像素的导航标签,导致整个页面高度变成1114像素,这时候全屏放不下了,会出现滚动条,很不美观。
所以,就要让出这部分高度 84=50+34像素
// gyc 让出导航标签高度 34
.hasTagsView {
  .app-main {
    min-height: calc(100vh - 84px);
  }

  .fixed-header+.app-main {
    padding-top: 84px;
  }
}
2.6 store中的tagsView.js
位置:src\store\modules\tagsView.js
代码:源码有 cachedViews和visitedViews两个数组
//  @desc 张家口裸砂MES
//  @author gyc
//  @date 2023-11-23
//  @note 标签栏导航

const state = {
  visitedViews: [],
  cachedViews: []
}

const mutations = {
  ADD_VISITED_VIEW: (state, view) => {
    if (state.visitedViews.some(v => v.path === view.path)) return
    state.visitedViews.push(
      Object.assign({}, view, {
        title: view.meta.title || 'no-name'
      })
    )
  },
  ADD_CACHED_VIEW: (state, view) => {
    if (state.cachedViews.includes(view.meta.path)) return
    if (view.meta.keepAlive) {
      state.cachedViews.push(view.meta.path)
    }
  },

  DEL_VISITED_VIEW: (state, view) => {
    for (const [i, v] of state.visitedViews.entries()) {
      if (v.path === view.path) {
        state.visitedViews.splice(i, 1)
        break
      }
    }
  },
  DEL_CACHED_VIEW: (state, view) => {
    for (const i of state.cachedViews) {
      if (i === view.meta.path) {
        const index = state.cachedViews.indexOf(i)
        state.cachedViews.splice(index, 1)
        break
      }
    }
  },

  DEL_OTHERS_VISITED_VIEWS: (state, view) => {
    state.visitedViews = state.visitedViews.filter(v => {
      return v.meta.affix || v.path === view.path
    })
  },
  DEL_OTHERS_CACHED_VIEWS: (state, view) => {
    for (const i of state.cachedViews) {
      if (i === view.meta.path) {
        const index = state.cachedViews.indexOf(i)
        state.cachedViews = state.cachedViews.slice(index, index + 1)
        break
      }
    }
  },

  DEL_ALL_VISITED_VIEWS: state => {
    // keep affix tags
    const affixTags = state.visitedViews.filter(tag => tag.meta.affix)
    state.visitedViews = affixTags
  },
  DEL_ALL_CACHED_VIEWS: state => {
    state.cachedViews = []
  },

  UPDATE_VISITED_VIEW: (state, view) => {
    for (let v of state.visitedViews) {
      if (v.path === view.path) {
        v = Object.assign(v, view)
        break
      }
    }
  }
}

const actions = {
  addView({ dispatch }, view) {
    dispatch('addVisitedView', view)
    dispatch('addCachedView', view)
  },
  addVisitedView({ commit }, view) {
    commit('ADD_VISITED_VIEW', view)
  },
  addCachedView({ commit }, view) {
    commit('ADD_CACHED_VIEW', view)
  },

  delView({ dispatch, state }, view) {
    return new Promise(resolve => {
      dispatch('delVisitedView', view)
      dispatch('delCachedView', view)
      resolve({
        visitedViews: [...state.visitedViews],
        cachedViews: [...state.cachedViews]
      })
    })
  },
  delVisitedView({ commit, state }, view) {
    return new Promise(resolve => {
      commit('DEL_VISITED_VIEW', view)
      resolve([...state.visitedViews])
    })
  },
  delCachedView({ commit, state }, view) {
    return new Promise(resolve => {
      commit('DEL_CACHED_VIEW', view)
      resolve([...state.cachedViews])
    })
  },

  delOthersViews({ dispatch, state }, view) {
    return new Promise(resolve => {
      dispatch('delOthersVisitedViews', view)
      dispatch('delOthersCachedViews', view)
      resolve({
        visitedViews: [...state.visitedViews],
        cachedViews: [...state.cachedViews]
      })
    })
  },
  delOthersVisitedViews({ commit, state }, view) {
    return new Promise(resolve => {
      commit('DEL_OTHERS_VISITED_VIEWS', view)
      resolve([...state.visitedViews])
    })
  },
  delOthersCachedViews({ commit, state }, view) {
    return new Promise(resolve => {
      commit('DEL_OTHERS_CACHED_VIEWS', view)
      resolve([...state.cachedViews])
    })
  },

  delAllViews({ dispatch, state }, view) {
    return new Promise(resolve => {
      dispatch('delAllVisitedViews', view)
      dispatch('delAllCachedViews', view)
      resolve({
        visitedViews: [...state.visitedViews],
        cachedViews: [...state.cachedViews]
      })
    })
  },
  delAllVisitedViews({ commit, state }) {
    return new Promise(resolve => {
      commit('DEL_ALL_VISITED_VIEWS')
      resolve([...state.visitedViews])
    })
  },
  delAllCachedViews({ commit, state }) {
    return new Promise(resolve => {
      commit('DEL_ALL_CACHED_VIEWS')
      resolve([...state.cachedViews])
    })
  },

  updateVisitedView({ commit }, view) {
    commit('UPDATE_VISITED_VIEW', view)
  }
}

export default {
  namespaced: true,
  state,
  mutations,
  actions
}
2.7 getters.js添加引用
位置:src\store\getters.js
代码:
  // gyc 添加 引入
  visitedViews: state => state.tagsView.visitedViews,
  cachedViews: state => state.tagsView.cachedViews
2.8 store index.js添加引用
位置:src\store\index.js
代码:
// gyc 添加
import tagsView from './modules/tagsView'

const store = new Vuex.Store({
  modules: {
    app,
    settings,
    user,
    // gyc 添加
    tagsView
  },
  getters
})
2.9 首页固钉
我们可以发现,导航标签有些 带有关闭的小叉号,但是首页就没有。这是如何实现的?是采用了
固钉属性,在路由中配置的。
位置:router\index.js
代码:affix: true

三、效果展示


四、异常问题
4.1 导航标签,刷页面报404
导致原因:refreshSelectedTag()发现他会在你当前路由前面加上一个/redirect,导致找不到路由。
处理思路:URL重写呗。
①处理方式一:发布部署时(IIS),配置路由重写(路由转发)。
以前文章有所介绍,阅读文章《【Vue】vue,在Windows IIS平台部署》,第 3.3 配置URL重写
②处理方式二:Vue项目中处理,增加 redirect路由重写,说白了就是路由文本级别的替换。
位置:views\redirect\index.vue
<!--
 @desc 张家口裸砂MES
 @author gyc
 @date 2023-12-13
 @note 页面重定向,删除报错概不负责
 -->
<script>
export default {
  created() {
    const { params, query } = this.$route
    const { path } = params
    this.$router.replace({ path: '/' + path, query })
  },
  render: function(h) {
    return h() // avoid warning message
  }
}
</script>
位置:router\index.js
  {
    path: '/redirect',
    component: Layout,
    hidden: true,
    children: [
      {
        path: '/redirect/:path(.*)',
        component: () => import('@/views/redirect/index')
      }
    ]
  },
4.2 页面高度无法全屏,出现滚动条或遮挡
按2.5节处理


