save_text_instance_predictions
- demo.py中修改
- 关于路径
- os.path.join()函数用于路径拼接文件路径,可以传入多个路径
- os.path.basename(path)就是给定一串路径的最终找到的那个文件
- python官方文档链接
- 将 Python 对象序列化为 JSON 字符串
- with open 打开文件,并以写入模式 **创建或覆盖 ** 文件
- 使用 json.JSONEncoder() 方法
- dump、dumps序列化为json格式和序列化为json字符串,区别?(用到再说)
- 保存列表为.txt文件
- python对CSV、Excel、txt、dat、mat文件的处理
- python将数据保存为json文件时,打开json文件里面的中文发现是unicode码
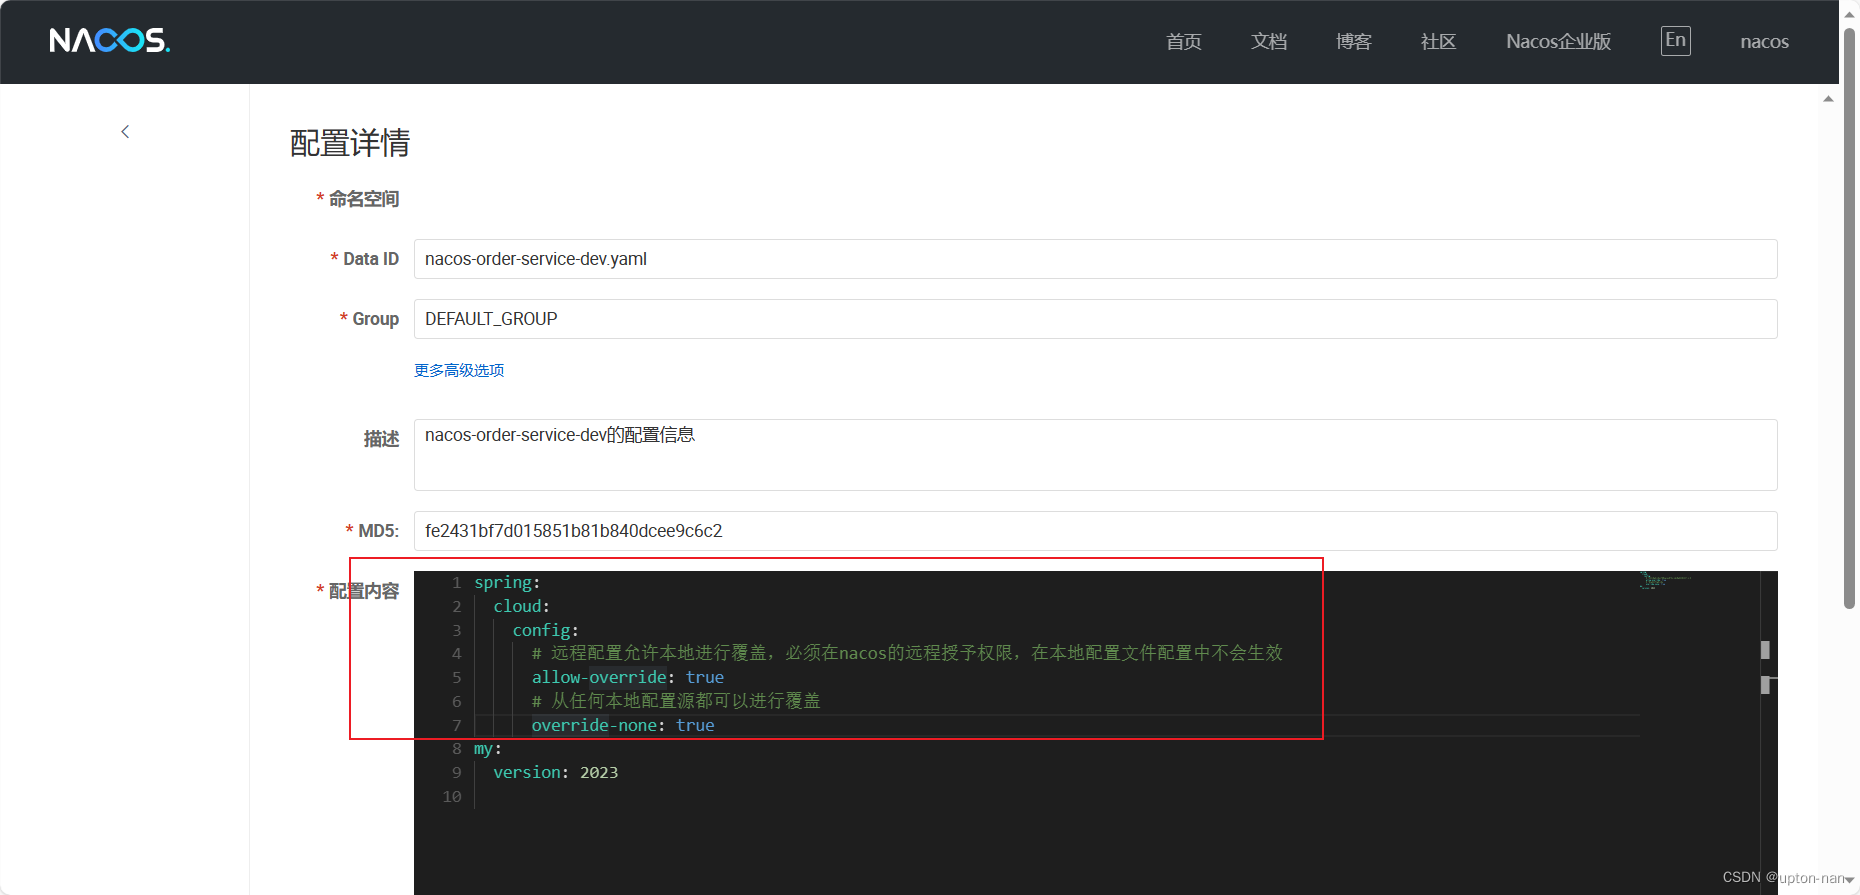
- with open(os.path.join(args.output, "data.json"), "a") as file: 读写文件参数
- predictor.py
- visualizer.py中save_text_instance_predictions(deepsolo/adet/visualizer.py,import了 detectron2的visualizer.py⭐
demo.py中修改
import json

## 生成json格式的数据
class Result:
    def __init__(self, id, image, value):
        self.id = id
        self.image = image
        self.value = value


def result_encoder(obj):
    if isinstance(obj, Result):
        return {'id': obj.id, 'image': obj.image, 'value': obj.value}
    return json.JSONEncoder.default(obj)


    visualized_output.save(out_filename)
    #predictions.save(out_filename)
    #print(predictions)
    res = Result(os.path.basename(path), out_filename, text_output)
    with open(os.path.join(args.output, "data.json"), "a", encoding="utf8") as file:
        json.dump(result_encoder(res), file, ensure_ascii=False, indent=4)
关于路径
assert os.path.isdir(args.output), args.output
	out_filename = os.path.join(args.output, os.path.basename(path))
Python编程语言判断是否是目录
在Python编程语言中可以使用os.path.isdir()函数判断某一路径是否为目录。其函数原型如下所示。
os.path.isdir(path)
其参数含义如下。path 要进行判断的路径。以下实例判断E:\book\temp是否为目录。
>>> import os
>>> os.path.isdir('E:\\book\\temp')
判断E:\book\temp是否为目录
True 表示 E:\book\temp是目录,注意力 python里面是True不是true
os.path.join()函数用于路径拼接文件路径,可以传入多个路径
>>> import os
>>> print(os.path.join('path','abc','yyy'))
path\abc\yyy
os.path.basename(path)就是给定一串路径的最终找到的那个文件


来个例子
import os
# --------------------------------------------------------#
filePath = r"D:\Python\Python35\Lib\site-packages\jieba\analyse\idf.txt"
print('路径为:',filePath)
print(os.path.basename(filePath))
print(os.path.dirname(filePath))
# --------------------------------------------------------#
filePath = r'D:\Python\Python35\Lib\site-packages\jieba'
print('路径为:',filePath)
print(os.path.basename(filePath))
print(os.path.dirname(filePath))
输出
路径为: D:\Python\Python35\Lib\site-packages\jieba\analyse\idf.txt
idf.txt
D:\Python\Python35\Lib\site-packages\jieba\analyse
路径为: D:\Python\Python35\Lib\site-packages\jieba
jieba
D:\Python\Python35\Lib\site-packages
————————————————

原文链接:https://blog.csdn.net/m0_46653437/article/details/115876616
python官方文档链接
将 Python 对象序列化为 JSON 字符串
with open 打开文件,并以写入模式 **创建或覆盖 ** 文件
这段很基础对我很重要,一开始在想,是否需要手动创建之后才能with open……,如果不存在,会自动创建
import json

# 创建一个字典对象


data = {
    "name": "John",
    "age": 30,
    "city": "New York"
}

# 打开文件,并以写入模式创建或覆盖文件
with open("data.json", "w") as file:
    # 将字典对象转换为JSON格式并写入文件
    json.dump(data, file)
上述代码将创建一个名为data.json的JSON文件,并将data字典对象写入文件中。如果你想要格式化输出的JSON文件,使其更易读,你可以使用indent参数指定缩进级别,如下所示:
import json

data = {
    "name": "John",
    "age": 30,
    "city": "New York"
}

with open("data.json", "w") as file:
    json.dump(data, file, indent=4)
作者:百科全书77
链接:https://www.zhihu.com/question/631483792/answer/3299538515
来源:知乎
使用 json.JSONEncoder() 方法
我们还可以使用 json.JSONEncoder() 方法来创建自定义的编码器,将 Python 对象序列化为 JSON 字符串,然后将其写入文件。以下是一个示例:
import json

class Person:
    def __init__(self, name, age, city):
        self.name = name
        self.age = age
        self.city = city

def person_encoder(obj):
    if isinstance(obj, Person):
        return {'name': obj.name, 'age': obj.age, 'city': obj.city}
    return json.JSONEncoder.default(obj)

person = Person('John', 30, 'New York')

with open('data.json', 'w') as f:
    json_str = json.dumps(person, default=person_encoder)
    f.write(json_str)
在这个示例中,我们首先定义了一个自定义的类 Person,然后定义了一个自定义的编码器 person_encoder,将 Person 对象序列化为 JSON 格式。最后,我们使用 json.dumps() 方法将 Person 对象序列化为 JSON 字符串,并将其写入文件 data.json 中。
原文链接:Python 如何创建 json 文件?
dump、dumps序列化为json格式和序列化为json字符串,区别?(用到再说)
import json

data = {'name': 'John', 'age': 30, 'city': 'New York'}

with open('data.json', 'w') as f:
    json.dump(data, f)
在这个示例中,我们使用了 json.dump() 方法将 Python 字典对象 data 序列化为 JSON 格式,并将其写入到文件 data.json 中。
除了使用 json.dump() 方法直接将 Python 对象写入到文件中,我们还可以使用 json.dumps() 方法将 Python 对象序列化为 JSON 字符串,然后将其写入文件。以下是一个示例:
import json

data = {'name': 'John', 'age': 30, 'city': 'New York'}

with open('data.json', 'w') as f:
    json_str = json.dumps(data)
    f.write(json_str)
在这个示例中,我们首先使用 json.dumps() 方法将 Python 字典对象 data 序列化为 JSON 字符串,然后使用文件对象的 write() 方法将其写入文件 data.json 中。
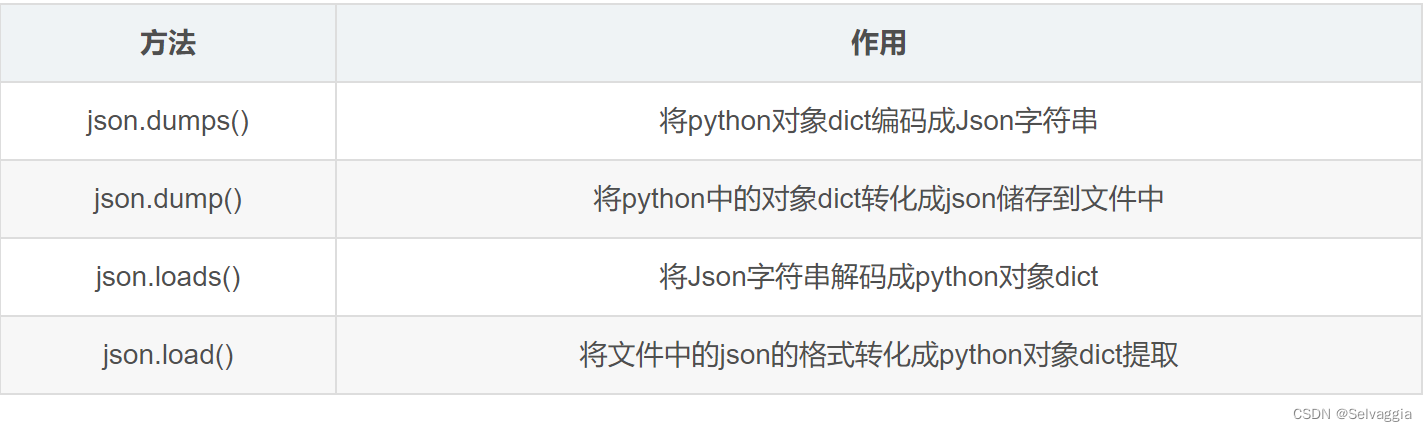
python中dict和json的转换以及读取json文件
python 把字典转json
将dict类型变量转换为json存在dump和dumps两个方法
dump将dict转换为str类型
注意
如果想将dict输出到文件中,直接用dumps即可,如果先dump再dumps就会输出一整个字符串,因为有引号的存在并不是正常的json格式
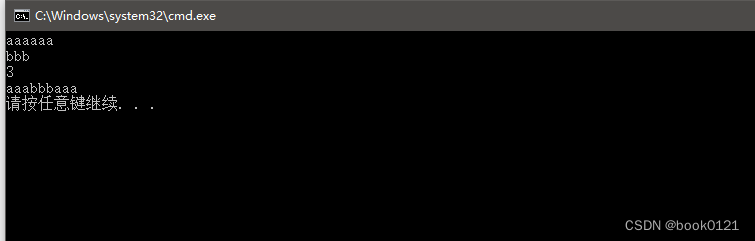
保存列表为.txt文件
#1/list写入txt

ipTable = ['158.59.194.213', '18.9.14.13', '58.59.14.21']
fileObject = open('sampleList.txt', 'w')
for ip in ipTable:
    fileObject.write(ip)
    fileObject.write('\n')
fileObject.close()
python对CSV、Excel、txt、dat、mat文件的处理
python将数据保存为json文件时,打开json文件里面的中文发现是unicode码
开保存之后的json文件发现除了字母,原来的字典数据里面的中文全部变成了unicode码,像下面这个样子
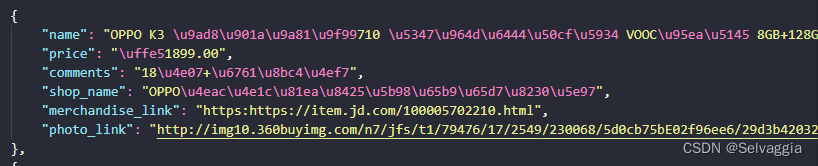
Python 使用 json.dump() 保存文件时中文会变成 Unicode。在打开写出文件时加入 encoding="utf8",在dump时加入 ensure_ascii=False 即可解决。
city_list = [{"name": "黑龙江呼玛", "lon": 126.6, "lat": 51.72},
			/{"name": "黑龙江塔河", "lon": 124.7, "lat": 52.32},
			/{"name": "黑龙江漠河", "lon": 122.37, "lat": 53.48}]
f = open("city.json", "w", encoding="utf8")
json.dump(city_list, f, ensure_ascii=False)
总结一下:
1、python3里面默认编码是unicode
2、做dump与dumps操作时,会默认将中文转换为unicode,但在做逆向操作load和loads时会转换为中文,但是中间态(例如存储的json文件)的中文编码方式仍然是unicode
解决办法:
在dump里面添加ensure_ascii=False
原文链接
with open(os.path.join(args.output, “data.json”), “a”) as file: 读写文件参数

Python实现将内容写入文件的五种方法总结
predictor.py
def run_on_image(self, image):

……
 else:
     if "sem_seg" in predictions:
          vis_output = visualizer.draw_sem_seg(
              predictions["sem_seg"].argmax(dim=0).to(self.cpu_device))
      if "instances" in predictions:
          instances = predictions["instances"].to(self.cpu_device)
          vis_output = visualizer.draw_instance_predictions(predictions=instances)

  text_output = visualizer.save_text_instance_predictions(predictions=instances)

  return predictions, vis_output,text_output
追溯到 visualizer.py写的save_text_instance_predictions 函数
visualizer.py中save_text_instance_predictions(deepsolo/adet/visualizer.py,import了 detectron2的visualizer.py⭐
class TextVisualizer(Visualizer):
……
    def _ctc_decode_recognition(self, rec):
        last_char = '###'
        s = ''
        for c in rec:
            c = int(c)
            if c < self.voc_size - 1:
                if last_char != c:
                    if self.voc_size == 37 or self.voc_size == 96:
                        s += self.CTLABELS[c]
                        last_char = c
                    else:
                        s += str(chr(self.CTLABELS[c]))
                        last_char = c
            else:
                last_char = '###'
        return s
    def draw_instance_predictions(self, predictions):
        ctrl_pnts = predictions.ctrl_points.numpy()
        scores = predictions.scores.tolist()
        recs = predictions.recs
        bd_pts = np.asarray(predictions.bd)

        self.overlay_instances(ctrl_pnts, scores, recs, bd_pts)

        return self.output
    def overlay_instances(self, ctrl_pnts, scores, recs, bd_pnts, alpha=0.4):
        colors = [(0,0.5,0),(0,0.75,0),(1,0,1),(0.75,0,0.75),(0.5,0,0.5),(1,0,0),(0.75,0,0),(0.5,0,0),
        (0,0,1),(0,0,0.75),(0.75,0.25,0.25),(0.75,0.5,0.5),(0,0.75,0.75),(0,0.5,0.5),(0,0.3,0.75)]
        fg=True
        for ctrl_pnt, score, rec, bd in zip(ctrl_pnts, scores, recs, bd_pnts):
            color = random.choice(colors)

            # draw polygons
            if bd is not None:
                bd = np.hsplit(bd, 2)
                bd = np.vstack([bd[0], bd[1][::-1]])
                self.draw_polygon(bd, color, alpha=alpha)

            # draw center lines
            line = self._process_ctrl_pnt(ctrl_pnt)
            line_ = LineString(line)
            center_point = np.array(line_.interpolate(0.5, normalized=True).coords[0], dtype=np.int32)
            # self.draw_line(
            #     line[:, 0],
            #     line[:, 1],
            #     color=color,
            #     linewidth=2
            # )
            # for pt in line:
            #     self.draw_circle(pt, 'w', radius=4)
            #     self.draw_circle(pt, 'r', radius=2)

            # draw text
            text = self._ctc_decode_recognition(rec)

            if self.voc_size == 37:
                text = text.upper()
            # text = "{:.2f}: {}".format(score, text)
            text = "{}".format(text)

            lighter_color = self._change_color_brightness(color, brightness_factor=0)
            if bd is not None:
                text_pos = bd[0] - np.array([0,15])
            else:
                text_pos = center_point
            horiz_align = "left"
            font_size = self._default_font_size
            self.draw_text(
                        text,
                        text_pos,
                        color=lighter_color,
                        horizontal_alignment=horiz_align,
                        font_size=font_size,
                        draw_chinese=False if self.voc_size == 37 or self.voc_size == 96 else True
                    )
    def draw_text(
        self,
        text,
        position,
        *,
        font_size=None,
        color="g",
        horizontal_alignment="center",
        rotation=0,
        draw_chinese=False
    ):
        """
        Args:
            text (str): class label
            position (tuple): a tuple of the x and y coordinates to place text on image.
            font_size (int, optional): font of the text. If not provided, a font size
                proportional to the image width is calculated and used.
            color: color of the text. Refer to `matplotlib.colors` for full list
                of formats that are accepted.
            horizontal_alignment (str): see `matplotlib.text.Text`
            rotation: rotation angle in degrees CCW
        Returns:
            output (VisImage): image object with text drawn.
        """
        if not font_size:
            font_size = self._default_font_size

        # since the text background is dark, we don't want the text to be dark
        color = np.maximum(list(mplc.to_rgb(color)), 0.2)
        color[np.argmax(color)] = max(0.8, np.max(color))

        x, y = position
        if draw_chinese:
            font_path = "./simsun.ttc"
            prop = mfm.FontProperties(fname=font_path)
            self.output.ax.text(
                x,
                y,
                text,
                size=font_size * self.output.scale,
                family="sans-serif",
                bbox={"facecolor": "white", "alpha": 0.8, "pad": 0.7, "edgecolor": "none"},
                verticalalignment="top",
                horizontalalignment=horizontal_alignment,
                color=color,
                zorder=10,
                rotation=rotation,
                fontproperties=prop
            )
        else:
            self.output.ax.text(
                x,
                y,
                text,
                size=font_size * self.output.scale,
                family="sans-serif",
                bbox={"facecolor": "white", "alpha": 0.8, "pad": 0.7, "edgecolor": "none"},
                verticalalignment="top",
                horizontalalignment=horizontal_alignment,
                color=color,
                zorder=10,
                rotation=rotation,
            )
        return self.output
结合这几段,按图索骥,
overlay_instances函数里的
for ctrl_pnt, score, rec, bd in zip(ctrl_pnts, scores, recs, bd_pnts):
……
text = self._ctc_decode_recognition(rec)
总之就是模仿draw_instance_predictions添加了一个函数save_text_instance_predictions
    def save_text_instance_predictions(self, predictions):
        recs = predictions.recs
        text_output = ""
        for rec in recs:
            text_output = text_output + ' ' + self._ctc_decode_recognition(rec)

        return text_output
就是不知道return self.output有什么特别含义,


![前沿重器[39] | 对话式推荐系统——概念和技术点](https://img-blog.csdnimg.cn/img_convert/f636159cc14c18be2d486e705be68835.png)