转载自: www.javaman.cn
博客系统访问: http://175.24.198.63:9090/front/index

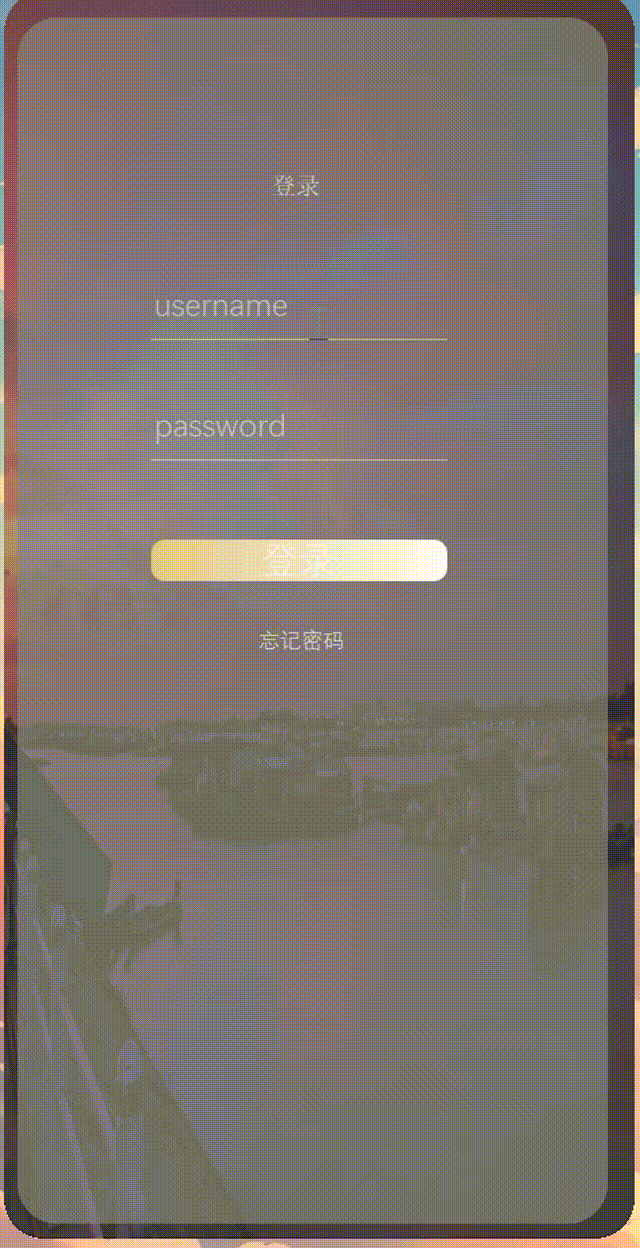
登录功能
1、前端页面
采用的是layui-admin框架,文中的验证码内容,请参考作者之前的验证码功能
<!DOCTYPE html>
<html lang="zh" xmlns:th="http://www.thymeleaf.org">
<head>
    <title>ds博客</title>
    <div th:replace="common/link::header"></div>
    <link rel="stylesheet" th:href="@{/static/layuiadmin/style/login.css}" media="all">
</head>
<body>
<div class="layadmin-user-login layadmin-user-display-show" id="LAY-user-login" style="display: none;">
    <div class="layadmin-user-login-main">
        <div class="layadmin-user-login-box layadmin-user-login-header">
            <h2>ds博客</h2>
            <p>后台登录</p>
        </div>
        <div class="layadmin-user-login-box layadmin-user-login-body layui-form">
            <div class="layui-form-item">
                <label class="layadmin-user-login-icon layui-icon layui-icon-username" for="LAY-user-login-username"></label>
                <input type="text" name="userName" value="test" id="LAY-user-login-username" lay-verify="required" placeholder="用户名" class="layui-input">
            </div>
            <div class="layui-form-item">
                <label class="layadmin-user-login-icon layui-icon layui-icon-password" for="LAY-user-login-password"></label>
                <input type="password" name="passWord" value="test" id="LAY-user-login-password" lay-verify="required" placeholder="密码" class="layui-input">
            </div>
            <div class="layui-form-item">
                <div class="layui-row">
                    <div class="layui-col-xs7">
                        <label class="layadmin-user-login-icon layui-icon layui-icon-vercode"></label>
                        <input type="text" name="code"  lay-verify="required" placeholder="图形验证码" class="layui-input">
                    </div>
                    <div class="layui-col-xs5">
                        <div style="margin-left: 10px;">
                            <img id="codeImg" class="layadmin-user-login-codeimg">
                        </div>
                    </div>
                </div>
            </div>
            <div class="layui-form-item" style="margin-bottom: 20px;">
                <input type="checkbox" name="remember-me" lay-skin="primary" title="记住密码">
            </div>
            <div class="layui-form-item">
                <button class="layui-btn layui-btn-fluid layui-bg-blue"  lay-submit lay-filter="login">登 录</button>
            </div>
        </div>
    </div>

<!--    <div class="layui-trans layadmin-user-login-footer">-->
<!--        <p>版权所有 © 2022 <a href="#" target="_blank">济南高新开发区微本地软件开发工作室</a> 鲁ICP备20002306号-1</p>-->
<!--    </div>-->
</div>
<div th:replace="common/script::footer"></div>
<script th:inline="javascript">
    layui.config({
        base: '/static/layuiadmin/' //静态资源所在路径
    }).extend({
        index: 'lib/index' //主入口模块
    }).use(['index', 'user'], function(){
        let $ = layui.$,
            form = layui.form;
        // 初始化
        getImgCode();
        form.render();
        //提交
        form.on('submit(login)', function(obj) {
            // 打开loading
            let loading = layer.load(0, {
                shade: false,
                time: 2 * 1000
            });
            // 禁止重复点击按钮
            $('.layui-btn').attr("disabled",true);
            //请求登入接口
            $.ajax({
                type: 'POST',
                url:  ctx + '/login',
                data: obj.field,
                dataType: 'json',
                success: function(result) {
                    if (result.code === 200) {
                        layer.msg('登入成功', {
                             icon: 1
                            ,time: 1000
                        }, function(){
                            window.location.href = '/';
                        });
                    } else {
                        layer.msg(result.message);
                        // 刷新验证码
                        getImgCode();
                        // 关闭loading
                        layer.close(loading);
                        // 开启点击事件
                        $('.layui-btn').attr("disabled", false);
                    }
                }
            });
        });
        $("#codeImg").on('click', function() {
            // 添加验证码
            getImgCode();
        });
        $(document).keydown(function (e) {
            if (e.keyCode === 13) {
                $('.layui-btn').click();
            }
        });
        // 解决session过期跳转到登录页并跳出iframe框架
        $(document).ready(function () {
            if (window != top) {
                top.location.href = location.href;
            }
        });
    });
    /**
     * 获取验证码
     */
    function getImgCode() {
        let url = ctx + '/getImgCode';
        let xhr = new XMLHttpRequest();
        xhr.open('GET', url, true);
        xhr.responseType = "blob";
        xhr.onload = function() {
            if (this.status === 200) {
                let blob = this.response;
                document.getElementById("codeImg").src = window.URL.createObjectURL(blob);
            }
        }
        xhr.send();
    }
</script>
</body>
</html>
2、后端处理/login请求

通过springsecurity的.loginProcessingUrl(“/login”)处理,处理逻辑如下:
.loginProcessingUrl("/login") 用于指定处理登录操作的URL地址,而具体的验证逻辑是由 Spring Security 提供的认证过滤器链负责的。在Spring Security中,主要的认证过程是由UsernamePasswordAuthenticationFilter来完成的。
当用户提交登录表单,请求到达.loginProcessingUrl("/login")配置的URL时,UsernamePasswordAuthenticationFilter会拦截这个请求,然后进行以下主要步骤:
-
获取用户名和密码:从请求中获取用户输入的用户名和密码。
-
创建认证令牌:使用获取到的用户名和密码创建一个认证令牌(
UsernamePasswordAuthenticationToken)。 -
将认证令牌传递给认证管理器:将认证令牌传递给配置的认证管理器(
AuthenticationManager)进行认证。 -
执行认证逻辑:认证管理器会调用已配置的身份验证提供者(
AuthenticationProvider)来执行实际的身份验证逻辑。通常,会使用用户提供的用户名和密码与系统中存储的用户信息进行比对。 -
处理认证结果:认证提供者返回认证结果,如果认证成功,则将认证令牌标记为已认证,并设置用户权限等信息。如果认证失败,会抛出相应的异常。
-
处理认证成功或失败:根据认证的结果,
UsernamePasswordAuthenticationFilter将请求重定向到成功或失败的处理器,执行相应的操作,比如跳转页面或返回错误信息。
这个整个过程是由 Spring Security 提供的默认配置完成的,通常情况下,开发者只需要配置好认证管理器、用户信息服务(UserDetailsService),以及成功和失败的处理器,Spring Security 就会负责处理登录验证的整个流程。
package com.ds.core.config;

import com.ds.blog.system.service.SysUserService;
import com.ds.core.security.CustomAccessDeniedHandler;
import com.ds.core.security.DefaultAuthenticationFailureHandler;
import com.ds.core.security.DefaultAuthenticationSuccessHandler;
import com.ds.core.security.filter.ValidateCodeFilter;
import net.bytebuddy.asm.Advice;
import org.springframework.beans.factory.annotation.Autowired;
import org.springframework.context.annotation.Bean;
import org.springframework.context.annotation.Configuration;
import org.springframework.security.config.annotation.authentication.builders.AuthenticationManagerBuilder;
import org.springframework.security.config.annotation.method.configuration.EnableGlobalMethodSecurity;
import org.springframework.security.config.annotation.web.builders.HttpSecurity;
import org.springframework.security.config.annotation.web.builders.WebSecurity;
import org.springframework.security.config.annotation.web.configuration.EnableWebSecurity;
import org.springframework.security.config.annotation.web.configuration.WebSecurityConfigurerAdapter;
import org.springframework.security.crypto.bcrypt.BCryptPasswordEncoder;
import org.springframework.security.web.access.AccessDeniedHandler;
import org.springframework.security.web.authentication.UsernamePasswordAuthenticationFilter;

@Configuration
@EnableWebSecurity
@EnableGlobalMethodSecurity(prePostEnabled = true)
public class MySecurityConfig extends WebSecurityConfigurerAdapter {

    @Override
    protected void configure(HttpSecurity http) throws Exception {
        http.authorizeRequests()
                // 放过
                .antMatchers("/loginPage", "/getImgCode").permitAll()
                .antMatchers("/**/*.jpg", "/**/*.png", "/**/*.gif", "/**/*.jpeg").permitAll()
                // 剩下的所有的地址都是需要在认证状态下才可以访问
                .anyRequest().authenticated()
                .and()
                // 过滤登录验证码
                .addFilterBefore(validateCodeFilter, UsernamePasswordAuthenticationFilter.class)
                // 配置登录功能
                .formLogin()
                .usernameParameter("userName")
                .passwordParameter("passWord")
                // 指定指定要的登录页面
                .loginPage("/loginPage")
                // 处理认证路径的请求
                .loginProcessingUrl("/login")
                .successHandler(defaultAuthenticationSuccessHandler)
                .failureHandler(defaultAuthenticationFailureHandler)
                .and()
                .exceptionHandling()
                .accessDeniedHandler(accessDeniedHandler)
                .and()
                // 登出
                .logout()
                .invalidateHttpSession(true)
                .deleteCookies("remember-me")
                .logoutUrl("/logout")
                .logoutSuccessUrl("/loginPage")
                .and()
                .rememberMe()
                // 有效期7天
                .tokenValiditySeconds(3600 * 24 * 7)
                // 开启记住我功能
                .rememberMeParameter("remember-me")
                .and()
                //禁用csrf
                .csrf().disable()
                // header response的X-Frame-Options属性设置为SAMEORIGIN
                .headers().frameOptions().sameOrigin()
                .and()
                // 配置session管理
                .sessionManagement()
                //session失效默认的跳转地址
                .invalidSessionUrl("/loginPage");
    }
}
3、登录成功监听器(记录登录日志)
创建监听器,在登录成功的时候记录登录日志。
-
@Slf4j:
@Slf4j是 Lombok 提供的注解,用于自动生成日志对象,这里是为了方便使用日志。
-
@Component:
@Component注解将类标识为一个 Spring 组件,使得 Spring 能够自动扫描并将其纳入容器管理。
-
AuthenticationSuccessListener 实现 ApplicationListener 接口:
AuthenticationSuccessListener类实现了ApplicationListener<AuthenticationSuccessEvent>接口,表明它是一个事件监听器,监听的是用户认证成功的事件。
-
SysLoginLogService 注入:
SysLoginLogService是一个服务类,通过@Autowired注解注入到当前类中。该服务类用于对登录日志的持久化操作。
-
onApplicationEvent 方法:
onApplicationEvent方法是实现ApplicationListener接口的回调方法,在用户认证成功的时候会被触发。- 通过
authenticationSuccessEvent.getAuthentication().getPrincipal()获取登录的用户信息,这里假设用户信息是User类型。 - 通过
ServletUtil.getClientIP获取客户端的IP地址,这里使用了ServletUtil工具类,可以通过请求上下文获取IP地址。 - 创建一个
SysLoginLog对象,将登录成功的相关信息设置进去,包括账号、登录IP、备注等。 - 调用
sysLoginLogService.save(sysLoginLog)将登录日志持久化存储。
总的来说,这段代码的作用是在用户成功登录后,通过监听 Spring Security 的认证成功事件,记录用户的登录日志信息,包括登录账号、登录IP和登录成功的备注。这样可以实现登录成功后的自定义操作,例如记录登录日志等。
@Slf4j
@Component
public class AuthenticationSuccessListener implements ApplicationListener<AuthenticationSuccessEvent> {
    @Autowired
    private SysLoginLogService sysLoginLogService;

    @Override
    public void onApplicationEvent(AuthenticationSuccessEvent authenticationSuccessEvent) {
        // 登录账号
        User user = (User) authenticationSuccessEvent.getAuthentication().getPrincipal();
        // 请求IP
        String ip = ServletUtil.getClientIP(((ServletRequestAttributes) Objects.requireNonNull(RequestContextHolder.getRequestAttributes())).getRequest(), "");
        SysLoginLog sysLoginLog = new SysLoginLog();
        sysLoginLog.setAccount(user.getUsername());
        sysLoginLog.setLoginIp(ip);
        sysLoginLog.setRemark("登录成功");
        sysLoginLogService.save(sysLoginLog);
    }
}
4、登录失败监听器(记录登录日志)
创建监听器,在登录失败的时候记录异常登录日志。
@Slf4j
@Component
public class AuthenticationFailureListener implements ApplicationListener<AbstractAuthenticationFailureEvent>  {

    @Autowired
    private SysLoginLogService sysLoginLogService;

    @Override
    public void onApplicationEvent(AbstractAuthenticationFailureEvent abstractAuthenticationFailureEvent) {
        // 登录账号
        String username = abstractAuthenticationFailureEvent.getAuthentication().getPrincipal().toString();
        // 登录失败原因
        String message ;
        if (abstractAuthenticationFailureEvent instanceof AuthenticationFailureBadCredentialsEvent) {
            //提供的凭据是错误的,用户名或者密码错误
            message = "提供的凭据是错误的,用户名或者密码错误";
        } else if (abstractAuthenticationFailureEvent instanceof AuthenticationFailureCredentialsExpiredEvent) {
            //验证通过,但是密码过期
            message = "验证通过,但是密码过期";
        } else if (abstractAuthenticationFailureEvent instanceof AuthenticationFailureDisabledEvent) {
            //验证过了但是账户被禁用
            message = "验证过了但是账户被禁用";
        } else if (abstractAuthenticationFailureEvent instanceof AuthenticationFailureExpiredEvent) {
            //验证通过了,但是账号已经过期
            message = "验证通过了,但是账号已经过期";
        } else if (abstractAuthenticationFailureEvent instanceof AuthenticationFailureLockedEvent) {
            //账户被锁定
            message = "账户被锁定";
        } else if (abstractAuthenticationFailureEvent instanceof AuthenticationFailureProviderNotFoundEvent) {
            //配置错误,没有合适的AuthenticationProvider来处理登录验证
            message = "配置错误";
        } else if (abstractAuthenticationFailureEvent instanceof AuthenticationFailureProxyUntrustedEvent) {
            // 代理不受信任,用于Oauth、CAS这类三方验证的情形,多属于配置错误
            message = "代理不受信任";
        } else if (abstractAuthenticationFailureEvent instanceof AuthenticationFailureServiceExceptionEvent) {
            // 其他任何在AuthenticationManager中内部发生的异常都会被封装成此类
            message = "内部发生的异常";
        } else {
            message = "其他未知错误";
        }
        // 请求IP
        String ip = ServletUtil.getClientIP(((ServletRequestAttributes) Objects.requireNonNull(RequestContextHolder.getRequestAttributes())).getRequest(), "");
        SysLoginLog sysLoginLog = new SysLoginLog();
        sysLoginLog.setAccount(username);
        sysLoginLog.setLoginIp(ip);
        sysLoginLog.setRemark(message);
        sysLoginLogService.save(sysLoginLog);
    }
}
5、认证成功处理器
下面是一个认证成功处理器,登录成功后,会返回响应的信息给前端
@Component
@Slf4j
public class DefaultAuthenticationSuccessHandler extends SavedRequestAwareAuthenticationSuccessHandler {

    @Override
    public void onAuthenticationSuccess(HttpServletRequest request, HttpServletResponse response, Authentication authentication) throws ServletException, IOException {
        log.info("-----login in success----");
        response.setCharacterEncoding("utf-8");
        response.setContentType("application/json;charset=utf-8");
        PrintWriter writer = response.getWriter();
        writer.write(JSON.toJSONString(Result.success()));
        writer.flush();
    }
}
.successHandler(defaultAuthenticationSuccessHandler)
.failureHandler(defaultAuthenticationFailureHandler)
6、认证失败处理器
下面是一个认证成功处理器,登录成功后,会返回响应的信息给前端
@Component
@Slf4j
public class DefaultAuthenticationFailureHandler extends SimpleUrlAuthenticationFailureHandler {
    @Override
    public void onAuthenticationFailure(HttpServletRequest request, HttpServletResponse response, AuthenticationException exception) throws IOException, ServletException {
        log.info("login in failure : " +  exception.getMessage());

        response.setContentType("application/json;charset=utf-8");
        response.setCharacterEncoding("utf-8");
        PrintWriter writer = response.getWriter();
        String message;
        if (exception instanceof BadCredentialsException) {
            message =  "用户名或密码错误,请重试。";
            writer.write(JSON.toJSONString(Result.failure(message)));
        }else{
            writer.write(JSON.toJSONString(Result.failure(exception.getMessage())));
        }
        writer.flush();
    }
.successHandler(defaultAuthenticationSuccessHandler)
.failureHandler(defaultAuthenticationFailureHandler)
7、前端页面
返回200,就代表成功,跳转到/请求,进去index或者main页面
if (result.code === 200) {
    layer.msg('登入成功', {
         icon: 1
        ,time: 1000
    }, function(){
        window.location.href = '/';
    });
} else {

总结
AuthenticationSuccessEvent 是 Spring Security 中用于表示用户认证成功的事件。判断登录成功的主要依据是在认证过程中,用户提供的凭据(通常是用户名和密码)与系统中存储的凭据匹配。以下是判断登录成功的基本流程:
- 用户提交登录表单:
- 用户在浏览器中输入用户名和密码,然后点击登录按钮,提交登录表单。
- Spring Security 拦截登录请求:
- 配置的
.loginProcessingUrl("/login")指定了登录请求的URL,Spring Security会拦截这个URL的请求。
- 配置的
- UsernamePasswordAuthenticationFilter处理登录请求:
UsernamePasswordAuthenticationFilter是 Spring Security 内置的过滤器之一,用于处理用户名密码登录认证。- 当用户提交登录表单时,
UsernamePasswordAuthenticationFilter会拦截该请求,尝试进行身份验证。
- AuthenticationManager执行身份验证:
UsernamePasswordAuthenticationFilter将用户名密码等信息封装成一个UsernamePasswordAuthenticationToken。- 通过
AuthenticationManager进行身份验证,AuthenticationManager是一个接口,实际的实现为ProviderManager。 ProviderManager通过配置的AuthenticationProvider来执行实际的身份验证逻辑。
- AuthenticationProvider处理身份验证:
DaoAuthenticationProvider是AuthenticationProvider的默认实现之一,用于处理基于数据库的身份验证。DaoAuthenticationProvider会从配置的UserDetailsService中获取用户信息,然后与用户提交的信息进行比对。
- 认证成功:
- 如果认证成功,
AuthenticationProvider会返回一个已认证的Authentication对象。 - 这个已认证的
Authentication对象包含了用户的信息,通常是UserDetails的实现。
- 如果认证成功,
- AuthenticationSuccessHandler处理认证成功:
- 在配置中,通过
.successHandler()方法指定了处理认证成功的AuthenticationSuccessHandler。 - 在这个处理器中,可以执行一些额外的逻辑,例如记录登录日志等。
- 在配置中,通过
- AuthenticationSuccessEvent被发布:
- 在处理成功的阶段,Spring Security 发布了
AuthenticationSuccessEvent事件,表示认证成功。
- 在处理成功的阶段,Spring Security 发布了
在上述流程中,认证成功的判断主要是在 AuthenticationProvider 中完成的。DaoAuthenticationProvider 会检查用户提供的密码与数据库中存储的密码是否匹配。如果匹配,就认为认证成功。当认证成功后,后续的处理流程包括 AuthenticationSuccessHandler 的执行和 AuthenticationSuccessEvent 的发布。你可以通过监听 AuthenticationSuccessEvent 事件来执行一些额外的自定义逻辑,例如记录登录日志。