搭建seata
官网
在linux下搭建
下载1.6.1版本:地址
新建文件夹、上传压缩包并解压
[root@hao ~]# cd /usr/local/software/
[root@hao /usr/local/software]# ls
canal  docker  elk  gitlab  jdk  mysql  nacos  nexus  nginx  rabbitmq  redis  redis_sentinel  xxl-job
[root@hao /usr/local/software]# mkdir seata
[root@hao /usr/local/software]# ls
canal  docker  elk  gitlab  jdk  mysql  nacos  nexus  nginx  rabbitmq  redis  redis_sentinel  seata  xxl-job
[root@hao /usr/local/software]# cd seata/
[root@hao /usr/local/software/seata]# ls
[root@hao /usr/local/software/seata]# tar -zxvf seata-server-1.6.1.tar.gz
seata/Dockerfile
seata/LICENSE
seata/target/seata-server.jar
seata/conf/application.yml
seata/conf/application.example.yml
seata/conf/logback-spring.xml
seata/bin/seata-server.sh
[root@hao /usr/local/software/seata]# ls
seata  seata-server-1.6.1.tar.gz
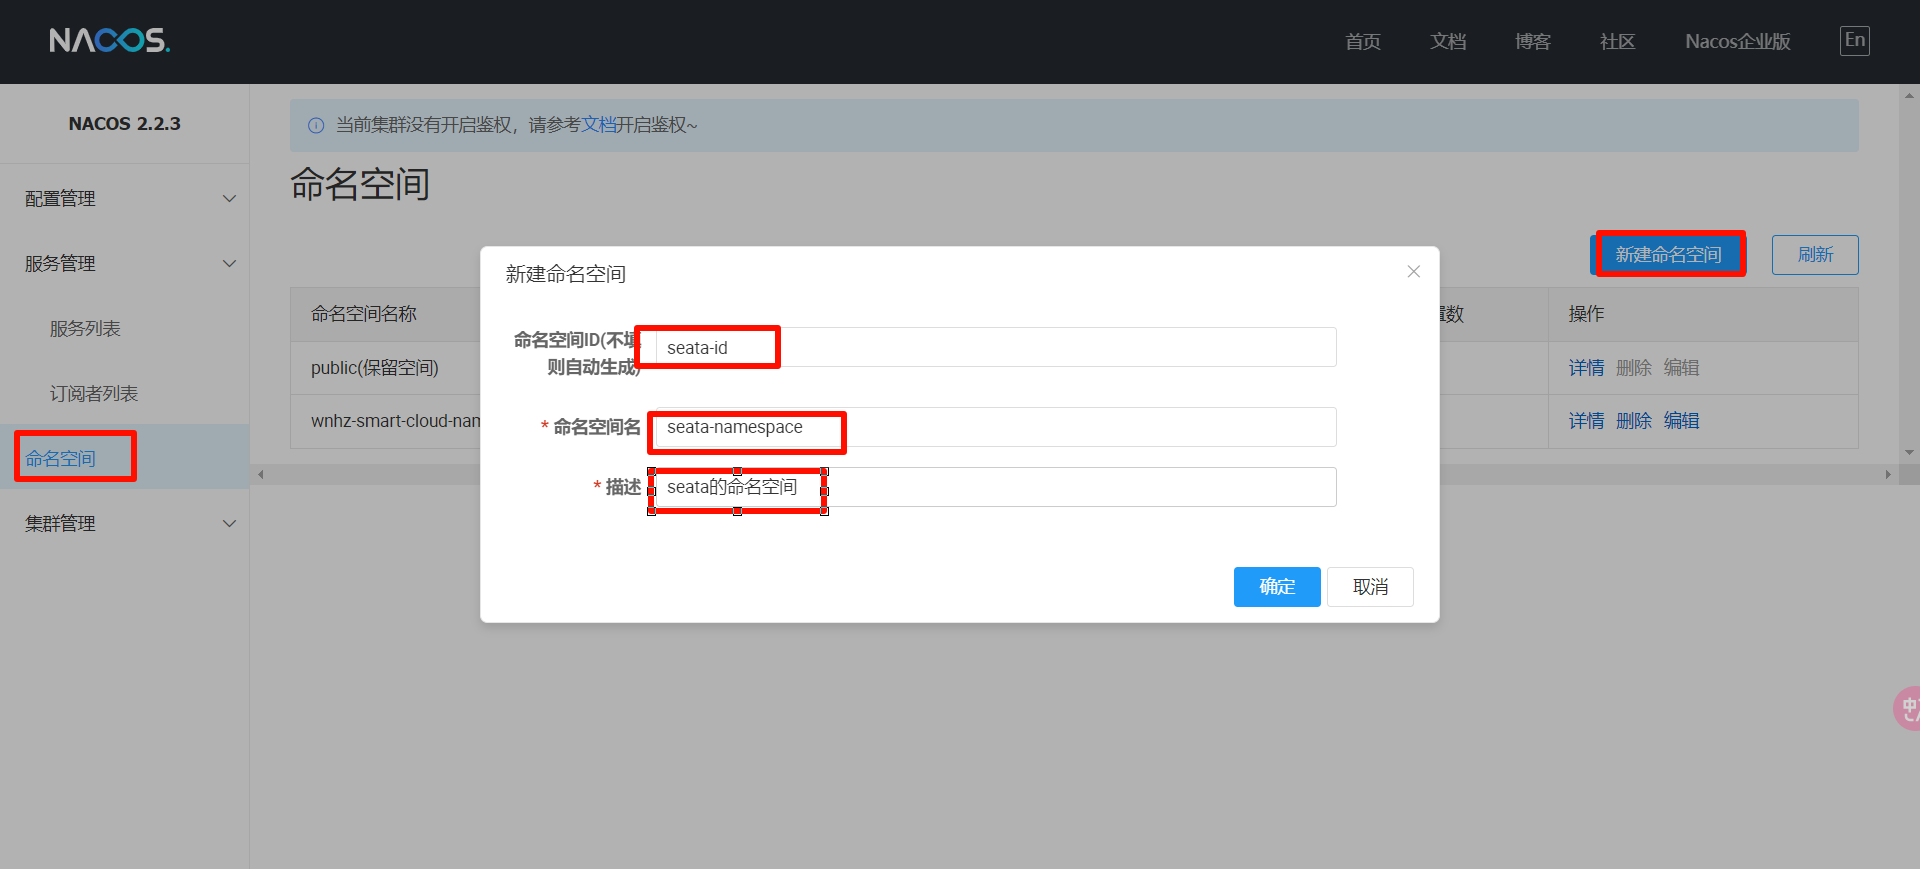
在nacos中创建命名空间
在数据库创建表【seata官方给出的步骤】【更改格式:时间戳】
CREATE TABLE `undo_log` (
  `branch_id` bigint(20) NOT NULL COMMENT 'branch transaction id',
  `xid` varchar(128) NOT NULL COMMENT 'global transaction id',
  `context` varchar(128) NOT NULL COMMENT 'undo_log context,such as serialization',
  `rollback_info` longblob NOT NULL COMMENT 'rollback info',
  `log_status` int(11) NOT NULL COMMENT '0:normal status,1:defense status',
  `log_created` datetime(6) NOT NULL COMMENT 'create datetime',
  `log_modified` datetime(6) NOT NULL COMMENT 'modify datetime',
  UNIQUE KEY `ux_undo_log` (`xid`,`branch_id`)
) ENGINE=InnoDB DEFAULT CHARSET=utf8mb4 COMMENT='AT transaction mode undo table';
备份原application.yml文件,将application.example.yml文件改为application.yml
[root@hao /usr/local/software/seata/seata]# cd conf/
[root@hao /usr/local/software/seata/seata/conf]# ls
application.example.yml  application.yml  logback  logback-spring.xml
[root@hao /usr/local/software/seata/seata/conf]# mv application.yml application.yml.bak
[root@hao /usr/local/software/seata/seata/conf]# ls
application.example.yml  application.yml.bak  logback  logback-spring.xml
[root@hao /usr/local/software/seata/seata/conf]# mv application.example.yml application.yml
[root@hao /usr/local/software/seata/seata/conf]# ls
application.yml  application.yml.bak  logback  logback-spring.xml
配置application.yml文件
配置config模块

console:
  user:
    username: seata
    password: 123456

seata:
  config:
    # support: nacos 、 consul 、 apollo 、 zk  、 etcd3
    type: nacos
    nacos:
      # nacos服务器的地址
      server-addr: 192.168.133.100:8848
      # nacos中配置的seata的命名空间
      namespace: seata-id
      # namespace下组的命名
      group: SEATA_GROUP
注册中心registry模块
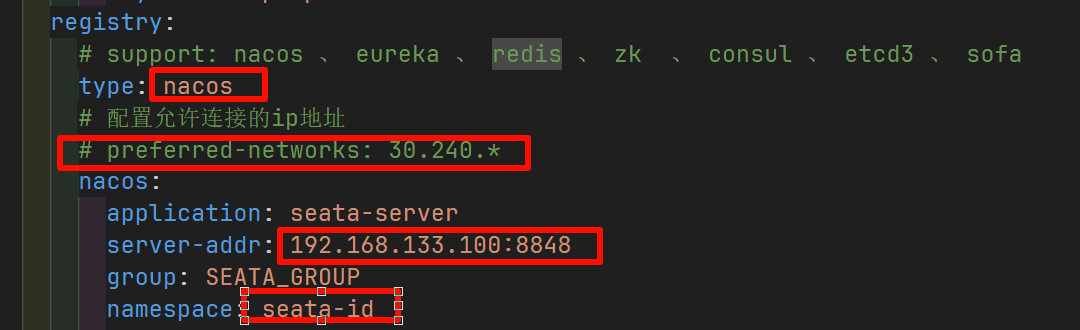
  registry:
    # support: nacos 、 eureka 、 redis 、 zk  、 consul 、 etcd3 、 sofa
    type: nacos
    # 配置允许连接的ip地址
    # preferred-networks: 30.240.*
    nacos:
      application: seata-server
      server-addr: 192.168.133.100:8848
      group: SEATA_GROUP
      namespace: seata-id
配置store模块
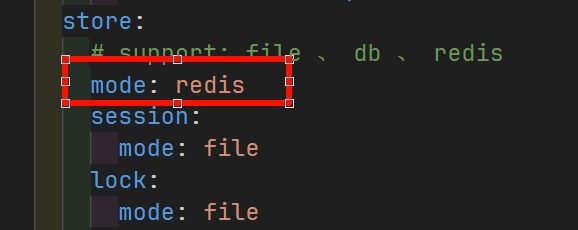
  store:
    # support: file 、 db 、 redis
    mode: redis
    session:
      mode: file
    lock:
      mode: file
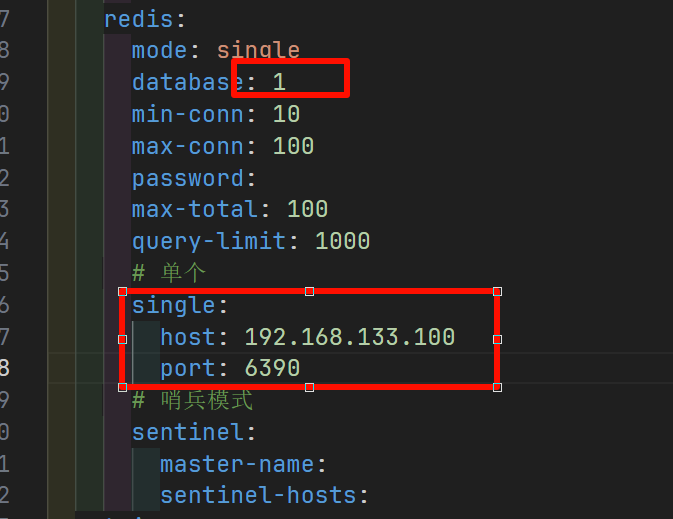
    redis:
      mode: single
      database: 1
      min-conn: 10
      max-conn: 100
      password:
      max-total: 100
      query-limit: 1000
      # 单个
      single:
        host: 192.168.133.100
        port: 6390
      # 哨兵模式
      sentinel:
        master-name:
        sentinel-hosts:
配置security模块
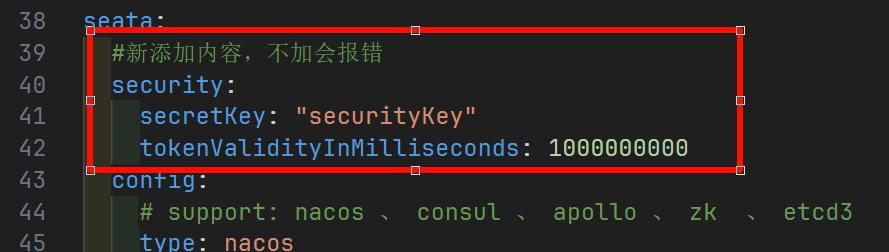
seata:
  #新添加内容,不加会报错
  security:
    secretKey: "securityKey"
    tokenValidityInMilliseconds: 1000000000
配置脚本文件script
[root@hao /usr/local/software/seata/seata/conf]# cd ..
[root@hao /usr/local/software/seata/seata]# ls
bin  conf  Dockerfile  ext  lib  LICENSE  logs  script  target
[root@hao /usr/local/software/seata/seata]# cd script/
[root@hao /usr/local/software/seata/seata/script]# ls
config-center  logstash  server
[root@hao /usr/local/software/seata/seata/script]# cd config-center/
[root@hao /usr/local/software/seata/seata/script/config-center]# ls
apollo  config.txt  consul  etcd3  nacos  README.md  zk
[root@hao /usr/local/software/seata/seata/script/config-center]# cd nacos/
[root@hao /usr/local/software/seata/seata/script/config-center/nacos]# ls
nacos-config-interactive.py  nacos-config-interactive.sh  nacos-config.py  nacos-config.sh
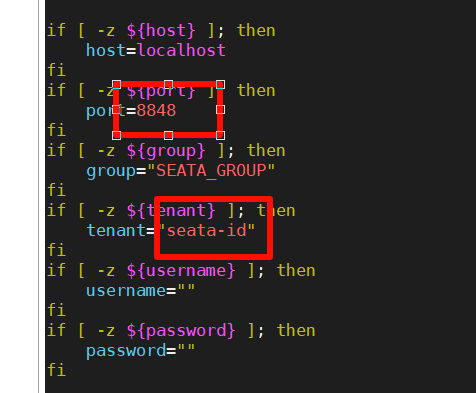
编辑nacos-config.sh,【如果运行了nginx,修改端口为7777:自己的代理端口】
运行
sh nacos-config.sh -h 192.168.133.100

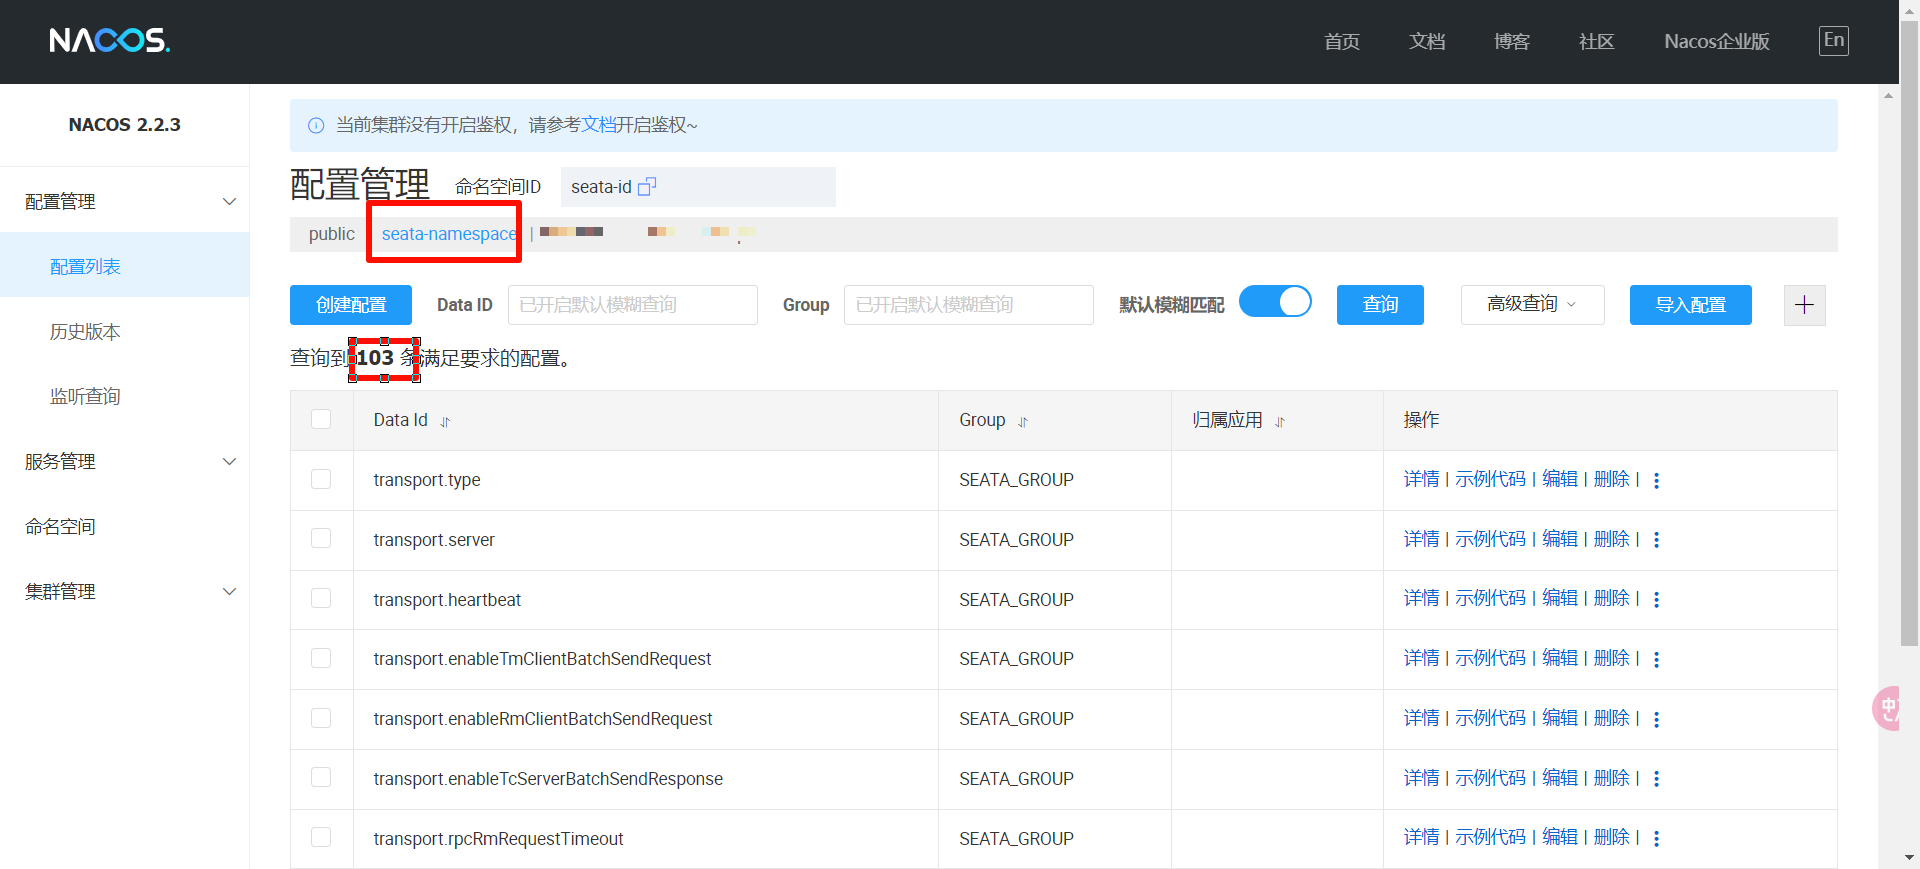
进入nacos查看,共103个配置文件
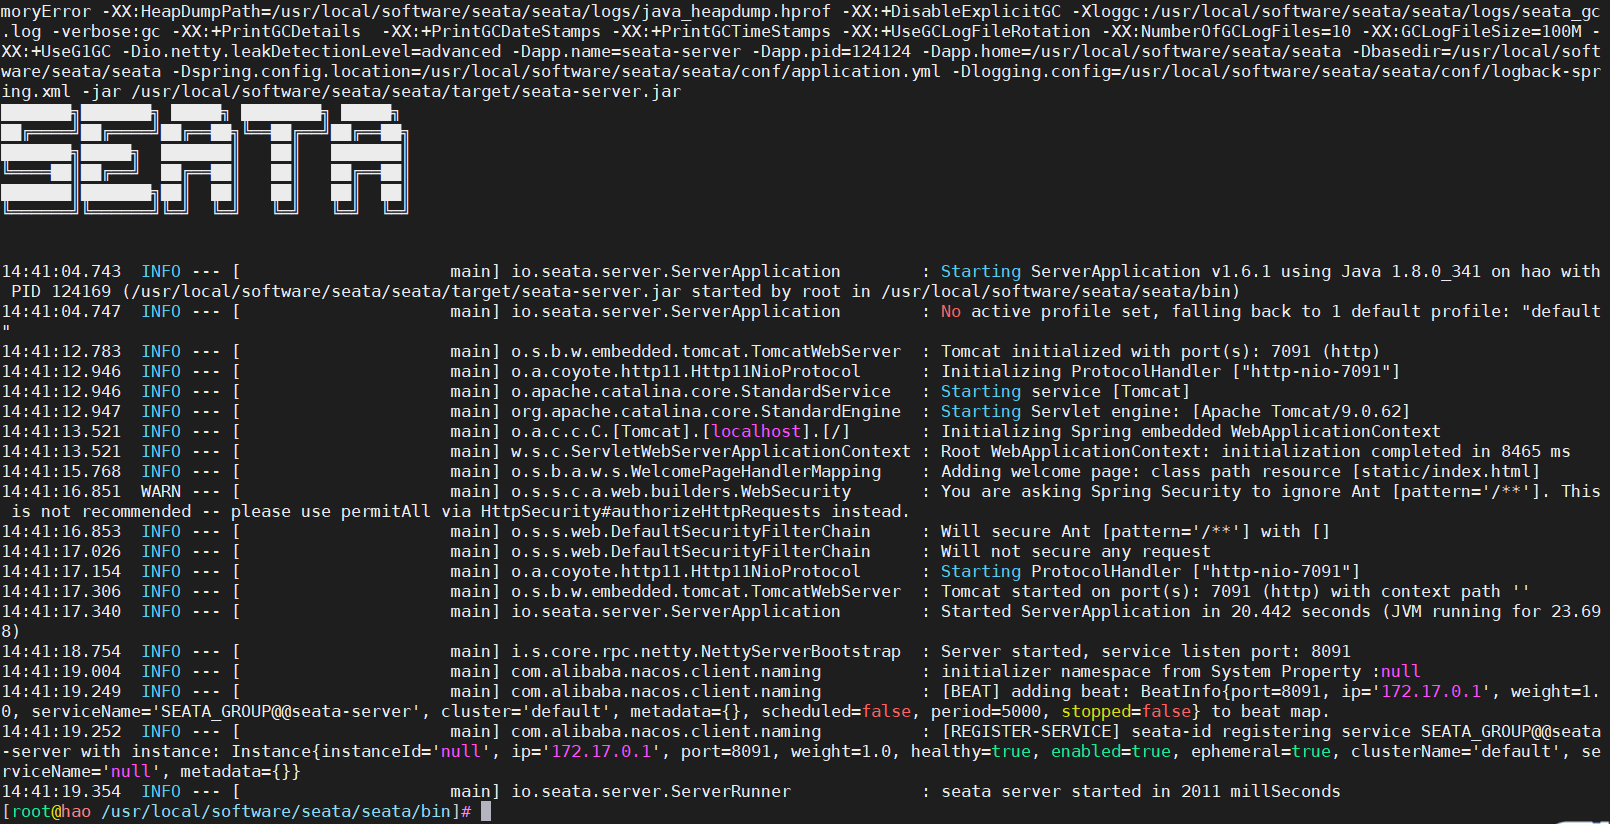
启动seata服务
进入bin文件夹进行启动
[root@hao /usr/local/software/seata/seata/script/config-center/nacos]# cd ..
[root@hao /usr/local/software/seata/seata/script/config-center]# cd ..
[root@hao /usr/local/software/seata/seata/script]# cd ..
[root@hao /usr/local/software/seata/seata]# ls
bin  conf  Dockerfile  ext  lib  LICENSE  logs  script  target
[root@hao /usr/local/software/seata/seata]# cd bin/
[root@hao /usr/local/software/seata/seata/bin]# ./seata-server.sh
apm-skywalking not enabled
seata-server is starting, you can check the /usr/local/software/seata/seata/logs/start.out
查看日志
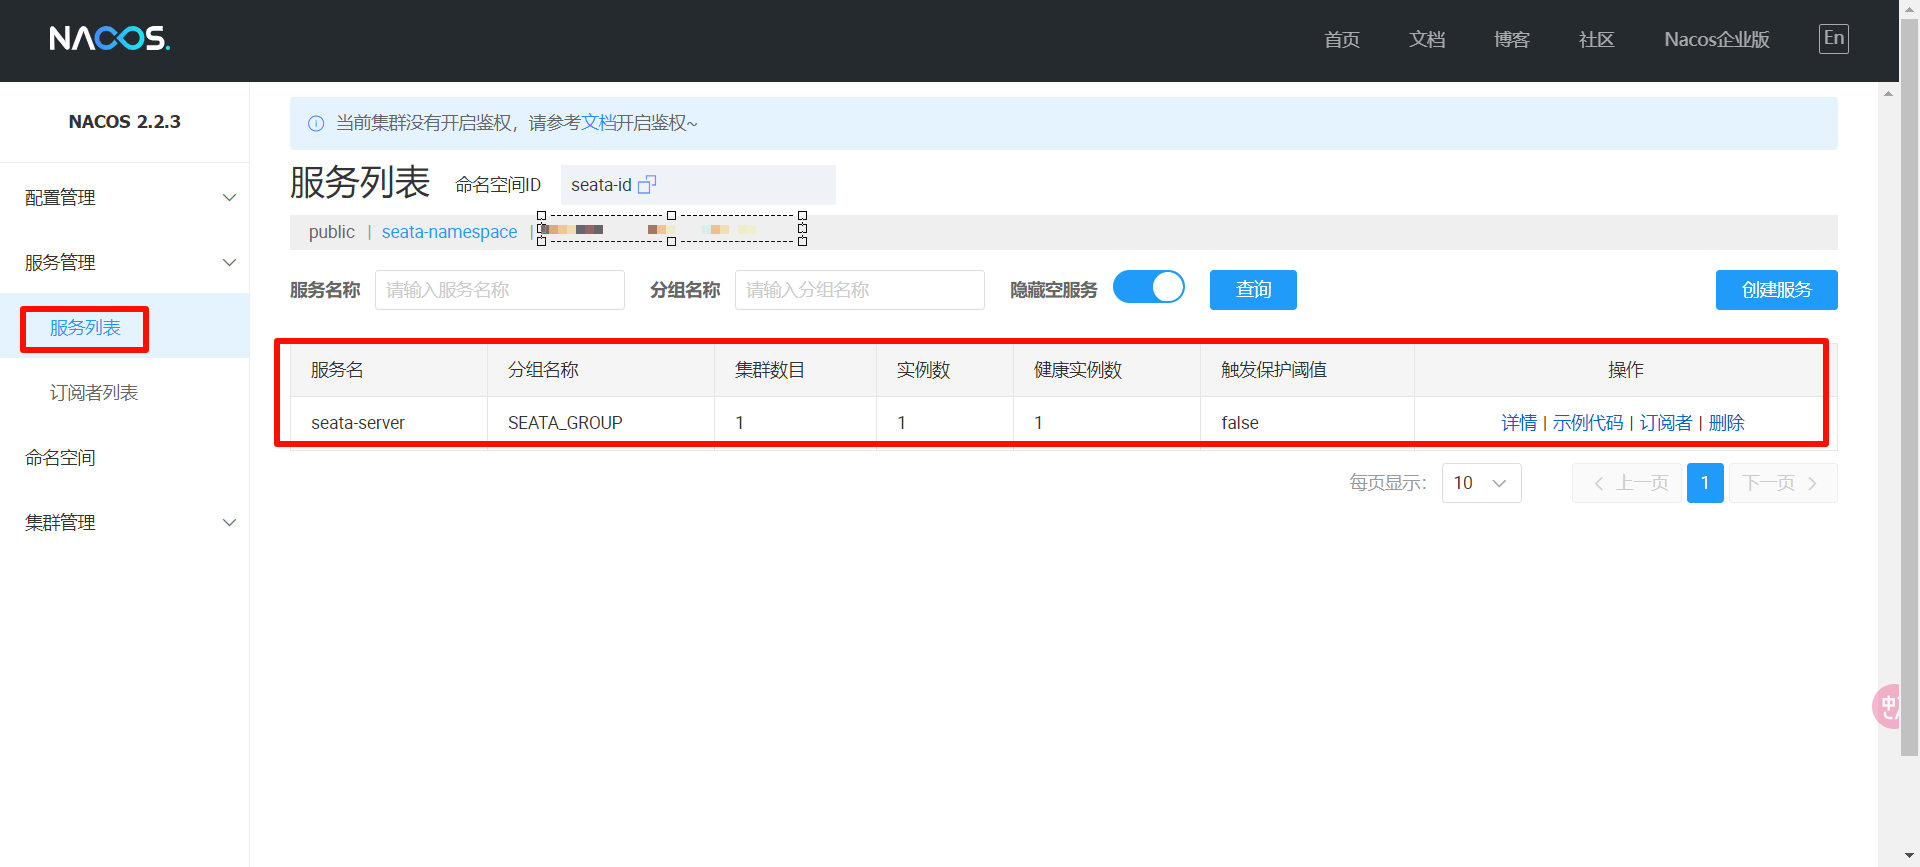
进入nacos网页查看服务列表,查看seata-server服务
开启8091端口
在业务中使用
基于seata的订单业务
订单模块
表
CREATE TABLE `order` (
  `order_id` bigint NOT NULL AUTO_INCREMENT,
  `order_product` bigint DEFAULT NULL,
  `order_num` varchar(255) CHARACTER SET utf8mb4 COLLATE utf8mb4_0900_ai_ci DEFAULT NULL COMMENT '订单号',
  `order_quantity` int DEFAULT NULL,
  `order_create_by` varchar(32) DEFAULT NULL,
  `order_create_time` datetime DEFAULT NULL,
  `order_update_time` datetime DEFAULT NULL,
  PRIMARY KEY (`order_id`)
) ENGINE=InnoDB AUTO_INCREMENT=15 DEFAULT CHARSET=utf8mb4 COLLATE=utf8mb4_0900_ai_ci;
maven
        <dependencies>
        <dependency>
            <groupId>com.wnhz.smart</groupId>
            <artifactId>smart-cloud-store-api</artifactId>
            <version>0.0.1-SNAPSHOT</version>
        </dependency>

        <dependency>
            <groupId>com.wnhz.smart</groupId>
            <artifactId>smart-cloud-common</artifactId>
            <version>0.0.1-SNAPSHOT</version>
        </dependency>

        <dependency>
            <groupId>org.springframework.boot</groupId>
            <artifactId>spring-boot-starter-web</artifactId>
        </dependency>

        <dependency>
            <groupId>com.alibaba.cloud</groupId>
            <artifactId>spring-cloud-starter-alibaba-nacos-config</artifactId>
        </dependency>

        <dependency>
            <groupId>com.alibaba.cloud</groupId>
            <artifactId>spring-cloud-starter-alibaba-nacos-discovery</artifactId>
        </dependency>

        <dependency>
            <groupId>org.springframework.cloud</groupId>
            <artifactId>spring-cloud-starter-bootstrap</artifactId>
        </dependency>

        <dependency>
            <groupId>org.springframework.cloud</groupId>
            <artifactId>spring-cloud-starter-loadbalancer</artifactId>
        </dependency>

        <dependency>
            <groupId>org.springframework.cloud</groupId>
            <artifactId>spring-cloud-starter-openfeign</artifactId>
        </dependency>

        <dependency>
            <groupId>com.alibaba.cloud</groupId>
            <artifactId>spring-cloud-starter-alibaba-seata</artifactId>
            <exclusions>
                <exclusion>
                    <groupId>io.seata</groupId>
                    <artifactId>seata-all</artifactId>
                </exclusion>
                <exclusion>
                    <groupId>io.seata</groupId>
                    <artifactId>seata-spring-boot-starter</artifactId>
                </exclusion>
            </exclusions>
        </dependency>
        <dependency>
            <groupId>io.seata</groupId>
            <artifactId>seata-all</artifactId>
            <version>1.6.1</version>
        </dependency>
        <dependency>
            <groupId>io.seata</groupId>
            <artifactId>seata-spring-boot-starter</artifactId>
            <version>1.6.1</version>
        </dependency>

        <dependency>
            <groupId>org.springframework.boot</groupId>
            <artifactId>spring-boot-starter-aop</artifactId>
        </dependency>
    </dependencies>

    <build>
        <plugins>
            <plugin>
                <groupId>org.springframework.boot</groupId>
                <artifactId>spring-boot-maven-plugin</artifactId>
            </plugin>
        </plugins>
    </build>
bootstrap.yml
spring:
  application:
    name: smart-cloud-order
  cloud:
    nacos:
      discovery:
        server-addr: 192.168.133.100:8848
        namespace: smart-cloud-id
        group: dev
        register-enabled: true
      config:
        server-addr: 192.168.133.100:8848
        namespace: smart-cloud-id
        file-extension: yaml
        shared-configs:
          - dataId: db.yaml
            group: dev
            refresh: true
          - dataId: mp.yaml
            group: dev
            refresh: true
seata:
  enabled: true
  tx-service-group: default_tx_group
  service:
    vgroup-mapping:
      default_tx_group: default
    grouplist:
      default: 192.168.133.100:8091
启动类
package com.wnhz.smart.cloud.order;

import org.mybatis.spring.annotation.MapperScan;
import org.springframework.boot.SpringApplication;
import org.springframework.boot.autoconfigure.SpringBootApplication;
import org.springframework.cloud.client.discovery.EnableDiscoveryClient;
import org.springframework.cloud.openfeign.EnableFeignClients;

/**
 * @author Hao
 * @date 2023-12-11 16:43
 */
@SpringBootApplication
@MapperScan("com.wnhz.smart.cloud.domain.mapper")
@EnableDiscoveryClient
@EnableFeignClients("com.wnhz.smart.cloud.store.feign")
public class SmartOrderApp {
    public static void main(String[] args) {
        SpringApplication.run(SmartOrderApp.class);
    }
}
分布式事务使用
package com.wnhz.smart.cloud.order.service.impl;

import cn.hutool.core.util.IdUtil;
import com.wnhz.smart.cloud.domain.entity.Order;
import com.wnhz.smart.cloud.domain.mapper.OrderMapper;
import com.wnhz.smart.cloud.order.service.IOrderService;
import com.wnhz.smart.cloud.store.feign.IStoreFeign;
import io.seata.spring.annotation.GlobalTransactional;
import lombok.extern.slf4j.Slf4j;
import org.springframework.beans.factory.annotation.Autowired;
import org.springframework.stereotype.Service;

import java.util.Date;

/**
 * @author Hao
 * @date 2023-12-11 16:53
 */
@Service
@Slf4j
public class OrderServiceImpl implements IOrderService {
    @Autowired
    private OrderMapper orderMapper;
    @Autowired
    private IStoreFeign iStoreFeign;

    @GlobalTransactional
    @Override
    public String generateOrder(Long productId, Integer quantity) {
        Order order = new Order()
                .setOrderProduct(productId)
                .setOrderQuantity(quantity)
                .setOrderCreateBy("Linda")
                .setOrderCreateTime(new Date())
                .setOrderUpdateTime(new Date());
        log.debug("产生订单对象:{},准备调用库存组件...", order);
        orderMapper.insert(order);
        iStoreFeign.decr(productId, quantity);
        String orderNum = IdUtil.getSnowflakeNextIdStr();
        log.debug("去库存成功,完善订单产生订单号:{}", orderNum);
        order.setOrderNum(orderNum);
        orderMapper.updateById(order);
        log.debug("订单生成成功:{}", order);
        return orderNum;
    }
}
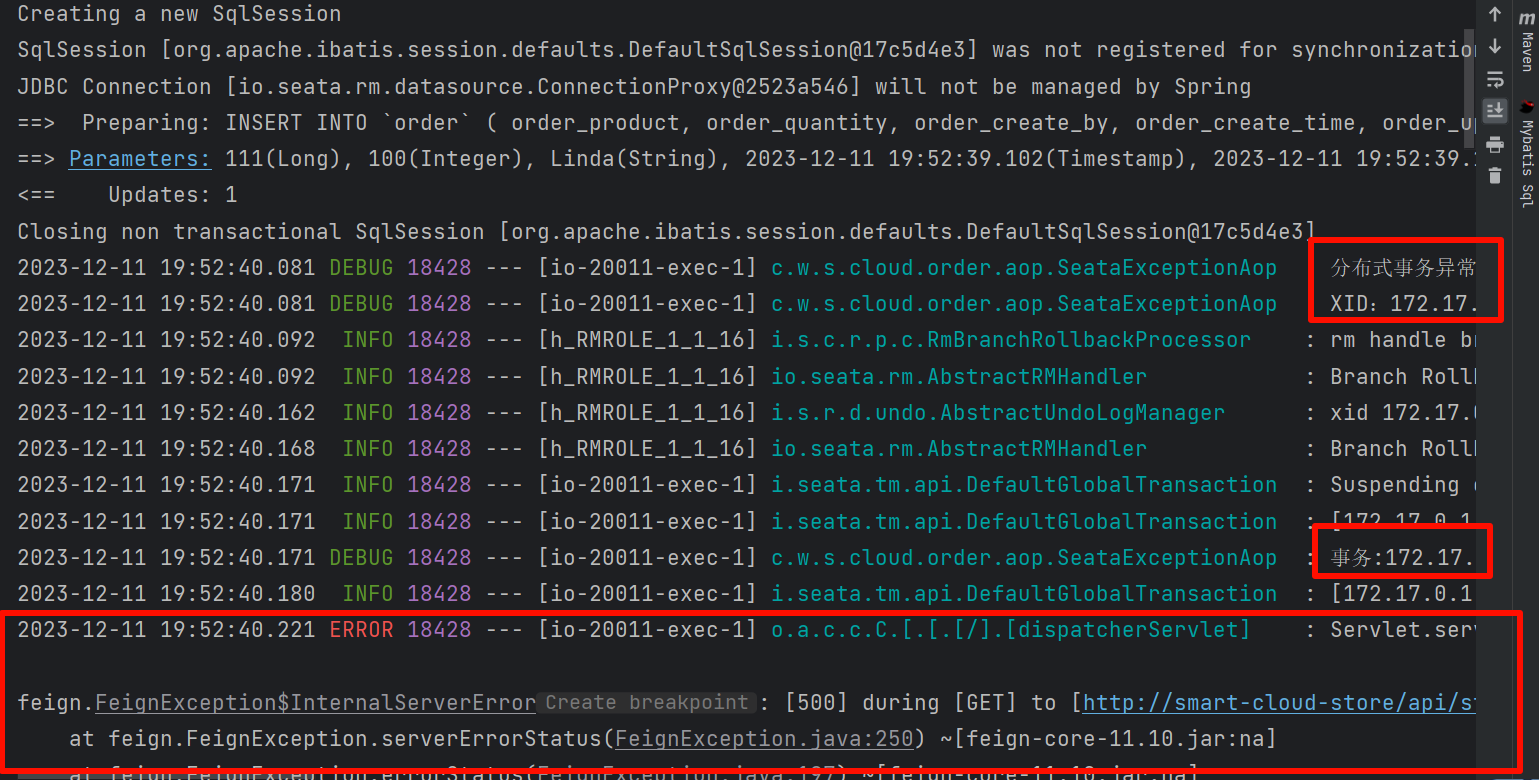
在业务中捕获异常【因为正常情况下在这里调用的是openFeign的接口,所以异常是openFeign的异常,这里是想要知道seata的异常】
package com.wnhz.smart.cloud.order.aop;

import io.seata.core.context.RootContext;
import io.seata.core.exception.TransactionException;
import io.seata.tm.api.GlobalTransactionContext;
import lombok.extern.slf4j.Slf4j;
import org.aspectj.lang.annotation.AfterThrowing;
import org.aspectj.lang.annotation.Aspect;
import org.aspectj.lang.annotation.Pointcut;
import org.springframework.stereotype.Component;
import org.springframework.util.StringUtils;

/**
 * @author Hao
 * @date 2023-12-11 19:26
 */
@Aspect
@Component
@Slf4j
public class SeataExceptionAop {
    @Pointcut("@annotation(io.seata.spring.annotation.GlobalTransactional)")
    private void transactionPointCut() {
    }

    @AfterThrowing(throwing = "e", pointcut = "transactionPointCut()")
    public void globalTransactionalException(Throwable e) throws TransactionException {
        log.debug("分布式事务异常:{}", e.getMessage());
        String xid = RootContext.getXID();
        if (StringUtils.hasText(xid)) {
            log.debug("XID:{},执行回滚操作", xid);
            GlobalTransactionContext.reload(xid).rollback();
            log.debug("事务:{}回滚完成", xid);
            // throw new TransactionException("事务处理失败,回滚完成........");
        }
    }
}
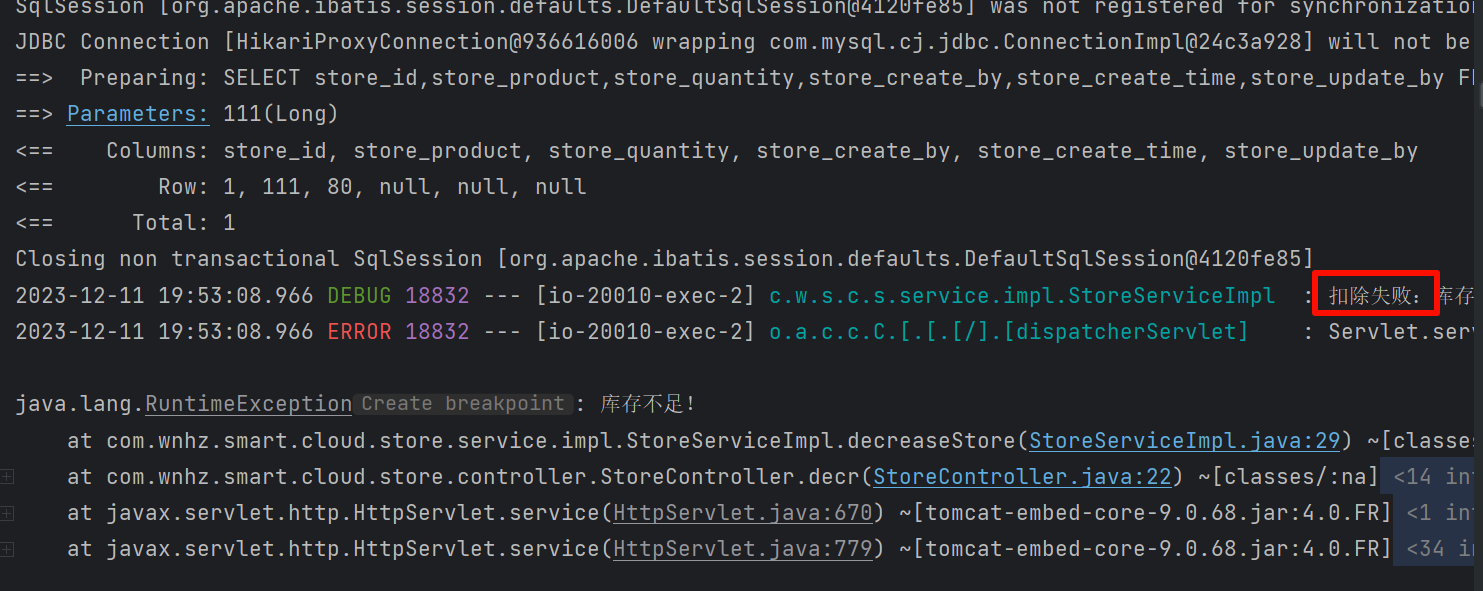
库存模块
表
CREATE TABLE `store` (
  `store_id` bigint NOT NULL AUTO_INCREMENT,
  `store_product` bigint DEFAULT NULL,
  `store_quantity` int DEFAULT NULL,
  `store_create_by` varchar(32) DEFAULT NULL,
  `store_create_time` datetime DEFAULT NULL,
  `store_update_by` datetime DEFAULT NULL,
  PRIMARY KEY (`store_id`)
) ENGINE=InnoDB AUTO_INCREMENT=2 DEFAULT CHARSET=utf8mb4 COLLATE=utf8mb4_0900_ai_ci;
bootstrap.yml
spring:
  application:
    name: smart-cloud-store
  cloud:
    nacos:
      discovery:
        server-addr: 192.168.133.100:8848
        namespace: smart-cloud-id
        group: dev
        register-enabled: true
      config:
        server-addr: 192.168.133.100:8848
        namespace: smart-cloud-id
        file-extension: yaml
        shared-configs:
          - dataId: db.yaml
            group: dev
            refresh: true
          - dataId: mp.yaml
            group: dev
            refresh: true
api-feign接口
@FeignClient(value = "smart-cloud-store")
public interface IStoreFeign {
    @GetMapping("/api/store/decr")
    ResponseResult<Void> decr(@RequestParam("productId") Long productId,
                              @RequestParam("quantity") Integer quantity);
}
order端
store端


![[UNILM]论文实现:Unified Language Model Pre-training for Natural Language.........](https://img-blog.csdnimg.cn/direct/bdb2bfeb4c9b41ada63ef02eb2e2200c.png)
