一、使用 fswebcam 测试 USB 摄像头
二、根据demo来实现功能点
三、功能点编写编译运行实现
一、使用 fswebcam 测试 USB 摄像头
a. 安装 fswebcam
orangepi@orangepi:~$ sudo apt update
orangepi@orangepi:~$ sudo apt-get install -y fswebcam
b. 安装完 fswebcam 后可以使用下面的命令来拍照
a) -d 选项用于指定 USB 摄像头的设备节点
b) --no-banner 用于去除照片的水印
c) -r 选项用于指定照片的分辨率
d) -S 选项用设置于跳过前面的帧数
e) ./image.jpg 用于设置生成的照片的名字和路径
orangepi@orangepi:~$ sudo fswebcam -d /dev/video0 \ --no-banner -r 1280x720 -S 5 ./image.jpg
c. 在服务器版的 linux 系统中,拍完照后可以使用 scp 命令将拍好的图片传到
Ubuntu PC 上镜像观看
orangepi@orangepi:~$ scp image.jpg test@192.168.1.55:/home/test(根据实际情况修改 IP 地址和路径)
d. 在桌面版的 linux 系统中,可以通过 HDMI 显示器直接查看拍摄的图片
这里使用fswebcam进行拍照。参考用户手册
首先在/smart_home拍照,命名为imageComp.jpg
sudo fswebcam -d /dev/video0 --no-banner -r 1280x720 -S 5 ./imageComp.jpg
二、根据demo来实现功能点
demo.c
主要的功能是通过摄像头采集人脸数据,然后通过 cURL 发送 POST 请求到指定的 API 接口,接收 OCR 后台返回的数据。在这个过程中,你使用了一些全局变量、文件 I/O、cURL 库等。
以下是一些建议和注意事项:
-
错误处理: 在系统调用和库函数调用后,最好检查其返回值,以确保操作成功。例如,你可以在文件打开、内存分配等操作后添加错误检查,并在失败时输出错误信息。
-
函数封装: 考虑将一些相关的操作封装成函数,以提高代码的模块性和可读性。例如,可以将 cURL 相关的初始化和清理操作封装成函数。
-
全局变量的使用: 全局变量在函数间传递数据,但过度使用全局变量可能导致代码难以理解和维护。尽量将数据传递作为函数参数,以提高函数的可复用性。
-
内存释放: 在使用
malloc分配内存后,确保在不再需要使用该内存时调用free进行释放,以避免内存泄漏。 -
字符串操作: 在使用字符串拼接函数(如
sprintf)时,确保目标缓冲区足够大以防止缓冲区溢出。 -
资源释放顺序: 在释放资源时,注意释放的顺序,以避免悬挂指针或资源泄漏。
-
安全性: 尽量避免使用
system函数来执行外部命令,这可能带来安全风险。如果可能的话,考虑使用更安全的库函数或 API。
下面是一些可能的改进:
// 错误处理函数
void handleError(const char *message)
{
    perror(message);
    exit(EXIT_FAILURE);
}

// 初始化 cURL
CURL *initCurl()
{
    CURL *curl = curl_easy_init();
    if (!curl)
    {
        handleError("curl_easy_init failed");
    }
    return curl;
}

// 释放 cURL 资源
void cleanupCurl(CURL *curl)
{
    curl_easy_cleanup(curl);
}

// 发送 cURL POST 请求
bool sendPostRequest(const char *url, const char *postString, size_t (*writeCallback)(void *, size_t, size_t, void *))
{
    CURL *curl = initCurl();
    if (!curl)
    {
        return false;
    }

    CURLcode res;

    // 设置 cURL 选项
    curl_easy_setopt(curl, CURLOPT_URL, url);
    curl_easy_setopt(curl, CURLOPT_POSTFIELDS, postString);
    curl_easy_setopt(curl, CURLOPT_WRITEFUNCTION, writeCallback);

    // 执行请求
    res = curl_easy_perform(curl);

    // 检查执行结果
    if (res != CURLE_OK)
    {
        fprintf(stderr, "curl_easy_perform() failed: %s\n", curl_easy_strerror(res));
        cleanupCurl(curl);
        return false;
    }

    cleanupCurl(curl);
    return true;
}

// 获取人脸数据
char *getFace()
{
    printf("人脸数据采集中...\n");
    system("sudo fswebcam -d /dev/video0 --no-banner -r 1280x720 -S 5 ./image.jpg");

    while (access("./image.jpg", F_OK) != 0)
    {
        // 等待文件存在
    }

    printf("数据采集完毕\n");

    // 获取 base64 数据
    char *base64BufFaceRec = getBase64FromFile("./image.jpg");
    remove("./image.jpg"); // 采集完成删除,防止占内存

    return base64BufFaceRec;
}

// 发送人脸数据到 OCR 后台
bool sendFaceToOcr()
{
    char *img1 = getFace(); // 图片 base64 流
    char *img2 = getBase64FromFile("/home/orangepi/smart_home/test/imageComp.jpg");
    char *key = "JFD5c1iBh9LVqPkkZMqM8Q";
    char *secret =

 "76f444813fc945bd9543e4d7e086ad87";
    int typeId = 21;
    char *format = "xml";

    // 分配足够的空间
    int len = strlen(key) + strlen(secret) + strlen(img1) + strlen(img2) + 128;
    char *postString = (char *)malloc(len);
    if (!postString)
    {
        handleError("Memory allocation failed");
    }

    // 字符串拼接
    snprintf(postString, len, "img1=%s&img2=%s&key=%s&secret=%s&typeId=%d&format=%s", img1, img2, key, secret, typeId, format);

    // 发送 POST 请求
    bool result = sendPostRequest("https://netocr.com/api/faceliu.do", postString, readData);

    // 释放动态分配的内存
    free(img1);
    free(img2);
    free(postString);

    return result;
}

// 入口函数
int main(void)
{
    // 发送人脸数据到 OCR 后台
    if (sendFaceToOcr())
    {
        // 处理 OCR 后台返回的数据
        // ...
    }

    return 0;
}
这个版本进行了一些重构,提高了可读性和模块性,同时加入了错误处理。你可以根据需要进一步调整。
三、功能点编写编译运行实现
camera.c
#include "controlDevice.h"
#include <stdio.h>
#include <curl/curl.h>
#include <string.h>
#include <stdlib.h>
#include <sys/types.h>
#include <sys/stat.h>
#include <fcntl.h>
#include <unistd.h>

char ocrReturnBuf[1024] = {'\0'}; // 全局变量,用来接收从OCR后台返回的数据

// 回调函数,读取从OCR后台返回的数据(把从后台的数据拷贝给ocrReturnBuf)
size_t readData(void *ptr, size_t size, size_t nmemb, void *stream)
{
        size_t totalSize = size * nmemb;

        // 为了避免溢出,计算实际拷贝的长度
        size_t copySize = (totalSize < (sizeof(ocrReturnBuf) - 1)) ? totalSize : (sizeof(ocrReturnBuf) - 1);

        // 拷贝数据到 ocrRetBuf 中
        memcpy(ocrReturnBuf, ptr, copySize);

        // 手动添加字符串终结符
        ocrReturnBuf[copySize] = '\0';

        return totalSize;
}

char *getBase64FromFile(const char *filePath)
{
        char cmd[256] = {'\0'};
        char *base64Buf = NULL;

        // 使用安全的方式构建命令
        snprintf(cmd, sizeof(cmd), "base64 %s | tr -d '\n' > tmpFile", filePath);

        if (system(cmd) == -1) {
                perror("Error executing system command");
                return NULL;
        }

        int fd = open("./tmpFile", O_RDWR);
        if (fd == -1) {
                perror("Error opening file");
                return NULL;
        }

        // 计算文件大小
        int fileLen = lseek(fd, 0, SEEK_END);
        lseek(fd, 0, SEEK_SET);

        // 动态分配内存
        base64Buf = (char *)malloc(fileLen + 1);
        if (base64Buf == NULL) {
                perror("Error allocating memory");
                close(fd);
                return NULL;
        }

        memset(base64Buf, '\0', fileLen + 1);

        // 读取文件内容到字符串
        if (read(fd, base64Buf, fileLen) == -1) {
                perror("Error reading file");
                free(base64Buf);
                close(fd);
                return NULL;
        }

        close(fd);

        // 删除临时文件
        if (remove("tmpFile") == -1) {
                perror("Error deleting temporary file");
        }

        return base64Buf;
}

// 获取人脸数据
char *getFace()
{
        printf("人脸数据采集中...\n");
        system("sudo fswebcam -d /dev/video0 --no-banner -r 1280x720 -S 5 /home/orangepi/smart_home/test/image.jpg");

        while (access("./image.jpg", F_OK) != 0); // 判断是否拍照完毕

        printf("数据采集完毕\n");

        // 获取 base64 数据
        char *base64BufFaceRec = getBase64FromFile("./image.jpg");
        remove("./image.jpg");   // 采集完成删除,防止占内存

        return base64BufFaceRec; // 返回刚才拍照的base64
}

// 根据文档,接口调用方法为post请求
void postUrl()
{
        CURL *curl;
        CURLcode res;

        // 根据翔云平台的接口要求  分开定义,然后字符串拼接
        char *img1 = getFace(); // 图片base64流
        char *img2 = getBase64FromFile("/home/orangepi/smart_home/test/imageComp.jpg");
        char *key = "JFD5c1iBh9LVqPkkZMqM8Q";
        char *secret = "76f444813fc945bd9543e4d7e086ad87";
        int typeId = 21;
        char *format = "xml";

        int len = strlen(key) + strlen(secret) + strlen(img1) + strlen(img2) + 128; // 分配空间不够会>导致栈溢出
        char* postString = (char*)malloc(len);
        memset(postString, '\0', len);//因为postString是一个指针,不能用sizeof来计算其指向的大小

        // 字符串拼接
        sprintf(postString, "img1=%s&img2=%s&key=%s&secret=%s&typeId=%d&format=%s", img1, img2, key, secret, typeId, format);

        // 初始化 cURL
        curl = curl_easy_init();
        if (curl)
        {
                // 指定cookie缓存文件
                // if (curl_easy_setopt(curl, CURLOPT_COOKIEFILE, "/tmp/cookie.txt") != CURLE_OK)
                // {
                //         fprintf(stderr, "Failed to set cookie file\n");
                //         return false; // 在设置失败时,直接返回
                // }
                // 指定post传输内容,get请求将URL和postString一次性发送
                curl_easy_setopt(curl, CURLOPT_POSTFIELDS, postString);
                // 指定url
                curl_easy_setopt(curl, CURLOPT_URL, "https://netocr.com/api/faceliu.do");
                // 回调函数读取返回值
                curl_easy_setopt(curl, CURLOPT_WRITEFUNCTION, readData);

                // 执行请求
                res = curl_easy_perform(curl);
                if (res != CURLE_OK) {
                        fprintf(stderr, "curl_easy_perform() failed: %s\n", curl_easy_strerror(res));
                        // 处理错误
                }

                // 释放 cURL 资源
                curl_easy_cleanup(curl);
        }
        // 释放动态分配的内存
        free(img1);
        free(img2);
        free(postString);
}

struct Devices camera = {
    .deviceName = "camera",
    .justDoOnce = postUrl
};

struct Devices *addCameraToDeviceLink(struct Devices *phead)
{
        if (phead == NULL) {
                return &camera;
        }
        else {
                camera.next = phead; // 以前的头变成.next
                phead = &camera;     // 更新头
                return phead;
        }
}
controlDevice.h
#include <wiringPi.h>					//wiringPi库
#include <stdio.h>
#include <stdlib.h>

// 设备结构体
struct Devices                          //设备类
{
    char deviceName[128];               //设备名
    int status;                         //状态
    int pinNum;							//引脚号

    // 函数指针,用于设备控制
    int (*Init)(int pinNum);			//“初始化设备”函数指针
	int (*open)(int pinNum);			//“打开设备”函数指针
	int (*close)(int pinNum);			//“关闭设备”函数指针
    int (*readStatus)(int pinNum);		//“读取设备状态”函数指针  为火灾报警器准备
	int (*changeStatus)(int status);	//“改变设备状态”函数指针
    void (*justDoOnce)();               // 仅执行一次的操作

    struct Devices *next;
};

struct Devices* addBathroomLightToDeviceLink(struct Devices *phead);		//“浴室灯”加入设备链表函数声明      2
struct Devices* addBedroomLightToDeviceLink(struct Devices *phead);	        //“卧室灯”加入设备链表函数声明      8
struct Devices* addRestaurantLightToDeviceLink(struct Devices *phead);		//“餐厅灯”加入设备链表函数声明      13
struct Devices* addLivingroomLightToDeviceLink(struct Devices *phead);		//“客厅灯”加入设备链表函数声明      16
struct Devices* addSmokeAlarmToDeviceLink(struct Devices *phead);           //“烟雾报警器”加入设备链表函数声明  6
struct Devices* addBuzzerToDeviceLink(struct Devices *phead);		        //“蜂鸣器”加入设备链表函数声明      9
struct Devices *addCameraToDeviceLink(struct Devices *phead);               // “摄像头”加入设备链表
struct Devices *addLockToDeviceLink(struct Devices *phead);                 // “门锁”加入设备链表
main.c
在main.c文件里的Command(struct InputCommand* CmdHandler)函数中添加
    // OCR 指令:执行人脸识别功能进行开门
    if (strcmp("OCR", CmdHandler->command) == 0)
    {
        tmp = findDeviceByName("camera", pdeviceHead);
        if (tmp != NULL)
        {
            tmp->justDoOnce();
            // 字符串检索 判断翔云后台返回的一大堆字符串中有没有“否”
            if (strstr(ocrReturnBuf, "否") != NULL)
            {
                printf("人脸比对失败\n");
            }
            else
            {
                printf("人脸比对成功\n");
                tmp = findDeviceByName("lock", pdeviceHead);
                if (tmp != NULL)
                {
                    tmp->open(tmp->pinNum);
                    printf("已开门\n");
                    delay(3000);
                    tmp->close(tmp->pinNum);
                }
            }
        }
    }
这里的摄像头只是当作一个设备去用,目前实现通过串口指令然后system()进行拍照。然后翔云平台进行人脸对比,未实现自动人脸检测。
所以摄像头没有另创线程。但是做视频监控可以另创线程。
这样当串口发送OCR时,实现人脸对比并开锁,所以没有用线程去做
当然,要把camera、lock设备加入设备工厂
注意:ocrReturnBuf这个因为要再不同文件调用的全局变量所以要extern
编译运行
gcc *.c -lwiringPi -lwiringPiDev -lpthread -lm -lcrypt -lrt -I /home/orangepi/curl-7.71.1/_install/include/ -L /home/orangepi/curl-7.71.1/_install/lib/ -lcurl

sudo ./a.out

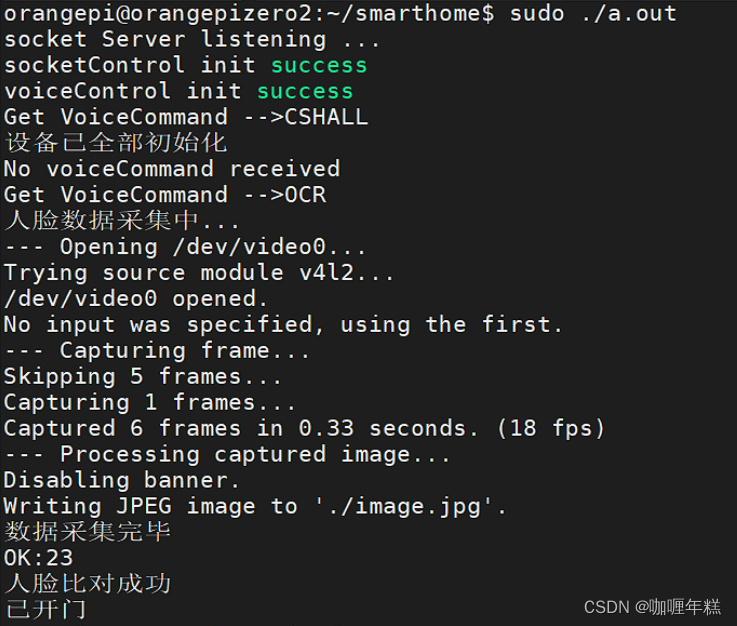
运行结果
