部门列表查询:
功能实现:
需求:查询数据库表中的所有部门数据,展示在页面上。

准备工作:
- 准备数据库表dept(部门表),实体类Dept。
- 在项目中引入mybatis的起步依赖,mysql的驱动包。
- 在项目的application.properties中引入mybatis的配置信息(数据库连接、日志输出)。
代码实现:
定义mapper包,并且定义DeptMapper接口,并声明接口方法。 改造之前编写的dao、service的代码,在service实现中注入mapper接口。
1,先准备部门表的SQL
-- 部门管理
create table dept(
    id int unsigned primary key auto_increment comment '主键ID',
    name varchar(10) not null unique comment '部门名称',
    create_time datetime not null comment '创建时间',
    update_time datetime not null comment '修改时间'
) comment '部门表';

INSERT INTO `dept` VALUES (1,'学工部','2023-09-25 09:47:40','2023-09-25 09:47:40'),
						(2,'教研部','2023-09-25 09:47:40','2023-09-25 09:47:40'),
						(3,'咨询部','2023-09-25 09:47:40','2023-09-25 09:47:40'),
						(4,'就业部','2023-09-25 09:47:40','2023-09-25 09:47:40'),
						(5,'人事部','2023-09-25 09:47:40','2023-09-25 09:47:40'),
						(6,'行政部','2023-09-27 14:00:00','2023-09-27 14:00:00'),
						(7,'综合部','2023-09-25 14:44:19','2023-09-25 14:44:19');
2,在项目中引入mybatis的依赖:

依赖的代码:
        <dependency>
            <groupId>mysql</groupId>
            <artifactId>mysql-connector-java</artifactId>
            <version>8.0.31</version>
        </dependency>
        <dependency>
            <groupId>com.alibaba</groupId>
            <artifactId>druid-spring-boot-starter</artifactId>
            <version>1.2.11</version>
        </dependency>

        <dependency>
            <groupId>org.projectlombok</groupId>
            <artifactId>lombok</artifactId>
            <optional>true</optional>
        </dependency>
3,在application.properties配置文件里面对mybatis进行配置

代码:
#配置druid连接池
spring.datasource.type=com.alibaba.druid.pool.DruidDataSource
#配置数据库连接信息
spring.datasource.driver-class-name=com.mysql.cj.jdbc.Driver
spring.datasource.url=jdbc:mysql://localhost:3306/tlias
spring.datasource.username=root
spring.datasource.password=root

logging.level.com.sde:debug

#mybatis 的日志信息  -- 输出控制台
mybatis.configuration.log-impl=org.apache.ibatis.logging.stdout.StdOutImpl

#开启驼峰命名
mybatis.configuration.map-underscore-to-camel-case=true
在com.sde.pojo 包下定义一个Dept实体类:
@Data
@NoArgsConstructor
@AllArgsConstructor
public class Dept {
    private Integer id;
    private String name;
    private LocalDateTime createTime;
    private LocalDateTime updateTime;

}
在com.sde.mapper包下定义一个DeptMapper接口,并在里面写一个查询全部的方法。
@Mapper
public interface DeptMapper {


    @Select("select * from dept")
    public List<Dept> selectAll();


}
在com.sde.service包里面创建一个 DeptService接口,并写一个查询全部的接口。
public interface DeptService {

    public List<Dept> getList();

}
在com.sde.service包下面在创建一个子包,impl包,然后创建一个DeptServiceImpl类
@Service
public class DeptServiceImpl implements DeptService {

    @Autowired
    private DeptMapper deptMapper;

  public List<Dept> getList(){
      return deptMapper.selectAll();
  }


}
controller层,调用service,service调用mapper层。
在 com.sde.controller包下,创建一个DeptController类
 部门相关的接口
 */
@Slf4j
@RequestMapping("/depts")
@RestController
public class DeptController {

   @Autowired
    private DeptService deptService;

    /**
     * 获取全部部门
     * @return
     * @throws IOException
     */
    @GetMapping
    public com.sde.utils.Result getDeptList() throws IOException {
        log.info("执行了查询全部的操作");
        List<Dept> deptList = deptService.getList();
        // 响应数据
        return Result.success(deptList);
    }


}
在Apifix里面进行测试
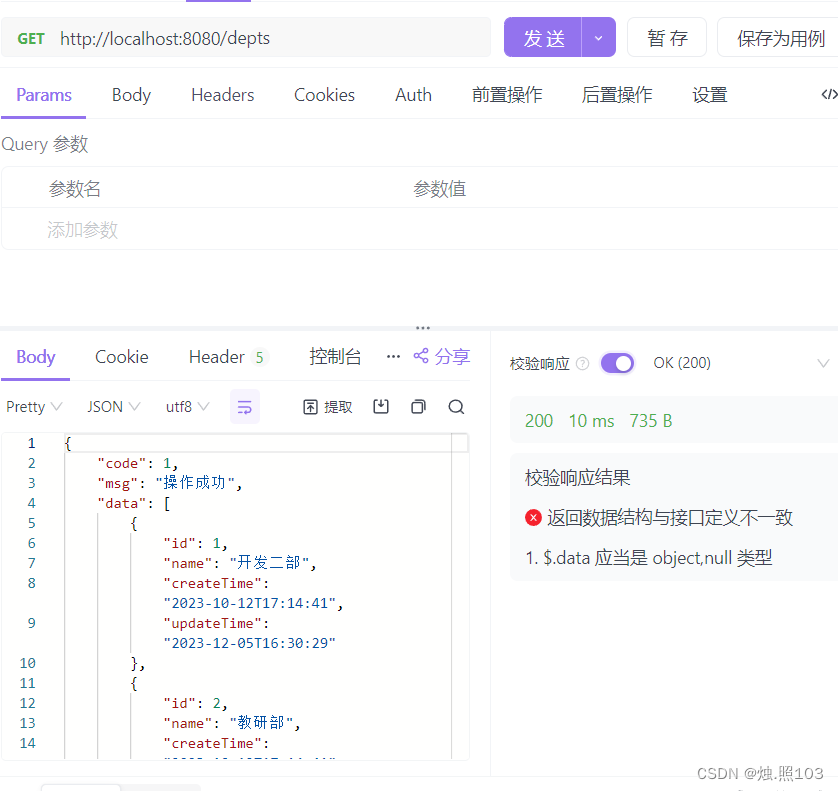
可以发现在Apifox里面测试已经查到数据了,接下来进行前后端联调测试

数据封装:
实体类的属性名和数据库表查询返回的字段名一致,mybatis会自动封装。
如果实体类属性名和数据库表查询返回的字段名不一致,不能自动封装。

手动结果映射:
通过@Result 以及@Result 进行手动结果映射。

    @Results({
            @Result(column = "create_time",property = "createTime"),
            @Result(column = "update_time",property = "updateTime")
    })
    @Select("select id,name,create_time,update_time from dept")
     public List<Dept> selectAll();
起别名:
在SQL语句中,对不一样的列名起别名,别名和实体类属性名一样。

@Select("select id,name,create_time createTime,update_time updateTime from dept")
public List<Dept> selectAll();
开启驼峰命名:
如果字段名与属性名符合驼峰命名规则,mybatis会自动通过驼峰命名规则映射。

#开启驼峰命名
mybatis.configuration.map-underscore-to-camel-case=true
删除部门:
思路分析:
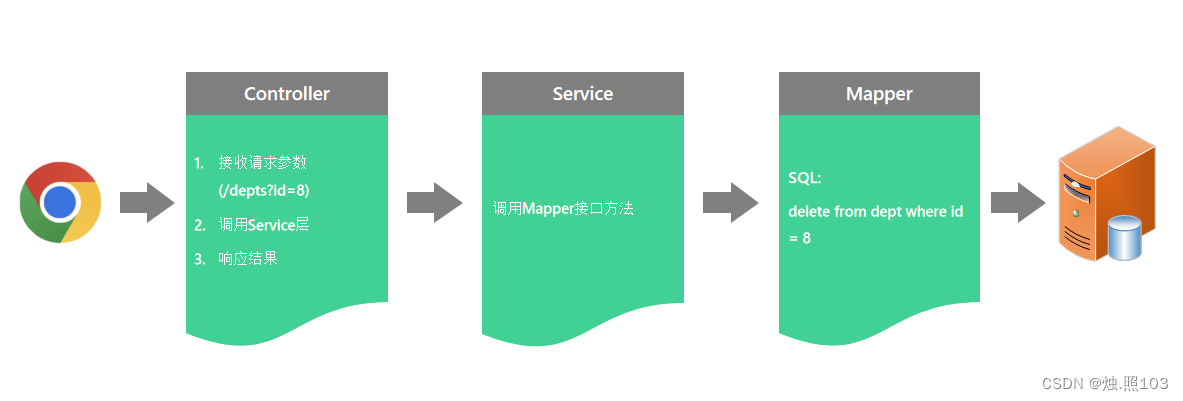
controller
接收请求参数:DELETE /depts?id=8 简单参数

HttpServletRequest:
通过原始的HttpServletRequest对象获取请求参数
比较繁琐,需要类型转换。
前端请求的路径:http://localhost:8080/depts?id=6

    /**
     * 根据id删除部门
     */
    @DeleteMapping("/depts")
    public Result delete(HttpServletRequest request, Integer id){
        String parma = request.getParameter("id");
        int i = Integer.parseInt(parma);
        System.out.println("删除部门的ID是:"+i);
        return Result.success();
    }
@RequestParam注解:
- 通过Spring提供的 @RequestParam 注解,将请求参数绑定给方法形参。
@RequestParam(" 方法的形参名")
- 注意事项: @RequestParam注解required属性默认为true,代表该参数必须传递,如果不传递将报错。 如果参数可选,可以将属性设置为false。

    /**
     * 删除部门信息
     * @param
     * @param
     * @return
     */
    @DeleteMapping("/depts")   //@Requestparam 注解用于接收根据前端指定参数名传递过来的参数值,
    // 适用于前端传递过来的参数名和后端方法形参名不一样的情况@RequestParam 默认是必传的。
    public Result delete(@RequestParam("id") Integer _id){
        System.out.println("删除部门的ID是:"+ _id);
        return Result.success();
    }
方法的形参等于前端传递的参数名:
如果请求参数名与形参变量名相同,直接定义方法形参即可接收。(省略@RequestParam)public Result delete(Integer id){}

    /**
     * 根据id删除数据
     * @param id
     * @return
     */
    @DeleteMapping  //如果不带@RequestParam注解,那么方法的形参名必须要和前端传递过来的参数名保持一致,不然获取不到 就为 null了
    public Result delete( Integer id){
       log.info("要删除的部门ID是:"+id);
        deptService.delete(id);
        return Result.success();
    }
创建deptMapper接口的方法:
@Mapper
public interface DeptMapper {


    /**
     * 根据删除部门数据
     * @param id
     */
    @Delete("delete from dept where id = #{id}")
    void delete(Integer id);


}
创建deptService接口:
public interface DeptService {


    void delete(Integer id);


}
创建deptServiceImpl实现类 实现deptService接口中的方法:
@Service
public class DeptServiceImpl implements DeptService {

    @Autowired
    private DeptMapper deptMapper;


    @Override
    public void delete(Integer id) {
        deptMapper.delete(id);
    }


}
在Apifox里面测试:

#{...} 和 ${...}的区别:

#{} 执行时会将#{...},替换成?生成预编译SQL,并自动设置参数值。安全,性能高
${} 拼接SQL,直接将参数拼接在SQL语句中,存在SQL注入问题。多用于表明,字段名动态设置时使用。 不安全,性能低。
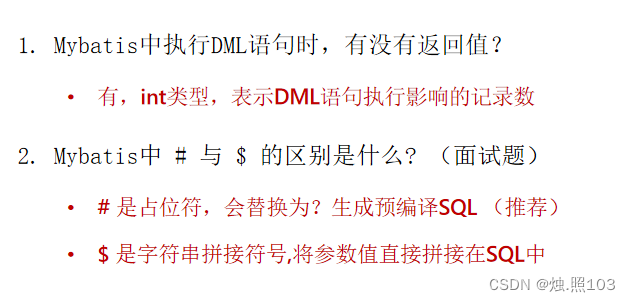
如果mapper接口里面有一个方法,且只有一个普通类型的参数,那么可以在#{...} 里面的属性名可以随便写。如 #{abc},#{sss}
示例:

    /**
     * 根据id删除
     * @param id
     */
    @Select("delete from dept where  id = #{abc}")
    void del(Integer id);
添加部门:

- JSON格式的参数,通常会使用一个实体对象进行接收。
- 规则:JSON数据的键名和方法的形参对象的属性名相同,并且需要使用@RequestBody注解标识。

编写deptController层,接收前端请求,并响应数据。
/**
 * 部门相关的接口
 */
@Slf4j
@RequestMapping("/depts")
@RestController
public class DeptController {

   @Autowired
    private DeptService deptService;

    /**
     * 添加部门
     * @param dept
     * @return
     */
    @PostMapping
    public Result add(@RequestBody Dept dept){
        log.info("新添加的数据::"+dept);
        deptService.add(dept);
        return Result.success();
    }

}
编写deptService接口:
public interface DeptService {

    void add(Dept dept);


}
编写deptServiceImpl实现类
@Service
public class DeptServiceImpl implements DeptService {

    @Autowired
    private DeptMapper deptMapper;

  public List<Dept> getList(){
      return deptMapper.selectAll();
  }

    @Override
    public void delete(Integer id) {
        deptMapper.delete(id);
    }

    @Override
    public void add(Dept dept) {
        dept.setCreateTime(LocalDateTime.now());
        dept.setUpdateTime(LocalDateTime.now());
        deptMapper.insert(dept);
    }


}
创建一个deptMapper接口:
@Mapper
public interface DeptMapper {


    @Select("select * from dept")
    public List<Dept> selectAll();


    /**
     * 根据删除部门数据
     * @param id
     */
    @Delete("delete from dept where id = #{id}")
    void delete(Integer id);

    /**
     * 添加部门
     * @param dept
     */
    @Insert("insert into dept(name,create_time,update_time) values(#{name},#{createTime},#{updateTime})")
    void insert(Dept dept);

}
在Apifox里面测试:
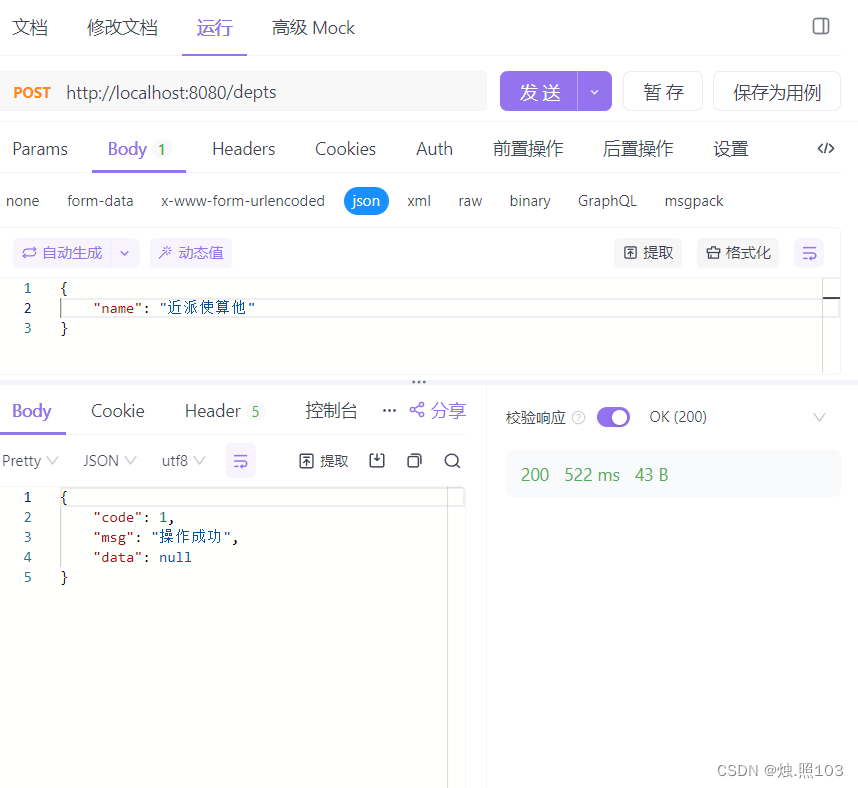
修改部门:

查询回显:
路径参数;通过url直接传递参数,使用{...}来标识该路径参数,需要使用@Pathvariable获取路径参数
controller 接收参数:接收请求参数(路径参数):GET /depts/1
在url中也可以携带多个路径参数,例如: /depts/1/6
@GetMapping("/depts/{id}/{sta}")
public Result getInfo(@PathVariable Integer id, @PathVariable Integer sta){
//...
}

    @GetMapping("/{id}/{username}")
    public Result getByIdAndName(@PathVariable Integer id,@PathVariable String username){
        log.info("查询的参数是:{},{}"+id,username);
        return Result.success();
    }
    /**
     * 根据id查询
     * @param id
     * @return
     */
    @GetMapping("/{id}")
    public Result getById(@PathVariable Integer id){
        log.info("根据ID查询的id是:"+id);
        Dept dept =  deptService.getById(id);
        return Result.success(dept);
    }
修改数据:
public Result getInfo(@PathVariable Integer id){}

编写deptService接口:
public interface DeptService {

    public List<Dept> getList();

    void delete(Integer id);

    void add(Dept dept);

    Dept getById(Integer id);

    void update(Dept dept);
}
编写deptServiceImpl实现类:
@Service
public class DeptServiceImpl implements DeptService {

    @Autowired
    private DeptMapper deptMapper;

  public List<Dept> getList(){
      return deptMapper.selectAll();
  }

    @Override
    public void delete(Integer id) {
        deptMapper.delete(id);
    }

    @Override
    public void add(Dept dept) {
        dept.setCreateTime(LocalDateTime.now());
        dept.setUpdateTime(LocalDateTime.now());
        deptMapper.insert(dept);
    }

    @Override
    public Dept getById(Integer id) {
        return deptMapper.getById(id);
    }

    @Override
    public void update(Dept dept) {
      dept.setUpdateTime(LocalDateTime.now());
        deptMapper.update(dept);
    }
}
deptMapper接口:
@Mapper
public interface DeptMapper {


    @Select("select * from dept")
    public List<Dept> selectAll();


    /**
     * 根据删除部门数据
     * @param id
     */
    @Delete("delete from dept where id = #{id}")
    void delete(Integer id);

    /**
     * 添加部门
     * @param dept
     */
    @Insert("insert into dept(name,create_time,update_time) values(#{name},#{createTime},#{updateTime})")
    void insert(Dept dept);

    /**
     * 根据id查询
     * @param id
     * @return
     */
    @Select("select * from dept where id = #{id}")
    Dept getById(Integer id);

    /**
     * 修改部门信息
     * @param dept
     */
 //   @Update("update dept set name = #{name},update_time = #{updateTime} where id = #{id}")
    void update(Dept dept);
}
在Apifox里面测试:

mybatis的动态SQL
在更新数据时,如何做到只更新某一个或几个字段呢 ?

随着用户的输入或外部条件的变化而变化的SQL语句,我们称为 动态SQL。

<if>标签:
用于判断条件是否成立。使用test属性进行条件判断,如果条件为true,则拼接SQL
<set>标签:
动态地在行首插入 SET 关键字,并会删掉额外的逗号。(用在update语句中)
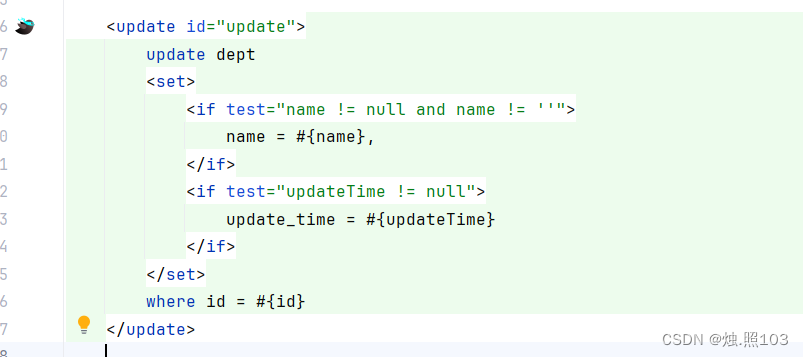
代码:
    <update id="update">
        update dept
        <set>
            <if test="name != null and name != ''">
                name = #{name},
            </if>
            <if test="updateTime != null">
                update_time = #{updateTime}
            </if>
        </set>
        where id = #{id}
    </update>
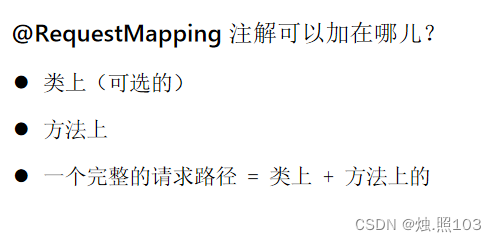
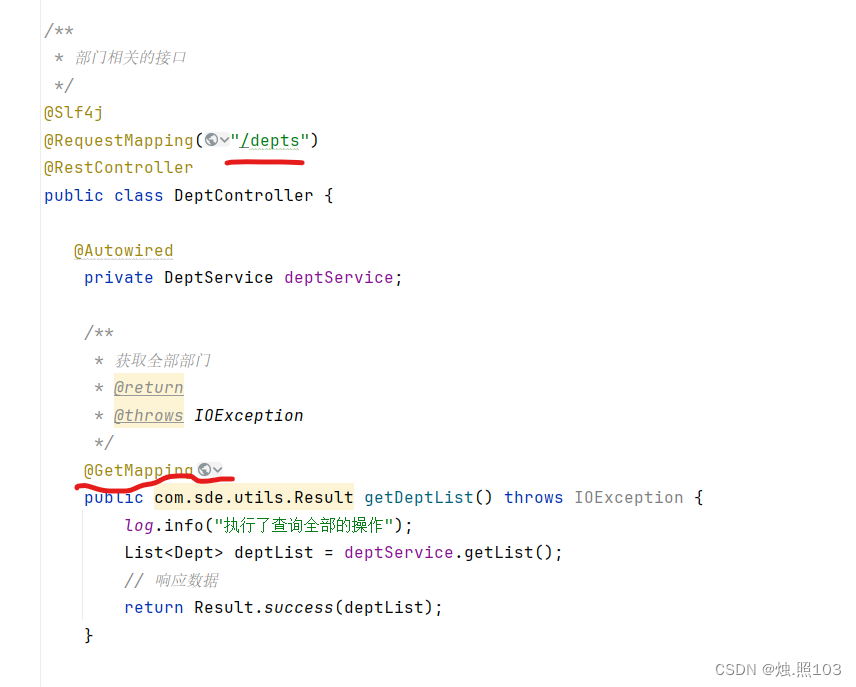
一个完整的请求路径,应该是类上的 @RequestMapping得到value值的属性 + 方法上的 @RequestMapping 的value属性。
日志技术:
程序中的日志,是用来记录应用程序的运行信息,状态信息,错误信息。

我们传统的日志输出方式,只能在控制台输出,有很多缺点。
- 硬编码
- 只能输出到控制台
- 不便于扩展、维护
日志框架:

- JUL:这是JavaSE平台提供的官方日志框架,也被称为JUL。配置相对简单,但不够灵活,性能较差。
- Log4j:一个流行的日志框架,提供了灵活的配置选项,支持多种输出目标。
- Logback:基于Log4j升级而来,提供了更多的功能和配置选项,性能由于Log4j。
- Slf4j(Simple Logging Facade for Java):简单日志门面,提供了一套日志操作的标准接口及抽象类,允许应用程序使用不同的底层日志框架。
Logback快速入门:
准备工作:引入logback的依赖 (springboot中无需操作)、配置文件logback.xml
记录日志:定义日志记录对象Logger,记录日志。

        <!--slf4j-->
        <dependency>
            <groupId>com.googlecode.sli4j</groupId>
            <artifactId>sli4j-slf4j</artifactId>
            <version>2.0</version>
        </dependency>
logback.xml配置类:

代码:
<?xml version="1.0" encoding="UTF-8"?>
<configuration>
    <!-- 控制台输出 -->
    <appender name="STDOUT" class="ch.qos.logback.core.ConsoleAppender">
        <encoder class="ch.qos.logback.classic.encoder.PatternLayoutEncoder">
            <!--格式化输出:%d表示日期,%thread表示线程名,%-5level:级别从左显示5个字符宽度  %logger{50}: 最长50个字符(超出.切割)  %msg:日志消息,%n是换行符 -->
            <pattern>%d{yyyy-MM-dd HH:mm:ss.SSS} [%thread] %-5level %logger{50} - %msg%n</pattern>
        </encoder>
    </appender>

    <!-- 日志输出级别 -->
    <root level="info">
        <appender-ref ref="STDOUT" />
    </root>
</configuration>
要先定义 日志记录对象

 // 定义日志记录对象
    public static final Logger log = LoggerFactory.getLogger(LogTest.class);
测试类:
public class LogTest {

    // 定义日志记录对象
    public static final Logger log = LoggerFactory.getLogger(LogTest.class);

    @Test
    public void testLog(){
      log.info("开始计算...");
        int sum = 0;
        try {
            int[] nums = {1, 5, 3, 2, 1, 4, 5, 4, 6, 7, 4, 34, 2, 23};
            for (int i = 0; i < nums.length; i++) {
                sum += nums[i];
            }
        } catch (Exception e) {
            log.info("程序运行出错...");
        }
        log.info("计算结果为: "+sum);
        log.info("结束计算...");
    }

}
Logback配置文件详解:
- 该配置文件是对Logback日志框架输出的日志进行控制的,可以来配置输出的格式、位置及日志开关等。
- 常用的两种输出日志的位置:控制台、系统文件

<!-- 控制台输出 -->
<appender name="STDOUT" class="ch.qos.logback.core.ConsoleAppender">...</appender>


<!-- 控制台输出 -->
<appender name="FILE" class="ch.qos.logback.core.rolling.RollingFileAppender">...</appender>
开启日志:(ALL),取消日志(OFF)

<root level="ALL">
    <appender-ref ref="STDOUT" />
    <appender-ref ref="FILE" />
</root>
Logback日志级别:
日志级别指的是日志信息的类型,日志都会分级别,常见的日志级别如下(优先级由低到高)

可以在配置文件中,灵活的控制输出那些类型的日志。(大于等于配置的日志级别的日志才会输出)

示例我把这个级别调节成 info
    <!-- 日志输出级别 -->
    <root level="info">
        <appender-ref ref="STDOUT" />
    </root>
然后运行 LogTest测试类

可以发现 只有日志级别大于等于 info级别的,才会输出。
如果我把日志级别改成 trace最低的级别。
    <!-- 日志输出级别 -->
    <root level="trace">
        <appender-ref ref="STDOUT" />
    </root>
在LogTest类里面测试:
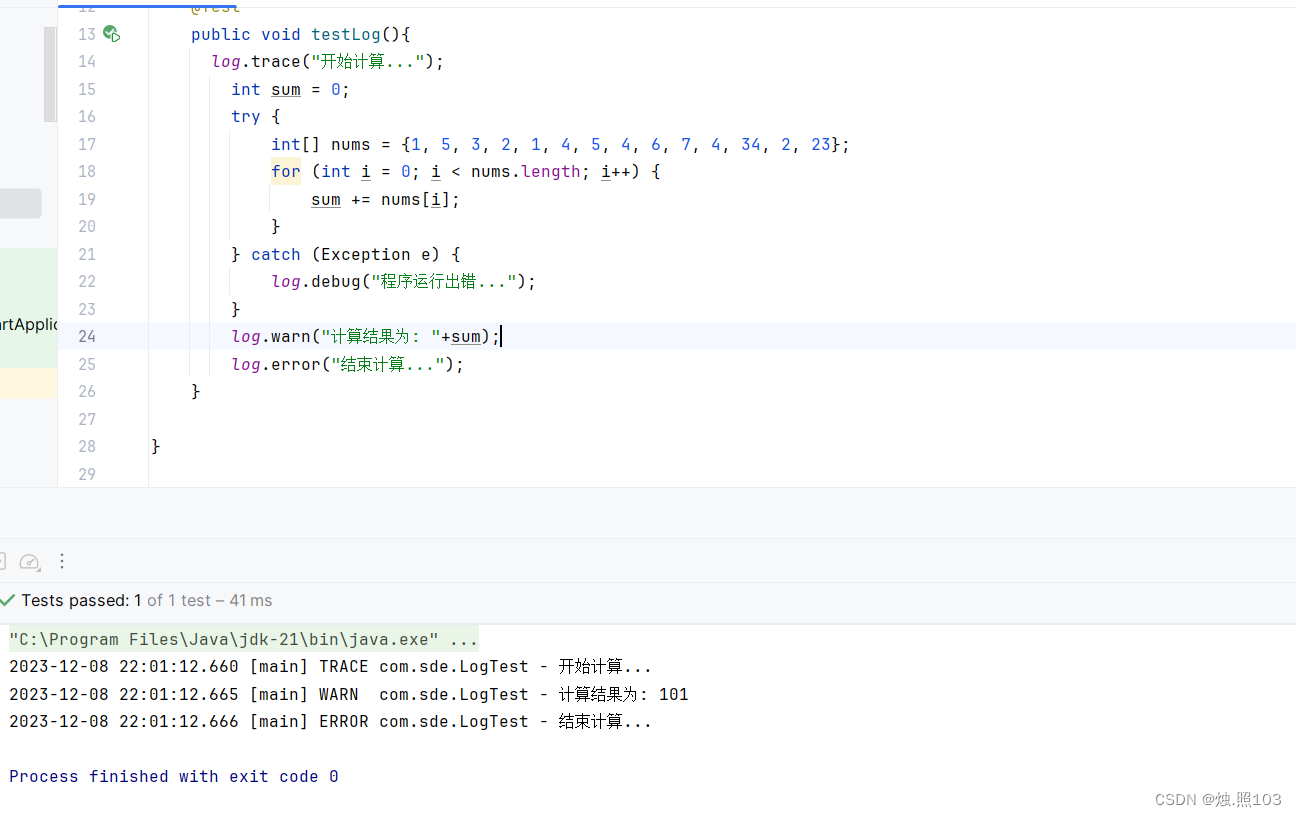
可以发现 大于等于 trace日志级别的都输出了。
当我在logbacl.xml配置文件把日志级别改成 error最高级别
    <!-- 日志输出级别 -->
    <root level="error">
        <appender-ref ref="STDOUT" />
    </root>
在LogTest测试类里面测试:

就只有一个 error级别的日志输出了,因为它是最高的日志输出级别。
springboot 整合日志:
在spring boot项目中,我们不需要引入日志的依赖,因为spring boot默认引入的有。
因为在spring-boot-starter-web这个依赖里面,内置了这些日志框架。

我们要是想使用,只需要在 类上面引入即可 @Slf4j,不需要在创建日志输出对象了,
因为这个注解里面,给我们创建的有log对象。我们直接调用log对象即可。

示例:

然后直接使用log调用即可:
示例1

效果:

示例2:

效果:

示例3:

效果:

另一种写法:
我们可以在 log.info("这里面加 {},{},{}....",在这里写要输出的值);
示例:

    /**
     * 条件分页查询--多参数接收
     * @param
     * @param
     * @return
     */
    @GetMapping
    public Result list(String name,Integer gender,
                       @DateTimeFormat(pattern = "yyyy-MM-dd") LocalDate begin,
                       @DateTimeFormat(pattern = "yyyy-MM-dd")  LocalDate end,
                       @RequestParam(defaultValue = "1") Integer page,
                       @RequestParam(defaultValue = "10") Integer pageSize){
        log.info("接收到前端传递来的参数:{},{},{},{},{},{}",name,gender,begin,end,page,pageSize);
      return Result.success();
    }
接收前端传递来的参数:
示例:

    /**
     * 条件分页查询用对象接收
     * @param empQuery
     * @return
     */
    @GetMapping
    public Result list(EmpQuery empQuery){
        log.info("接收到前端传递来的参数:{}",empQuery);
       PageBean pageBean =  empService.wherePage(empQuery);
        return Result.success(pageBean);
    }
示例:

    /**
     * 新增员工的数据
     * @param emp
     * @return
     * @throws Exception
     */
    @PostMapping
    public Result add(@RequestBody Emp emp) throws Exception {
        log.info("新增员工数据:{}",emp);
        empService.add(emp);
        return Result.success();
    }
效果:

