springboot傻瓜式教程用久了,回过来研究下SSM的工作流程,当然从Spring MVC开始,从傻瓜式入门处理请求和页面交互,再到后面深入源码分析。
本人写了一年多的后端和半年多的前端了。用的都是springbioot和vue,源码一直来不及时间看,就先从SSM开刀吧~
一、SpringMvc入门之用tomcat插件使用MVCweb项目打印Hello World!
1、新建一个空项目
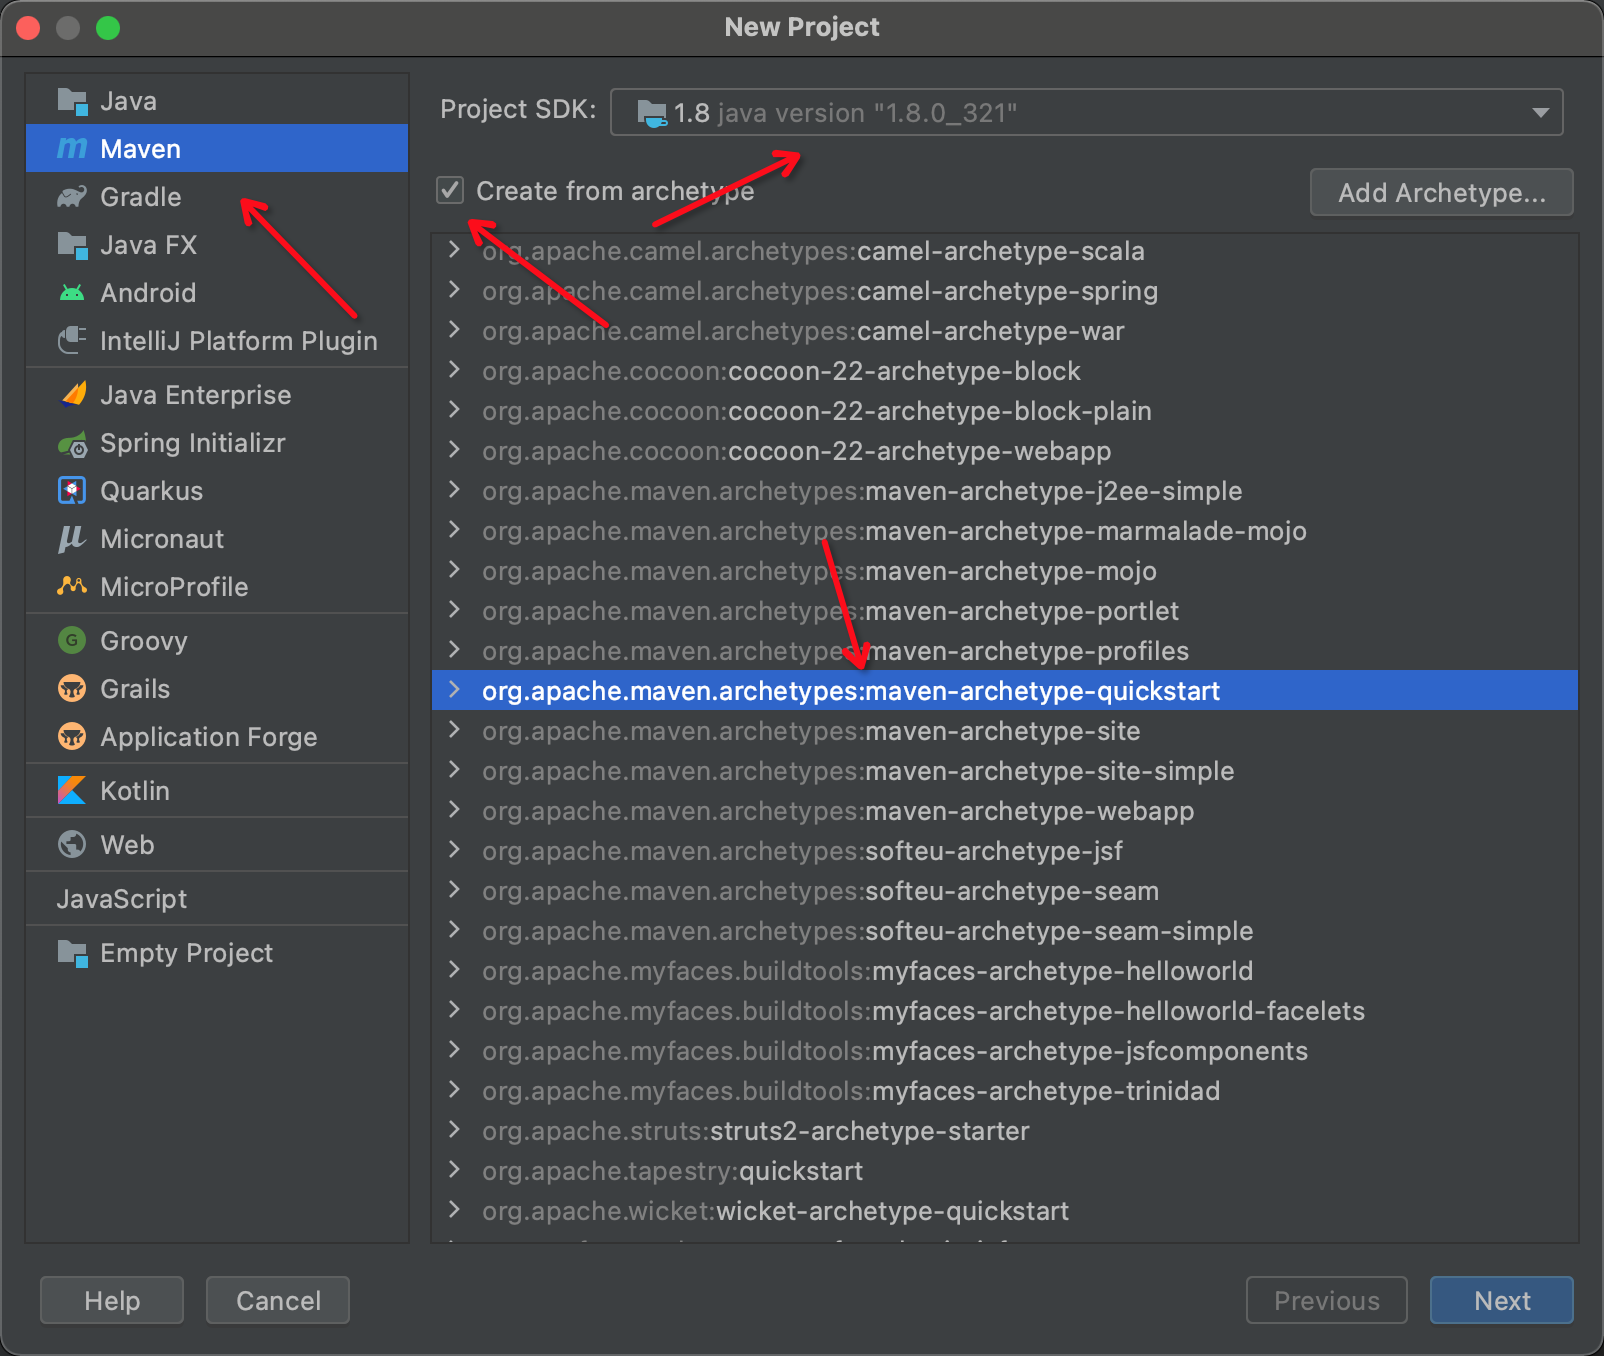
File- New-Project -----选择Maven 然后SDK选择1.8
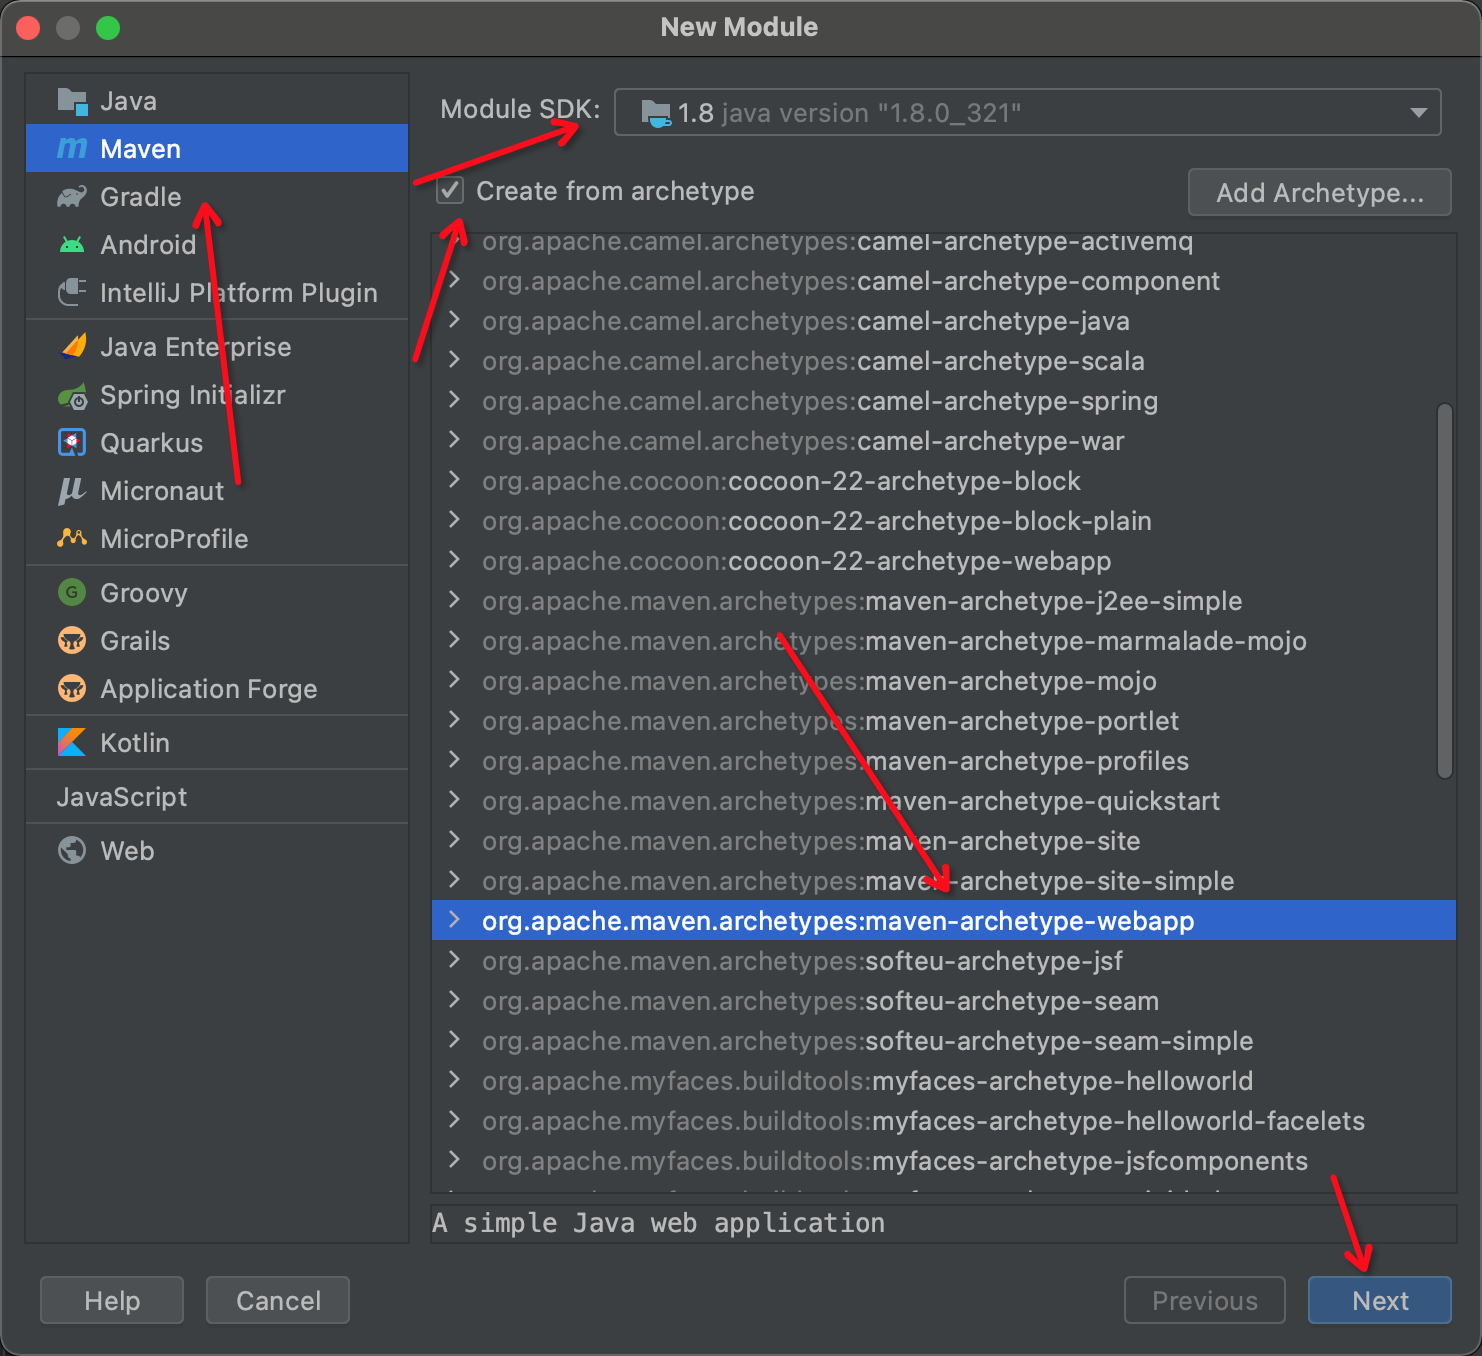
2、新建一个模块开始写web项目
File- New - Module
下一步 - 创建项目的名称
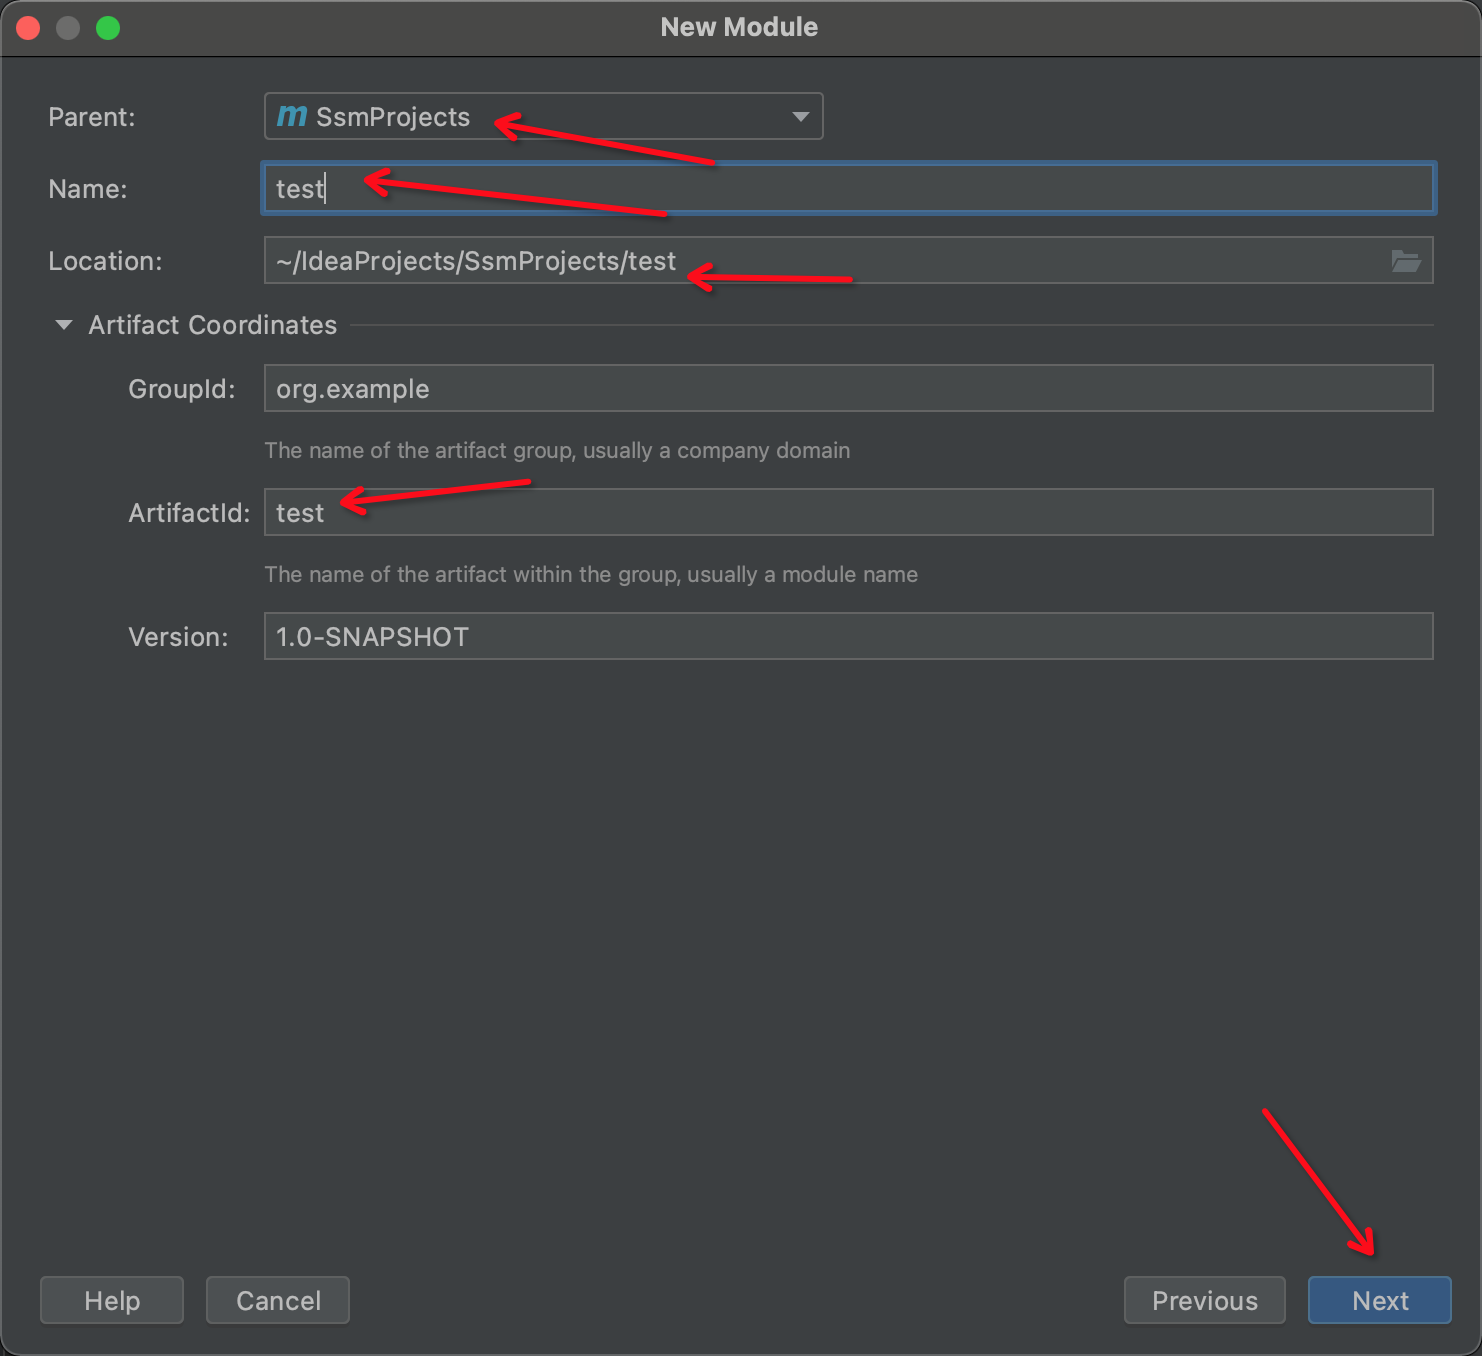
然后填写自己的maven坐标,即可完成模块的创建。
3、填写maven依赖
1、servlet-api的依赖 这个一定要写 <scope>provided</scope> 不然tomcat启动失败
2、既然mvc就要添加webmvc依赖
3、填写tomcat插件依赖
最后 记得刷新maven
<?xml version="1.0" encoding="UTF-8"?>

<project xmlns="http://maven.apache.org/POM/4.0.0" xmlns:xsi="http://www.w3.org/2001/XMLSchema-instance"
  xsi:schemaLocation="http://maven.apache.org/POM/4.0.0 http://maven.apache.org/xsd/maven-4.0.0.xsd">
  <modelVersion>4.0.0</modelVersion>

  <groupId>org.example</groupId>
  <artifactId>SpringMvcSimple</artifactId>
  <version>1.0-SNAPSHOT</version>
  <packaging>war</packaging>

  <name>SpringMvcSimple Maven Webapp</name>
  <!-- FIXME change it to the project's website -->
  <url>http://www.example.com</url>

  <properties>
    <project.build.sourceEncoding>UTF-8</project.build.sourceEncoding>
    <maven.compiler.source>1.7</maven.compiler.source>
    <maven.compiler.target>1.7</maven.compiler.target>
  </properties>

  <dependencies>
    <dependency>
      <groupId>junit</groupId>
      <artifactId>junit</artifactId>
      <version>4.11</version>
      <scope>test</scope>
    </dependency>

    <dependency>
      <groupId>javax.servlet</groupId>
      <artifactId>javax.servlet-api</artifactId>
      <version>3.1.0</version>
      <!--  这里确实必须设置 不然tomcat启动会失败    -->
      <scope>provided</scope>
    </dependency>


    <dependency>
      <groupId>org.springframework</groupId>
      <artifactId>spring-webmvc</artifactId>
      <version>4.3.10.RELEASE</version>

    </dependency>
  </dependencies>

  <build>
    <finalName>SpringMvcSimple</finalName>
    <plugins>
      <plugin>
        <groupId>org.apache.tomcat.maven</groupId>
        <artifactId>tomcat7-maven-plugin</artifactId>
        <version>2.1</version>
        <configuration>
          <port>8088</port>
          <path>/</path>
        </configuration>
      </plugin>
    </plugins>
  </build>
</project>
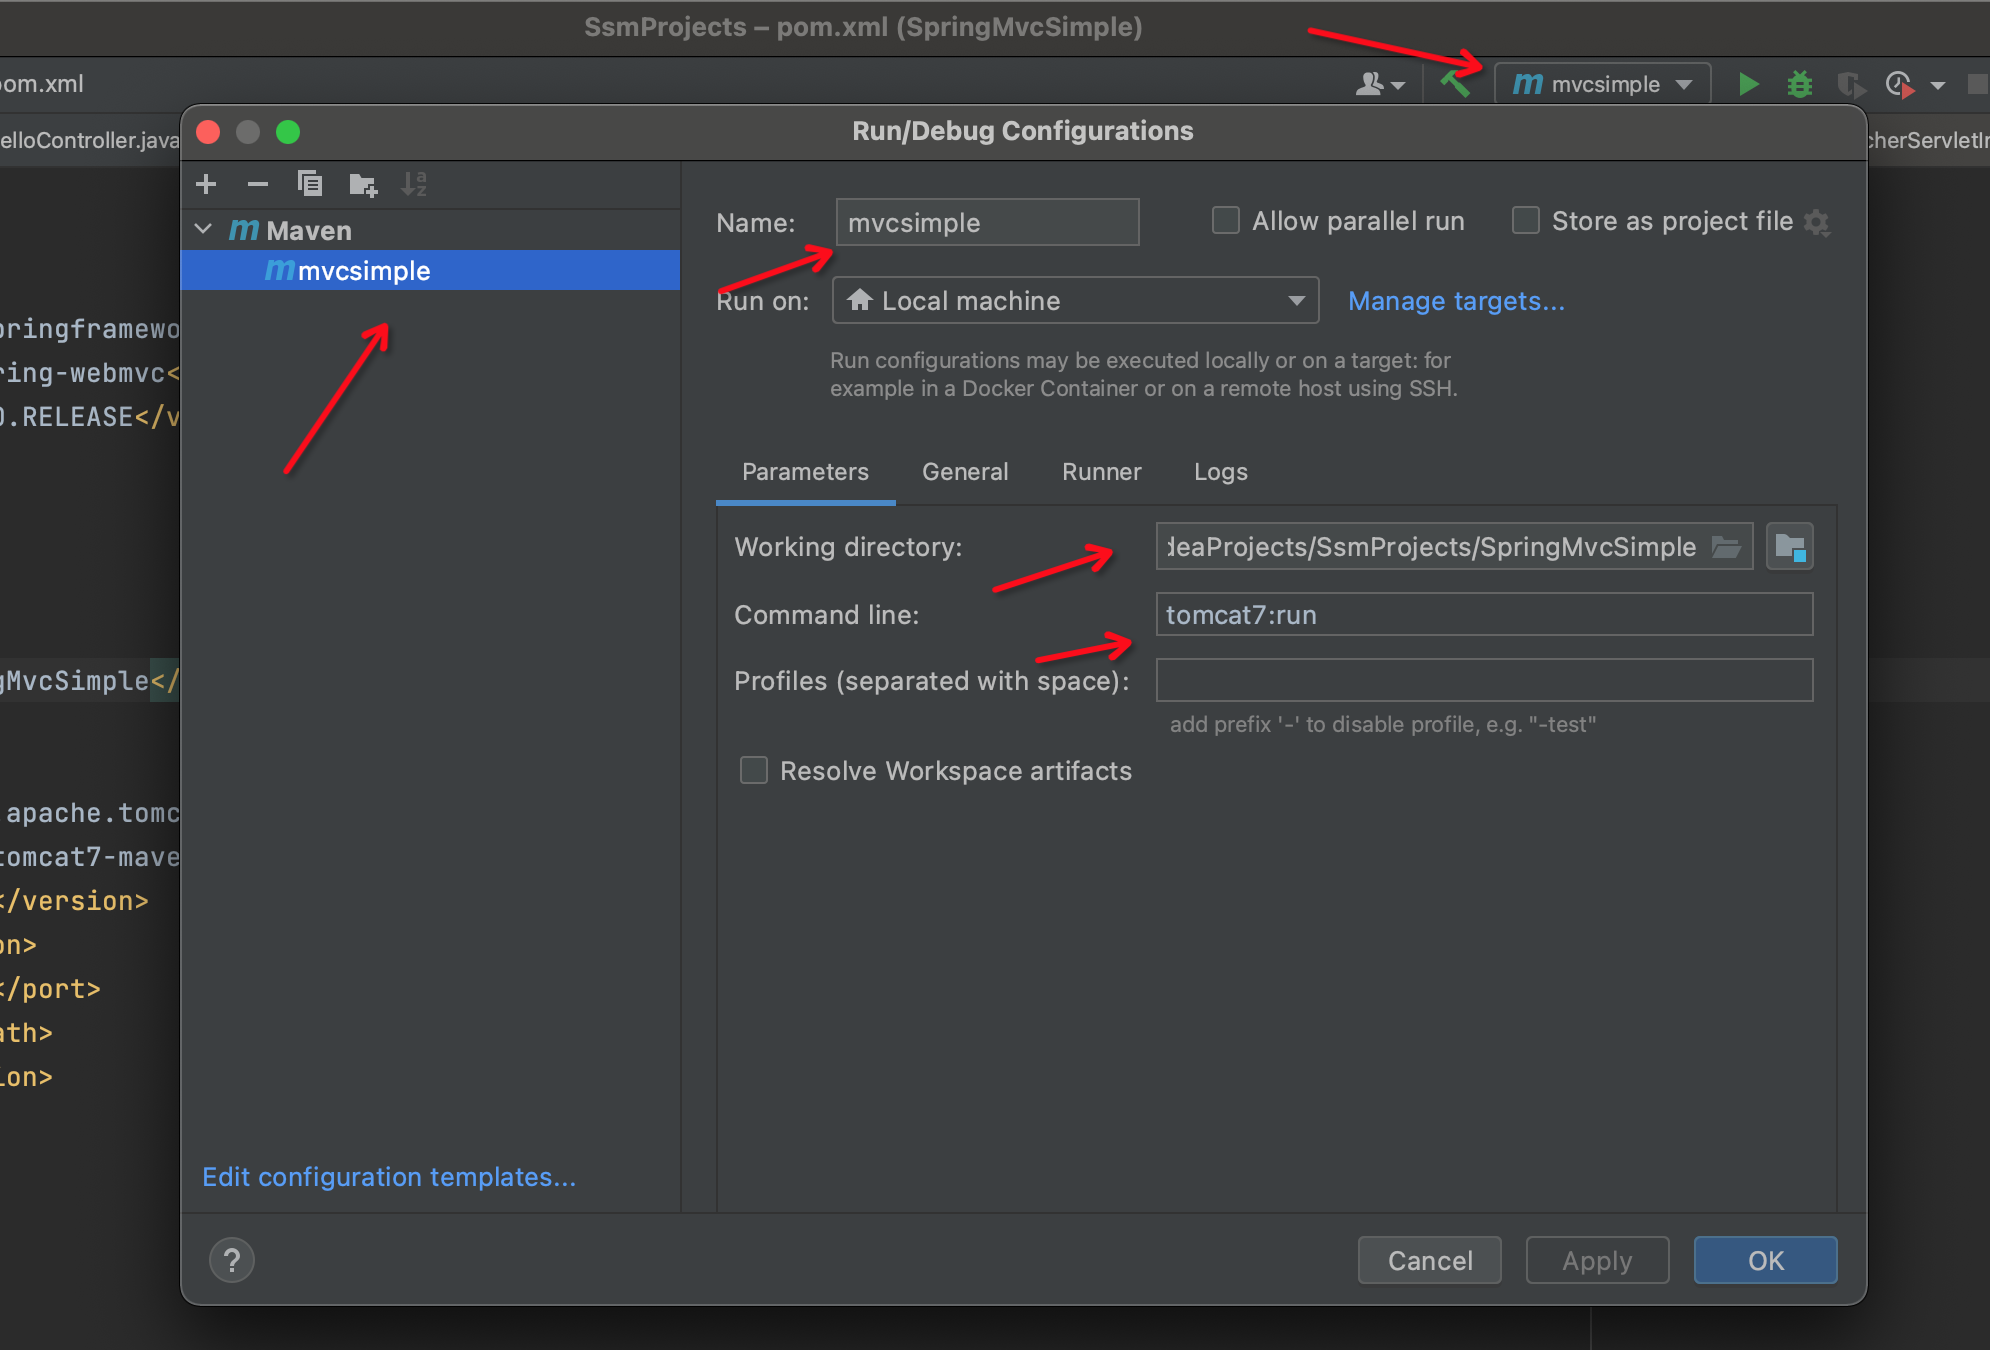
4、配置tomcat容器
1、记得一定要配置工作目录 选择你要启动的项目目录
2、命令行 写 tomcat7:run 这个是会自己提示的,如果没有提示说明你的tomcat插件依赖有问题,记得刷新maven依赖
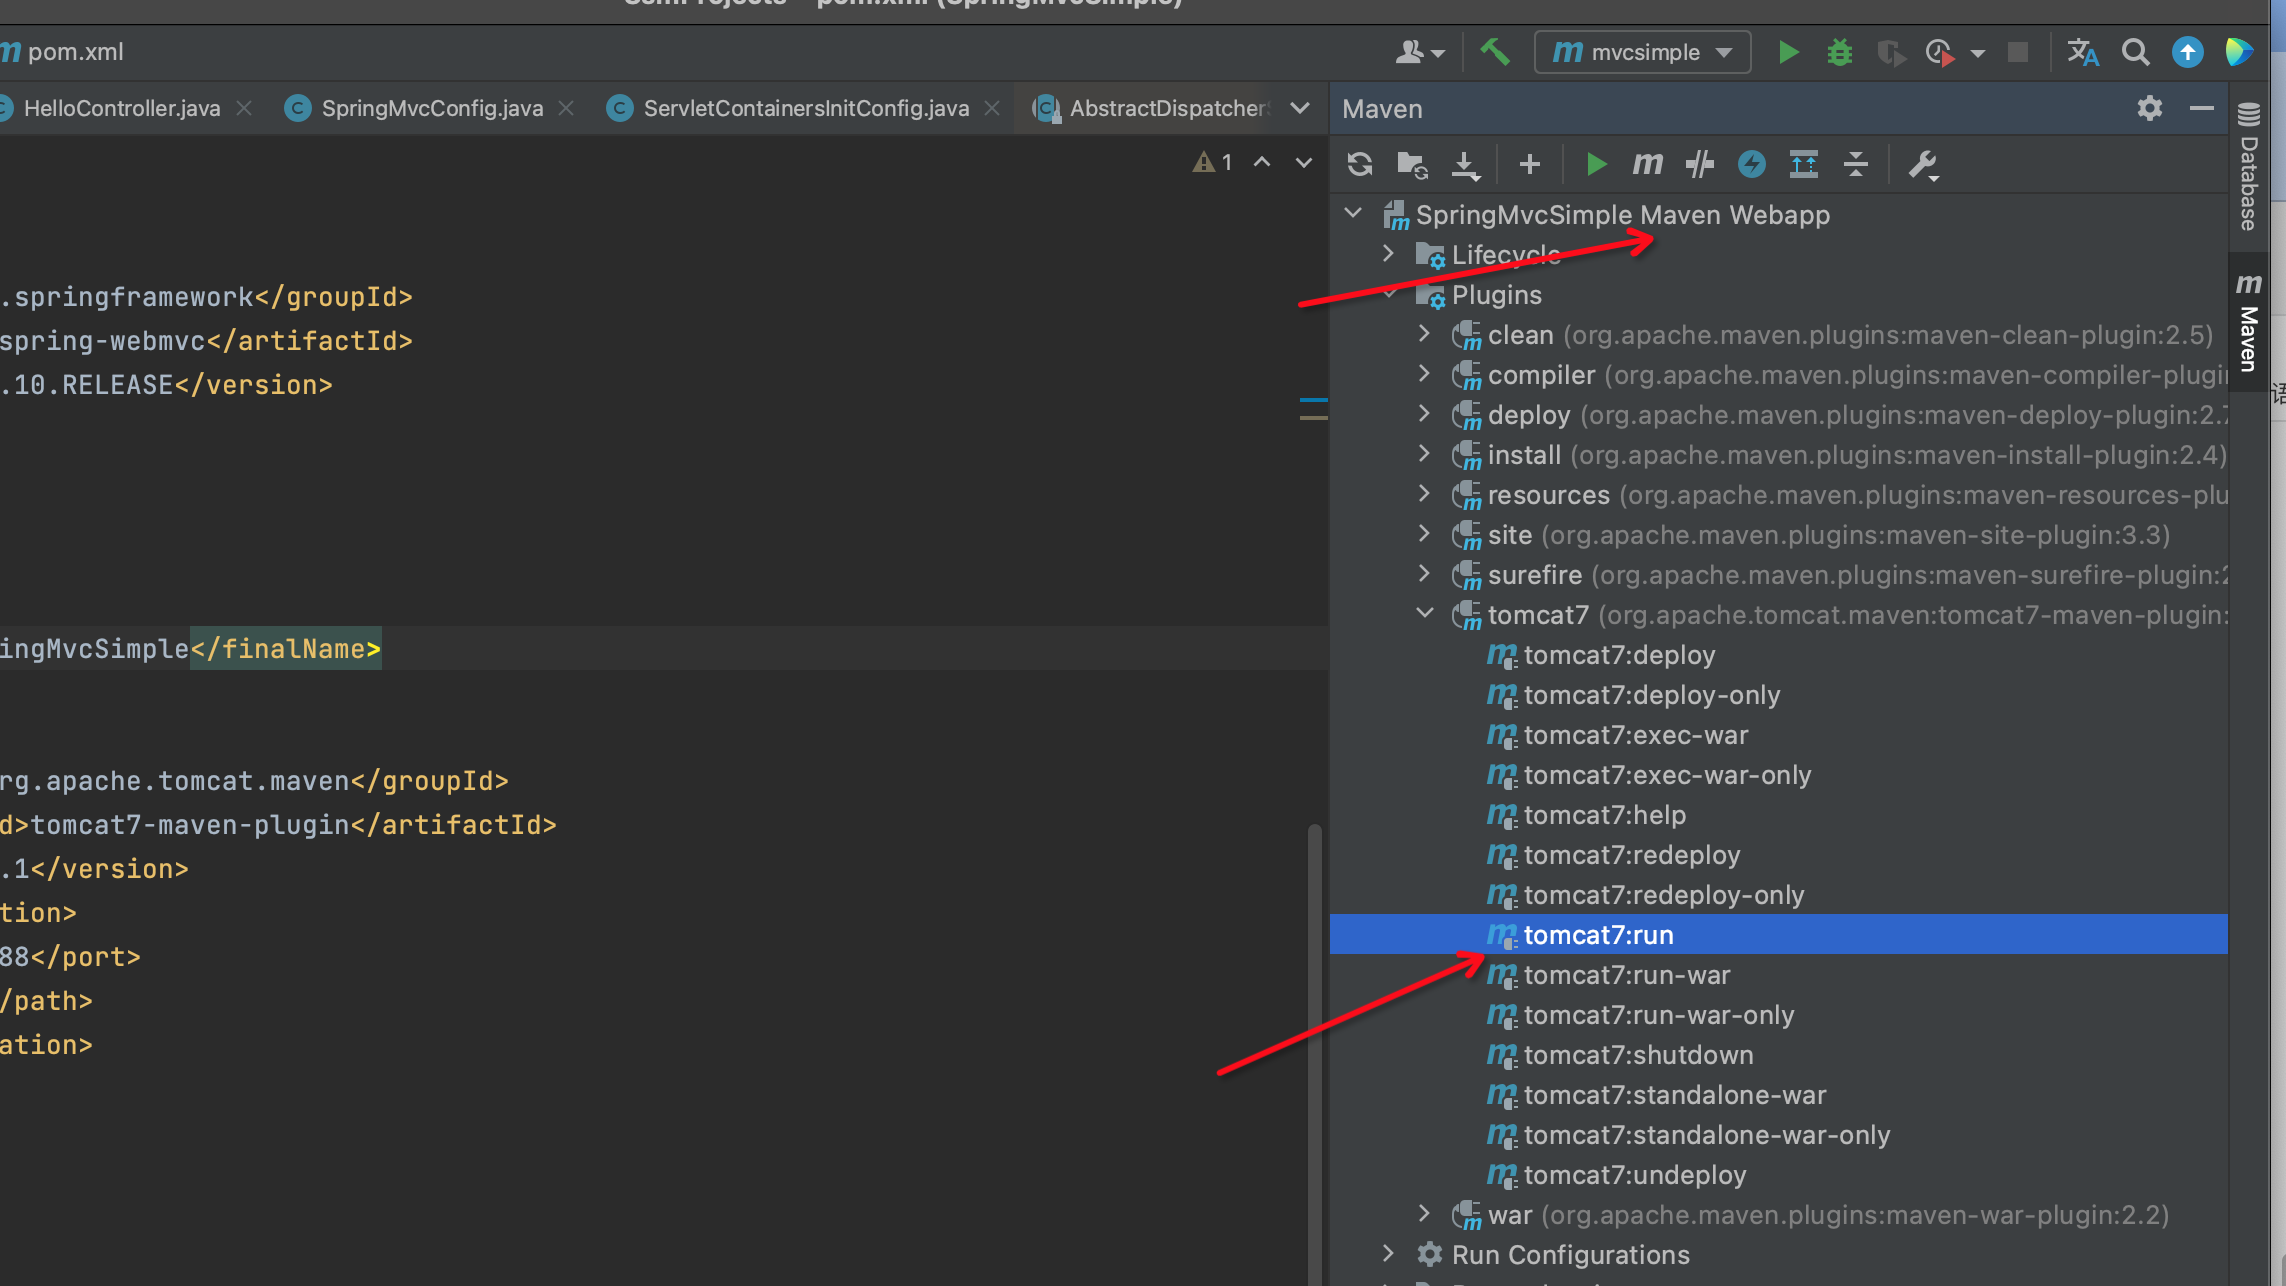
3、另外这个tomcat启动其实也可以直接从你项目的依赖下启动
即双击即可启动容器
4、项目启动
1、写一个Controller 用来处理请求
@Controller
public class HelloController {

    @RequestMapping("/hello")
    @ResponseBody
    public String hello(){
        return "hello world123";
    }
}
2、配置web mvc环境
这个主要用来配置mvc环境以及 将我们需要的配置注册进来。SpringMvcConfig被注册进来
public class ServletContainersInitConfig extends AbstractDispatcherServletInitializer {

    /**
     * 用于创建并配置DispatcherServlet应用程序上下文。
     * @return
     */
    @Override
    protected WebApplicationContext createServletApplicationContext() {
         AnnotationConfigWebApplicationContext ctx = new AnnotationConfigWebApplicationContext();
         ctx.register(SpringMvcConfig.class);
        return ctx;
    }

    /**
     * 是一个抽象方法,返回DispatcherServlet映射路径的字符串数组。
     * 哪些路径被mvc 管理
     * @return
     */
    @Override
    protected String[] getServletMappings() {
        return new String[]{"/"};//所有路径交给 mvc 管理
    }

    @Override
    protected WebApplicationContext createRootApplicationContext() {
        return null;
    }
}
mvc配置
此时自动去扫描我们的com.item.controller包注入到容器中
@Configuration
@ComponentScan({"com.item.controller"})
public class SpringMvcConfig {
}
接下来启动tomcat 访问 端口 http://localhost:8088/hello
即可将请求打到控制层 返回数据
hello world123
至此,一个简单的mvc web应用就启动了。
5、优化加载配置
我们上面用的继承 AbstractDispatcherServletInitializer这个类然后加载我们的mvc配置进而初始化webmvc容器,接下来用 继承 AbstractAnnotationConfigDispatcherServletInitializer完成同样的工作。
public class ServletContainersInitConfig2 extends AbstractAnnotationConfigDispatcherServletInitializer {


    @Override
    protected Class<?>[] getRootConfigClasses() {
        return new Class[0];
    }

    @Override
    protected Class<?>[] getServletConfigClasses() {
        return new Class[]{SpringMvcConfig.class};
    }

    @Override
    protected String[] getServletMappings() {
        return new String[]{"/"};
    }
}
这个也能完成初始化webmvc的配置
6、处理乱码问题
post请求乱码
post请求处理乱码(注意是post请求!!!)
添加一个中文编码的过滤器即可
在 刚才写的 AbstractAnnotationConfigDispatcherServletInitializer继承此类 ,实现其 getServletFilters 即可
@Override
    protected Filter[] getServletFilters() {
        CharacterEncodingFilter filter=new CharacterEncodingFilter();
        filter.setEncoding(Charset.defaultCharset().name());
        return new Filter[]{filter};
    }
然后使用 curl命令发送post请求
curl 'http://localhost:8088/chinese' -d 'name=你好' -d 'address=哈哈'
控制台打印未出现乱码.
get请求乱码
这个是发送请求是 参数不在请求体中,直接在url后面。这个可以在tomcat插件配置中增加 <uriEncoding>UTF-8</uriEncoding>解决。
发送get请求
curl 'http://localhost:8088/chinese?name=你好&address=123'
发现控制台就不乱码了
7、页面交互处理静态资源
1、报错过程分析
在webapp目录下创建 views/books.html
<!DOCTYPE html>
<html lang="en">
<head>
    <meta charset="UTF-8">
    <title>Title</title>
</head>
<body>
<h1>欢迎来到书籍页面</h1>
</body>
</html>
接下来浏览器输入 http://localhost:8088/views/books.html
报错 :
HTTP Status 404 -
type Status report
message
description The requested resource is not available.
Apache Tomcat/7.0.37
很显然,404找不到资源了。说明mvc不知道如何处理这个资源。它实际上是把这个views/books.html当成请求去controler层匹配请求了。但是我们这个是静态页面,实际就是去访问静态资源而已。那么接下来就是这么让容器知道这个是静态资源?不把它当成请求处理呢?
2、springMVC放行静态资源交给tomcat容器处理
造成的原因:
显然在 ServletContainersInitConfig2 类中 我们springMvc拦截了所有的请求。
 @Override
    protected String[] getServletMappings() {
        return new String[]{"/"};
    }
解决办法:(有很多种,此处是 继承 WebMvcConfigurationSupport类 然后实现其 添加资源方法 进行放行静态资源。同时记得 此类需要加载到 mvc环境中,具体看下面步骤)
1、配置类过滤静态资源
在 com.item.config 包下 编写 SpringMvcSupport 去实现过滤静态资源
一、注意加上@Configuration 这个是为了 SpringMvcConfig 去扫描这个包时,把它注入到mvc环境中
二、重写 addResourceHandlers 方法 这个就是处理映射请求的。
@Configuration
public class SpringMvcSupport extends WebMvcConfigurationSupport {
    /**
     * 资源处理
     * @param registry
     */
    @Override
    protected void addResourceHandlers(ResourceHandlerRegistry registry) {

        registry
                //当访问 /views/** 这个路径 我们让它 访问资源路径 /views/
                .addResourceHandler("/views/**")
                .addResourceLocations("/views/")
        ;

        super.addResourceHandlers(registry);
    }
}
2、注入到Mvc环境中
一、我们新加了 com.item.config 这个包 就是让他去扫描这个包 注入Mvc中的
@Configuration
@ComponentScan({"com.item.controller","com.item.config"})
public class SpringMvcConfig {
}
最后
启动tomcat容器,访问 http://localhost:8088/views/books.html
可以看到页面
欢迎来到书籍页面
即成功。
![论文阅读[2023ICME]Edge-FVV: Free Viewpoint Video Streaming by Learning at the Edge](https://img-blog.csdnimg.cn/direct/472224ca6a1544baa636cf087d36a706.png)
