前后端分离
参考链接
PyQt5实战(二):创建一个PyQt5项目_pyqt5实战项目_笨鸟未必先飞的博客-CSDN博客
项目目录

创建一个QT项目
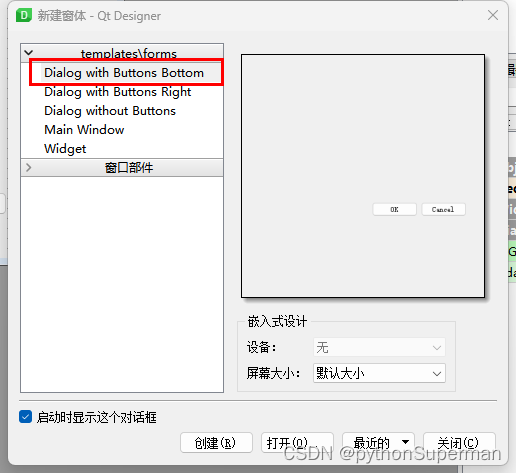
调用pyuic工具将dialog.ui文件编译为Python程序文件ui_dialog.py。
# -*- coding: utf-8 -*-

# Form implementation generated from reading ui file 'dialog.ui'
#
# Created by: PyQt5 UI code generator 5.15.9
#
# WARNING: Any manual changes made to this file will be lost when pyuic5 is
# run again.  Do not edit this file unless you know what you are doing.


from PyQt5 import QtCore, QtGui, QtWidgets


class Ui_Dialog(object):
    def setupUi(self, Dialog):
        Dialog.setObjectName("Dialog")
        Dialog.resize(400, 310)
        self.buttonBox = QtWidgets.QDialogButtonBox(Dialog)
        self.buttonBox.setGeometry(QtCore.QRect(30, 240, 341, 32))
        self.buttonBox.setOrientation(QtCore.Qt.Horizontal)
        self.buttonBox.setStandardButtons(QtWidgets.QDialogButtonBox.Cancel|QtWidgets.QDialogButtonBox.Ok)
        self.buttonBox.setObjectName("buttonBox")

        self.retranslateUi(Dialog)
        self.buttonBox.accepted.connect(Dialog.accept) # type: ignore
        self.buttonBox.rejected.connect(Dialog.reject) # type: ignore
        QtCore.QMetaObject.connectSlotsByName(Dialog)

    def retranslateUi(self, Dialog):
        _translate = QtCore.QCoreApplication.translate
        Dialog.setWindowTitle(_translate("Dialog", "Dialog"))
创建myDialog.py文件
创建一个myDialog.py文件,包含对窗体进行业务操作的类。
在该文件中创建一个与QT中生成的槽函数名称同名的一个方法:on_btn_train_clicked(self)。
from PyQt5.QtWidgets import QDialog

from ui_Dialog import Ui_Dialog


class QMyDialog(QDialog):
    def __init__(self,parent=None):
        super().__init__(parent)
        self.ui = Ui_Dialog()    #创建UI对象
        self.ui.setupUi(self)  #构造UI

    def on_btn_train_clicked(self):      #按键的click事件
        """
        按键click实现的功能
        "
        return
创建main.py文件
在PyCharm中创建一个main.py文件,创建应用程序和窗体对象的实例,显示窗体并运行。
from PyQt5.QtWidgets import QApplication

from myDialog import QMyDialog

app = QApplication(sys.argv) #创建GUI应用程序
mainform = QMyDialog() #创建主窗体
mainform.show() #显示主窗体
sys.exit(app.exec_())
解释
import sys
这行代码导入了Python的sys模块,该模块提供了与Python解释器和系统交互的功能。
from PyQt5.QtWidgets import QApplication
这行代码从PyQt5库中导入了QApplication类,用于创建GUI应用程序的实例。
from myDialog import QMyDialog
这行代码从myDialog模块中导入了QMyDialog类,该模块中定义了一个自定义的对话框类。
app = QApplication(sys.argv)
这行代码创建了一个QApplication对象,它表示整个GUI应用程序。sys.argv是一个命令行参数的列表,它会被传递给QApplication对象。
mainform = QMyDialog()
这行代码创建了一个QMyDialog对象,即自定义的对话框窗体。
mainform.show()
这行代码显示了主窗体,让它可见。
sys.exit(app.exec_())
这行代码启动了应用程序的主事件循环,并等待退出。app.exec_()方法开始事件循环,直到应用程序退出。sys.exit()方法确保在退出时清理资源并终止应用程序。
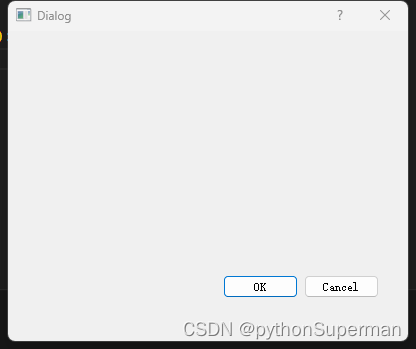
综上所述,这段代码创建了一个使用PyQt5库的GUI应用程序,并显示了一个自定义的对话框窗体。它可以通过执行脚本来启动应用程序,并在用户关闭窗口时退出。
运行结果
总结
运行的入口在main.py文件,通过main.py文件:
1、创建GUI应用程序
2、创建主窗体,通过主窗体进入myDialog.py文件中的对窗体进行业务操作的类。通过这个类的init初始函数构建刚刚从ui文件转换过来的UI对象,然后构造UI。其余通过click等函数创建业务操作。
3、显示主窗体
前后端合并
参考链接:
PyQt5 从零开始环境搭建_pyqt5菜鸟教程_老菜鸟的每一天的博客-CSDN博客
main.py
import sys

from PyQt5.QtWidgets import QApplication

from myDialog import QMyDialog
from ui_Dialog import Ui_Dialog

app = QApplication(sys.argv)   #创建GUI应用程序
mainform = QMyDialog()         #创建主窗体
ui = Ui_Dialog()    #创建UI对象
ui.setupUi(mainform)
mainform.show()                #显示主窗体
sys.exit(app.exec_())
ui_Dialog.py
# -*- coding: utf-8 -*-

# Form implementation generated from reading ui file 'dialog.ui'
#
# Created by: PyQt5 UI code generator 5.15.9
#
# WARNING: Any manual changes made to this file will be lost when pyuic5 is
# run again.  Do not edit this file unless you know what you are doing.


from PyQt5 import QtCore, QtGui, QtWidgets


class Ui_Dialog(object):
    def setupUi(self, Dialog):
        Dialog.setObjectName("Dialog")
        Dialog.resize(400, 310)
        self.buttonBox = QtWidgets.QDialogButtonBox(Dialog)
        self.buttonBox.setGeometry(QtCore.QRect(30, 240, 341, 32))
        self.buttonBox.setOrientation(QtCore.Qt.Horizontal)
        self.buttonBox.setStandardButtons(QtWidgets.QDialogButtonBox.Cancel|QtWidgets.QDialogButtonBox.Ok)
        self.buttonBox.setObjectName("buttonBox")

        self.retranslateUi(Dialog)
        self.buttonBox.accepted.connect(Dialog.accept) # type: ignore
        self.buttonBox.rejected.connect(Dialog.reject) # type: ignore
        QtCore.QMetaObject.connectSlotsByName(Dialog)

    def retranslateUi(self, Dialog):
        _translate = QtCore.QCoreApplication.translate
        Dialog.setWindowTitle(_translate("Dialog", "Dialog"))

