项目地址(kaggle):基于CNN对彩色图像数据集CIFAR-10实现图像分类--keras | Kaggle
项目地址(Colab):https://colab.research.google.com/drive/1gjzglPBfQKuhfyT3RlltCLUPgfccT_G9
导入依赖
在tensorflow-keras-gpu环境中导入下面依赖:
from keras.datasets import cifar10

from keras import regularizers
from keras.callbacks import ModelCheckpoint
from keras.layers import Conv2D, Activation, BatchNormalization, MaxPooling2D, Dropout, Flatten, Dense
from keras.models import Sequential
from keras.preprocessing.image import ImageDataGenerator
from matplotlib import pyplot
from keras import optimizers
import numpy as np
准备训练数据
本次实验使用的是keras提供的CIFAER-10数据集,这些数据集是经过预处理,基本可以当作神经网络的输入直接使用,其中包含5000张32x32大小的彩色训练图像和超过10个类别的标注,以及10000张测试图像。
打印数据集
Keras提供的CIFAR-10数据集已被划分为训练集和测试集,并打印测试集和训练集的形状。
# download and split the data
(x_train, y_train), (x_test, y_test) = cifar10.load_data()
x_train = x_train.astype('float32')
x_test = x_test.astype('float32')

print("training data = ", x_train.shape)
print("testing data = ", x_test.shape)
数据归一化处理
要对图像的像素值进行归一化处理,应将每个像素减去平均值并以所得结果除以标准差。
# Normalize the data to speed up training
mean = np.mean(x_train)
std = np.std(x_train)
x_train = (x_train-mean)/(std+1e-7)
x_test = (x_test-mean)/(std+1e-7)

# let's look at the normalized values of a sample image
x_train[0]
对标签进行one-hot编码
# one-hot encode the labels in train and test datasets
# we use “to_categorical” function in keras
from keras.utils import to_categorical
num_classes = 10
y_train = to_categorical(y_train,num_classes)
y_test = to_categorical(y_test,num_classes)
# let's display one of the one-hot encoded labels
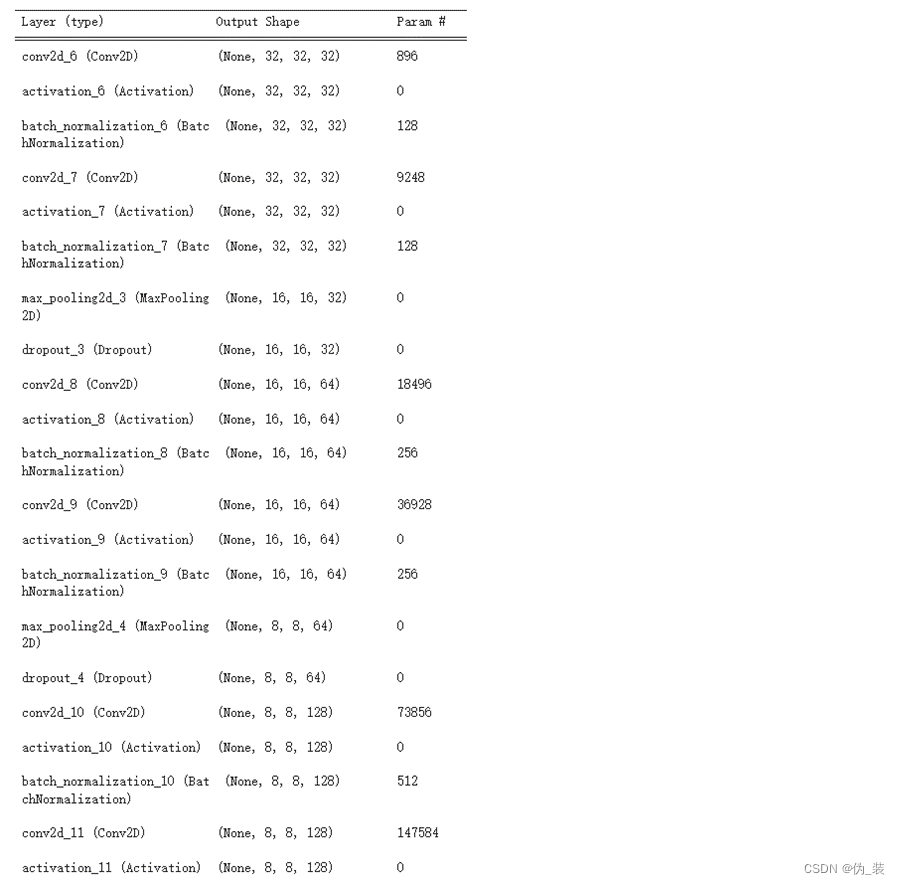
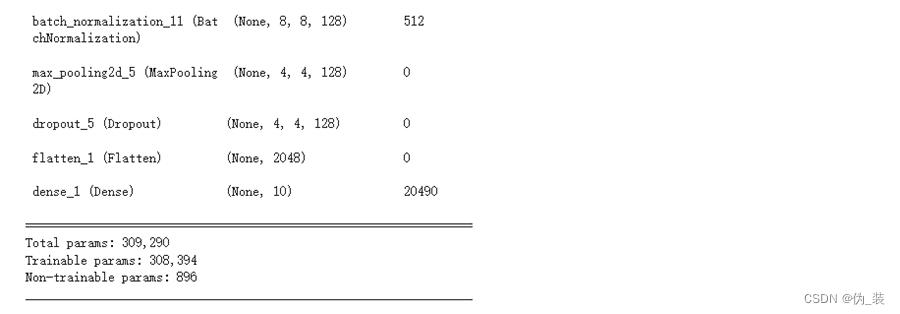
y_train[0]构建模型架构
模型的网络结构配置如下:
(1)之前在一个卷积层后面加一个池化层,而在全新的架构中,将在每两个卷积层后面加一个池化层,这个想法是受到VGGNet的启发
(2)这里的卷积层的dilation_rate设置为3x3,并将池化层的pool_size设置为2x2。
(3)每隔一个卷积层就添加dropout层,舍弃率p的取值为0.2-0.4
(4)在Keras中,L2正则化被添加到卷积层中
# build the model

# number of hidden units variable
# we are declaring this variable here and use it in our CONV layers to make it easier to update from one place
base_hidden_units = 32

# l2 regularization hyperparameter
weight_decay = 1e-4

# instantiate an empty sequential model
model = Sequential()

# CONV1
# notice that we defined the input_shape here because this is the first CONV layer.
# we don’t need to do that for the remaining layers
model.add(Conv2D(base_hidden_units, (3,3), padding='same', kernel_regularizer=regularizers.l2(weight_decay), input_shape=x_train.shape[1:]))
model.add(Activation('relu'))
model.add(BatchNormalization())

# CONV2
model.add(Conv2D(base_hidden_units, (3,3), padding='same', kernel_regularizer=regularizers.l2(weight_decay)))
model.add(Activation('relu'))
model.add(BatchNormalization())
model.add(MaxPooling2D(pool_size=(2,2)))
model.add(Dropout(0.2))

# CONV3
model.add(Conv2D(2*base_hidden_units, (3,3), padding='same', kernel_regularizer=regularizers.l2(weight_decay)))
model.add(Activation('relu'))
model.add(BatchNormalization())

# CONV4
model.add(Conv2D(2*base_hidden_units, (3,3), padding='same', kernel_regularizer=regularizers.l2(weight_decay)))
model.add(Activation('relu'))
model.add(BatchNormalization())
model.add(MaxPooling2D(pool_size=(2,2)))
model.add(Dropout(0.3))

# CONV5
model.add(Conv2D(4*base_hidden_units, (3,3), padding='same', kernel_regularizer=regularizers.l2(weight_decay)))
model.add(Activation('relu'))
model.add(BatchNormalization())

# CONV6
model.add(Conv2D(4*base_hidden_units, (3,3), padding='same', kernel_regularizer=regularizers.l2(weight_decay)))
model.add(Activation('relu'))
model.add(BatchNormalization())
model.add(MaxPooling2D(pool_size=(2,2)))
model.add(Dropout(0.4))

# FC7
model.add(Flatten())
model.add(Dense(num_classes, activation='softmax'))

# print model summary
model.summary()
模型摘要如下:
 数据增强
数据增强
本实验将随意采用旋转、高度、和宽度变换、水平翻转等数据增强技术。处理问题时,请检查看网络没有进行分类或分类结果较差的图像,并尝试理解网络在这些图像上表现不佳的原因,然后提出改进假设并进行试验。分析、试验、评估并重复这个过程,通过纯粹的数据分析和对网络性能的理解来做出决定
# data augmentation
datagen = ImageDataGenerator(
    rotation_range=15,
    width_shift_range=0.1,
    height_shift_range=0.1,
    horizontal_flip=True,
    vertical_flip=False
    )

# compute the data augmentation on the training set
datagen.fit(x_train)
训练模型
训练模型之前先讨论一些超参数的设置策略。
(1)batch_size:batch_size越大,算法学习的越快。可将初始值设置为64,然后将该值翻倍来加速训练。
(2)epochs:开始时将值设为50,但是发现网络仍在改进,所以不断则更加训练轮数并观察训练结果
(3)optimizer:本实验实验了Adam优化器。因新版本的keras很多优化器找不到配置文件的问题,最终解决Adam优化器配置的问题。
# training
from tensorflow.keras.optimizers import legacy
batch_size = 128
epochs=200

checkpointer = ModelCheckpoint(filepath='model.125epochs.hdf5', verbose=1, save_best_only=True)

# you can try any of these optimizers by uncommenting the line
#optimizer = rmsprop(lr=0.001,decay=1e-6)
optimizer = legacy.Adam(learning_rate=0.0001,decay=1e-6)

#optimizer =keras.optimizers.rmsprop(lr=0.0003,decay=1e-6)
model.compile(loss='categorical_crossentropy', optimizer=optimizer, metrics=['accuracy'])
history = model.fit(datagen.flow(x_train, y_train, batch_size=batch_size), callbacks=[checkpointer],
                steps_per_epoch=x_train.shape[0] // batch_size, epochs=epochs,verbose=2,
                validation_data=(x_test,y_test))
评估模型
调用Keras的evalute函数来评估模型并打印结果
# evaluating the model
scores = model.evaluate(x_test, y_test, batch_size=128, verbose=1)
print('\nTest result: %.3f loss: %.3f' % (scores[1]*100,scores[0]))
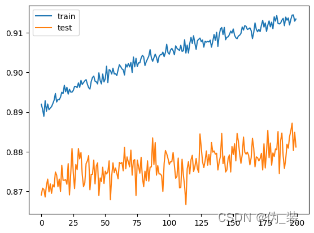
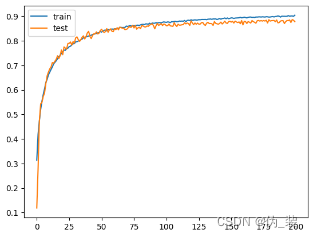
打印学习曲线,分析训练性能
# plot learning curves of model accuracy

pyplot.plot(history.history['accuracy'], label='train')
pyplot.plot(history.history['val_accuracy'], label='test')
pyplot.legend()
pyplot.show() 
调参
为了提升模型的结果,需要对模型进一步改进:
(1)增加训练的轮数:通过上述效果可以得出模型在125轮之前一直在增加,可将模型的训练轮数进行进一步增加。
(2)使用更深的网络结构:尝试添加更多层来提升模型的复杂度,以增强其学习能力。
(3)降低学习率:通过降低学习率learning_rate的方式使其模型使用更长的时间去学习。
(4)使用不同的CNN架构。
最终我们经过多次调参得到如下结果
| 序号 | batch_size | epochs | learning_rate | Test result | 学习曲线 |
| 1 | 128 | 125 | 0.0001 | 86.560 |
|
| 2 | 128 | 200 | 0.0001 | 87.360 |
|
| 3 | 256 | 200 | 0.001 | 86.930 |
|
| 4 | 256 | 200 | 0.0001 | 88.120 |
|
| 5 | 256 | 200 | 0.0003 | 87.820 |
|


我们经过了五次实验发现当batch_size=256,epochs=200,learning_rate=0.0001的时候,Test result最高,分类效果最好,当然可以继续尝试添加更多层来提升模型的复杂度,以增强其学习能力。
异常问题与解决方案
1、报错:Failed to get convolution algorithm. cudnn failed to initialize
解决办法:在模型前面加上这几句话,意思大概也是运行内存增加
physical_devices = tf.config.experimental.list_physical_devices('GPU')

if len(physical_devices) > 0:

     for k in range(len(physical_devices)):

         tf.config.experimental.set_memory_growth(physical_devices[k], True)

     print('memory growth:', tf.config.experimental.get_memory_growth(physical_devices[k]))

else:

     print("Not enough GPU hardware devices available")
2、报错:lr "参数已被弃用,请使用 "learning_rate "参数。 super().__init__(name, **kwargs)
解决办法:将lr换为learning_rate
3、报错:`Model.fit_generator` is deprecated and will be removed in a future version. Please use `Model.fit`, which supports generators.
解决办法:将Model.fit_generator改为Model.fit
4、报错:No module named ‘adam’
解决办法:将keras.optimizers.adam改为legacy.Adam,并重新导入legacy包
5、报错:Image transformations require SciPy. Install SciPy.
解决办法:重新安装SciPy
6、报错----> 3 pyplot.plot(history.history['acc'], label='train')
4 pyplot.plot(history.history['val_acc'], label='test')
5 pyplot.legend()
KeyError: 'acc'
解决办法:将acc替换为accuracy;val_acc替换为val_accuracy