Win10安装Ubuntu子系统
#推荐博客
https://www.cnblogs.com/xiaoliangge/p/9124089.html
#推荐视频
https://www.bilibili.com/video/BV184411i7As?spm_id_from=333.337.search-card.all.click
#Ubuntu18.04安装教程
https://edu.csdn.net/skill/gml/gml-214229ddcc6a496ba175a0a4cd24d486?category=875
#学习ubuntu基础
https://blog.csdn.net/weixin_42949808/article/details/110038095
#Ubuntu详解
https://blog.csdn.net/xxdw1992/article/details/114920741
1、开启适用于Linux的Windows子系统
>控制面板->程序->启用或关闭Windows功能->适用于Linux的Windows子系统

2、在Microsoft Store上下载Ubuntu 18.04 LTS
**注意:**在下载之前先检查windows update是否开启,如果没有开启Microsoft Store页面一直在转圈;如果windows update无法正确启动,可以下载下面这个工具来启动。
链接:https://pan.baidu.com/s/1pmae_bbviaGe1maQCc5trw?pwd=luji
提取码:luji
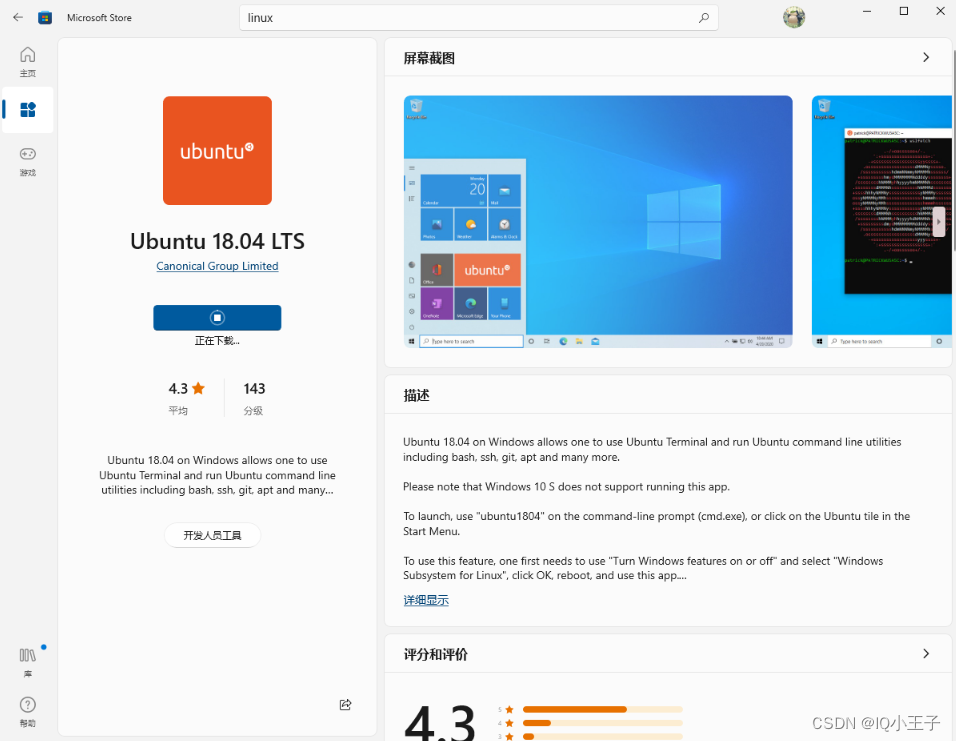
3、启动Ubuntu设置用户名和密码
- 方式一:启动ubuntu客户端窗口
- 方式二:window下cmd命令输入bash进入Linux系统
4、把sources.list更换为国内镜像
参考磁盘博客
https://blog.csdn.net/weixin_41762173/article/details/79480832
清华大学TUNA镜像源:https://mirrors.tuna.tsinghua.edu.cn/
Ubuntu版本:18.04TLS
#阿里云镜像源
deb-src http://archive.ubuntu.com/ubuntu xenial main restricted
deb http://mirrors.aliyun.com/ubuntu/ xenial main restricted
deb-src http://mirrors.aliyun.com/ubuntu/ xenial main restricted multiverse universe
deb http://mirrors.aliyun.com/ubuntu/ xenial-updates main restricted
deb-src http://mirrors.aliyun.com/ubuntu/ xenial-updates main restricted multiverse universe
deb http://mirrors.aliyun.com/ubuntu/ xenial universe
deb http://mirrors.aliyun.com/ubuntu/ xenial-updates universe
deb http://mirrors.aliyun.com/ubuntu/ xenial multiverse
deb http://mirrors.aliyun.com/ubuntu/ xenial-updates multiverse
deb http://mirrors.aliyun.com/ubuntu/ xenial-backports main restricted universe multiverse
deb-src http://mirrors.aliyun.com/ubuntu/ xenial-backports main restricted universe multiverse
deb http://archive.canonical.com/ubuntu xenial partner
deb-src http://archive.canonical.com/ubuntu xenial partner
deb http://mirrors.aliyun.com/ubuntu/ xenial-security main restricted
deb-src http://mirrors.aliyun.com/ubuntu/ xenial-security main restricted multiverse universe
deb http://mirrors.aliyun.com/ubuntu/ xenial-security universe
deb http://mirrors.aliyun.com/ubuntu/ xenial-security multiverse

#清华大学镜像源
# 默认注释了源码镜像以提高 apt update 速度,如有需要可自行取消注释
deb https://mirrors.tuna.tsinghua.edu.cn/ubuntu/ bionic main restricted universe multiverse
# deb-src https://mirrors.tuna.tsinghua.edu.cn/ubuntu/ bionic main restricted universe multiverse
deb https://mirrors.tuna.tsinghua.edu.cn/ubuntu/ bionic-updates main restricted universe multiverse
# deb-src https://mirrors.tuna.tsinghua.edu.cn/ubuntu/ bionic-updates main restricted universe multiverse
deb https://mirrors.tuna.tsinghua.edu.cn/ubuntu/ bionic-backports main restricted universe multiverse
# deb-src https://mirrors.tuna.tsinghua.edu.cn/ubuntu/ bionic-backports main restricted universe multiverse
deb https://mirrors.tuna.tsinghua.edu.cn/ubuntu/ bionic-security main restricted universe multiverse
# deb-src https://mirrors.tuna.tsinghua.edu.cn/ubuntu/ bionic-security main restricted universe multiverse

# 预发布软件源,不建议启用
# deb https://mirrors.tuna.tsinghua.edu.cn/ubuntu/ bionic-proposed main restricted universe multiverse
# deb-src https://mirrors.tuna.tsinghua.edu.cn/ubuntu/ bionic-proposed main restricted universe multiverse
操作步骤:
-
输入下面命令,编辑sources.list
>sudo apt-get install nano #安装nano编辑器,同样可以使用vim >sudo nano /etc/apt/sources.list -
复制上面的镜像源到该文件

-
保存和退出编辑器
>ctr+o:保存 >ctr+x:退出编辑器 -
更新源列表
>sudo apt-get update
5、安装中文字体及设置
-
查看系统类型
>cat /proc/version
#说明:
Linux version 4.4.0-19041-Microsoft (Microsoft@Microsoft.com)  #Linux版本号
(gcc version 5.4.0 (GCC) ) #gcc编译
>uname -a
#说明:
显示linux 的内核版本和系统是多少位的:X86_64代表系统是64位的
>lsb_release  -a
#说明:
Distributor ID: Ubuntu                   #类别是  Ubuntu
Description:    Ubuntu 18.04.5 LTS       #18年4月发布的稳定版本, LTS 是  Long  Term Support:长时间支持版本,支持周期长达三年至五年
Release:        18.04                    #发行日期或者发行版本号
Codename:       bionic                   #ubuntu的代号名称
-
查看中文字体
>fc-list :lang=zh-cn #没有中文语言包,先执行下面命令安装
>sudo apt install -y --force-yes --no-install-recommends fonts-wqy-microhei
>sudo apt install -y --force-yes --no-install-recommends ttf-wqy-zenhei
-
编辑.profile
>nano .profile >export LANG = "zh_CN.UTF-8" #添加到文件下 >export LC_ALL="zh_CN.UTF-8" #添加到文件下 -
设置系统默认语言为中文
>sudo dpkg-reconfigure locales >按键盘pagedown选择zh_CN.UTF-8 UTF-8后,按tab键到<ok>回车(先在zh_CN.UTF-8 UTF-8、zh_CN.GBK和zh_CN GB2312上面按空格用*标记好) >再选择zh_CN.UTF-8,按tab键到<ok>回车 -
查看语言是否为中文
>locale -
重启Ubuntu系统
>启动管理员powershell,输入:
>net stop LxssManager   #关闭系统
>net start LxssManager  #开启系统
6、安装Ubuntn图形界面
1、方式一
安装tasksel
>sudo apt-get install tasksel -y
>sudo tasksel

>sudo apt-get install xfce4
>重启Ubuntu系统
2、方式二<xfce桌面,个性化定制高,bug少>
安装xubuntn-desktop
>sudo apt update
>sudo apt-get upgrade
>sudo apt install xubuntu-desktop #上面命令无法安装,采用下面:
>sudo apt-get install aptitude
>sudo aptitude install xubuntu-desktop
#说明:
输入:sudo apt-get install xubuntu-desktop之后会自动安装桌面。
(gnome.桌面、xfce4桌面、Unity桌面、kde桌面等可自行选择,只需命令sudo install xxx就可安装了)
如果界面管理器出错就安装(没有就不用管这句):sudo apt install lightdm安装完成后重启系统就好了。
(桌面管理器切换命令:sudo dpkg-reconfigure lightdm)
(如果桌面安装出错,卸载命令:sudo apt remove gnome*-purge)
如果需要root登录的话,那么配置root登陆权限:
1、默认情况是不允许用root帐号直接登录图形界面的。这可以通过修改sudo nano
/usr/share/lightdm/lightdm.d/50-ubuntu.conf文件来允许root直接登录,增加
greeter-show-manual-login=true allow-guest=false.
2、登录之后会每次弹一个小错误,然后
,/root/.profile文件中将mesg n||true修改为tty-s&&mesg n ||true
扩展
1、Ubuntu软件操作的相关命令
sudo apt-get update  更新源

sudo apt-get install package 安装包

sudo apt-get remove package 删除包

sudo apt-cache search package 搜索软件包

sudo apt-cache show package  获取包的相关信息,如说明、大小、版本等

sudo apt-get install package --reinstall   重新安装包

sudo apt-get -f install   修复安装

sudo apt-get remove package --purge 删除包,包括配置文件等

sudo apt-get build-dep package 安装相关的编译环境

sudo apt-get upgrade 更新已安装的包

sudo apt-get dist-upgrade 升级系统

sudo apt-cache depends package 了解使用该包依赖那些包

sudo apt-cache rdepends package 查看该包被哪些包依赖

sudo apt-get source package  下载该包的源代码

sudo apt-get clean && sudo apt-get autoclean 清理无用的包

sudo apt-get check 检查是否有损坏的依赖
2、vim中的保存和退出
在 Linux 中使用 vim 时,输入 vim xxx.file 输入好文件内容之后,怎么保存呢?
按 ESC,左下角就可以进行输入命令:
| 命令 | 说明 |
|---|---|
:w | 保存但不退出 |
:wq | 保存并退出 |
:q | 退出 |
:q! | 强制退出,不保存 |
:e! | 放弃所有修改,从上次保存文件开始再编辑命令历史 |
3、aptitude和apt-get
#安装aptitude
>sudo apt-get install aptitide
aptitude 与 apt-get 一样,是 Debian 及其衍生系统中功能极其强大的包管理工具基于大名鼎鼎的APT机制, 整合了 dselect 和 apt-get 的所有功能, 并提供的更多特性,特别是在依赖关系处理上。。与 apt-get 不同的是,aptitude在处理依赖问题上更佳一些。举例来说,aptitude在删除一个包时,会同时删除本身所依赖的包。这样,系统中不会残留无用的包,整个系统更为干净。
推荐使用aptitude命令来代替apt-get,下载或者删除依赖包的时候aptitude要比apt-get更好。不过aptitude和apt-get不能混用,要不然互相都不知道对方做了什么
语法
aptitude 选项 参数
选项
-h:显示帮助信息
-d:仅下载软件包,不执行安装操作
-P:每一步操作都要求确认
-y:所有问题都回答“yes”
-v:显示附加信息;
-u:启动时下载新的软件包列表
参数
aptitude常用命令
aptitude update            更新可用的包列表

aptitude safe-upgrade      执行一次安全的升级

aptitude full-upgrade      将系统升级到新的发行版

aptitude install pkgname   安装包

aptitude remove pkgname    删除包

aptitude purge pkgname     删除包及其配置文件

aptitude search string     搜索包

aptitude show pkgname      显示包的详细信息

aptitude clean             删除下载的包文件

aptitude autoclean         仅删除过期的包文件
4、ubuntn和centos区别
- 1、centos基于EHEL开发,而ubuntu基于Debian开发;
- 2、centos使用rpm和flatpak软件包,而ubuntu使用deb和snap的软件包;
- 3、centos使用yum来更新,而ubuntu使用apt来更新。
4、apt-get和yum的区别
1、linux系统分类
一般来说linux系统基本上分两大类:
RedHat系列:Redhat、Centos、Fedora等
Debian系列:Debian、Ubuntu等
RedHat 系列
- 常见的安装包格式 rpm包,安装rpm包的命令是“rpm -参数”
- 包管理工具 yum
- 支持tar包
Debian系列
- 常见的安装包格式 deb包,安装deb包的命令是“dpkg -参数”
- 包管理工具 apt-get
- 支持tar包
tar 只是一种压缩文件格式,它只是把文件压缩打包而已。 rpm 相当于windows中的安装文件,它会自动处理软件包之间的依赖关系。
优缺点来说,rpm一般都是预先编译好的文件,它可能已经绑定到某种CPU或者发行版上面了。
tar一般包括编译脚本,你可以在你的环境下编译,所以具有通用性。
如果你的包不想开放源代码,你可以制作成rpm,如果开源,用tar更方便了。
tar一般都是源码打包的软件,需要自己解包,然后进行安装三部曲,./configure, make, make install. 来安装软件。
安装rpm包的命令是“rpm -参数”,安装deb包的命令是“dpkg -参数”。而linux系统很方便和人性化的一点就是很多软件或服务根本就不用我们去下载,直接使用相应的命令就可以管理了,可能这就是传说中的 “云”的概念。
2、yum
yum是RedHat系列的高级软件包管理工具
- 主要功能是更方便的添加/删除/更新RPM包。
- 它能自动解决包的依赖性问题。
- 它能便于管理大量系统的更新问题。
yum的特点
- 可以同时配置多个资源库(Repository)
- 简洁的配置文件(/etc/yum.conf)
- 自动解决增加或删除rpm包时遇到的倚赖性问题
- 保持与RPM数据库的一致性
yum可以用于运作rpm包,例如在CentOS/RedHat系统上对某个软件的管理
  安装:yum install <package_name>
  卸载:yum remove <package_name>
  更新:yum update <package_name>
3、apt-get
apt-get是Debian系列的高级软件包管理工具
- 配置文件/etc/apt/sources.list
- sudo apt-get install xxx
apt-get可以用于运作deb包,例如在Ubuntu上对某个软件的管理:
 安装:apt-get install <package_name>
 卸载:apt-get remove <package_name>
 更新:apt-get update <package_name>


