MVI架构的原理和流程
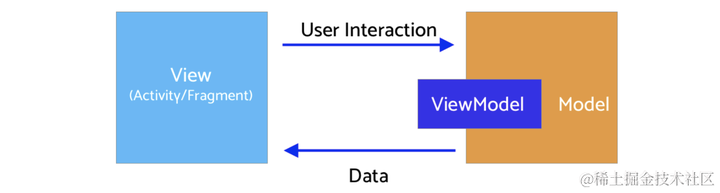
MVI架构是一种基于响应式编程的架构模式,它将应用程序分为四个核心组件:模型(Model)、视图(View)、意图(Intent)和状态(State)。 原理:
- 模型(Model):负责处理数据的状态和逻辑。
- 视图(View):负责展示数据和用户界面。
- 意图(Intent):代表用户的操作,如按钮点击、输入等。
- 状态(State):反映应用程序的当前状态。
流程:
- 用户通过视图(View)发起意图(Intent)。
- 意图(Intent)被传递给模型(Model)。
- 模型(Model)根据意图(Intent)进行状态(State)的更新。
- 状态(State)的变化被传递给视图(View),视图(View)进行相应的界面更新。
优点:
- 单向数据流:通过单向的数据流动,可确保状态的一致性和可预测性。
- 响应式特性:MVI利用响应式编程的思想,实现了对状态变化的高效处理。
- 易于测试:由于数据流的清晰性,测试模型的行为变得更加容易。
缺点:
- 学习曲线较陡:相对于传统的MVC或MVP,MVI架构需要开发者熟悉响应式编程的概念和工具。
- 增加了一些复杂性:引入状态管理和数据流管理,可能会增加一定的复杂性。
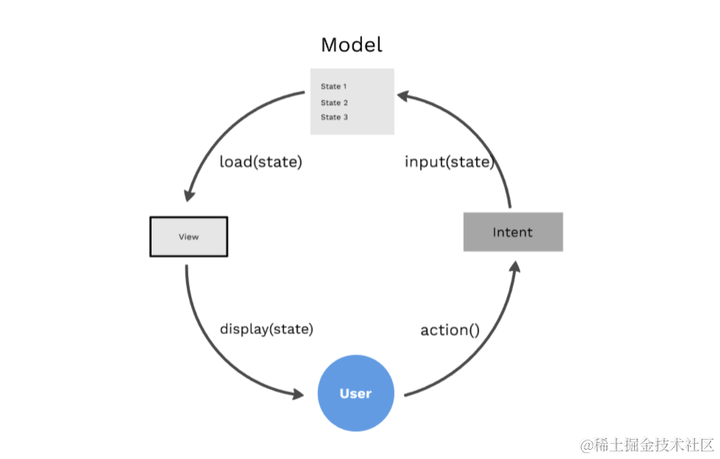
单向数据流
用户操作以Intent的形式通知Model => Model基于Intent更新State => View接收到State变化刷新UI。数据永远在一个环形结构中单向流动,不能反向流动:
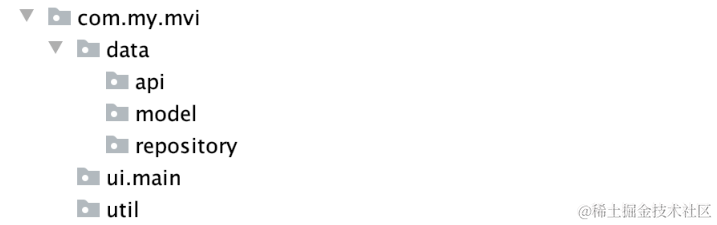
一个Sample快速搭建一个MVI架构的项目
代码示例
代码结构如下:
Sample中的依赖库
// Added Dependencies
implementation "androidx.recyclerview:recyclerview:1.1.0"
implementation 'android.arch.lifecycle:extensions:1.1.1'
implementation 'androidx.lifecycle:lifecycle-viewmodel-ktx:2.2.0'
implementation 'androidx.lifecycle:lifecycle-runtime-ktx:2.2.0'
implementation 'com.github.bumptech.glide:glide:4.11.0'

//retrofit
implementation 'com.squareup.retrofit2:retrofit:2.8.1'
implementation "com.squareup.retrofit2:converter-moshi:2.6.2"

//Coroutine
implementation "org.jetbrains.kotlinx:kotlinx-coroutines-android:1.3.6"
implementation "org.jetbrains.kotlinx:kotlinx-coroutines-core:1.3.6"
代码中使用以下API进行请求
https://reqres.in/api/users
将得到结果:

1. 数据层
1.1 User
定义User的data class
package com.my.mvi.data.model

data class User(
    @Json(name = "id")
    val id: Int = 0,
    @Json(name = "first_name")
    val name: String = "",
    @Json(name = "email")
    val email: String = "",
    @Json(name = "avator")
    val avator: String = ""
)
1.2 ApiService
定义ApiService,getUsers方法进行数据请求
package com.my.mvi.data.api

interface ApiService {

   @GET("users")
   suspend fun getUsers(): List<User>
}
1.3 Retrofit
创建Retrofit实例
object RetrofitBuilder {

    private const val BASE_URL = "https://reqres.in/api/user/1"

    private fun getRetrofit() = Retrofit.Builder()
        .baseUrl(BASE_URL)
        .addConverterFactory(MoshiConverterFactory.create())
        .build()


    val apiService: ApiService = getRetrofit().create(ApiService::class.java)

}
1.4 Repository
定义Repository,封装API请求的具体实现
package com.my.mvi.data.repository

class MainRepository(private val apiService: ApiService) {

    suspend fun getUsers() = apiService.getUsers()

}
2. UI层
Model定义完毕后,开始定义UI层,包括View、ViewModel以及Intent的定义
2.1 RecyclerView.Adapter
首先,需要一个RecyclerView来呈现列表结果,定义MainAdapter如下:
package com.my.mvi.ui.main.adapter

class MainAdapter(
    private val users: ArrayList<User>
) : RecyclerView.Adapter<MainAdapter.DataViewHolder>() {

    class DataViewHolder(itemView: View) : RecyclerView.ViewHolder(itemView) {
        fun bind(user: User) {
            itemView.textViewUserName.text = user.name
            itemView.textViewUserEmail.text = user.email
            Glide.with(itemView.imageViewAvatar.context)
                .load(user.avatar)
                .into(itemView.imageViewAvatar)
        }
    }

    override fun onCreateViewHolder(parent: ViewGroup, viewType: Int) =
        DataViewHolder(
            LayoutInflater.from(parent.context).inflate(
                R.layout.item_layout, parent,
                false
            )
        )

    override fun getItemCount(): Int = users.size

    override fun onBindViewHolder(holder: DataViewHolder, position: Int) =
        holder.bind(users[position])

    fun addData(list: List<User>) {
        users.addAll(list)
    }

}
item_layout.xml
<?xml version="1.0" encoding="utf-8"?>
<androidx.constraintlayout.widget.ConstraintLayout xmlns:android="http://schemas.android.com/apk/res/android"
    xmlns:app="http://schemas.android.com/apk/res-auto"
    xmlns:tools="http://schemas.android.com/tools"
    android:id="@+id/container"
    android:layout_width="match_parent"
    android:layout_height="60dp">

    <ImageView
        android:id="@+id/imageViewAvatar"
        android:layout_width="60dp"
        android:layout_height="0dp"
        android:padding="4dp"
        app:layout_constraintBottom_toBottomOf="parent"
        app:layout_constraintStart_toStartOf="parent"
        app:layout_constraintTop_toTopOf="parent" />

    <androidx.appcompat.widget.AppCompatTextView
        android:id="@+id/textViewUserName"
        style="@style/TextAppearance.AppCompat.Large"
        android:layout_width="0dp"
        android:layout_height="wrap_content"
        android:layout_marginStart="8dp"
        android:layout_marginTop="4dp"
        app:layout_constraintEnd_toEndOf="parent"
        app:layout_constraintStart_toEndOf="@+id/imageViewAvatar"
        app:layout_constraintTop_toTopOf="parent"/>

    <androidx.appcompat.widget.AppCompatTextView
        android:id="@+id/textViewUserEmail"
        android:layout_width="0dp"
        android:layout_height="wrap_content"
        app:layout_constraintEnd_toEndOf="parent"
        app:layout_constraintStart_toStartOf="@+id/textViewUserName"
        app:layout_constraintTop_toBottomOf="@+id/textViewUserName" />

</androidx.constraintlayout.widget.ConstraintLayout>
2.2 Intent
定义Intent用来包装用户Action
package com.my.mvi.ui.main.intent

sealed class MainIntent {

    object FetchUser : MainIntent()

}
2.3 State
定义UI层的State结构体
sealed class MainState {

    object Idle : MainState()
    object Loading : MainState()
    data class Users(val user: List<User>) : MainState()
    data class Error(val error: String?) : MainState()

}
2.4 ViewModel
ViewModel是MVI的核心,存放和管理State,同时接受Intent并进行数据请求
package com.my.mvi.ui.main.viewmodel

class MainViewModel(
    private val repository: MainRepository
) : ViewModel() {

    val userIntent = Channel<MainIntent>(Channel.UNLIMITED)
    private val _state = MutableStateFlow<MainState>(MainState.Idle)
    val state: StateFlow<MainState>
        get() = _state

    init {
        handleIntent()
    }

    private fun handleIntent() {
        viewModelScope.launch {
            userIntent.consumeAsFlow().collect {
                when (it) {
                    is MainIntent.FetchUser -> fetchUser()
                }
            }
        }
    }

    private fun fetchUser() {
        viewModelScope.launch {
            _state.value = MainState.Loading
            _state.value = try {
                MainState.Users(repository.getUsers())
            } catch (e: Exception) {
                MainState.Error(e.localizedMessage)
            }
        }
    }
}
我们在handleIntent中订阅userIntent并根据Action类型执行相应操作。本case中当出现FetchUser的Action时,调用fetchUser方法请求用户数据。用户数据返回后,会更新State,MainActivity订阅此State并刷新界面。
2.5 ViewModelFactory
构造ViewModel需要Repository,所以通过ViewModelFactory注入必要的依赖
class ViewModelFactory(private val apiService: ApiService) : ViewModelProvider.Factory {

    override fun <T : ViewModel?> create(modelClass: Class<T>): T {
        if (modelClass.isAssignableFrom(MainViewModel::class.java)) {
            return MainViewModel(MainRepository(apiService)) as T
        }
        throw IllegalArgumentException("Unknown class name")
    }

}
2.6 定义MainActivity
package com.my.mvi.ui.main.view

class MainActivity : AppCompatActivity() {

    private lateinit var mainViewModel: MainViewModel
    private var adapter = MainAdapter(arrayListOf())

    override fun onCreate(savedInstanceState: Bundle?) {
        super.onCreate(savedInstanceState)
        setContentView(R.layout.activity_main)
        setupUI()
        setupViewModel()
        observeViewModel()
        setupClicks()
    }

    private fun setupClicks() {
        buttonFetchUser.setOnClickListener {
            lifecycleScope.launch {
                mainViewModel.userIntent.send(MainIntent.FetchUser)
            }
        }
    }


    private fun setupUI() {
        recyclerView.layoutManager = LinearLayoutManager(this)
        recyclerView.run {
            addItemDecoration(
                DividerItemDecoration(
                    recyclerView.context,
                    (recyclerView.layoutManager as LinearLayoutManager).orientation
                )
            )
        }
        recyclerView.adapter = adapter
    }


    private fun setupViewModel() {
        mainViewModel = ViewModelProviders.of(
            this,
            ViewModelFactory(
                ApiHelperImpl(
                    RetrofitBuilder.apiService
                )
            )
        ).get(MainViewModel::class.java)
    }

    private fun observeViewModel() {
        lifecycleScope.launch {
            mainViewModel.state.collect {
                when (it) {
                    is MainState.Idle -> {

                    }
                    is MainState.Loading -> {
                        buttonFetchUser.visibility = View.GONE
                        progressBar.visibility = View.VISIBLE
                    }

                    is MainState.Users -> {
                        progressBar.visibility = View.GONE
                        buttonFetchUser.visibility = View.GONE
                        renderList(it.user)
                    }
                    is MainState.Error -> {
                        progressBar.visibility = View.GONE
                        buttonFetchUser.visibility = View.VISIBLE
                        Toast.makeText(this@MainActivity, it.error, Toast.LENGTH_LONG).show()
                    }
                }
            }
        }
    }

    private fun renderList(users: List<User>) {
        recyclerView.visibility = View.VISIBLE
        users.let { listOfUsers -> listOfUsers.let { adapter.addData(it) } }
        adapter.notifyDataSetChanged()
    }
}
MainActivity中订阅mainViewModel.state,根据State处理各种UI显示和刷新。
activity_main.xml:
<?xml version="1.0" encoding="utf-8"?>
<androidx.constraintlayout.widget.ConstraintLayout xmlns:android="http://schemas.android.com/apk/res/android"
    xmlns:app="http://schemas.android.com/apk/res-auto"
    xmlns:tools="http://schemas.android.com/tools"
    android:layout_width="match_parent"
    android:layout_height="match_parent"
    tools:context=".ui.main.view.MainActivity">

    <androidx.recyclerview.widget.RecyclerView
        android:id="@+id/recyclerView"
        android:layout_width="match_parent"
        android:layout_height="match_parent"
        android:visibility="gone" />

    <ProgressBar
        android:id="@+id/progressBar"
        android:layout_width="wrap_content"
        android:layout_height="wrap_content"
        app:layout_constraintBottom_toBottomOf="parent"
        app:layout_constraintEnd_toEndOf="parent"
        android:visibility="gone"
        app:layout_constraintStart_toStartOf="parent"
        app:layout_constraintTop_toTopOf="parent" />

    <Button
        android:id="@+id/buttonFetchUser"
        android:layout_width="wrap_content"
        android:layout_height="wrap_content"
        android:text="@string/fetch_user"
        app:layout_constraintBottom_toBottomOf="parent"
        app:layout_constraintEnd_toEndOf="parent"
        app:layout_constraintStart_toStartOf="parent"
        app:layout_constraintTop_toTopOf="parent" />

</androidx.constraintlayout.widget.ConstraintLayout>
如上,一个完整的MVI项目完成了。
实战讲解和代码示例
为了更好地理解MVI架构,让我们通过一个例子进行实战演示。我们将创建一个天气预报应用,展示当前天气和未来几天的天气预报信息。 在代码示例中,我们会用到以下库:
- RxJava:用于处理响应式数据流。
- LiveData:用于将数据流连接到视图。
 首先,我们定义模型(Model)的状态(State)类,包含天气预报的相关信息,例如温度、湿度和天气状况等。
data class WeatherState(
    val temperature: Float,
    val humidity: Float,
    val condition: String
)
接下来,我们创建视图(View)界面,展示天气信息,并提供一个按钮用于刷新数据。
class WeatherActivity : AppCompatActivity() {

    // 初始化ViewModel
    private val viewModel: WeatherViewModel by viewModels()

    override fun onCreate(savedInstanceState: Bundle?) {
        super.onCreate(savedInstanceState)
        setContentView(R.layout.activity_weather)

        // 监听状态变化,更新UI
        viewModel.weatherState.observe(this, Observer { state ->
            // 更新温度、湿度和天气状况的显示
            temperatureTextView.text = state.temperature.toString()
            humidityTextView.text = state.humidity.toString()
            conditionTextView.text = state.condition
        })

        // 刷新按钮点击事件
        refreshButton.setOnClickListener {
            // 发送刷新数据的意图
            viewModel.processIntent(RefreshIntent)
        }
    }
}
然后,我们创建意图(Intent)类,代表用户操作的动作。在这个例子中,我们只有一个刷新数据的意图。
object RefreshIntent : WeatherIntent
接下来,我们实现模型(Model)部分,包括状态管理和数据流的处理。
class WeatherViewModel : ViewModel() {

    // 状态管理
    private val _weatherState = MutableLiveData<WeatherState>()
    val weatherState: LiveData<WeatherState> = _weatherState

    // 处理意图
    fun processIntent(intent: WeatherIntent) {
        when (intent) {
            RefreshIntent -> fetchWeatherData()
        }
    }

    // 获取天气数据
    private fun fetchWeatherData() {
        // 发起网络请求或其他数据获取逻辑
        // 更新状态
        val weatherData = // 获取的天气数据
        val newState = WeatherState(
            temperature = weatherData.temperature,
            humidity = weatherData.humidity,
            condition = weatherData.condition
        )
        _weatherState.value = newState
    }
}
全文对Android中MVI的架构讲解,其中包括原理、项目演示以及实战演练。有关更多的Android架构学习进阶可以参考《Android核心技术手册》文档,点击可以查看详细的内容板块。
总结
MVI架构通过响应式数据流和单向数据流的特性,提供了一种可维护、可测试且具备响应式特性的架构模式。尽管学习曲线较陡,但在大型复杂应用开发中,MVI架构能够更好地管理状态和响应用户操作。通过合理设计状态模型和注意副作用管理,我们可以充分发挥MVI架构的优势,提升应用的可维护性和用户体验。
![Mybatisplus同时向两张表里插入数据[事务的一致性]](https://img-blog.csdnimg.cn/direct/fd1514bd194f41afbed78da7a890efaa.png)