文章目录
- 1 前言
- 2 网络爬虫
- 2.1 构造自己的Scrapy爬虫
- 2.1.1 items.py
- 2.1.2 spiders子目录
- 2.1.3 pipelines.py
- 2.2 构造可接受参数的Scrapy爬虫
- 2.3 运行Scrapy爬虫
- 2.3.1 在命令行运行
- 2.3.2 在程序中调用
- 2.4 运行Scrapy的一些要点
- 3 大规模非结构化数据的存储与分析
- 4 全部代码
1 前言
- 介绍几种常见的数据收集、存储、组织以及分析的方法和工具
- 首先介绍如何构造自己的网络爬虫从网上抓取内容,并将其中按照一定结构组织的信息抽取出来
- 然后介绍如何使用ElasticSearch来有效地存储、组织和查询非结构化数据
- 最后简要介绍和使用Spark对大规模的非结构化数据进行初步分析的方法
2 网络爬虫
2.1 构造自己的Scrapy爬虫
-
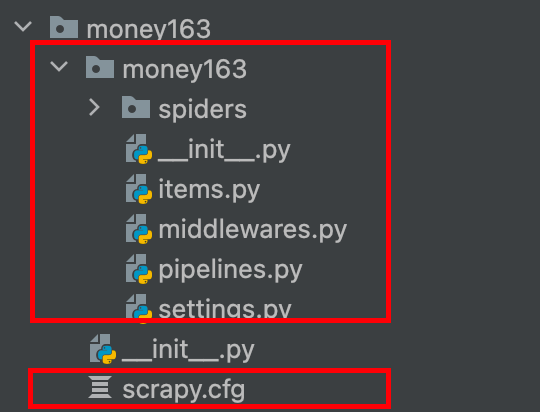
在终端输入
scrapy startproject money163,会自动生成一个同名的子目录和一个scrapy.cfg配置文件 -
-
有两个init文件都是空白的,暂时不用管,将经历放在items.py、settings.py、pipelines.py和将要在spiders子目录下生成的爬虫程序上
-
基本结构建立起来之后,需要按照说明的步骤一次完成对内容抽取,爬虫目标和行为以及数据操作的定义,每一个定义都对应一个文件。
2.1.1 items.py
- 在这个文件里面定义需要抽取的内容,这基本上是通过定义一个继承于scrapy.Item的内容类来完成的,每一个内容都属于scrapy.Field(),定义非常简单,即内容名称 = scrapy.Field()
2.1.2 spiders子目录
- 在spiders子目录下新建一个python文件,假设命名为money_spider.py
- 这个文件比较复杂,可以继承不同的类来定义
- 首先使用Scrapy的CrawlSpider类,定义三个内容:一是爬虫的名字,二是目标网站,包括爬取模式和对返回链接的过滤等;三是返回的对象按照其结构抽取所需要的数据
- 在money_spider.py文件中输入以下代码,注意将Stock163换成money163
# encoding: utf-8
import scrapy
import re
from scrapy.selector import Selector
from stock163.items import Stock163Item
from scrapy.linkextractors import LinkExtractor
from scrapy.spiders import CrawlSpider, Rule


class ExampleSpider(CrawlSpider):
    name = "stocknews" #爬虫的名字为 "stocknews"
    allowed_domains = ["money.163.com"]#设置允许爬取的域名

    def __init__(self, id='600000', page='0', *args, **kwargs):#初始化方法,设置了一些初始参数,包括 id(默认为 '600000')、page(默认为 '0'),以及其他可能传递的参数。
        # allowrule = "/%s/%s\d+/\d+/*" % (year, month)
        # allowrule = "/%s/%s%s/\d+/*" % (year, month, day) #这个规则匹配类似 "/2022/11/25/" 这样的日期结构
        allowrule = r"/\d+/\d+/\d+/*"# 定义了一个正则表达式,用于匹配新闻链接的规则。数字 数字 数字 任意字符
        self.counter = 0 # 初始化一个计数器,可能用于跟踪爬取的新闻数量。
        self.stock_id = id  # 保存股票ID
        self.start_urls = ['http://quotes.money.163.com/f10/gsxw_%s,%s.html' % (id, page)] # 设置初始爬取的URL,这里使用了 id 和 page 参数构造URL。
        ExampleSpider.rules = (Rule(LinkExtractor(allow=allowrule), callback="parse_news", follow=False),)
        # 定义了爬取规则。这里使用了 LinkExtractor 来提取链接,通过正则表达式 allow=allowrule 匹配链接规则,然后指定了回调函数为 parse_news
        # 最后设置 follow=False 表示不跟踪从当前链接提取的链接。
        # recompile the rule
        super(ExampleSpider, self).__init__(*args, **kwargs)
        # 调用父类(CrawlSpider)的初始化方法,确保爬虫的正确初始化。

    '''
    rules=Rule(LinkExtractor(allow=r"/\d+/\d+/\d+/*"),
               callback="parse_news", follow=True
    )
    '''

    # f = open("out.txt", "w")

    def printcn(suni):
        for i in suni:
            print(suni.encode('utf-8'))

    def parse_news(self, response):
        item = Stock163Item()
        item['news_thread'] = response.url.strip().split('/')[-1][:-5]
        #这行代码从响应的URL中提取新闻线程信息。它首先通过response.url获取当前页面的URL,然后使用strip()方法去除首尾的空格,接着使用split('/')方法根据斜杠切割URL为一个列表,最后通过[-1]
        #取列表的最后一个元素,即URL中最后一个斜杠后的部分。[: -5] 是为了去掉文件扩展名(假设是.html或类似的扩展名),剩下的部分就是新闻线程的信息,然后将其赋值给item对象的news_thread属性。
        self.get_thread(response,item)
        self.get_title(response, item)
        self.get_source(response, item)
        self.get_url(response, item)
        self.get_news_from(response, item)
        self.get_from_url(response, item)
        self.get_text(response, item)

        return item  ##############!!!!!!!!!!!!!!!!!!!!!!!!!!!!!!!!!remenber to Retrun Item after parse

    def get_title(self, response, item):
        title = response.xpath("/html/head/title/text()").extract()
        if title:
            # print ('title:'+title[0][:-5].encode('utf-8'))
            item['news_title'] = title[0][:-5]

    def get_source(self, response, item):
        source = response.xpath("//div[@class='left']/text()").extract()
        if source:
            # print ('source'+source[0][:-5].encode('utf-8'))
            item['news_time'] = source[0][:-5]

    def get_news_from(self, response, item):
        news_from = response.xpath("//div[@class='left']/a/text()").extract()
        if news_from:
            # print 'from'+news_from[0].encode('utf-8')
            item['news_from'] = news_from[0]

    def get_from_url(self, response, item):
        from_url = response.xpath("//div[@class='left']/a/@href").extract()
        if from_url:
            # print ('url'+from_url[0].encode('utf-8')        )
            item['from_url'] = from_url[0]

    def get_text(self, response, item):
        news_body = response.xpath("//div[@id='endText']/p/text()").extract()
        if news_body:
            # for  entry in news_body:
            #     print (entry.encode('utf-8'))
            item['news_body'] = news_body

    def get_url(self, response, item):
        news_url = response.url
        if news_url:
            print(news_url)
        item['news_url'] = news_url
2.1.3 pipelines.py
- 接着需要对所抽取的具体要素进行处理,要么显示在终端的窗口中,要么存入某个地方或者数据库中,现在我们假设将所抽取出来的要素构造成一个词典,以JSON文档的格式存为文本文件,每个页面单独存成一个文件。
- 这个时候需要定义一个类,这个类里面只有一个方法,process_item(self,item,spider)
# -*- coding: utf-8 -*-

# Define your item pipelines here
#
# Don't forget to add your pipeline to the ITEM_PIPELINES setting
# See: http://doc.scrapy.org/en/latest/topics/item-pipeline.html
#encoding: utf-8
import os
def ParseFilePath(url, id):
    # user should change this folder path
    outfolder = "e:\\data\\FinTech\\News\\Stocks\\%s" % id
    components = url.split("/")
    year = components[3]
    monthday=components[4]
    month = monthday[:2]
    day = monthday[2:]
    idx=components[5]
    page=idx+"_"+components[6]
    #folder = outfolder + "\\%s_%s_%s_" % (year, month, day)
    folder = outfolder
    if ((year=='') | ('keywords' in page)):
       filepath='xxx'
    else:
       filepath = folder + "\\%s_%s_%s_%s.txt" % (year, month, day, page)
    filepath=filepath.replace('?', '_')
    return(folder, filepath)

class Stock163Pipeline(object):
    def process_item(self, item, spider):
        if spider.name != "stocknews":  return item
        if item.get("news_thread", None) is None: return item

        url = item['news_url']
        if 'keywords' in url:
           return item
        folder, filepath = ParseFilePath(url, spider.stock_id)
        spider.counter = spider.counter+1
        counterfilepath = folder+"\\counter.txt"
        #one a single machine will is virtually no risk of race-condition
        if not os.path.exists(folder):
           os.makedirs(folder)
        #print(filepath, counterfilepath)
        #print(spider.stats)
        fo = open(counterfilepath, "w", encoding="UTF-8")
        fo.write(str(spider.counter))
        fo.close()

        if (filepath!='xxx'):
           fo = open(filepath, 'w', encoding='utf-8')
           fo.write(str(dict(item)))
           fo.close()
        return None
2.2 构造可接受参数的Scrapy爬虫
- 这节内容主要介绍能改变起始网页的地址,从而使得同一个爬虫爬去不同的网站
- 修改来start_urls,同时也修改了allowed_domain,保证爬虫顺利进行,最后通过super方法执行这个类,来更新参数
`class ExampleSpider(CrawlSpider):
    name = "stocknews"


    def __init__(self, id='600000', page='0', *args, **kwargs):
        #allowrule = "/%s/%s\d+/\d+/*" % (year, month)
        allowrule = "/%s/%s%s/\d+/*" % (year, month, day)
        self.counter = 0
        self.stock_id = id
        self.start_urls = ['http://\%s' \% (site)]
        ExampleSpider.rules=(Rule(LinkExtractor(allow=allowrule), callback="parse_news", follow=False),)
        #recompile the rule        `
2.3 运行Scrapy爬虫
- 一种是在命令行里面执行crawl命令,一种是在别的程序中调用Scrapy爬虫
- 命令行中是单线程,程序调用是多线程,一次可以同时爬取不同的网站,当然也可以通过twisted包里面的internet.defer方法来将每个爬虫串联起来,同时调用reactor来控制执行顺序
- Scrapy也可以在多台机器上部署分布式
2.3.1 在命令行运行
- 在命令行中非常简单,进入项目的主目录,即包含scrapy.cfg文件的那个目录,输入:scrapy crawl money163,这里的money163是在spider.py程序文件中使用“ name=“money163”定义的爬虫名字,crawl是让Scrapy爬虫开始爬去网页“scrapy craw money163 -a site = money.163.com/stock
2.3.2 在程序中调用
- 在别的程序里调用Scrapy爬虫可以使用不同的类,这里使用CrawlerProcess类,配合get_project_setting方法,就可以在项目目录中非常方面地使用别的程序运行自己的爬虫
-首先引入相应的模块和函数
from scrapy.crawler import CrawlerProcess
from scrapy.utils.project import get_project_settings
- 然后定义爬虫过程,在定义的过程中,先通过get_project_settings获取项目的信息,再传给所定义的爬虫过程
process = CrawlerProcess(get_project_settings()) - 定义好爬虫过程后,只需调用这个过程对象,包括传递参数,就能运行爬虫了,比如:
process.crawl('stocknews', id=stockid, page=str(page)) - 按照列表中的三个网址定义了三个爬虫,最后通过process.start来启动爬虫,因为使用了get_project_settings,这个python程序需要在项目所在目录下执行才能有效运行
for site in ['money.163.com', 'tech.163.com', 'money.163.com/stock']:
	process.crawl('myspider', site = site)
process.start()
2.4 运行Scrapy的一些要点
- 有些网站会对网络请求是否是网络爬虫进行识别,如果发现是网络爬虫,则会进行约束,比如限制流量甚至直接拒绝响应
- 因此需要合理设置setting.py和middleware文件里面的选项来实现
3 大规模非结构化数据的存储与分析
- 非结构化的数据是指没有定义结构的数据,一种典型的非结构化数据是文本,包括日期、数字、人名、事件等,这样的数据没有规则可循
- 比如数据挖掘、自然语言处理、文本分析等提供了不同方法从非结构化数据里找出模式,处理文本常用的技巧通常涉及到元数据或者词性标签手动标记
- 非结构化数据一般使用schema.org定义的类型和属性作为标记(比如JSON- LD)
- 当单个网页上有多种实体类型时,这些实体应该都被标记,例如视频schemma.org/VideoObject
4 全部代码
from keras.applications.vgg16 import VGG16
from keras.layers import Input,Flatten,Dense,Dropout
from keras.models import Model
from keras.optimizers import SGD

from keras.datasets import mnist

import cv2
import h5py as h5py
import numpy as np

model_vgg = VGG16(include_top=False,weights='imagenet',input_shape=(ishape,ishape,3))
model = Flatten(name='flatten')(model_vgg.output)
model = Dense(4096,activation='relu',name='fc1')(model)
model = Dense(4096,activation='relu',name='fc2')(model)
model = Dropout(0.5)(model)
model = Dense(10,activation='softmax')(model)
model_vgg_mnist = Model(model_vgg.input,model,name='vgg16')

model_vgg_mnist.summary()

model_vgg = VGG16(include_top=False,weights='imagenet',input_shape=(224,224,3))
for layer in model_vgg.layers:
    layer.trainable=False
model = Flatten()(model_vgg.output)
model = Dense(4096,activation='relu',name='fc1')(model)
model = Dense(4096,activation='relu',name='fc2')(model)
model = Dropout(0.5)(model)
model = Dense(10,activation='softmax',name='prediction')(model)
model_vgg_mnist_pretrain = Model(model_vgg.input,model,name='vgg16_pretrain')

model_vgg_mnist_pretrain.summary()

sgd = SGD(lr = 0.05,decay=1e-5)
model_vgg_mnist_pretrain.compile(loss='categorical_crossentropy',optimizer=sgd,metrics=['accuracy'])

(x_train,y_train),(x_test,y_test) = mnist.load_data()
x_train = [cv2.cvtColor(cv2.resize(i,(ishape,ishape)),cv2.COLOR_GRAY2BGR) for i in x_train]
x_train = np.concatenate([arr[np.newaxis] for arr in x_train]).astype('float32')
x_test = [cv2.cvtColor(cv2.resize(i,(ishape,ishape)),cv2.COLOR_GRAY2BGR) for i in x_test]
x_test = np.concatenate([arr[np.newaxis] for arr in x_test]).astype('float32')

x_test.shape
x_train.shape

x_train /= 255
x_test /= 255

np.where(x_train[0]!=0)

def tran_y(y):
    y_ohe = np.zeros(10)
    y_ohe[y] = 1
    return y_ohe

y_train_ohe = np.array([tran_y(y_train[i]) for i in range(len(y_train))])
y_test_ohe = np.array([tran_y(y_test[i]) for i in range(len(y_test))])

model_vgg_mnist_pretrain.fit(x_train,y_train_ohe,validation_data=(x_test,y_test_ohe),epochs=200,batch_size=128)


