距论文阅读完毕已经过了整整一周多。。。终于抽出时间来写这篇辣!~
论文阅读笔记放这里:
基于可变形卷积和注意力机制的带钢表面缺陷快速检测网络DCAM-Net(论文阅读笔记)-CSDN博客
为了方便观看,我把结构图也拿过来了。

众所周知,DCAMnet是在yolox的基础上改进、升级的。(应该只有博主这个憨憨对着yolov5网络改了两天,被学长一语道破天机后才幡然醒悟的吧?)
既然这样,我们就需要先对照着原yolox的网络结构,找出新增的或改动的结构,下面是yolox的网络结构图(温馨提示,在csdn页面观看图片很难受,下载后打开方式选择照片可以看得很清楚)。
yolox的项目请自行去github上获取,下面推荐一篇->
GitHub - renyuehe/bilibili-yolox_simple_voc_coco: yolox 详细注释-简化版,已配置好 voc + coco 数据集

改动点
一 ,CSPLayer


相对于yolox,DCAMnet在所有CSPLayer层的右支路都加上了一个EDE-block,而EDE-block是论文作者新提出的一个模块,结构不算复杂,可以通过开头放的传送门去论文阅读笔记学一学。
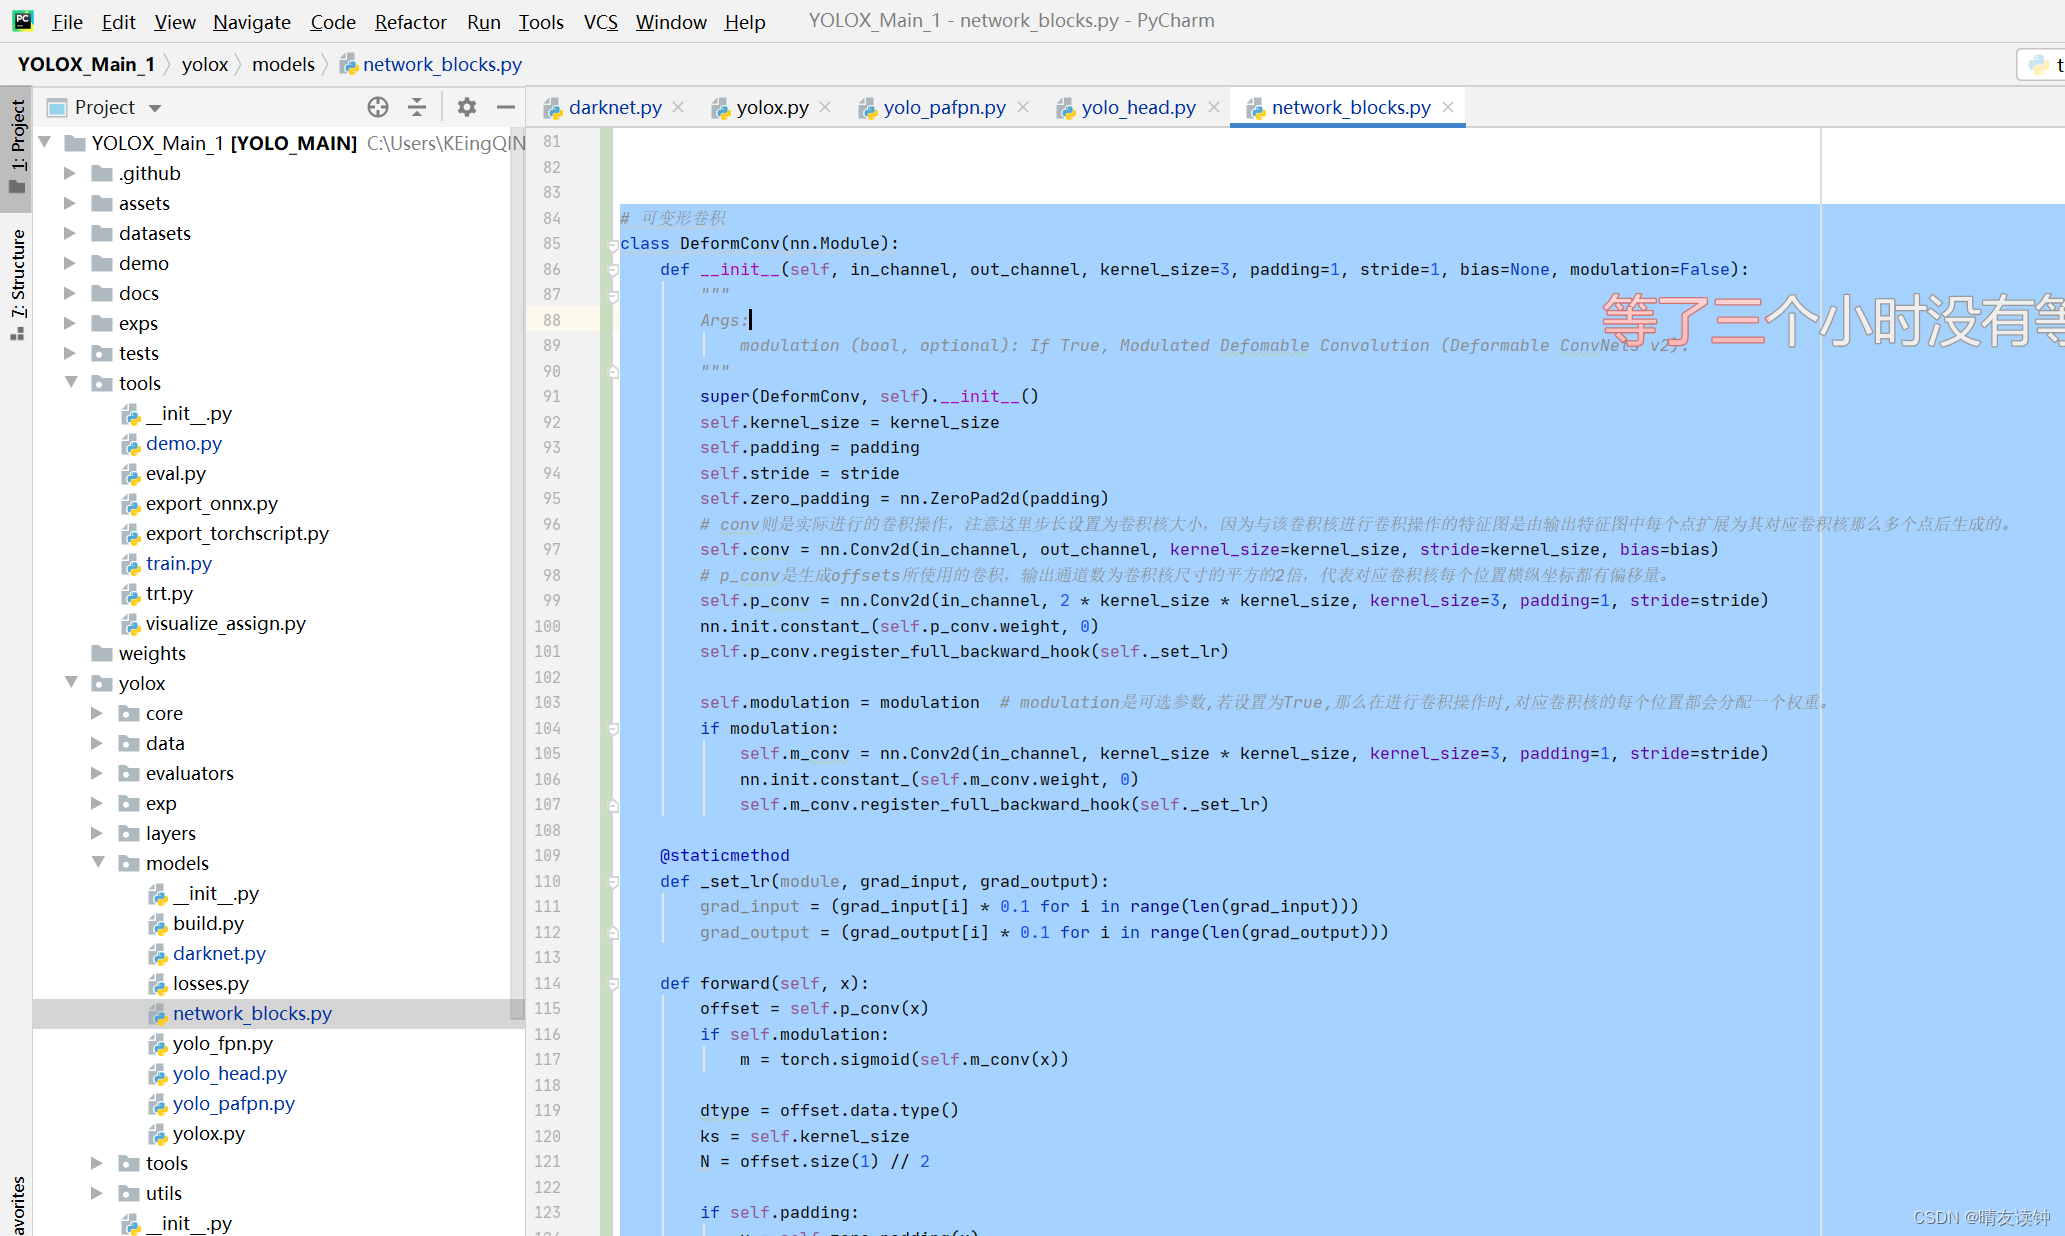
EDE-block中的DFMConv即可变形卷积模块,本模块的代码如下:
此模块的代码放在该位置->yolox\models\network_blocks.py
class DeformConv(nn.Module):
    def __init__(self, in_channel, out_channel, kernel_size=3, padding=1, stride=1, bias=None, modulation=False):
        """
        Args:
            modulation (bool, optional): If True, Modulated Defomable Convolution (Deformable ConvNets v2).
        """
        super(DeformConv, self).__init__()
        self.kernel_size = kernel_size
        self.padding = padding
        self.stride = stride
        self.zero_padding = nn.ZeroPad2d(padding)
        # conv则是实际进行的卷积操作,注意这里步长设置为卷积核大小,因为与该卷积核进行卷积操作的特征图是由输出特征图中每个点扩展为其对应卷积核那么多个点后生成的。
        self.conv = nn.Conv2d(in_channel, out_channel, kernel_size=kernel_size, stride=kernel_size, bias=bias)
        # p_conv是生成offsets所使用的卷积,输出通道数为卷积核尺寸的平方的2倍,代表对应卷积核每个位置横纵坐标都有偏移量。
        self.p_conv = nn.Conv2d(in_channel, 2 * kernel_size * kernel_size, kernel_size=3, padding=1, stride=stride)
        nn.init.constant_(self.p_conv.weight, 0)
        self.p_conv.register_full_backward_hook(self._set_lr)

        self.modulation = modulation  # modulation是可选参数,若设置为True,那么在进行卷积操作时,对应卷积核的每个位置都会分配一个权重。
        if modulation:
            self.m_conv = nn.Conv2d(in_channel, kernel_size * kernel_size, kernel_size=3, padding=1, stride=stride)
            nn.init.constant_(self.m_conv.weight, 0)
            self.m_conv.register_full_backward_hook(self._set_lr)

    @staticmethod
    def _set_lr(module, grad_input, grad_output):
        grad_input = (grad_input[i] * 0.1 for i in range(len(grad_input)))
        grad_output = (grad_output[i] * 0.1 for i in range(len(grad_output)))

    def forward(self, x):
        offset = self.p_conv(x)
        if self.modulation:
            m = torch.sigmoid(self.m_conv(x))

        dtype = offset.data.type()
        ks = self.kernel_size
        N = offset.size(1) // 2

        if self.padding:
            x = self.zero_padding(x)

        # (b, 2N, h, w)
        p = self._get_p(offset, dtype)

        # (b, h, w, 2N)
        p = p.contiguous().permute(0, 2, 3, 1)
        q_lt = p.detach().floor()
        q_rb = q_lt + 1

        q_lt = torch.cat([torch.clamp(q_lt[..., :N], 0, x.size(2) - 1), torch.clamp(q_lt[..., N:], 0, x.size(3) - 1)],
                         dim=-1).long()
        q_rb = torch.cat([torch.clamp(q_rb[..., :N], 0, x.size(2) - 1), torch.clamp(q_rb[..., N:], 0, x.size(3) - 1)],
                         dim=-1).long()
        q_lb = torch.cat([q_lt[..., :N], q_rb[..., N:]], dim=-1)
        q_rt = torch.cat([q_rb[..., :N], q_lt[..., N:]], dim=-1)

        # clip p
        p = torch.cat([torch.clamp(p[..., :N], 0, x.size(2) - 1), torch.clamp(p[..., N:], 0, x.size(3) - 1)], dim=-1)

        # bilinear kernel (b, h, w, N)
        g_lt = (1 + (q_lt[..., :N].type_as(p) - p[..., :N])) * (1 + (q_lt[..., N:].type_as(p) - p[..., N:]))
        g_rb = (1 - (q_rb[..., :N].type_as(p) - p[..., :N])) * (1 - (q_rb[..., N:].type_as(p) - p[..., N:]))
        g_lb = (1 + (q_lb[..., :N].type_as(p) - p[..., :N])) * (1 - (q_lb[..., N:].type_as(p) - p[..., N:]))
        g_rt = (1 - (q_rt[..., :N].type_as(p) - p[..., :N])) * (1 + (q_rt[..., N:].type_as(p) - p[..., N:]))

        # (b, c, h, w, N)
        x_q_lt = self._get_x_q(x, q_lt, N)
        x_q_rb = self._get_x_q(x, q_rb, N)
        x_q_lb = self._get_x_q(x, q_lb, N)
        x_q_rt = self._get_x_q(x, q_rt, N)

        # (b, c, h, w, N)
        x_offset = g_lt.unsqueeze(dim=1) * x_q_lt + \
                   g_rb.unsqueeze(dim=1) * x_q_rb + \
                   g_lb.unsqueeze(dim=1) * x_q_lb + \
                   g_rt.unsqueeze(dim=1) * x_q_rt

        # modulation
        if self.modulation:
            m = m.contiguous().permute(0, 2, 3, 1)
            m = m.unsqueeze(dim=1)
            m = torch.cat([m for _ in range(x_offset.size(1))], dim=1)
            x_offset *= m

        x_offset = self._reshape_x_offset(x_offset, ks)
        out = self.conv(x_offset)

        return out

    def _get_p_n(self, N, dtype):
        # 由于卷积核中心点位置是其尺寸的一半,于是中心点向左(上)方向移动尺寸的一半就得到起始点,向右(下)方向移动另一半就得到终止点
        p_n_x, p_n_y = torch.meshgrid(
            torch.arange(-(self.kernel_size - 1) // 2, (self.kernel_size - 1) // 2 + 1),
            torch.arange(-(self.kernel_size - 1) // 2, (self.kernel_size - 1) // 2 + 1),
            indexing='ij'
        )
        # (2N, 1)
        p_n = torch.cat([torch.flatten(p_n_x), torch.flatten(p_n_y)], 0)
        p_n = p_n.view(1, 2 * N, 1, 1).type(dtype)

        return p_n

    def _get_p_0(self, h, w, N, dtype):
        # p0_y、p0_x就是输出特征图每点映射到输入特征图上的纵、横坐标值。
        p_0_x, p_0_y = torch.meshgrid(
            torch.arange(1, h * self.stride + 1, self.stride),
            torch.arange(1, w * self.stride + 1, self.stride),
            indexing='ij'
        )

        p_0_x = torch.flatten(p_0_x).view(1, 1, h, w).repeat(1, N, 1, 1)
        p_0_y = torch.flatten(p_0_y).view(1, 1, h, w).repeat(1, N, 1, 1)
        p_0 = torch.cat([p_0_x, p_0_y], 1).type(dtype)

        return p_0

    # 输出特征图上每点(对应卷积核中心)加上其对应卷积核每个位置的相对(横、纵)坐标后再加上自学习的(横、纵坐标)偏移量。
    # p0就是将输出特征图每点对应到卷积核中心,然后映射到输入特征图中的位置;
    # pn则是p0对应卷积核每个位置的相对坐标;
    def _get_p(self, offset, dtype):
        N, h, w = offset.size(1) // 2, offset.size(2), offset.size(3)

        # (1, 2N, 1, 1)
        p_n = self._get_p_n(N, dtype)
        # (1, 2N, h, w)
        p_0 = self._get_p_0(h, w, N, dtype)
        p = p_0 + p_n + offset
        return p

    def _get_x_q(self, x, q, N):
        # 计算双线性插值点的4邻域点对应的权重
        b, h, w, _ = q.size()
        padded_w = x.size(3)
        c = x.size(1)
        # (b, c, h*w)
        x = x.contiguous().view(b, c, -1)

        # (b, h, w, N)
        index = q[..., :N] * padded_w + q[..., N:]  # offset_x*w + offset_y
        # (b, c, h*w*N)
        index = index.contiguous().unsqueeze(dim=1).expand(-1, c, -1, -1, -1).contiguous().view(b, c, -1)

        x_offset = x.gather(dim=-1, index=index).contiguous().view(b, c, h, w, N)

        return x_offset

    @staticmethod
    def _reshape_x_offset(x_offset, ks):
        b, c, h, w, N = x_offset.size()
        x_offset = torch.cat([x_offset[..., s:s + ks].contiguous().view(b, c, h, w * ks) for s in range(0, N, ks)],
                             dim=-1)
        x_offset = x_offset.contiguous().view(b, c, h * ks, w * ks)

        return x_offset
有了DFMConv模块后,就可以完成EDE-block,EDE-block的结构图和代码如下:
此模块的代码放在该位置->yolox\models\network_blocks.py
(其实我就放在可变形卷积的下面)
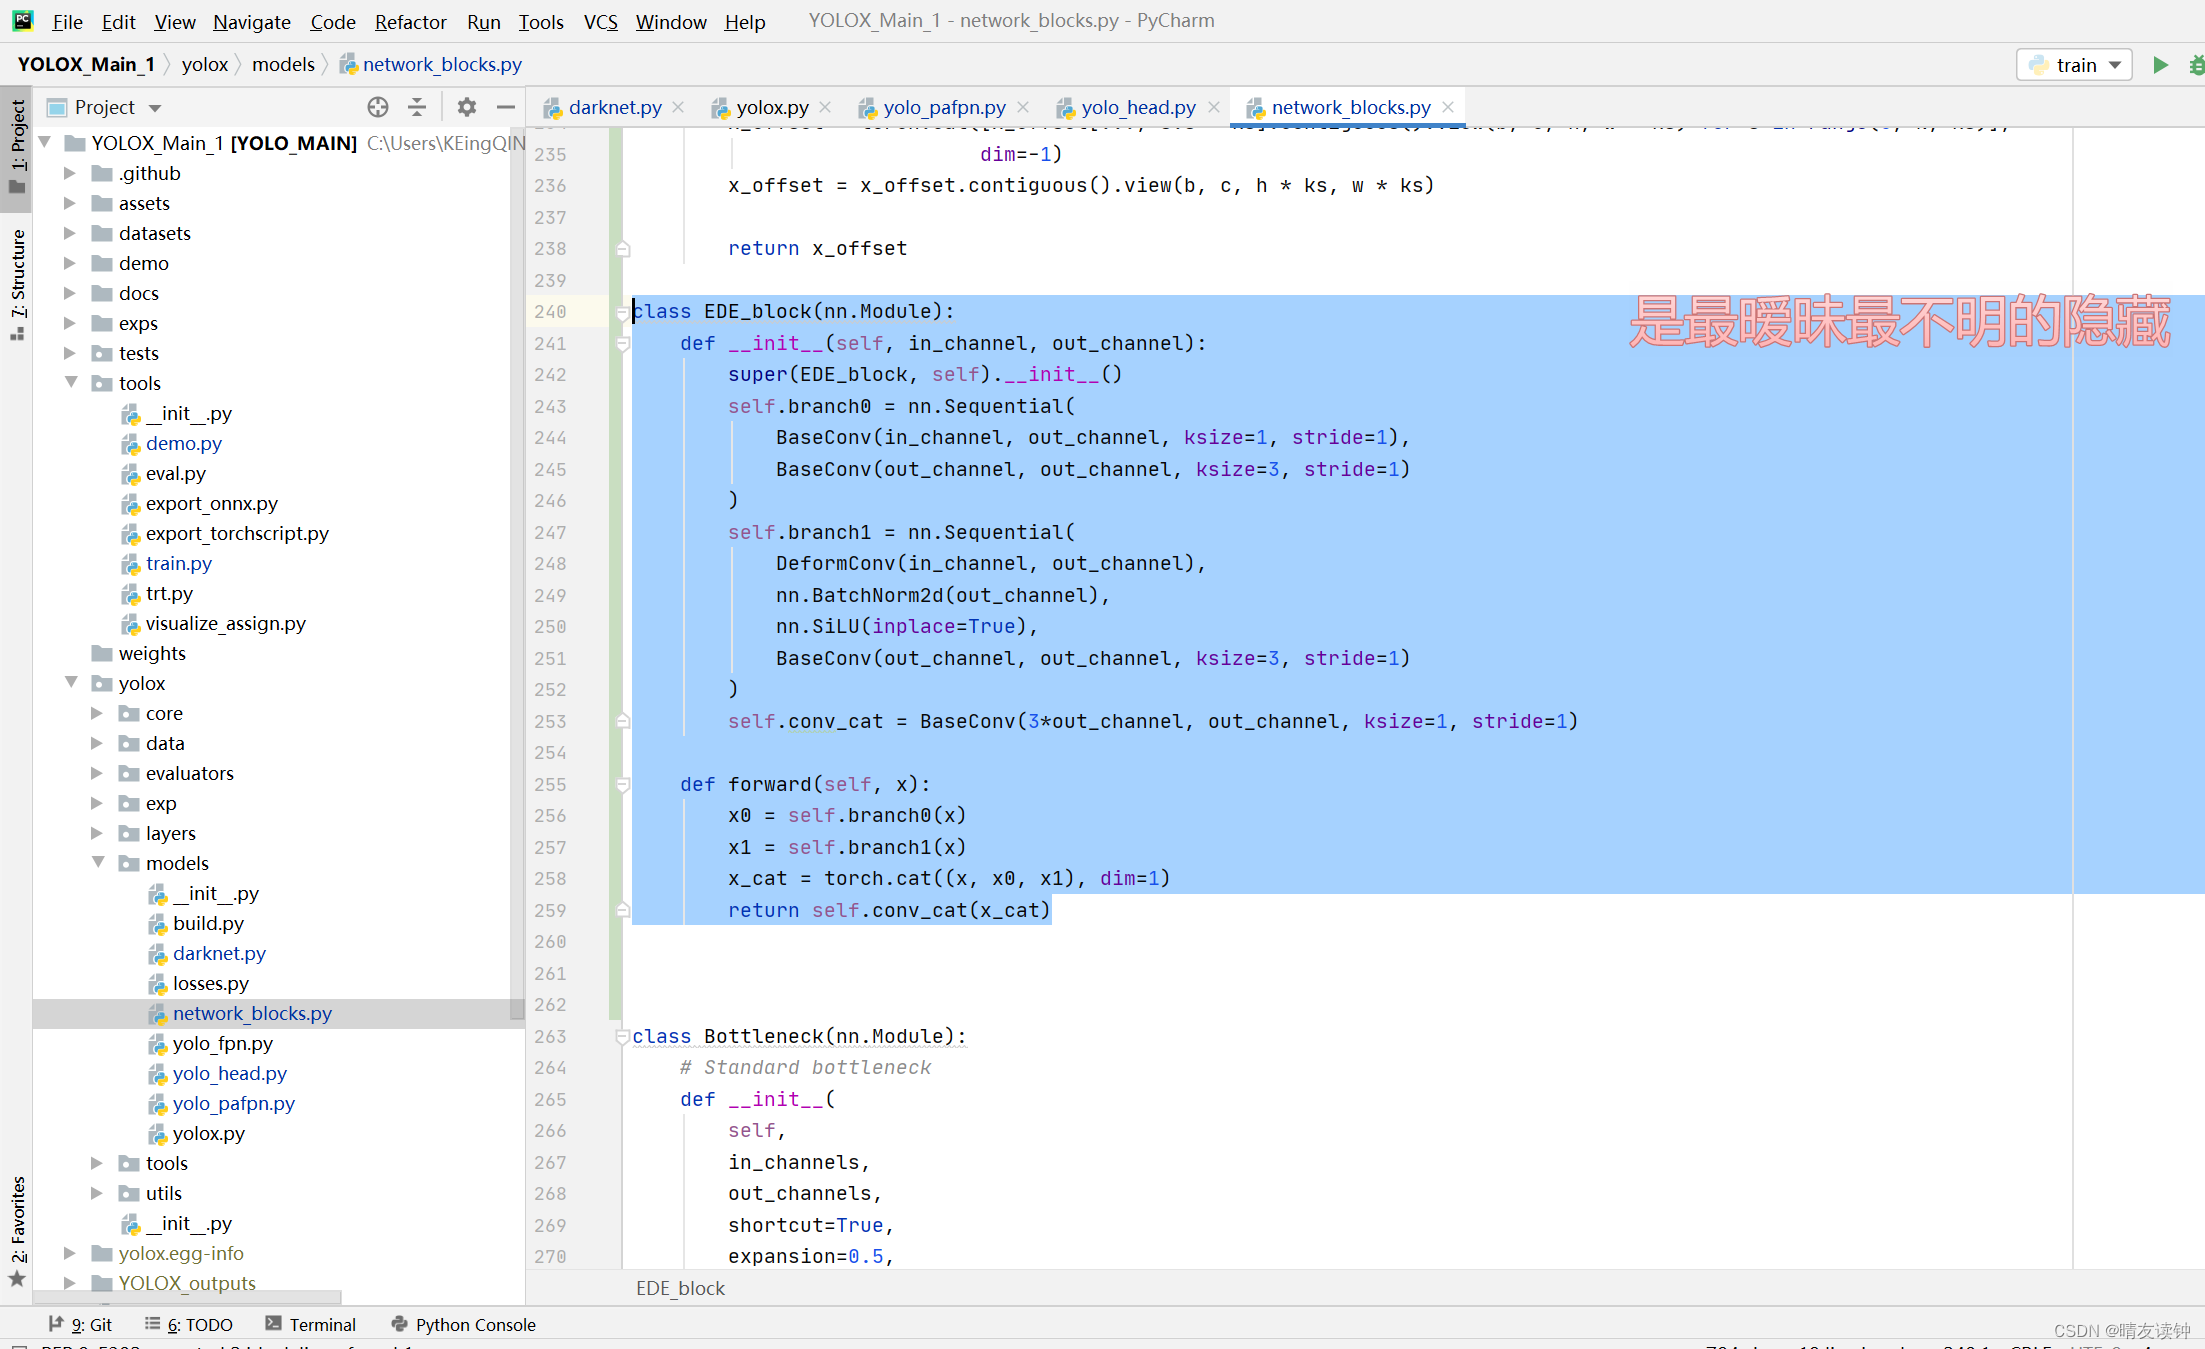

class EDE_block(nn.Module):
    def __init__(self, in_channel, out_channel):
        super(EDE, self).__init__()
        self.branch0 = nn.Sequential(
            BaseConv(in_channel, out_channel, ksize=1, stride=1),
            BaseConv(out_channel, out_channel, ksize=3, stride=1)
        )#左支路分别经过1*1和3*3的两个BaseConv。
        self.branch1 = nn.Sequential(
            DeformConv(in_channel, out_channel),
            nn.BatchNorm2d(out_channel),
            nn.SiLU(inplace=True),
            BaseConv(out_channel, out_channel, ksize=3, stride=1)
        )#中支路首先经过(可变形卷积,BN归一化,SiLU激活)这三块看作DFMConv模块,然后经过一个3*3的BaseConv。
        self.conv_cat = BaseConv(3*out_channel, out_channel, ksize=1, stride=1)#最后将左、中、和右(右支路就是原特征层)完成拼接后的结果压缩回需要的通道数即out_channel

    def forward(self, x):
        x0 = self.branch0(x)
        x1 = self.branch1(x)
        x_cat = torch.cat((x, x0, x1), dim=1)#在维度1即通道上进行拼接
        return self.conv_cat(x_cat)
有了EDE-block后,可以完成CSPLayer层,结构图和代码如下:
#因为取的名字和原yolox网络相同,所以请注意修改或注释原网络的CSPLayer层,以便网络正确调用修改过后的层!~
此模块的代码放在该位置->yolox\models\network_blocks.py
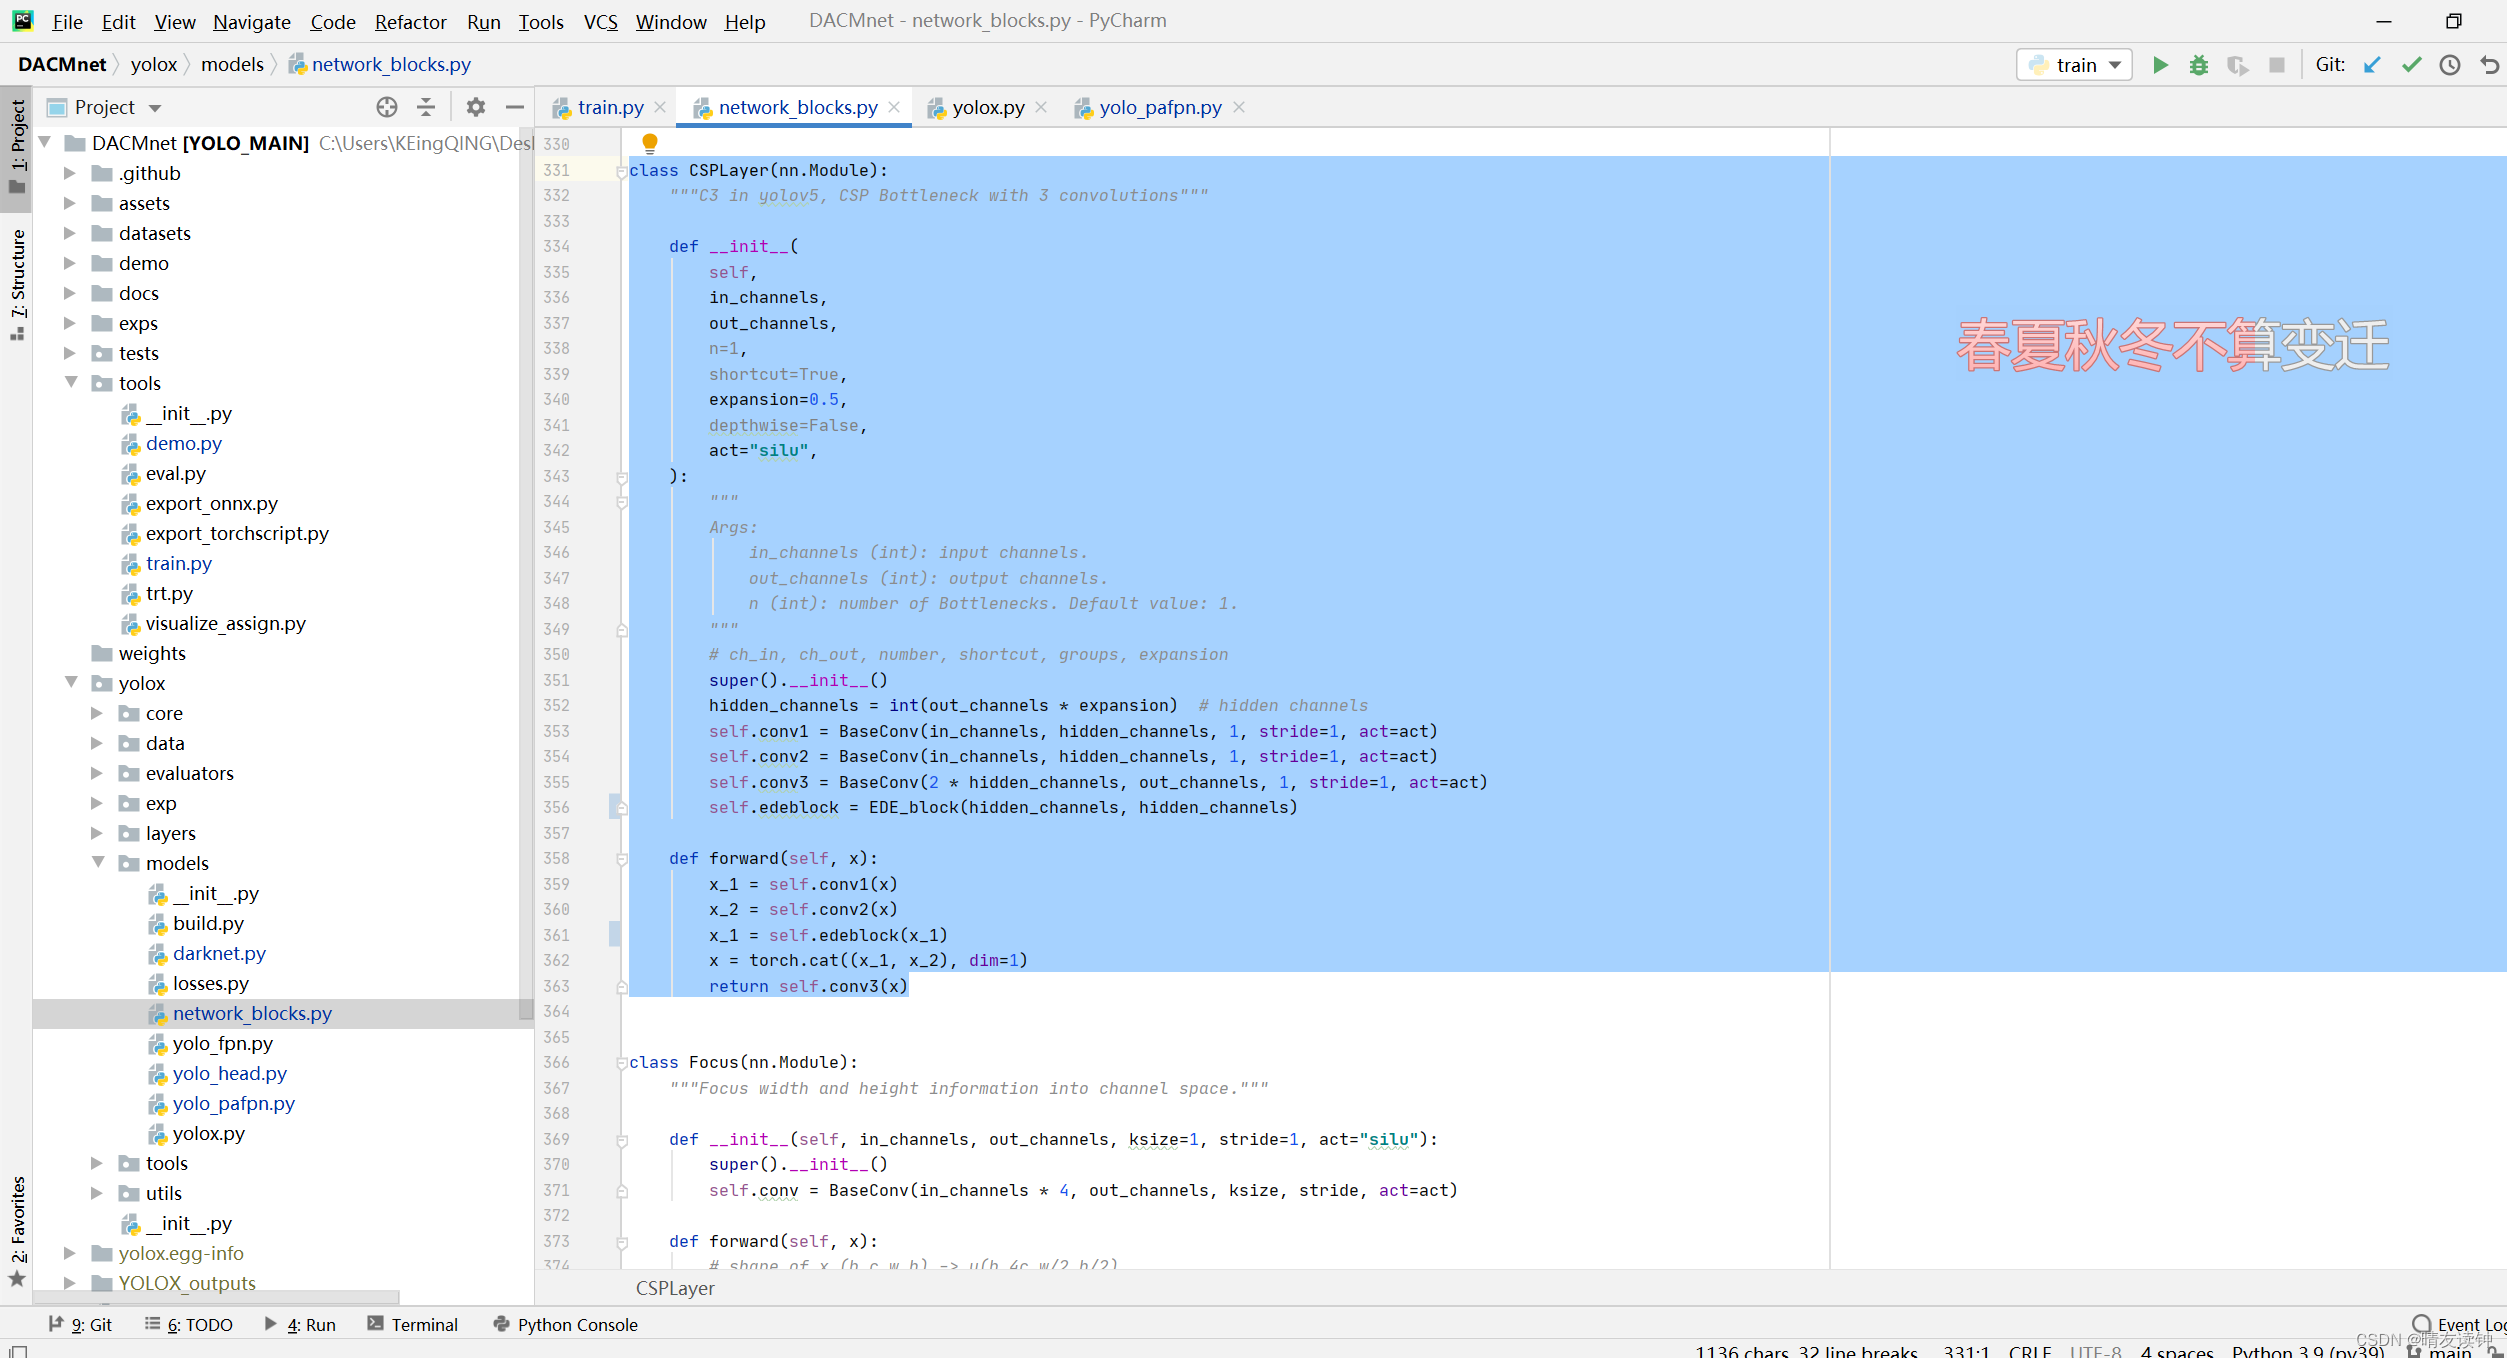

class CSPLayer(nn.Module):
    """C3 in yolov5, CSP Bottleneck with 3 convolutions"""

    def __init__(
        self,
        in_channels,
        out_channels,
        n=1,
        shortcut=True,
        expansion=0.5,
        depthwise=False,
        act="silu",
    ):
        """
        Args:
            in_channels (int): input channels.
            out_channels (int): output channels.
            n (int): number of Bottlenecks. Default value: 1.
        """
        # ch_in, ch_out, number, shortcut, groups, expansion
        super().__init__()
        hidden_channels = int(out_channels * expansion)  # hidden channels
        self.conv1 = BaseConv(in_channels, hidden_channels, 1, stride=1, act=act)
        self.conv2 = BaseConv(in_channels, hidden_channels, 1, stride=1, act=act)

        self.edeblock = EDE_block(hidden_channels, hidden_channels)#与源代码唯一的区别,在右支路加了一个EDE-block。
        self.conv3 = BaseConv(2 * hidden_channels, out_channels, 1, stride=1, act=act)

    def forward(self, x):
        x_1 = self.conv1(x)
        x_1 = self.edeblock(x_1)

        x_2 = self.conv2(x)
        x = torch.cat((x_1, x_2), dim=1)#在维度1即通道上进行拼接
        return self.conv3(x)#拼接后再压缩回原通道
至此CSPLayer的改动就完成了!
二,backbone部分的dark5处
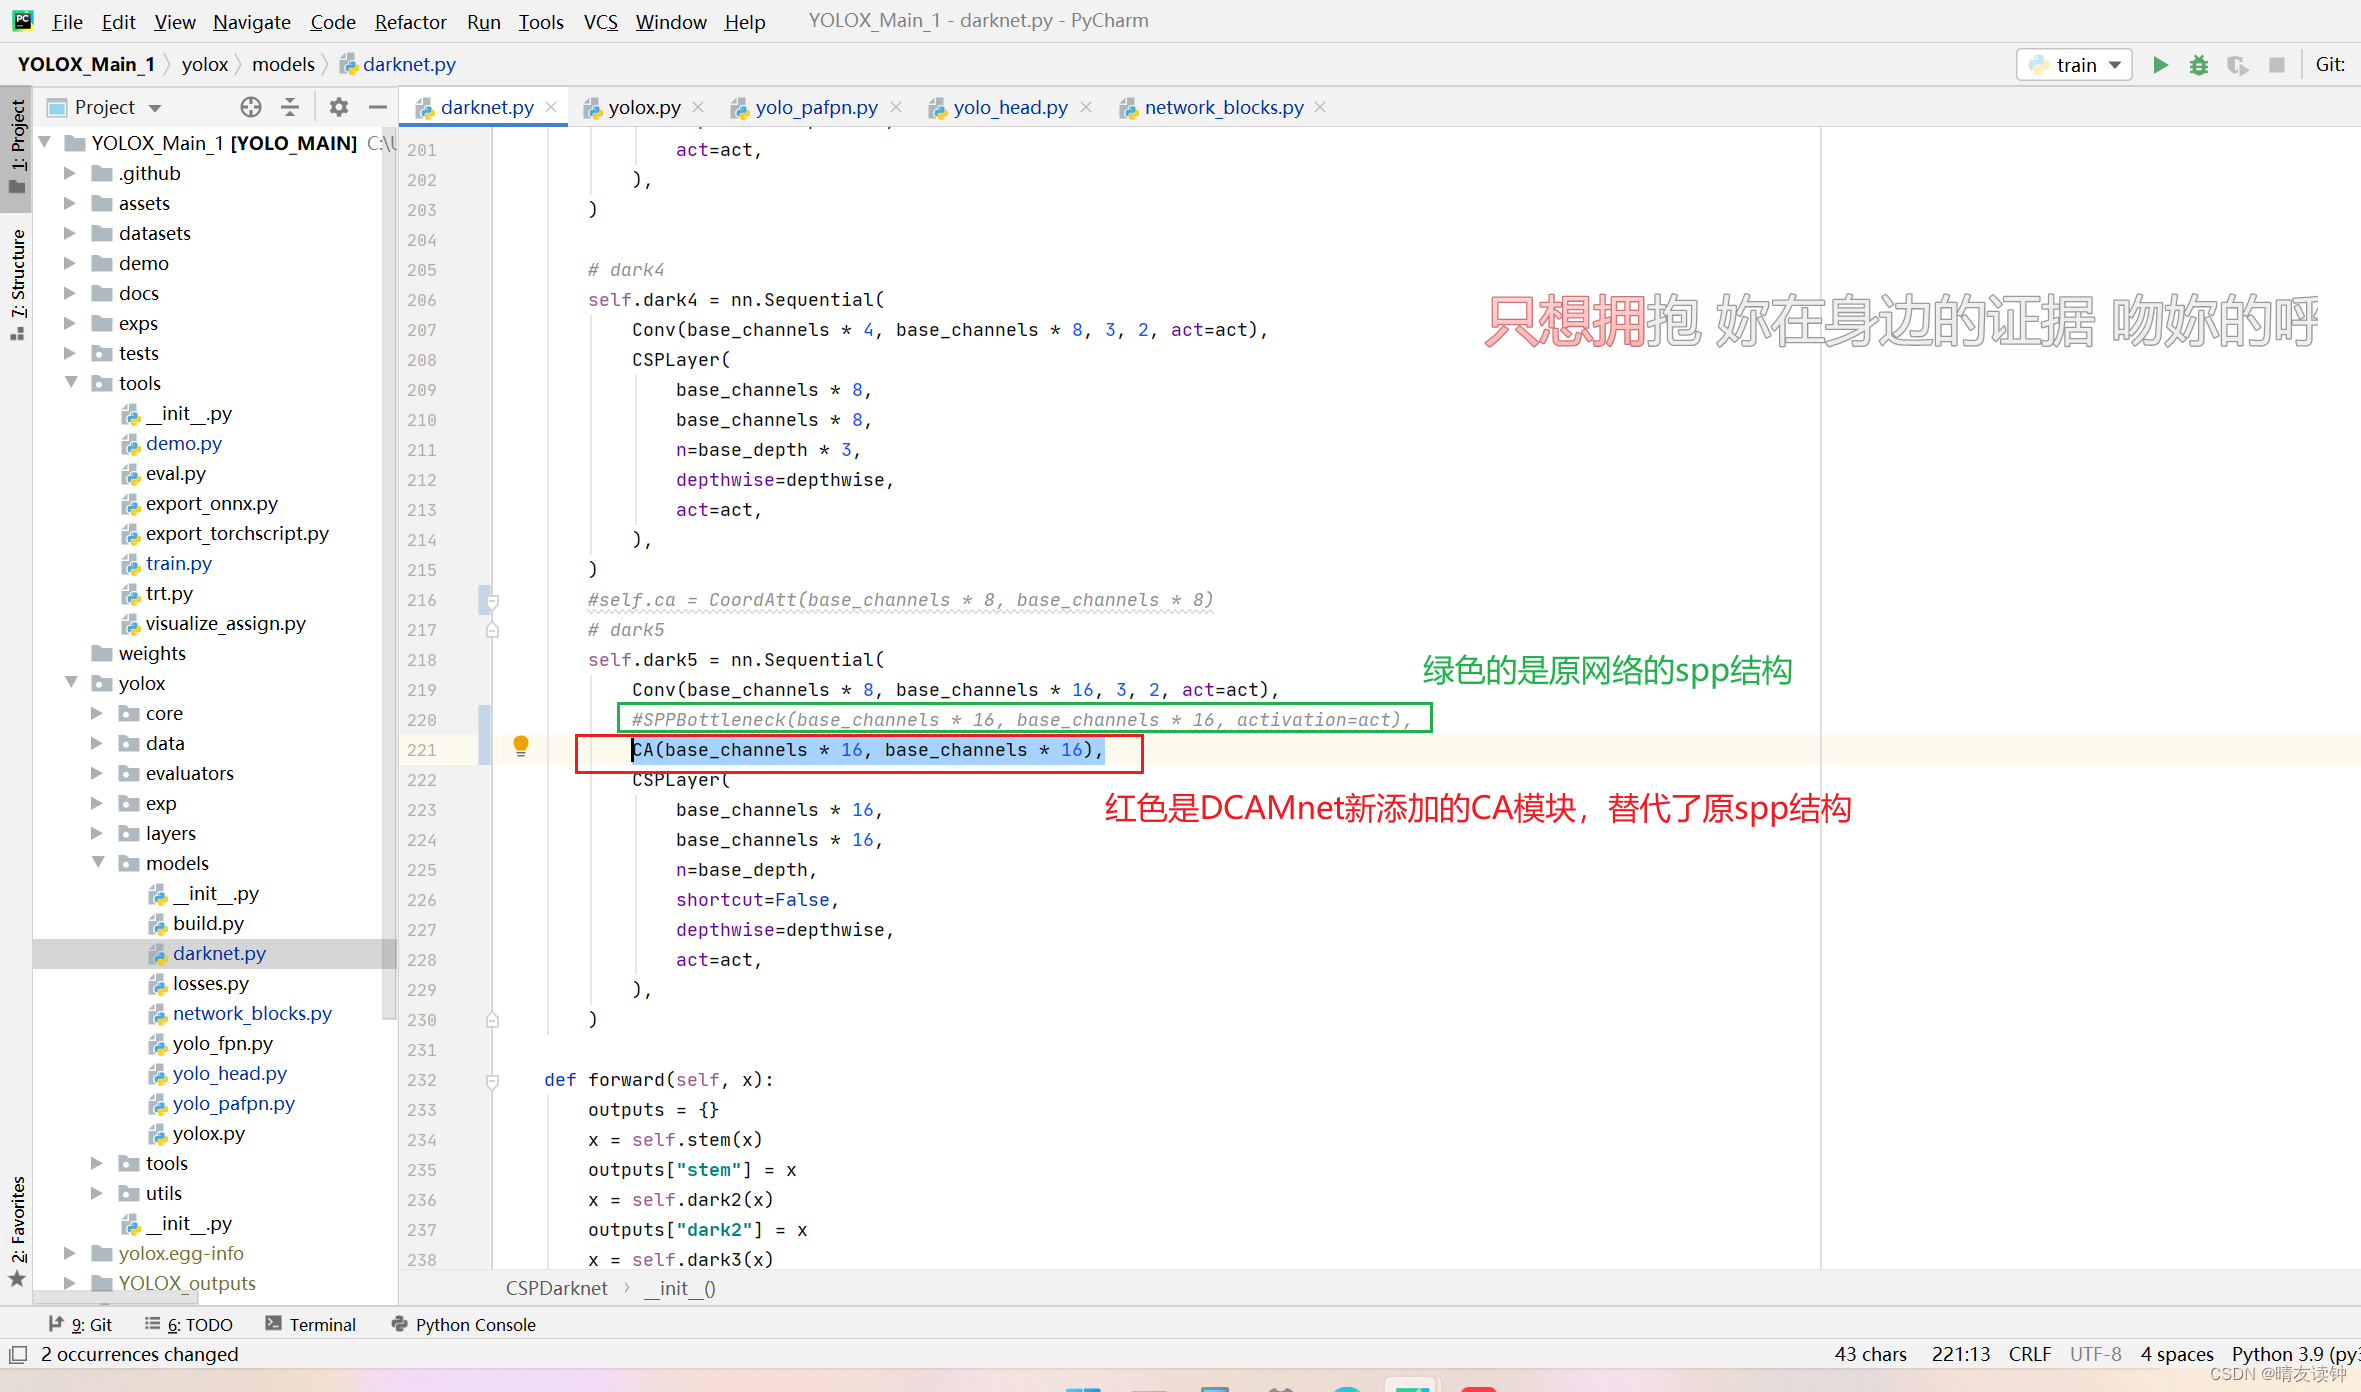
在此处添加了一个CA注意力模块来替换了源码的SPP结构,替换的原因请通过开头传送门移动论文阅读笔记自行学习。
CA即Coordinate Attention注意力模块,代码如下:
此模块的代码放在该位置->yolox\models\darknet.py
(其实就是backbone源码部分的上面,当然你放network_blocks.py文件里面也是没问题的,但是你就得在darknet.py导入写好的CA模块)

#CA注意模块
class h_sigmoid(nn.Module):
    def __init__(self, inplace=True):
        super(h_sigmoid, self).__init__()
        self.relu = nn.ReLU6(inplace=inplace)

    def forward(self, x):
        return self.relu(x + 3) / 6


class h_swish(nn.Module):
    def __init__(self, inplace=True):
        super(h_swish, self).__init__()
        self.sigmoid = h_sigmoid(inplace=inplace)

    def forward(self, x):
        return x * self.sigmoid(x)


class CA(nn.Module):
    def __init__(self, inp, oup, reduction=32):
        super(CA, self).__init__()
        self.pool_h = nn.AdaptiveAvgPool2d((None, 1))
        self.pool_w = nn.AdaptiveAvgPool2d((1, None))

        mip = max(8, inp // reduction)

        self.conv1 = nn.Conv2d(inp, mip, kernel_size=1, stride=1, padding=0)
        self.bn1 = nn.BatchNorm2d(mip)
        self.act = h_swish()

        self.conv_h = nn.Conv2d(mip, oup, kernel_size=1, stride=1, padding=0)
        self.conv_w = nn.Conv2d(mip, oup, kernel_size=1, stride=1, padding=0)

    def forward(self, x):
        identity = x

        n, c, h, w = x.size()
        x_h = self.pool_h(x)
        x_w = self.pool_w(x).permute(0, 1, 3, 2)

        y = torch.cat([x_h, x_w], dim=2)
        y = self.conv1(y)
        y = self.bn1(y)
        y = self.act(y)

        x_h, x_w = torch.split(y, [h, w], dim=2)
        x_w = x_w.permute(0, 1, 3, 2)

        a_h = self.conv_h(x_h).sigmoid()
        a_w = self.conv_w(x_w).sigmoid()

        out = identity * a_w * a_h

        return out
有了CA模块就能在dark上进行添加了,如下:
就加这一行代码,替换原来的spp结构->
CA(base_channels * 16, base_channels * 16),
三,检测头
DCAMnet把Head的右支路上的第一个BaseConv替换成了DFMConv,结构图如下:
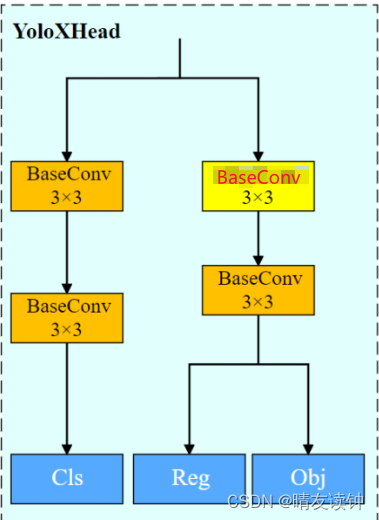
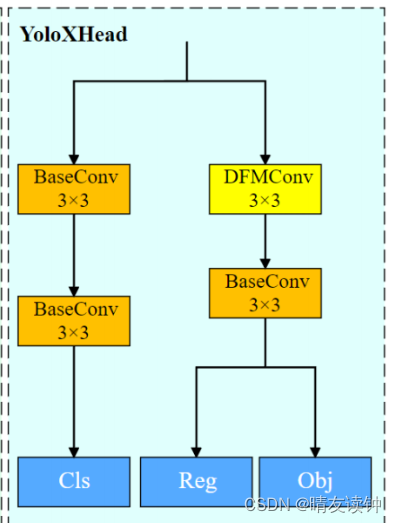
所以先在->yolox\models\yolo_head.py
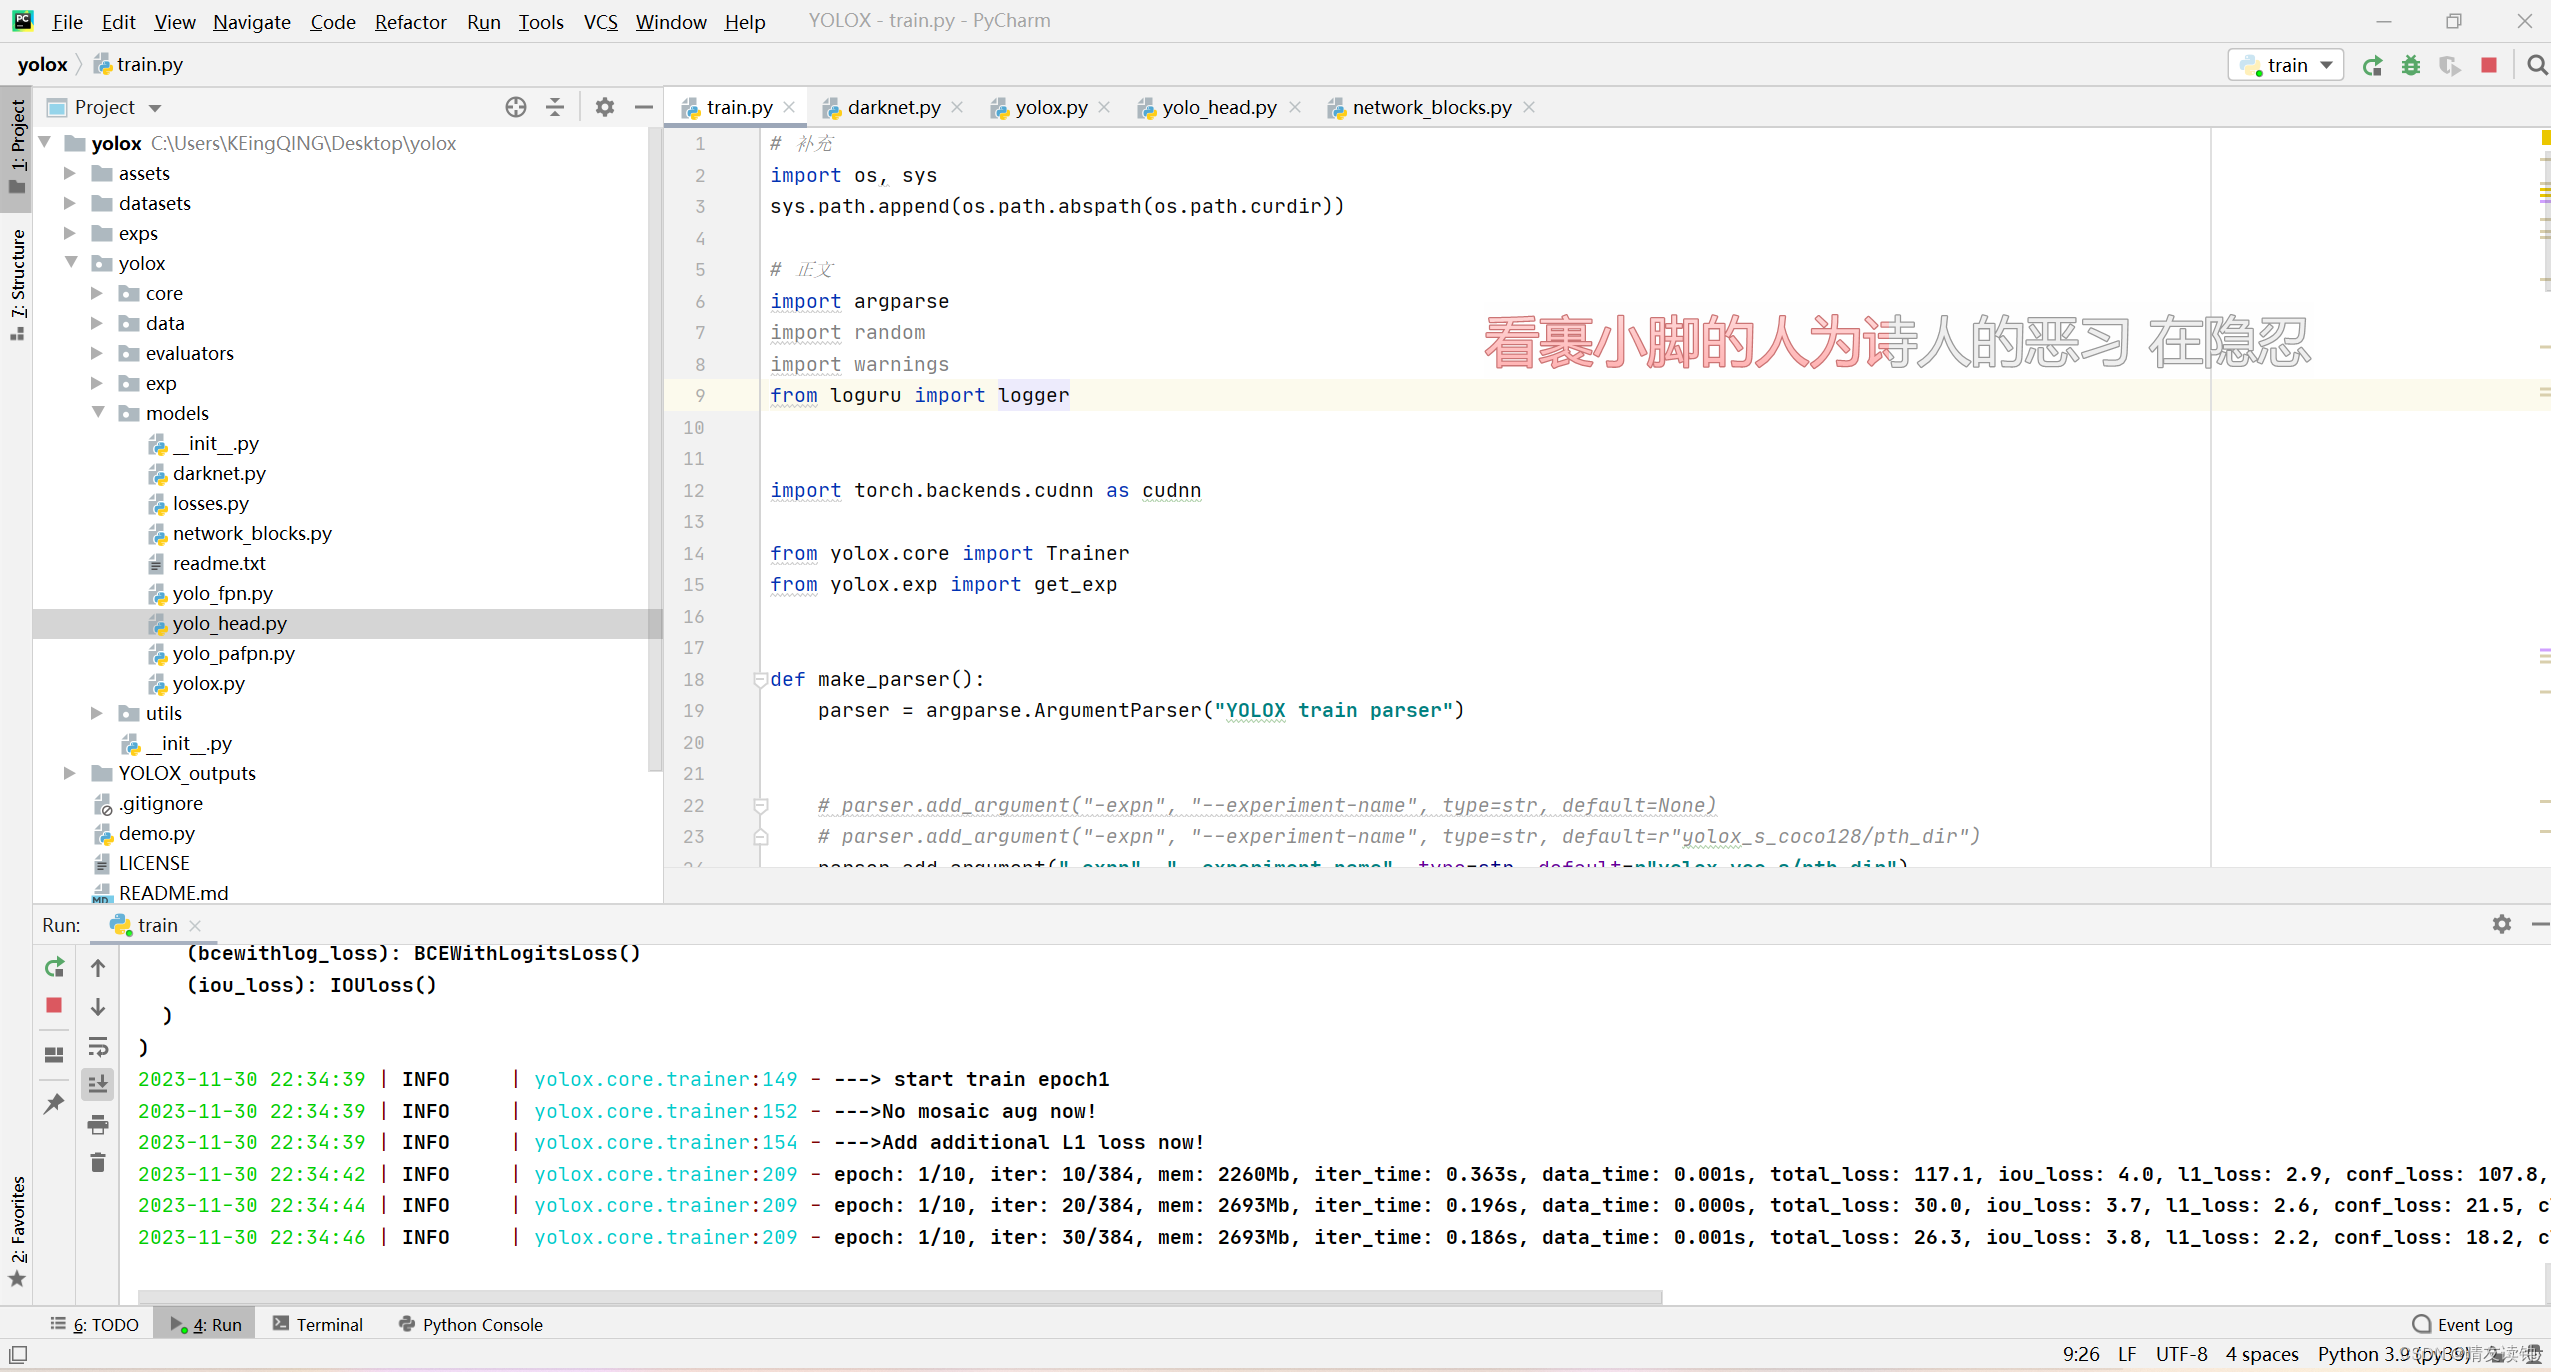
中导入DFMConv模块,如下图:

然后在reg_convs模块中用DFMConv模块替换原来的BaseConv模块,如下图:
DeformConv(int(256 * width),
           int(256 * width)),
nn.BatchNorm2d(int(256 * width)),
nn.SiLU(inplace=True),

至此,DCAMnet就完成复现了,祝愿各位代码成功跑通
o(* ̄▽ ̄*)ブ
博主自己对着自己写的教程,从头做了一遍,是没有任何问题的!
因为博主也是才学了不到2月半的小白,所以难免出现问题,如果有问题欢迎在评论区指出!~


![[iOS开发]UITableView的性能优化](https://img-blog.csdnimg.cn/97ad9136a44b471c815dc8c64d05d176.png)

