实验前准备
HAProxy服务器:192.168.188.11
内核版本最好要在2.6以上,使用uname -r查看自己的内核版本是否适用![]()
Nginx服务器1:192.168.188.12
Nginx服务器2:192.168.188.13
客户端:192.168.188.1(本机windows)
- HAProxy部署
- 关闭防火墙
systemctl stop firewalld
setenforce 0 - 编译安装HAProxy
安装依赖包
yum install -y pcre-devel bzip2-devel gcc gcc-c++ make
解压HAProxy软件包
tar zxvf haproxy-1.5.19.tar.gz
安装
cd haproxy-1.5.19/
使用uname -r查看内核版本,如果是2.6的那下面的参数就用TARGET=linux26,大于2.6.28的请使用TARGET=linux2628
make TARGET=linux2628 ARCH=x86_64
make install - HAProxy服务器配置
复制一份模板过来使用
mkdir /etc/haproxy
/opt/haproxy-1.5.19是我的软件包的位置
cp cp /opt/haproxy-1.5.19/examples/haproxy.cfg /etc/haproxy/
对模板配置文件进行修改
cd /etc/haproxy
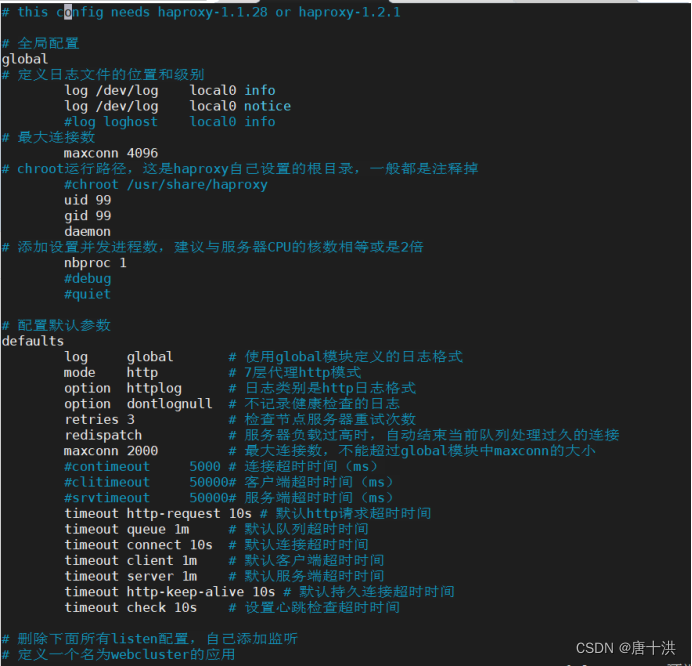
vim haproxy.cfg# this config needs haproxy-1.1.28 or haproxy-1.2.1 # 全局配置 global # 定义日志文件的位置和级别 log /dev/log local0 info log /dev/log local0 notice #log loghost local0 info # 最大连接数 maxconn 4096 # chroot运行路径,这是haproxy自己设置的根目录,一般都是注释掉 #chroot /usr/share/haproxy uid 99 gid 99 daemon # 添加设置并发进程数,建议与服务器CPU的核数相等或是2倍 nbproc 1 #debug #quiet # 配置默认参数 defaults log global # 使用global模块定义的日志格式 mode http # 7层代理http模式 option httplog # 日志类别是http日志格式 option dontlognull # 不记录健康检查的日志 retries 3 # 检查节点服务器重试次数 redispatch # 服务器负载过高时,自动结束当前队列处理过久的连接 maxconn 2000 # 最大连接数,不能超过global模块中maxconn的大小 #contimeout 5000 # 连接超时时间(ms) #clitimeout 50000# 客户端超时时间(ms) #srvtimeout 50000# 服务端超时时间(ms) timeout http-request 10s # 默认http请求超时时间 timeout queue 1m # 默认队列超时时间 timeout connect 10s # 默认连接超时时间 timeout client 1m # 默认客户端超时时间 timeout server 1m # 默认服务端超时时间 timeout http-keep-alive 10s # 默认持久连接超时时间 timeout check 10s # 设置心跳检查超时时间 # 删除下面所有listen配置,自己添加监听 # 定义一个名为webcluster的应用 listen webcluster 0.0.0.0:80 # 检查服务器的test.html文件 option httpchk GET /test.html # 负载均衡调度算法使用轮询算法 balance roundrobin # 定义节点 # check inter 2000是健康检查时间间隔,fall 3表示失败3次代表节点失效 # 节点后如果加backup,表示是备用服务器,只有在所有在线节点失效后才启用,不加表示是在线节点 server inst1 192.168.188.12:80 check inter 2000 fall 3 server inst2 192.168.188.13:80 check inter 2000 fall 3

- 添加HAProxy系统服务
复制初始化脚本文件
cp /opt/haproxy-1.5.19/examples/haproxy.init /etc/init.d/haproxy
给与执行权限
chmod +x /etc/init.d/haproxy
将初始化脚本添加到系统服务中
chkconfig --add /etc/init.d/haproxy
软链接到命令目录底下,方便使用
ln -s /usr/local/sbin/haproxy /usr/sbin/haproxy
启动服务
service haproxy start
- 关闭防火墙
- 节点服务器部署
- 关闭防火墙
systemctl stop firewalld
setenforce 0 - 安装nginx的过程不再赘述,还不清楚请翻阅之前的实验
- 在两台服务器上写入不同的内容,注意这里的页面文件不是默认的index.html,因为我们在haproxy.cfg文件中检查的就是test.html
echo "my ip is 192.168.188.12" > /usr/local/nginx/html/test.html
echo "my ip is 192.168.188.13" > /usr/local/nginx/html/test.html - 启动服务
systemctl start nginx
- 关闭防火墙
- 测试
- 在客户端浏览器上访问http://192.168.188.11/test.html,多刷新几次,负载均衡也没问题,注意这里我们访问的uri是test.html,所以得到的响应数据就是节点服务器上的test.html,如果只输入192.168.188.11会怎么样呢?可以自己猜测一下然后进行实验


- 在客户端浏览器上访问http://192.168.188.11/test.html,多刷新几次,负载均衡也没问题,注意这里我们访问的uri是test.html,所以得到的响应数据就是节点服务器上的test.html,如果只输入192.168.188.11会怎么样呢?可以自己猜测一下然后进行实验
- 补充:默认haproxy的日志是输出到系统的syslog中,不便于查看,所以我们单独保存haproxy的日志
- vim /etc/haproxy/haproxy.cfg
global
log /dev/log local0 info
log /dev/log local0 notice
这一步我们之前的步骤已经改过了,没改过的改完记得重启haproxy服务 - 一般来说需要修改rsyslog配置,但是为了便于管理,直接在/etc/rsyslog.d/下新建一个haproxy.conf文件,将haproxy的配置独立定义,rsyslog启动时会自动加载此目录下的所有配置文件
vim /etc/rsyslog.d/haproxy.confif ($programname == 'haproxy' and $syslogseverity-text == 'info') then -/var/log/haproxy/haproxy-info.log &~ if ($programname == 'haproxy' and $syslogseverity-text == 'notice') then -/var/log/haproxy/haproxy-notice.log &~
这样haproxy的info日志将记录到/var/log/haproxy/haproxy-info.log下,notice日志将记录到/var/log/haproxy/haproxy-notice.log下 - 重启rsyslog
systemctl restart rsyslog.service - 此时我们再进行几次访问,就能看到相应的日志了
tail /var/log/haproxy/haproxy-info.log
- vim /etc/haproxy/haproxy.cfg


