初始化脚手架
使用 npx 创建
npx create-react-app 项目名
使用 npm install 创建
全局安装create-react-app包:
npm install -g create-react-app
创建脚手架:
create-react-app 项目名
npm 镜像
执行 create-react-app时,还会自动安装一些包,这个时候,默认使用的是npm,速度较慢,可以替换为国内源。
# 换源
npm config set registry https://registry.npm.taobao.org
# 查看修改的结果
npm config get registry
若已经安装
cpm,则全局安装create-react-app时可以使用cnpm,但需要注意的是,在执行create-react-app my-app时,还会自动安装一些包,这个时候,默认使用的还是npm。
脚手架文件结构
public
-
favicon.ico
偏爱图标,设置默认图标 -
index.html
详见注释(英文注释为react自动生成)<!DOCTYPE html> <html lang="en"> <head> <meta charset="utf-8" /> <!-- %PUBLIC_URL% 代表public文件夹的路径 --> <link rel="icon" href="%PUBLIC_URL%/favicon.ico" /> <!-- 开启理想视口,用于移动端适配 --> <meta name="viewport" content="width=device-width, initial-scale=1" /> <!-- 用于配置浏览器页签和地址栏颜色(仅支持Android手机浏览器) --> <meta name="theme-color" content="#000000" /> <meta name="description" content="Web site created using create-react-app" /> <!-- 用于指定网页添加到手机桌面后的图标(iPhone) --> <link rel="apple-touch-icon" href="%PUBLIC_URL%/logo192.png" /> <!-- manifest.json provides metadata used when your web app is installed on a user's mobile device or desktop. See https://developers.google.com/web/fundamentals/web-app-manifest/ 应用加壳时的配置文件 --> <link rel="manifest" href="%PUBLIC_URL%/manifest.json" /> <!-- Notice the use of %PUBLIC_URL% in the tags above. It will be replaced with the URL of the `public` folder during the build. Only files inside the `public` folder can be referenced from the HTML. Unlike "/favicon.ico" or "favicon.ico", "%PUBLIC_URL%/favicon.ico" will work correctly both with client-side routing and a non-root public URL. Learn how to configure a non-root public URL by running `npm run build`. --> <title>React App</title> </head> <body> <!-- 若浏览器不支持js则展示标签中的内容 --> <noscript>You need to enable JavaScript to run this app.</noscript> <div id="root"></div> <!-- This HTML file is a template. If you open it directly in the browser, you will see an empty page. You can add webfonts, meta tags, or analytics to this file. The build step will place the bundled scripts into the <body> tag. To begin the development, run `npm start` or `yarn start`. To create a production bundle, use `npm run build` or `yarn build`. --> </body> </html> -
robots.txt
爬虫协议规则文件,限制网站爬虫抓取
src
-
App.js
定义名为App的组件 -
App.css
App组件的样式表 -
index.js
入口文件import React from 'react'; import ReactDOM from 'react-dom'; import './index.css'; import App from './App'; import reportWebVitals from './reportWebVitals'; ReactDOM.render( <React.StrictMode> <App /> </React.StrictMode>, document.getElementById('root') ); // If you want to start measuring performance in your app, pass a function // to log results (for example: reportWebVitals(console.log)) // or send to an analytics endpoint. Learn more: https://bit.ly/CRA-vitals reportWebVitals();App组件外包裹
React.StrictMode标签可以对App组件代码进行检查,如:警告字符串类型的ref -
index.css
全局通用样式表,也可放在public文件夹中,在index.html中用link标签引入(不建议,破坏结构) -
reportWebVitals.js
记录页面性能 -
setupTests.js
做组件测试(整体测试或单元测试)
一个简单的Hello案例
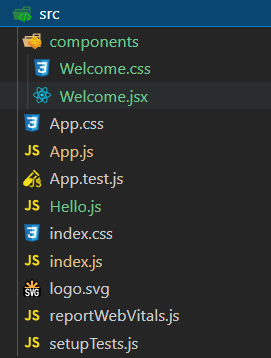
index.js
// 引入React核心库
import React from 'react'
// 引入React-DOM
import ReactDOM from 'react-dom'
// 引入App组件
import App from './App' // .js后缀可省略

// 渲染App到页面
ReactDOM.render(<App/>, document.getElementById('root'))
App.js
// 创建“外壳”组件App
import React, {Component} from "react" // 这里的{Component}能够引用是因为React.Component被局部暴露
import Hello from "./Hello"
import Welcome from "./components/Welcome"

// 创建并暴露App组件
export default class App extends Component {
  render() {
    return(
      <div>
        <Hello/>
        <Welcome/>
      </div>
    )
  }
}

// 暴露App组件
// export default App
Hello.js
import React, {Component} from "react"

export default class Hello extends Component {
    render() {
        return(
            <h1>Hello React</h1>
        )
    }
}
Welcome.jsx
import React, {Component} from "react"
import './Welcome.css'

export default class Welcome extends Component {
    render() {
        return(
            <h1 className="wel">Welcome to line2!</h1>
        )
    }
}
Welcome.css
.wel {
    color: blueviolet;
}
效果
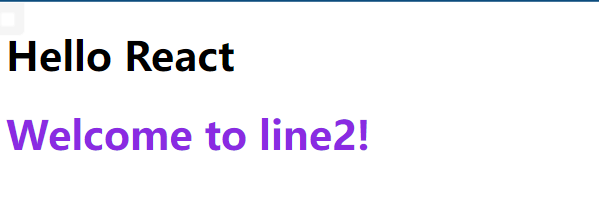
需要注意的点
-
js文件可以更改为jsx文件(index.js也是)
-
import React, {Component} from "react"里的{Component}能够引用是因为React.Component被局部暴露,即:未暴露不能这么写,可以写成:const {Component} = React,继承时不再写extends React.Component,直接写extends Component即可 -
组件文件夹中为每个子组件创建文件夹,可以有两种形式:
- 文件位置:
components/Welcome/Welcome.js,引用方式:import Welcome from "./components/Welcome/Welcome" - 文件位置:
components/Welcome/index.js,引用方式:import Welcome from "./components/Welcome"
- 文件位置:
-
样式的模块化:将
Welcome.css更名为Welcome.module.css,随后在对应组件中引入import welcome from './index.module.css'组件完整代码如下:import React, {Component} from "react" import welcome from './index.module.css' export default class Welcome extends Component { render() { return( <h1 className={welcome.wel}>Welcome to line2!</h1> ) } }
功能界面的组件化编码流程
- 拆分组件:拆分界面,抽取组件
- 实现静态组件:使用组件实现静态页面效果
- 实现动态组件
- 动态显示初始化数据(状态)
- 数据类型
- 数据名称
- 保存在哪个组件
- 交互(从绑定事件监听开始)
- 动态显示初始化数据(状态)
TodoList案例
文件结构
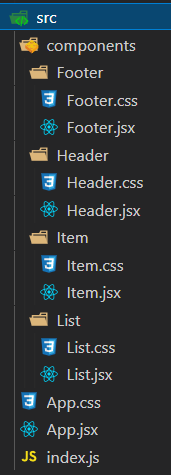
静态页面准备
index.js
import React from 'react'
import ReactDOM from 'react-dom'
import App from './App'

ReactDOM.render(<App/>, document.getElementById('root'))
App.jsx
import React, { Component } from 'react'

import Header from './components/Header/Header'
import List from './components/List/List'
import Footer from './components/Footer/Footer'

import './App.css'

export default class App extends Component {
  render() {
    return (
        <div className="todo-container">
            <div className="todo-wrap">
                <Header />
                <List />
                <Footer />
            </div>
        </div>
    )
  }
}
App.css
/*base*/
body {
    background: #fff;
  }

  .btn {
    display: inline-block;
    padding: 4px 12px;
    margin-bottom: 0;
    font-size: 14px;
    line-height: 20px;
    text-align: center;
    vertical-align: middle;
    cursor: pointer;
    box-shadow: inset 0 1px 0 rgba(255, 255, 255, 0.2), 0 1px 2px rgba(0, 0, 0, 0.05);
    border-radius: 4px;
  }

  .btn-danger {
    color: #fff;
    background-color: #da4f49;
    border: 1px solid #bd362f;
  }

  .btn-danger:hover {
    color: #fff;
    background-color: #bd362f;
  }

  .btn:focus {
    outline: none;
  }

  .todo-container {
    width: 600px;
    margin: 0 auto;
  }
  .todo-container .todo-wrap {
    padding: 10px;
    border: 1px solid #ddd;
    border-radius: 5px;
  }
Header.jsx
import React, { Component } from 'react'

import './Header.css'

export default class Header extends Component {
  render() {
    return (
        <div className="todo-header">
            <input type="text" placeholder="请输入你的任务名称,按回车键确认"/>
        </div>
    )
  }
}
Header.css
.todo-header input {
    width: 560px;
    height: 28px;
    font-size: 14px;
    border: 1px solid #ccc;
    border-radius: 4px;
    padding: 4px 7px;
}

.todo-header input:focus {
    outline: none;
    border-color: rgba(82, 168, 236, 0.8);
    box-shadow: inset 0 1px 1px rgba(0, 0, 0, 0.075), 0 0 8px rgba(82, 168, 236, 0.6);
}
List.jsx
import React, { Component } from 'react'

import Item from '../Item/Item'

import './List.css'

export default class List extends Component {
  render() {
    return (
        <ul className="todo-main">
            <Item />
            <Item />
        </ul>
    )
  }
}
List.css
.todo-main {
    margin-left: 0px;
    border: 1px solid #ddd;
    border-radius: 2px;
    padding: 0px;
  }

  .todo-empty {
    height: 40px;
    line-height: 40px;
    border: 1px solid #ddd;
    border-radius: 2px;
    padding-left: 5px;
    margin-top: 10px;
  }
Item.jsx
import React, { Component } from 'react'

import './Item.css'

export default class Item extends Component {
  render() {
    return (
        <li>
        <label>
            <input type="checkbox"/>
            <span>xxxxx</span>
        </label>
        <button className="btn btn-danger" style={{display: 'none'}}>删除</button>
        </li>
    )
  }
}
Item.css
  li {
    list-style: none;
    height: 36px;
    line-height: 36px;
    padding: 0 5px;
    border-bottom: 1px solid #ddd;
  }

  li label {
    float: left;
    cursor: pointer;
  }

  li label li input {
    vertical-align: middle;
    margin-right: 6px;
    position: relative;
    top: -1px;
  }

  li button {
    float: right;
    display: none;
    margin-top: 3px;
  }

  li:before {
    content: initial;
  }

  li:last-child {
    border-bottom: none;
  }
Footer.jsx
import React, { Component } from 'react'

import './Footer.css'

export default class Footer extends Component {
  render() {
    return (
        <div className="todo-footer">
            <label>
                <input type="checkbox"/>
            </label>
            <span>
                <span>已完成0</span> / 全部2
            </span>
            <button className="btn btn-danger">清除已完成任务</button>
        </div>
    )
  }
}
Footer.css
.todo-footer {
    height: 40px;
    line-height: 40px;
    padding-left: 6px;
    margin-top: 5px;
  }

  .todo-footer label {
    display: inline-block;
    margin-right: 20px;
    cursor: pointer;
  }

  .todo-footer label input {
    position: relative;
    top: -1px;
    vertical-align: middle;
    margin-right: 5px;
  }

  .todo-footer button {
    float: right;
    margin-top: 5px;
  }
动态初始化列表
目前没有学消息订阅与发布,兄弟组件间无法通信,所以将状态放在App组件中。
App.jsx
// 初始化状态
state = {todoList:[
    {id: 1, name: '吃饭', done: true},
    {id: 2, name: '睡觉', done: true},
    {id: 3, name: '写代码', done: false}
]}

render() {
const {todoList} = this.state
return (
    <div className="todo-container">
        <div className="todo-wrap">
            <Header/>
            <List todoList={todoList}/>
            <Footer/>
        </div>
    </div>
)
List组件接收后使用展开运算符传递给Item组件
List.jsx
render() {
    const {todoList} = this.props
    return (
        <ul className="todo-main">
            {
                todoList.map((todo) => {
                    return <Item key={todo.id} {...todo}/>
                })
            }
        </ul>
    )
}
Item组件接收props并展示
Item.jsx
render() {
    const {id, name, done} = this.props
    return (
        <li>
        <label>
            <input type="checkbox" defaultChecked={done}/> // 不能使用checked,会将选定状态写死,defaultChecked可能产生bug
            <span>{name}</span>
        </label>
        <button className="btn btn-danger" style={{display: 'none'}}>删除</button>
        </li>
    )
}
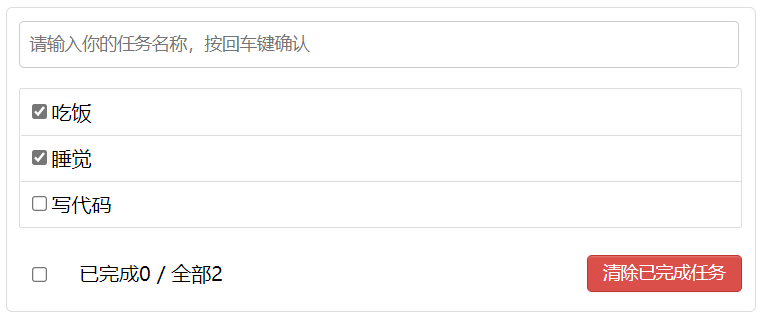
效果如下:
实现添加一个Todo
Header组件中为input添加onKeyUp事件
Header.jsx
export default class Header extends Component {
    handleKeyUp = (event) => {
        const {target, key} = event // 不建议使用keyCode
        if (key !== 'Enter') {
            return
        }
        console.log(target.value)
    }
    render() {
        return (
            <div className="todo-header">
                <input onKeyUp={this.handleKeyUp} type="text" placeholder="请输入你的任务名称,按回车键确认"/>
            </div>
        )
    }
}

App组件向Header组件传递addTodo函数
App.jsx
// addTodo用于添加一个todo,接收的参数是todo对象
addTodo = (todoObj) => {
    // 获取原todoList
    const {todoList} = this.state
    // 追加一个todo
    const newTodos = [todoObj, ...todoList]
    // 更新状态
    this.setState({todoList: newTodos})
}

render() {
const {todoList} = this.state
return (
    <div className="todo-container">
        <div className="todo-wrap">
            <Header addTodo={this.addTodo}/>
            <List todoList={todoList}/>
            <Footer/>
        </div>
    </div>
)
Header组件onKeyUp对输入数据进行处理并传回App组件
Header.jsx
handleKeyUp = (event) => {
    // 解构赋值获取target, key
    const {target, key} = event
    // 判断是否是回车
    if (key !== 'Enter') {
        return
    }
    // 添加的todo名字不能为空
    if (target.value.trim() === '') {
        alert('输入不能为空')
        return
    }
    // 准备一个todo对象
    const todoObj = {id: nanoid(), name: target.value, done: false}
    // 将todoObj传递给App
    this.props.addTodo(todoObj)
    // 清空输入
    target.value = ''
}
nanoid
使用nanoid或uuid生成唯一id值
执行
npm i nanoid或yarn add nanoid安装依赖,使用时执行引入语句import { nanoid } from 'nanoid',调用nanoid()函数即可
效果

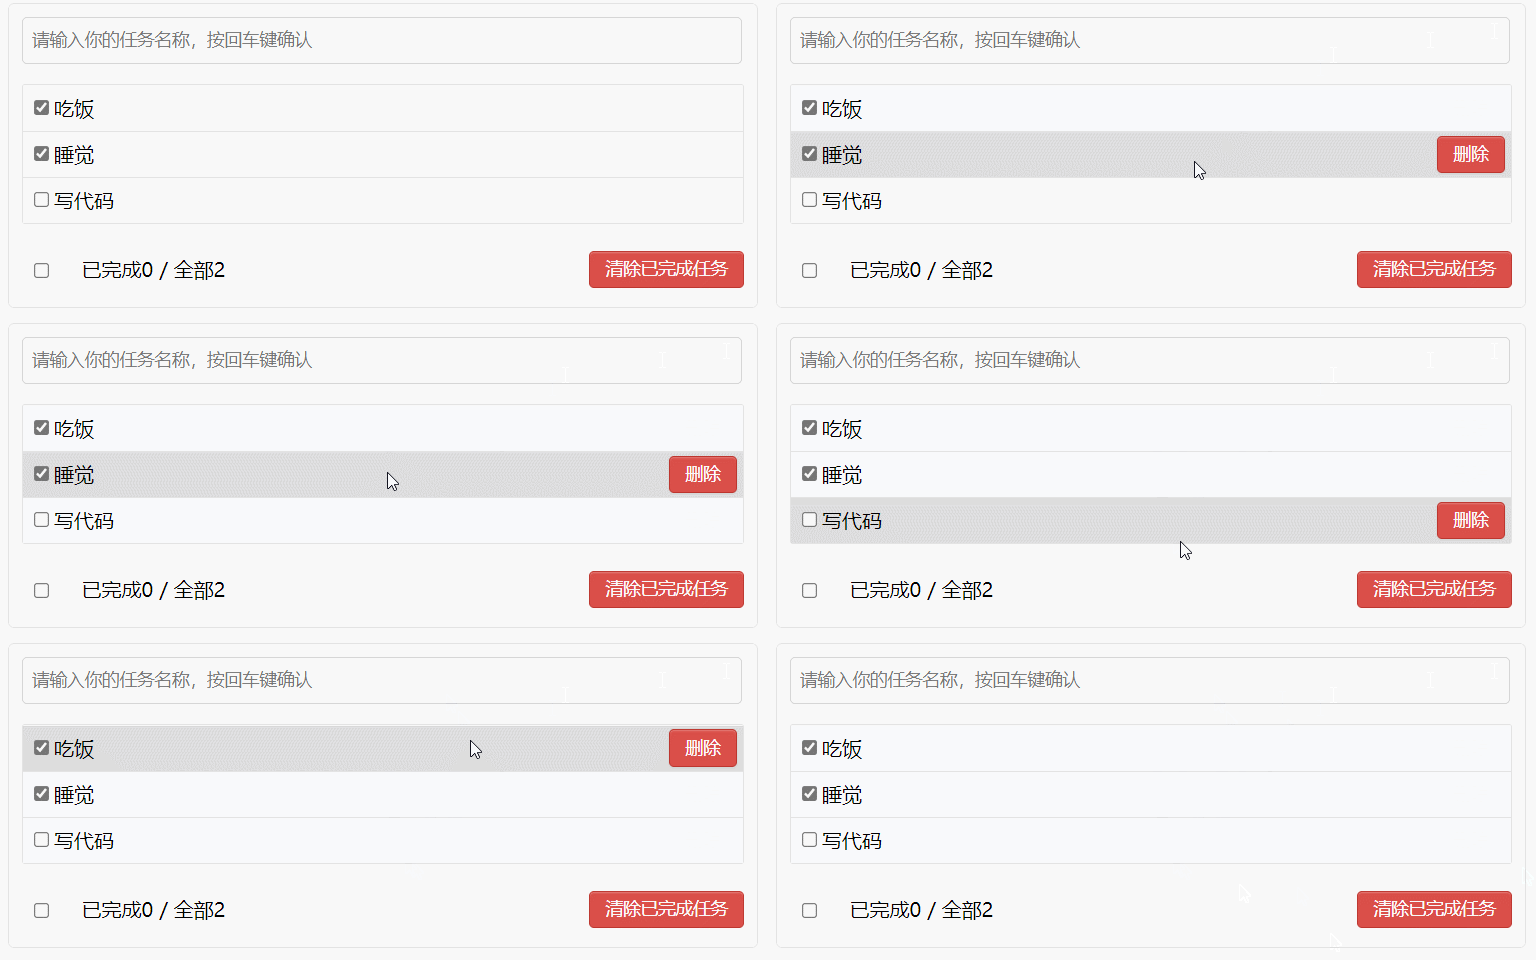
鼠标悬浮效果
为Item组件设置state,并添加鼠标移入移出监听
Item.jsx
export default class Item extends Component {

    state = {mouse: false}

    handleMouse = flag => {
        return () => {
            this.setState({mouse: flag})
        }
    }

    render() {
        const {id, name, done} = this.props
        const {mouse} = this.state
        return (
            <li style={{backgroundColor: mouse ? '#ddd' : '#fff'}} onMouseEnter={this.handleMouse(true)} onMouseLeave={this.handleMouse(false)}>
                <label>
                    <input type="checkbox" defaultChecked={done}/>
                    <span>{name}</span>
                </label>
                <button className="btn btn-danger" style={{display: mouse ? 'block' : 'none'}}>删除</button>
            </li>
        )
    }
}
复选框更新状态
App组件通过List组件向Item组件传递updateTodo函数
App.jsx
// updateTodo用于更新一个todo对象
updateTodo = (id, done) => {
    // 获取状态中的todoList
    const {todoList} = this.state
    // 加工数据(匹配处理)
    const newTodos = todoList.map((todoObj) => {
        if (todoObj.id === id) {
            return {...todoObj, done} // 简写形式,{...todoObj, done: done}
        } else {
            return todoObj
        }
    })
    this.setState({todoList: newTodos})
}

render() {
    const {todoList} = this.state
    return (
        <div className="todo-container">
            <div className="todo-wrap">
                <Header addTodo={this.addTodo}/>
                <List todoList={todoList} updateTodo={this.updateTodo}/>
                <Footer/>
            </div>
        </div>
    )
List.jsx
return <Item key={todo.id} {...todo} updateTodo={updateTodo}/>
Item.jsx
handleChange = id => {
    return (event) => {
        this.props.updateTodo(id, event.target.checked)
    }
}

render() {
    const {id, name, done} = this.props
    const {mouse} = this.state
    return (
        <li style={{backgroundColor: mouse ? '#ddd' : '#fff'}} onMouseEnter={this.handleMouse(true)} onMouseLeave={this.handleMouse(false)}>
            <label>
                <input type="checkbox" defaultChecked={done} onChange={this.handleChange(id)}/>
                <span>{name}</span>
            </label>
            <button className="btn btn-danger" style={{display: mouse ? 'block' : 'none'}}>删除</button>
        </li>
    )
}

对props进行限制
引入prop-types库
import PropTypes from 'prop-types'
Header.jsx
// 对接收的props进行类型、必要性的限制
static propTypes = {
    addTodo: PropTypes.func.isRequired
}
List.jsx
// 对接收的props进行类型、必要性的限制
static propTypes = {
    todoList: PropTypes.array.isRequired,
    updateTodo: PropTypes.func.isRequired
}
实现删除一个Todo
与addTodo和updateTodo实现同理,App通过List向Item传递deleteTodo
App.jsx
// deleteTodo用于删除一个todo对象
deleteTodo = (id) => {
    // 获取原todoList
    const {todoList} = this.state
    // 删除指定id的todo对象
    const newTodos = todoList.filter((todoObj) => {
        return todoObj.id !== id
    })
    // 更新状态
    this.setState({todoList: newTodos})
}

render() {
    const {todoList} = this.state
    return (
        <div className="todo-container">
            <div className="todo-wrap">
                <Header addTodo={this.addTodo}/>
                <List todoList={todoList} updateTodo={this.updateTodo} deleteTodo={this.deleteTodo}/>
                <Footer/>
            </div>
        </div>
    )
}
List.jsx
export default class List extends Component {

    // 对接收的props进行类型、必要性的限制
    static propTypes = {
        todoList: PropTypes.array.isRequired,
        updateTodo: PropTypes.func.isRequired,
        deleteTodo: PropTypes.func.isRequired
    }

    render() {
        const {todoList, updateTodo, deleteTodo} = this.props
        return (
            <ul className="todo-main">
                {
                    todoList.map((todo) => {
                        return <Item key={todo.id} {...todo} updateTodo={updateTodo} deleteTodo={deleteTodo}/>
                    })
                }
            </ul>
        )
    }
}
Item.jsx
// 删除一个todo的回调
handleDelete = (id) => {
    if (window.confirm('确定删除吗?')) { // 此处要加window,否则会报错Unexpected use of 'confirm'.
        this.props.deleteTodo(id)
    }
}

render() {
    const {id, name, done} = this.props
    const {mouse} = this.state
    return (
        <li style={{backgroundColor: mouse ? '#ddd' : '#fff'}} onMouseEnter={this.handleMouse(true)} onMouseLeave={this.handleMouse(false)}>
            <label>
                <input type="checkbox" defaultChecked={done} onChange={this.handleChange(id)}/>
                <span>{name}</span>
            </label>
            <button onClick={() => this.handleDelete(id) } className="btn btn-danger" style={{display: mouse ? 'block' : 'none'}}>删除</button>
        </li>
    )
}
JavaScript中,关于消息提示框的方法有三个:
- alert(message)方法用于显示带有一条指定消息和一个 OK 按钮的警告框。
- confirm(message)方法用于显示一个带有指定消息和 OK 及取消按钮的对话框。如果用户点击确定按钮,则 confirm() 返回 true。如果点击取消按钮,则 confirm() 返回 false。
- prompt(text,defaultText)方法用于显示可提示用户进行输入的对话框。如果用户单击提示框的取消按钮,则返回 null。如果用户单击确认按钮,则返回输入字段当前显示的文本。

实现footer的功能
重要
将
defaultChecked修改为checked
defaultChecked指定复选框的初始状态,一旦指定后无法修改
已完成/全部 + 全选
- 已完成
App组件向Footer组件传递todoListFooter组件计算已完成数目和总数
- 全选
App组件向Footer组件传递checkAllTodoFooter组件完成全选checkbox的回调
App.jsx
// checkAllTodo用于todo对象的全选
checkAllTodo = (done) => {
    // 获取原todoList
    const {todoList} = this.state
    // 加工数据
    const newTodos = todoList.map((todoObj) => { return {...todoObj, done} })
    // 更新状态
    this.setState({todoList: newTodos})
}

render() {
    const {todoList} = this.state
    return (
        <div className="todo-container">
            <div className="todo-wrap">
                <Header addTodo={this.addTodo}/>
                <List todoList={todoList} updateTodo={this.updateTodo} deleteTodo={this.deleteTodo}/>
                <Footer todoList={todoList} checkAllTodo={this.checkAllTodo}/>
            </div>
        </div>
    )
}
Footer.jsx
export default class Footer extends Component {

    // 全选checkbox的回调
    handleChangeAll = (event) => {
        this.props.checkAllTodo(event.target.checked)
    }

    render() {

        const {todoList} = this.props

        // 已完成的个数
        const doneCount = todoList.reduce((pre, currentTodo) => pre + (currentTodo.done ? 1 : 0), 0) // pre上一次的返回值
        // console.log('@', doneCount)

        // 总数
        const total = todoList.length

        return (
            <div className="todo-footer">
                <label>
                    <input type="checkbox" onChange={this.handleChangeAll} checked={doneCount === total && total !== 0}/>
                </label>
                <span>
                    <span>已完成{doneCount}</span> / 全部{total}
                </span>
                <button className="btn btn-danger">清除已完成任务</button>
            </div>
        )
    }
}
清除全部已完成
App组件向Footer组件传递clearAllDoneTodo
App.jsx
// clearAllDoneTodo用于清除所有已完成任务
clearAllDoneTodo = () => {
    // 获取原todoList
    const {todoList} = this.state
    // 过滤数据
    const newTodos = todoList.filter((todoObj) => { return !todoObj.done })
    // 更新状态
    this.setState({todoList: newTodos})
}

render() {
    const {todoList} = this.state
    return (
        <div className="todo-container">
            <div className="todo-wrap">
                <Header addTodo={this.addTodo}/>
                <List todoList={todoList} updateTodo={this.updateTodo} deleteTodo={this.deleteTodo}/>
                <Footer todoList={todoList} checkAllTodo={this.checkAllTodo} clearAllDoneTodo={this.clearAllDoneTodo}/>
            </div>
        </div>
    )
}
Footer.jsx
this.handleClearAll = () => {
    this.props.clearAllDoneTodo()
}

return (
    <div className="todo-footer">
        <label>
            <input type="checkbox" onChange={this.handleChangeAll} checked={doneCount === total && total !== 0}/>
        </label>
        <span>
            <span>已完成{doneCount}</span> / 全部{total}
        </span>
        <button onClick={this.handleClearAll} className="btn btn-danger">清除已完成任务</button>
    </div>
)
完整逻辑代码与最终效果
App.jsx
import React, { Component } from 'react'

import Header from './components/Header/Header'
import List from './components/List/List'
import Footer from './components/Footer/Footer'

import './App.css'

export default class App extends Component {

    // 初始化状态
    state = {todoList:[
        {id: '1', name: '吃饭', done: true},
        {id: '2', name: '睡觉', done: true},
        {id: '3', name: '写代码', done: false}
    ]}

    // addTodo用于添加一个todo,接收的参数是todo对象
    addTodo = (todoObj) => {
        // 获取原todoList
        const {todoList} = this.state
        // 追加一个todo
        const newTodos = [todoObj, ...todoList]
        // 更新状态
        this.setState({todoList: newTodos})
    }

    // updateTodo用于更新一个todo对象
    updateTodo = (id, done) => {
        // 获取状态中的todoList
        const {todoList} = this.state
        // 加工数据(匹配处理)
        const newTodos = todoList.map((todoObj) => {
            if (todoObj.id === id) {
                return {...todoObj, done} // 简写形式,{...todoObj, done: done}
            } else {
                return todoObj
            }
        })
        this.setState({todoList: newTodos})
    }

    // deleteTodo用于删除一个todo对象
    deleteTodo = (id) => {
        // 获取原todoList
        const {todoList} = this.state
        // 删除指定id的todo对象
        const newTodos = todoList.filter((todoObj) => {
            return todoObj.id !== id
        })
        // 更新状态
        this.setState({todoList: newTodos})
    }

    // checkAllTodo用于todo对象的全选
    checkAllTodo = (done) => {
        // 获取原todoList
        const {todoList} = this.state
        // 加工数据
        const newTodos = todoList.map((todoObj) => { return {...todoObj, done} })
        // 更新状态
        this.setState({todoList: newTodos})
    }

    // clearAllDoneTodo用于清除所有已完成任务
    clearAllDoneTodo = () => {
        // 获取原todoList
        const {todoList} = this.state
        // 过滤数据
        const newTodos = todoList.filter((todoObj) => { return !todoObj.done })
        // 更新状态
        this.setState({todoList: newTodos})
    }

    render() {
        const {todoList} = this.state
        return (
            <div className="todo-container">
                <div className="todo-wrap">
                    <Header addTodo={this.addTodo}/>
                    <List todoList={todoList} updateTodo={this.updateTodo} deleteTodo={this.deleteTodo}/>
                    <Footer todoList={todoList} checkAllTodo={this.checkAllTodo} clearAllDoneTodo={this.clearAllDoneTodo}/>
                </div>
            </div>
        )
    }
}
Header.jsx
import React, { Component } from 'react'
import PropTypes from 'prop-types'
import { nanoid } from 'nanoid'

import './Header.css'

export default class Header extends Component {

    // 对接收的props进行类型、必要性的限制
    static propTypes = {
        addTodo: PropTypes.func.isRequired
    }

    handleKeyUp = (event) => {
        // 解构赋值获取target, key
        const {target, key} = event
        // 判断是否是回车
        if (key !== 'Enter') {
            return
        }
        // 添加的todo名字不能为空
        if (target.value.trim() === '') {
            alert('输入不能为空')
            return
        }
        // 准备一个todo对象
        const todoObj = {id: nanoid(), name: target.value, done: false}
        // 将todoObj传递给App
        this.props.addTodo(todoObj)
        // 清空输入
        target.value = ''
    }

    render() {
        return (
            <div className="todo-header">
                <input onKeyUp={this.handleKeyUp} type="text" placeholder="请输入你的任务名称,按回车键确认"/>
            </div>
        )
    }
}
List.jsx
import React, { Component } from 'react'
import PropTypes from 'prop-types'

import Item from '../Item/Item'

import './List.css'

export default class List extends Component {

    // 对接收的props进行类型、必要性的限制
    static propTypes = {
        todoList: PropTypes.array.isRequired,
        updateTodo: PropTypes.func.isRequired,
        deleteTodo: PropTypes.func.isRequired
    }

    render() {
        const {todoList, updateTodo, deleteTodo} = this.props
        return (
            <ul className="todo-main">
                {
                    todoList.map((todo) => {
                        return <Item key={todo.id} {...todo} updateTodo={updateTodo} deleteTodo={deleteTodo}/>
                    })
                }
            </ul>
        )
    }
}
Item.jsx
import React, { Component } from 'react'

import './Item.css'

export default class Item extends Component {

    state = {mouse: false}

    // 鼠标移入移出的回调
    handleMouse = flag => {
        return () => {
            this.setState({mouse: flag})
        }
    }

    // 勾选、取消某一个todo的回调
    handleChange = id => {
        return (event) => {
            this.props.updateTodo(id, event.target.checked)
        }
    }

    // 删除一个todo的回调
    handleDelete = (id) => {
        if (window.confirm('确定删除吗?')) { // 此处要加window,否则会报错Unexpected use of 'confirm'.
            this.props.deleteTodo(id)
        }
    }

    render() {
        const {id, name, done} = this.props
        const {mouse} = this.state
        return (
            <li style={{backgroundColor: mouse ? '#ddd' : '#fff'}} onMouseEnter={this.handleMouse(true)} onMouseLeave={this.handleMouse(false)}>
                <label>
                    <input type="checkbox" checked={done} onChange={this.handleChange(id)}/>
                    <span>{name}</span>
                </label>
                <button onClick={() => this.handleDelete(id) } className="btn btn-danger" style={{display: mouse ? 'block' : 'none'}}>删除</button>
            </li>
        )
    }
}
Footer.jsx
import React, { Component } from 'react'

import './Footer.css'

export default class Footer extends Component {

    // 全选checkbox的回调
    handleChangeAll = (event) => {
        this.props.checkAllTodo(event.target.checked)
    }

    // 清除已完成任务的回调
    handleClearAll = () => {

    }

    render() {

        const {todoList} = this.props

        // 已完成的个数
        const doneCount = todoList.reduce((pre, currentTodo) => pre + (currentTodo.done ? 1 : 0), 0) // pre上一次的返回值
        // console.log('@', doneCount)

        // 总数
        const total = todoList.length

        // 清除已完成任务的回调
        this.handleClearAll = () => {
            this.props.clearAllDoneTodo()
        }

        return (
            <div className="todo-footer">
                <label>
                    <input type="checkbox" onChange={this.handleChangeAll} checked={doneCount === total && total !== 0}/>
                </label>
                <span>
                    <span>已完成{doneCount}</span> / 全部{total}
                </span>
                <button onClick={this.handleClearAll} className="btn btn-danger">清除已完成任务</button>
            </div>
        )
    }
}

总结
- 拆分组件、实现静态组件,注意:
className、style的写法 - 动态初始化列表,如何确定将数据放在哪个组件的
state中:- 某个组件使用:放在自身的state中
- 某些组件使用:放在他们共同的父组件state中(状态提升)
- 关于父子之间通信:
- 【父组件】给【子组件】传递数据:通过
props传递 - 【子组件】给【父组件】传递数据:通过
props传递,要求父提前给子传递一个函数
- 【父组件】给【子组件】传递数据:通过
- 注意
defaultChecked和checked的区别,类似的还有:defaultValue和value - 状态在哪里,操作状态的方法就在哪里
import React, { Component } from 'react'

import './Footer.css'

export default class Footer extends Component {

    // 全选checkbox的回调
    handleChangeAll = (event) => {
        this.props.checkAllTodo(event.target.checked)
    }

    // 清除已完成任务的回调
    handleClearAll = () => {

    }

    render() {

        const {todoList} = this.props

        // 已完成的个数
        const doneCount = todoList.reduce((pre, currentTodo) => pre + (currentTodo.done ? 1 : 0), 0) // pre上一次的返回值
        // console.log('@', doneCount)

        // 总数
        const total = todoList.length

        // 清除已完成任务的回调
        this.handleClearAll = () => {
            this.props.clearAllDoneTodo()
        }

        return (
            <div className="todo-footer">
                <label>
                    <input type="checkbox" onChange={this.handleChangeAll} checked={doneCount === total && total !== 0}/>
                </label>
                <span>
                    <span>已完成{doneCount}</span> / 全部{total}
                </span>
                <button onClick={this.handleClearAll} className="btn btn-danger">清除已完成任务</button>
            </div>
        )
    }
}
总结
- 拆分组件、实现静态组件,注意:
className、style的写法 - 动态初始化列表,如何确定将数据放在哪个组件的
state中:- 某个组件使用:放在自身的state中
- 某些组件使用:放在他们共同的父组件state中(状态提升)
- 关于父子之间通信:
- 【父组件】给【子组件】传递数据:通过
props传递 - 【子组件】给【父组件】传递数据:通过
props传递,要求父提前给子传递一个函数
- 【父组件】给【子组件】传递数据:通过
- 注意
defaultChecked和checked的区别,类似的还有:defaultValue和value - 状态在哪里,操作状态的方法就在哪里

