JavaWeb实验重点代码笔记
一、课上练习题目汇总(部分)
题目一 基础HTML、CSS和JavaScript
1.1 问题要求
页面上有下拉菜单、文本框、跳转按钮并排放置,当下拉菜单选中某个具体网站名称时,文本框出现其对应的链接地址,点击跳转,将从原网页链接到网站地址。请写出该功能的实现代码。
1.1 00.html
<!DOCTYPE html>
<html>
    <head>
    </head>
    <body>
        <form>
            <select name="site_name" id=4sites onchange="change()">
                <option value="" selected></option>
                <option value="https://www.163.com/">网易</option>
                <option value="https://www.baidu.com/">百度</option>
                <option value="https://www.google.cn/">谷歌</option>
                <option value="https://www.tencent.com/">腾讯</option>
            </select>
            <input type="text" id=sitetext name="url" />
            <input type="button" id=bu value="跳转" />
        </form>
    </body>

    <script language="JavaScript">
            var s = document.getElementById("4sites")
            var p = document.getElementById("sitetext")
            var b = document.getElementById("bu")
            function change() {
                p.value=s.value;
            }
            b.onclick=function(){
                self.location = p.value;
            }
        </script>
</html>
1.2 实验内容
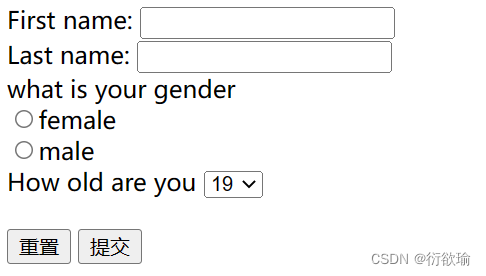
- 表单页面html设计,包括文本框、单选按钮、下拉菜单,重置提交选项。
1.2 01.html
<!DOCTYPE html>
<html>
	<body>
		<form>
		First name:
			<input type = "text" name = "Your Name"><br>
		Last name:
			<input type = "Password" name = "Password"><br>
		what is your gender<br>
		<input type = "radio" name = "female">female<br>
		<input type = "radio" name = "male">male<br>
		How old are you
		<select name = "(select one)">
		<option value = "17" selected>17
		<option value = "18" selected>18
		<option value = "19" selected>19
		</select><br>
		<br>
		<input type = "reset" name = "clear">
		<input type = "submit" name = "Submit">
		</form>
	</body>
</html>
1.2 页面展示
1.3 实验内容
与下方实验2.2相近,略。
1.4 实验内容
- 自动装载案例
1.4 10.html
<!DOCTYPE html>
<html>
	<head>
		<h4>practice</h4>
		<script language = "javascript">
			function loadform(){
				alert("这是一个自动装载例子!");
			}
			function unloadform(){
				alert("这是一个自动装载例子!");
			}
		</script>
	</head>
	<body onLoad = "loadform()" onUnload = "unloadform()">
	 	<a herf="two.htm">调用</a>
	</body>
</html>
1.5 实验内容
文本框复制,当第二个文本框内容变动,第一个文本框自动复制其内容。
1.5 11.html
<!DOCTYPE html>
<html>
<head>
	<script type="text/javascript">
		function change() {
			// body...
			var str=document.getElementById("2").value
			document.getElementById("1").value=str
		}
	</script>
</head>
<body>
	<form>
		<input type="text" id="1" name="oo" value="333">
		<input type="text" id="2" name="tt" value="222" onchange="change()">
		<!-- 第二个文本框内容改变的时候,第一个文本框的内容跟着改为第二个文本框的内容 -->
	</form>
</body>
</html>
1.6 实验内容
图片变化
1.6 100.html
<!DOCTYPE html>
<html>
    <head>
        <script language="javascript">
            function function1(){
            	document.getElementById("image").src="2.png";
            }
            function function2(){
            	document.getElementById("image").src="3.png";
            }
        </script>
    </head>
    <body>
        <img src="1.png" id="image" width="300" height="400">
        <br>
        <a href=" " onmouseover="a1()" onmouseout="a2()">超链接</a >
    </body>
</html>
1.7 实验内容
提交弹窗
1.7 101.html
<!DOCTYPE html>
<html>
    <head>
        <script language="javascript">
            function judge(){
                   var str =document.getElementsByName("box")
                   checkStr =""
                   for(i in str)
                   {
                       if(str[i].checked==true)
                       {
                           checkStr+=str[i].value+";"
                       }
                   }
                   if (checkStr=="")
                   	alert("没有选择!")
                   else
                   	alert(checkStr)
                }
        </script>
    </head>
    <body>
        <form>
            <input type="checkbox"  name="box" value="sport">sport
            <br>
            <input type="checkbox"  name="box" value="game">game
            <br>
            <input type="submit"  name="submit" value="提交" onclick="judge()">
        </form>
    </body>
</html>
1.8 实验内容
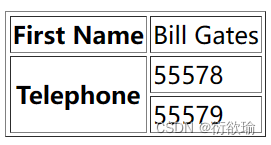
合并重复行
1.8 110.html
<!DOCTYPE html>
<html>
	<body>
		<table border = "1">
		<tr>	<th>First Name</th>
			<td>Bill Gates</td>
		</tr>
		<tr>	<th rowspan = "2">Telephone</th>
			<td>55578</td>
		</tr>
		<tr>
			<td>55579</td>
		</tr>
	</body>
</html>
1.8 结果展示
二、实验题目汇总
实验一 HTML语言
1.1 实验内容:
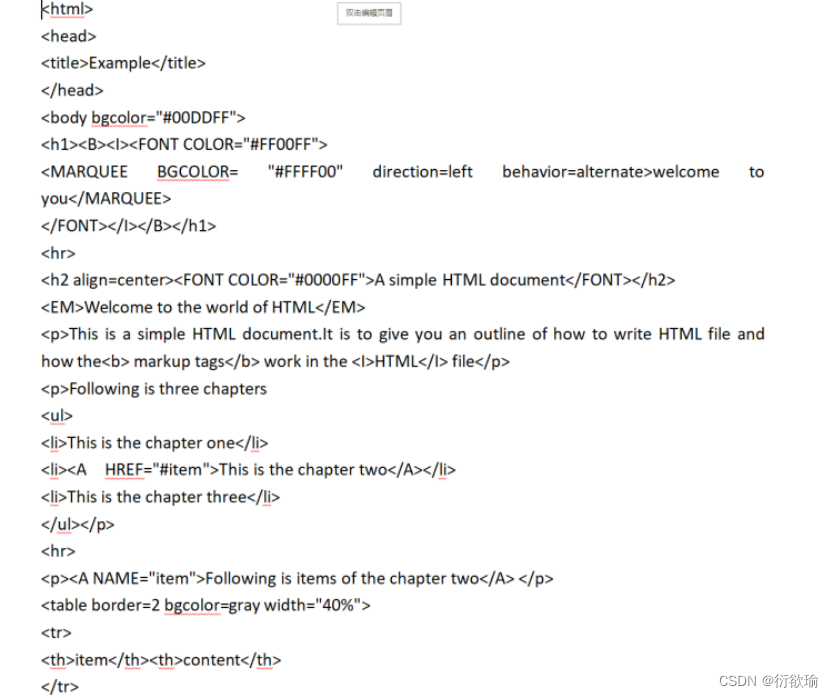
在文本编辑器“记事本”中输入如下的HTML代码程序,以文件名sy1.html保存,并在浏览器中运行。(请仔细阅读下列程序语句,理解每条语句的作用)
源程序清单如下:
1.1 sy1.html:
<!DOCTYPE html>
<html>
	<head>
		<title>Example</title>
	</head>
	<body bgcolor="#00DDFF">
		<h1><B><l><FONT COLOR="#FF00FF"><!--紫色Purple-->
		<MARQUEE  BGCOLOR="#FFFF00"  direction=left  behavior=alternate><!--黄色-->
		welcome to you</MARQUEE>
		</FONT></l></B></h1>
		<hr>
		<h2 align=center><FONT COLOR="#0000FF"><!--font标签在 HTML 4 中用于指定字体、字体大小和文本颜色。--><!--纯蓝色-->A simple HTML document</FONT></h2>
		<EM>Welcome to the world of HTML</EM><!--定义强调文本-->
		<p>This is a simple HTML document. It is to give you an outline of how to write HTML file and
		how the <b>markup tags</b>work in the<l>HTML</l>file</p>
		<p>Following is three chapters
		<ul>
			<li>This is the chapter one</li>
			<li><A HREF="#item">This is the chapter two</A></li>
			<li>This is the chapter three</li>
		</ul></p>
		</hr>
		<p><A NAME="item">Following is items of the chapter two</A></p>
		<table border=2 bgcolor=gray width="40%">
		<tr>
		<th>item</th><th>content</th><!--表头单元格-->
		</tr>
		<tr>
		<td>item 1</td>
		<td>font</td>
		</tr>
		<tr>
		<td>item 2</td><!--单元格-->
		<td>table</td>
		</tr>
		<tr>
		<td>item 3</td>
		<td>form</td>
		</tr><!--表格一行标签-->
		</table>
		<hr><p>
		1</p>
		2</p>
		3</p>
		4</p>
		5</p>
		<B><l><FONT COLOR=BLUE SIZE=4>End of the example document</FONT></l></B>
		</p>
	</body>
</html>
1.2 实验内容
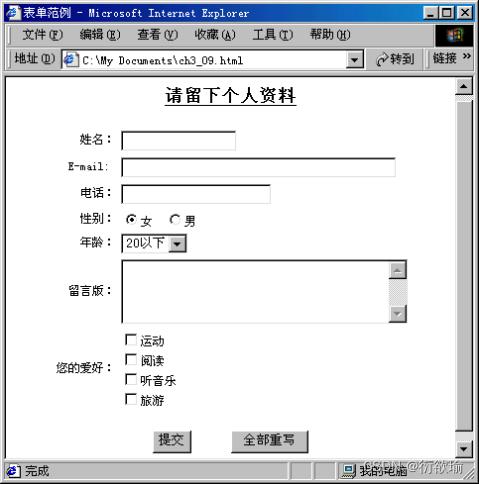
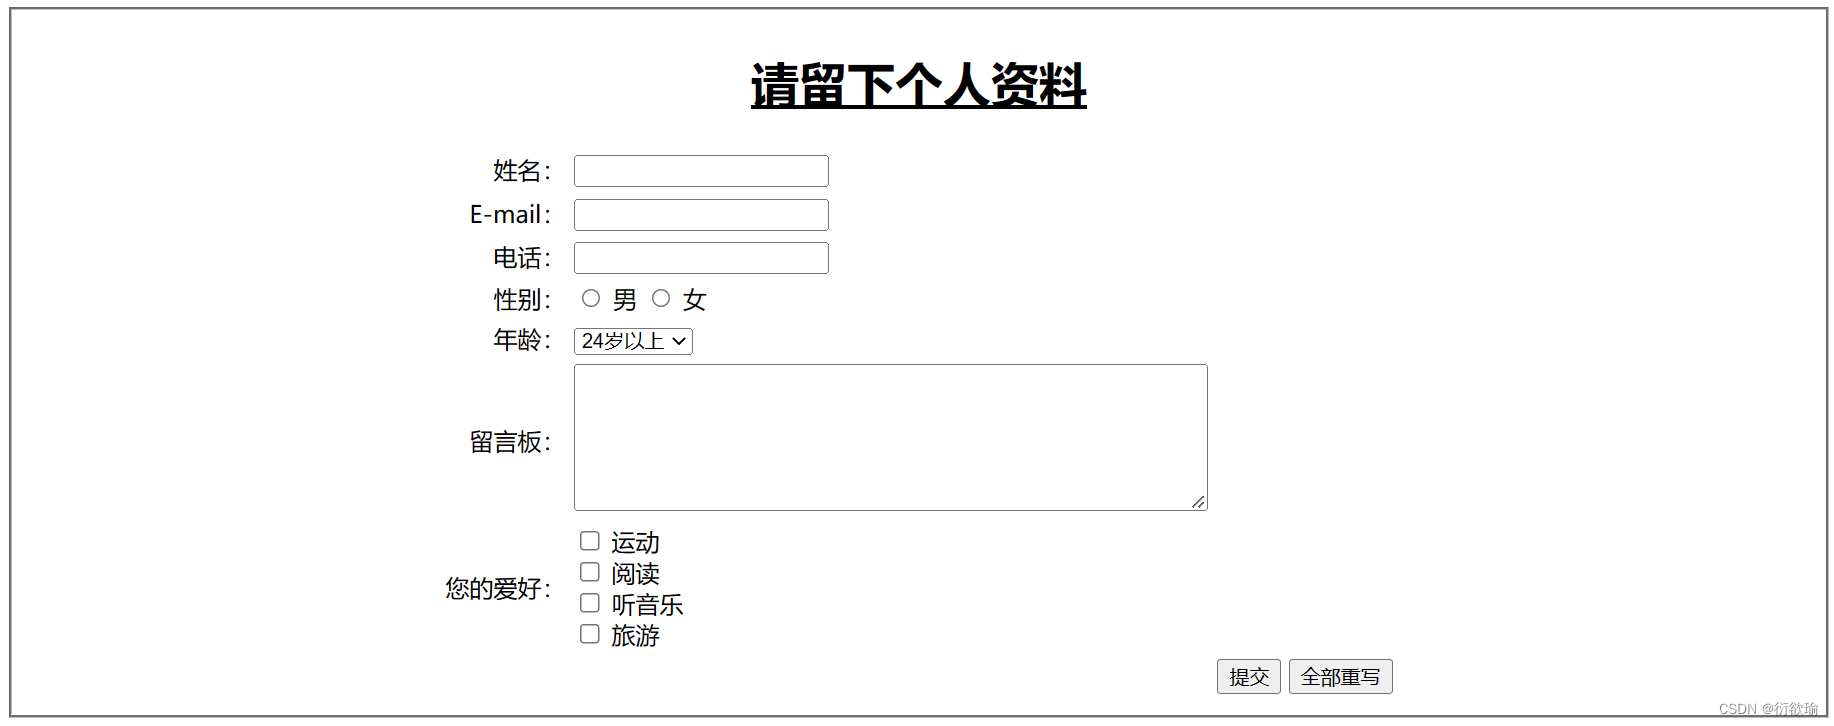
- 编写一个能输出如图所示界面的HTML文件,其中年龄包含的选项为:20以下、20~24、24以上。
1.2 sy2.html
<!DOCTYPE html>
<html>
	<head>
		<title>表单范例</title>
	</head>
	<body>
		<fieldset>
		<h1 align="center"><u>请留下个人资料</u></h1>
		<!--表单数据的提交方式为POST-->
		<form action="#" method="post">
			<table cellpadding="2" align="center">
				<tr>
					<td align="right">姓名:</td>
					<td>
						<!--文本输入框控件-->
						<input type="text" name="name" />
					</td>
				</tr>
				<tr>
					<td align="right">E-mail:</td>
					<td>
						<!--文本输入框控件-->
						<input type="text" name="E-mail" />
					</td>
				</tr>
				<tr>
					<td align="right">电话:</td>
					<td>
						<!--文本输入框控件-->
						<input type="text" name="telephone" />
					</td>
				</tr>
				<tr>
					<td align="right">性别:</td>
					<td>
						<!--单选输入框控件-->
						<input type="radio" name="gender" value="male" /> 男
						<input type="radio" name="gender" value="female" /> 女
					</td>
				</tr>
				<tr>
					<td align="right">年龄:</td>
					<td>
						<!--下拉菜单控件-->
						<select name="age" size="1">
							<option value="<20" selected>20岁以下
							<option value="20-24" selected>20-24岁
							<option value=">24" selected>24岁以上
						</select>
					</td>
				</tr>
				<tr>
					<td align="right">留言板:</td>
					<td>
						<!--文本域控件-->
						<textarea cols="60" rows="6">
						</textarea>
					</td>
				</tr>
				<tr>
					<td align="right">您的爱好:</td>
					<td>
						<!--复选框控件-->
						<input type="checkbox" name="interest" value="sport" /> 运动<br>
						<input type="checkbox" name="interest" value="reading" /> 阅读<br>
						<input type="checkbox" name="interest" value="music" /> 听音乐<br>
						<input type="checkbox" name="interest" value="journal" /> 旅游<br>
					</td>
				</tr>
				<tr>
					<td colspan="2" align="center"></td>
					<td>
						<!--提交按钮控件-->
						<div align="center"><input type="submit" value="提交" />
						<!--重置提交按钮控件,单击后会清空当前form-->
						<input type="reset" value="全部重写" /></div>
					</td>
				</tr>
			</table>
		</form>
	</fieldset>
	</body>
</html>
1.2 运行结果
实验二 JavaScript 内置对象与事件驱动
2.1 实验内容
2.1 sy3.html
<!DOCTYPE html>
<html>
	<head>
		<title>页面中显示动态的实时时间</title>
        <script language="JavaScript">
            function startTime()
            {
                var today=new Date();//定义日期对象
                var hh=today.getHours();//通过日期对象的getHours方法返回小时
                var mm=today.getMinutes();//通过日期对象的getMinutes方法返回分钟
                var ss=today.getSeconds();//通过日期对象的getSeconds方法返回秒

                hh=checkTime(hh);
                mm=checkTime(mm);
                ss=checkTime(ss);
                document.getElementById('nowDateTimeSpan').innerHTML= hh+":"+mm+":"+ss;
                setTimeout('startTime()',1000);//每一秒中重新加载startTime()方法
            }

            // 如果分钟或小时的值小于10,则在其值前加0
            function checkTime(i)
            {
                if (i<10){
                    i="0" + i;
                }
                  return i;
            }

        </script>
	</head>
	<body onload="startTime()" style="background-color: #000000;color: white;">

        <font color="#33FFFF"><span id="nowDateTimeSpan"></span></font>

    </body>
</html>
2.1 运行结果

2.2 实验内容
- JavaScript事件驱动。
设计一个包含学生处、研究生院、教务处、科技处等选项的下拉菜单,当下拉菜单的选项改变时转向对应的页面内容。(其中各部门的主页分别为:xuesheng.htm ,yanjiusheng.htm, jiaowu.htm,keji.htm)。
2.2 sy4.html
<meta charset="utf-8">
<html>
	<head>
		<script language="javascript">
			function go(form){
			location=form.selectmenu.value}
		</script>
	</head>
	<body>
		<form>
			<select name="selectmenu" onChange="go(this.form)">
				<option>--Select page--</option>
				<option value="xuesheng.htm">学生处  </option>
				<option value="yanjiusheng.htm">研究生院  </option>
				<option value="jiaowu.htm">教务处</option>
                <option value="keji.htm">科技处</option>
			</select>
		</form>
	</body>
</html>
实验三 Request与Response对象的应用
3.1 实验内容
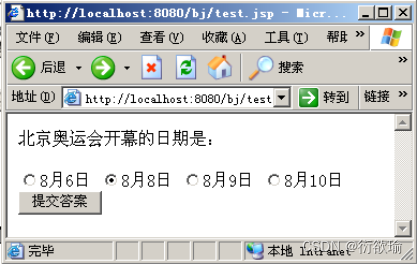
- 编写程序实现一个单选小测试。在test.jsp页面显示问题,并将答案提交至answer.jsp进行判断,如果回答正确,则将页面转至yes.jsp;否则,转至no.jsp。
3.1 test.jsp
<%@ page contentType="text/html; charset=UTF-8" pageEncoding="UTF-8" %>
<html>
<head>
    <title>Title</title>
</head>
<body>
    <h1>"北京奥运会开幕的日期是:"</h1>
    <form action="answer.jsp">
        <input type="radio" value="8月6日" id="1" name="day">8月6日
        <input type="radio" value="8月8日" id="2" name="day">8月8日
        <input type="radio" value="8月9日" id="3" name="day">8月9日
        <input type="radio" value="8月10日" id="4" name="day">8月10日<br>

        <input type="submit" align="center" value="提交答案" onclick="next()">
    </form>
</body>
</html>
3.1 answer.jsp
<%@ page contentType="text/html; charset=UTF-8" pageEncoding="UTF-8" %>
<html>
<head>
    <title>Title</title>
</head>
<body>
    <%
        String name= request.getParameter("day");
        String rightDay = "8月9日";
        if(name.equals(rightDay))
            response.sendRedirect("yes.jsp");
        else
            response.sendRedirect("no.jsp");
    %>
</body>
</html>
3.1 yes.jsp
<%@ page contentType="text/html; charset=UTF-8" pageEncoding="UTF-8" %>
<html>
<head>
    <title>Title</title>
</head>
<body>
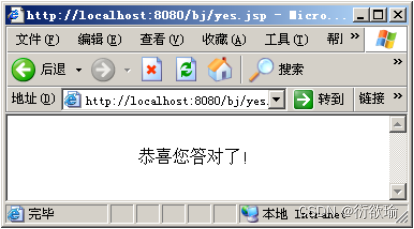
    <h1>恭喜你答对了!</h1>
</body>
</html>
3.1 no.jsp
<%@ page contentType="text/html; charset=UTF-8" pageEncoding="UTF-8" %>
<html>
<head>
    <title>Title</title>
</head>
<body>
    <h1>太遗憾了,你答错了!</h1>
</body>
</html>
实验四 Application对象Session对象
4.1 实验内容
- 请仔细阅读下列程序语句,理解每条语句的作用。源程序清单如下:
<%@ page contentType="text/html;charset=gb2312"%>
<html>
	<head><title>网页计数器</title><head>
<body>
	<%
	if (application.getAttribute("counter")==null)
		application.setAttribute("counter","1");
	else{
		String strnum=null;
		strnum=application.getAttribute("counter").toString();
		int icount=0;
		icount=Integer.valueOf(strnum).intValue();
		icount++;
		application.setAttribute("counter",Integer.toString(icount));
	}
	%>
	您是第<%=application.getAttribute("counter")%>位访问者!
</body>
</html>
- 上述计数器当进行刷新时也会自动加1,试编写程序count.jsp,实现防刷新文本计数器。
4.1 sy6.html
<%@ page contentType="text/html; charset=UTF-8" pageEncoding="UTF-8" %>
<html>
<head>
    <title>网页计数器</title>
</head>
<body>
<%
    int iCount=0;
    if (application.getAttribute("counter") == null)
        application.setAttribute("counter","1");
    // 判断Cookie
    else {
        String strnum=null;
        strnum=application.getAttribute("counter").toString();
        if (request.getHeader("Cookie") == null) {
            iCount = (Integer.valueOf(strnum).intValue()) + 1;
        } else {
            iCount = (Integer.valueOf(strnum).intValue());
        }
        application.setAttribute("counter", Integer.toString(iCount));
    }
%>
    您是第<%=application.getAttribute("counter")%>位访问者!
</body>
</html>
4.2 实验内容
- 编写程序register.htm和register.jsp,做一个用户注册的界面,要求对用户填写的部分进行合法性检验,然后提交到register.jsp进行注册检验,若用户名为user开头的,就提示“该用户名已被注册”,若用户名为admin,就提示“欢迎您,管理员”,否则,就显示“注册成功”。
4.2 register.htm
<!DOCTYPE html>
<html lang="en">
<head>
    <meta charset="UTF-8">
    <title>Title</title>
</head>
<body>
    <h1 align="center">欢迎注册我们的系统!</h1>
    <form action="register.jsp">
        <input type="text" value="username" name="name">
        <input type="password" value="password" name="pwd"><br>
        <input type="submit" value="register" name="register">
    </form>
</body>
</html>
4.2 register.jsp
<%@ page contentType="text/html; charset=UTF-8" pageEncoding="UTF-8" %>
<html>
<head>
    <title>Title</title>
</head>
<body>
    <%
        String username = request.getParameter("name");
        System.out.println(username);
        if (username.equalsIgnoreCase("admin"))
            out.println("欢迎您,管理员!");
        else if (username.startsWith("user"))
            out.println("该用户已注册!");
        else
            out.println("注册成功!");
    %>
</body>
</html>
实验五 使用JDBC连接数据库
5.1 实验内容
- 利用数据库建立一个同学录,然后通过JDBC编写一系列基于Web方式的JSP程序,来对同学录的数据库进行添加、查询等功能,要求在网页上显示出来。
1.建立数据库
建立名为students的access数据库,在库中建立schoolmate表,字段包括:
id 自动编号
name 文本
birthday 日期/时间
phone 文本
email 文本
address 文本
other 备注
创建数据源名
打开数据源(ODBC);添加Microsoft Access Driver(*.mdb)数据源驱动程序。数据源名称:students;更改默认数据库,选择students。运行所编写的应用程序
启动eclipse,建立项目exp5,将编写的程序放入该项目的WebContent下,右键点击WebContent,选择“刷新”。打开要运行的页面,在程序的任意位置单击右键,选择“运行方式”/“在服务器上运行”,单击“在服务器上运行” 对话框的“完成”,即可看到运行结果。
实验六 Servlet编程
6.1 实验内容
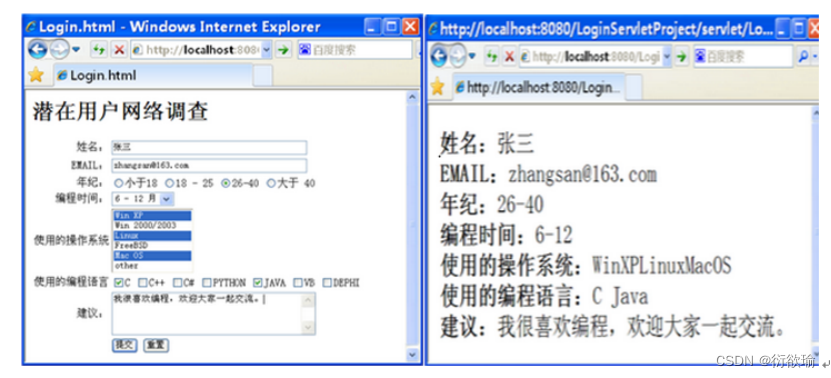
- 编写一个Servlet处理表单的程序,客户端以HTML表单方式向服务器提交数据,提交方法采用Post方法,使用相应方法获取表单数据。
- 程序实现功能如图所示:
注意:项目名为ServletProject,表单文件名为test.html,获取表单的Servlet名为testServlet。
6.1 test.html
<!DOCTYPE html>
<html>
<head>
    <meta charset="UTF-8">
    <title>Title</title>
</head>
<body>
    <h1>潜在用户网络调查</h1>
    <fieldset>
        <form action="test-servlet" method="post">
            <tr>
                <td>姓名:</td>
                <td>
                    <input type="text" align="center" name="name" />
                </td>
            </tr>
            <br>
            <tr>
                <td>E-mail:</td>
                <td>
<!--                       验证-->
                    <input type="text" align="center" name="email" />
                </td>
            </tr>
            <br>
            <tr>
                <td>age:</td>
                <td><input type="radio" value="<18" name="age"></td><18
                <td><input type="radio" value="18-25" name="age"></td>18~25
                <td><input type="radio" value="26-40" name="age"></td>26~40
                <td><input type="radio" value=">40" name="age"></td>>40
            </tr>
            <br>
            <tr>
                <td>编程时间:</td>
                <td>
                    <select name="CodeTime" size="1">
                        <option value="<6" name="CodeTime">小于6个月
                        <option value="6-12个月" name="CodeTime">6~12个月
                        <option value="12-24个月" name="CodeTime">1~2年
                        <option value=">24" name="CodeTime">大于2年
                    </select>
                </td>
            </tr>
            <br>
            <tr>
                <td>使用的操作系统:</td>
                <td>
                    <select name="useOS" size="1">
                        <option value="<6" name="useOS">小于6个月
                        <option value="6-12个月" name="useOS">6~12个月
                        <option value="12-24个月" name="useOS">1~2年
                        <option value=">24" name="useOS">大于2年
                        <option value=">24" name="useOS">大于2年
                        <option value=">24" name="useOS">大于2年
                    </select>
                </td>
            </tr>
            <br>
            <tr>
                <td align="right">使用的编程语言:</td>
                <td>
                    <input type="checkbox" name="codeLanguage" value="sport" /> 运动
                    <input type="checkbox" name="codeLanguage" value="reading" /> 阅读
                    <input type="checkbox" name="codeLanguage" value="music" /> 听音乐
                    <input type="checkbox" name="codeLanguage" value="journal" /> 旅游
                    <input type="checkbox" name="codeLanguage" value="journal" /> 旅游
                    <input type="checkbox" name="codeLanguage" value="journal" /> 旅游
                    <input type="checkbox" name="codeLanguage" value="journal" /> 旅游
                </td>
            </tr>
            <br>
            <tr>
                <td>建议:</td>
                <td>
                    <textarea cols="60" rows="6" align="center" name="propose">
                    </textarea>
                </td>
            </tr>
            <br>
            <tr>
                <td colspan="2"></td>
                <td>
                    <div align="left"><input type="submit" value="提交" />
                    <input type="reset" value="重置" /></div>
                </td>
            </tr>
        </form>
    </fieldset>
</body>
</html>
6.1 testServlet
package com.example.Jsp.Servlet;

import javax.servlet.annotation.WebServlet;
import javax.servlet.http.HttpServlet;
import javax.servlet.http.HttpServletRequest;
import javax.servlet.http.HttpServletResponse;
import java.io.IOException;
import java.io.PrintWriter;

/**
 * @author gzz
 */
@WebServlet(name = "TestServlet", value = "/test-servlet")
public class TestServlet extends HttpServlet{

    @Override
    public void init(){
    }

    @Override
    public void doPost(HttpServletRequest req, HttpServletResponse resp) throws IOException {
        req.setCharacterEncoding("UTF-8");
        resp.setCharacterEncoding("UTF-8");
        resp.setContentType("application/json");
        PrintWriter out=resp.getWriter();
        String name = req.getParameter("name");
        String EMAIL = req.getParameter("email");
        String age = req.getParameter("age");
        String codeTime = req.getParameter("CodeTime");
        String useOS = req.getParameter("useOS");
        String [] codeLanguage = req.getParameterValues("codeLanguage");
        String propose = req.getParameter("propose");
        out.println("姓名:"+ name);
        out.println("EMAIL:"+EMAIL);
        out.println("年纪:"+age);
        out.println("编程时间:"+codeTime);
        out.println("使用的操作系统:"+useOS);
        out.print("使用的编程语言:");
        for (int i = 0;i<codeLanguage.length;i++){
            out.print(codeLanguage[i]+" ");
        }
        out.println();
        out.println("建议:"+propose);
    }

    @Override
    public void destroy() {
    }
}
编辑于2022/12/28日。
