CocoaPods
- 前提
- Homebrew
- Homebrew是什么?
- Homebrew怎么安装?
- Homebrew怎么用?有哪些必须知道的命令
- Homebrew和CocoaPods的关系
- 卸载Homebrew
- Ruby
- rbenv
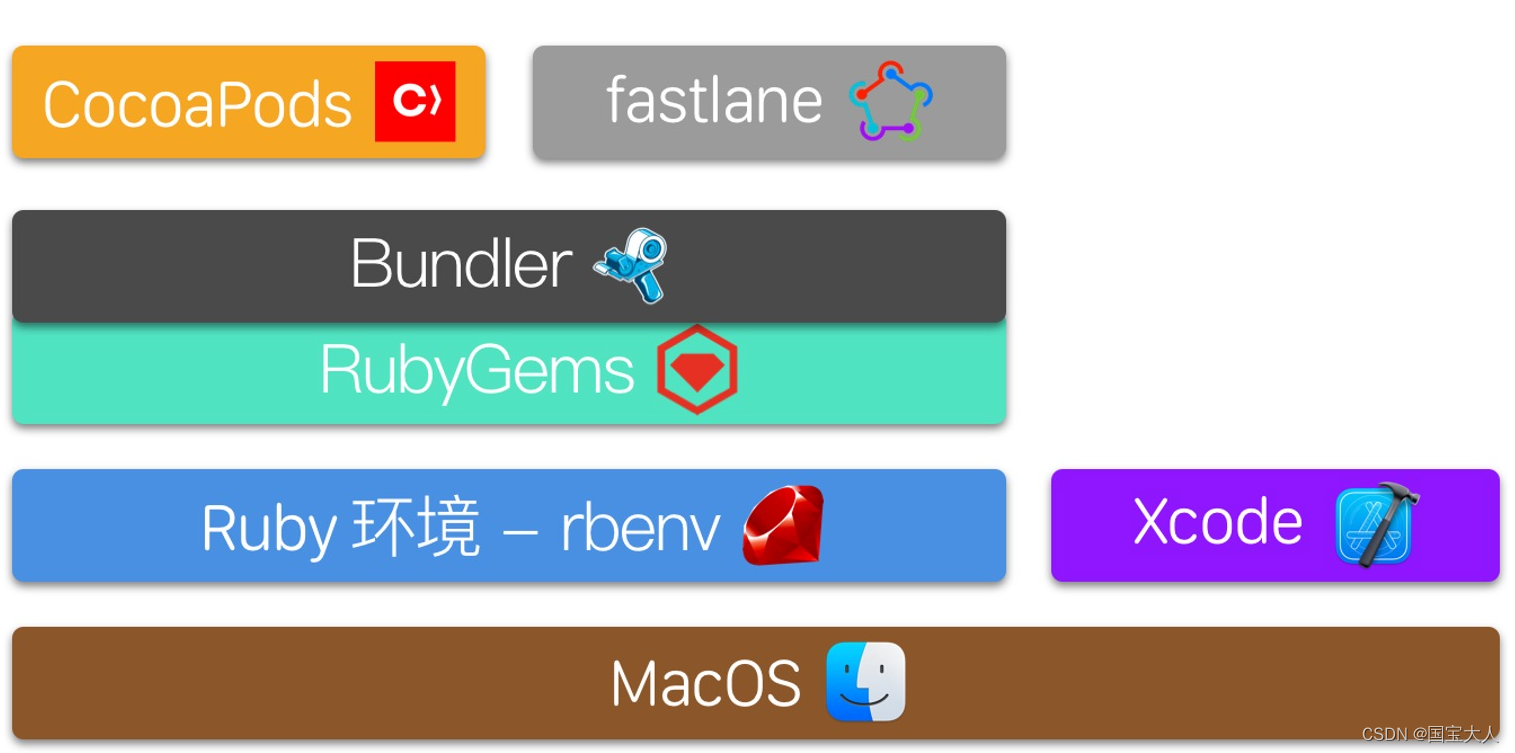
- RubyGems 和 Bundler
- 安装Ruby
- 管理Ruby
- 更新Ruby
- 替换Ruby镜像
- 方式1
- 方式2
- CocoaPods
- 安装CocoaPods
- CocoaPods使用
- 安装的一些问题
- 单元测试引用问题
- 参考的链接
前提
每次开启一个新项目,都需要手动搭建开发环境,或者加入一个新项目,都需要各种手动搭建,这些都是重复的工作。就不能统一搭建一次,后面的人直接使用这个配置去生成吗?可以的,本篇就是为了这个目的。
Homebrew
Homebrew是什么?
Homebrew 是 macOS 上的一个包管理器,用于简化安装和管理开发工具、库和其他软件包。它的核心是用 Ruby 编写的,这使得它可以充分利用 Ruby 的灵活性和表达能力。
Homebrew 的安装依赖于 Ruby: 在安装 Homebrew 时,系统通常需要已经安装了 Ruby。Homebrew 安装脚本本身也是用 Ruby 编写的,因此在安装 Homebrew 之前,Ruby 会被系统视为一个依赖项。
Homebrew怎么安装?
Homebrew源使用帮助
安装:参考
Mac环境情况:
macOS Catalina(10.15.x) 版开始,Mac使用/bin/zsh作为默认Shell,其对应的配置文件为/.zshrc
查看Mac的CPU型号,M1
$ uname -m
#M1芯片的打印是:x86_64
$ brew --config
*可以发现打印有下面一行:
Homebrew Ruby: 2.6.10 => /usr/local/Homebrew/Library/Homebrew/vendor/portable-ruby/2.6.10_1/bin/ruby
Homebrew 的安装目录为 /usr/local/bin/brew ,而 portable-ruby/ 在 /usr/local/Homebrew/Library/Homebrew/vendor/ 中
权限问题:
修改 /user/local/Homebrew 权限即可,如果 /usr/local 的很多文件都属于其他用户,那就进行全部修改,将 /usr/local 下的全部文件都修改为当前用户和当前用户所属的组:
$ sudo chown -R -v $(whoami): /usr/local/*
通常,Homebrew安装的软件的相关文件存储在以下位置:

/usr/local/Cellar:这个目录包含了Homebrew安装的软件的实际文件。
/usr/local/Homebrew/Caskroom:如果你使用Homebrew Cask来安装软件,那么相关文件可能存储在这个目录中。
~/.config:有些软件的配置文件可能存储在你的用户配置文件夹中。
Homebrew怎么用?有哪些必须知道的命令
brew --version			查看Homebrew的版本(或者brew -v)
brew update     		更新Homebrew
brew upgrade  			更新所有安装过的软件包
brew upgrade wget   	更新这个指定‘wget'的软件包
brew search wget  		搜索
brew install wget   	安装
brew remove wget  		卸载
brew list  				列出已安装的所有软件包
brew info wget   		查看软件包的信息
brew deps wget  		列出软件包的依赖关系
brew outdated    		列出可以更新的软件包
brew cleanup            清理卸载后残留的文件
brew help				帮助
Homebrew和CocoaPods的关系
如果不使用Ruby工具链,一般是使用Homebrew来安装和管理CocoaPods,比如:
brew install cocoapods
brew upgrade cocoapods
brew uninstall cocoapods
使用 Homebrew 管理 CocoaPods 的好处之一是它可以更好地集成到你的系统环境中,并且能够更容易地进行版本控制和更新。
而使用Ruby链能创建统一的开发环境,也更容易’复制‘(意味着节省不必要的重复工作)。
卸载Homebrew
/bin/bash -c “$(curl -fsSL https://raw.githubusercontent.com/Homebrew/install/master/uninstall.sh)”
Ruby
目前流行的Ruby环境管理工具有 RVM 和 rbenv。这里推荐使用 rbenv,因为它使用shims 文件夹来分离各个 Ruby版本,相对于RVM更加方便。
rbenv
rbenv 是 Ruby的环境管理工具,能够安装、管理、隔离以及在多个Ruby版本之间切换。rbenv使用Homebrew来安装,下面是安装的脚本。
$ /bin/bash -c "$(curl -fsSL https://raw.githubusercontent.com/Homebrew/install/master/install.sh)"
brew install rbenv ruby-build rbenv-vars
一旦安装 rbenv 完毕,我们需要把以下的设置信息放到你的 Shell 配置文件里面,例如 ~/.bash_profile 或者 ~/.zshrc 等文件,这样能保证每次打开终端的时候都会初始化 rbenv。
export PATH="$HOME/.rbenv/bin:$PATH"
eval "$(rbenv init -)"
接着我们就可以安装和设置项目的 Ruby 环境了。
$ cd $(PROJECT_DIR)
$ rbenv install 3.2.0   //安装3.2.0版本,位置在/Users/_pc_name_/.rbenv/versions/
$ rbenv local 2.7.1		//在项目文件下生成一个文件:.ruby-version
RubyGems 和 Bundler
RubyGems和Bundler这两个主要用来管理CocoaPods和fastlane等第三方工具。
在Ruby的世界,包叫做Gem,可以用 gem install 命令来安装。但是因为RubyGems在管理 Gem 版本时有些缺陷,就有了Bundler,用来检查和安装Gem的特定版本,以此为Ruby项目提供一致性的环境。
//搜索
$ gem search cocoapods
$ gem install cocoapods
//安装Bundler
gem install bundler
//更新gem
sudo gem update --system
安装Ruby
- 安装ruby,有两种格式 brew install ruby@3.1 或者 brew install ruby ,
直接在terminal根目录运行下面的代码
$ brew install ruby@3.1
#运行后会有如下的输出:
ruby@3.1 is keg-only, which means it was not symlinked into /usr/local,
because this is an alternate version of another formula.

If you need to have ruby@3.1 first in your PATH, run:
  echo 'export PATH="/usr/local/opt/ruby@3.1/bin:$PATH"' >> ~/.zshrc

For compilers to find ruby@3.1 you may need to set:
  export LDFLAGS="-L/usr/local/opt/ruby@3.1/lib"
  export CPPFLAGS="-I/usr/local/opt/ruby@3.1/include"

For pkg-config to find ruby@3.1 you may need to set:
  export PKG_CONFIG_PATH="/usr/local/opt/ruby@3.1/lib/pkgconfig"
==> Summary
🍺  /usr/local/Cellar/ruby@3.1/3.1.4: 16,183 files, 43MB
==> Running `brew cleanup ruby@3.1`...
Disable this behaviour by setting HOMEBREW_NO_INSTALL_CLEANUP.
Hide these hints with HOMEBREW_NO_ENV_HINTS (see `man brew`).
$ brew install ruby
#运行后会有如下的输出:
ruby is keg-only, which means it was not symlinked into /usr/local,
because macOS already provides this software and installing another version in
parallel can cause all kinds of trouble.

If you need to have ruby first in your PATH, run:
  echo 'export PATH="/usr/local/opt/ruby/bin:$PATH"' >> ~/.zshrc

For compilers to find ruby you may need to set:
  export LDFLAGS="-L/usr/local/opt/ruby/lib"
  export CPPFLAGS="-I/usr/local/opt/ruby/include"

For pkg-config to find ruby you may need to set:
  export PKG_CONFIG_PATH="/usr/local/opt/ruby/lib/pkgconfig"
==> Summary
🍺  /usr/local/Cellar/ruby/3.2.2_1: 16,605 files, 46.2MB
==> Running `brew cleanup ruby`...
Disable this behaviour by setting HOMEBREW_NO_INSTALL_CLEANUP.
Hide these hints with HOMEBREW_NO_ENV_HINTS (see `man brew`).
- 按照提示输入下面的命令:
$ echo ‘export PATH=“/usr/local/opt/ruby/bin:$PATH”’ >> ~/.zshrc
$ source ~/.zshrc
$ source ~/.bash_profile
第一行:是将路径写入到.zshrc,这个可以直接从文件夹找到(路径:/Users/你的用户名/.zshrc),直接按照文本方式打开,复制这个 export PATH=“/usr/local/opt/ruby/bin:$PATH” 到末尾也是一样。
第二行:是让对.zshrc的修改生效
第三行:是让.bash_profile在这个窗口生效,其它窗口包括新开的窗口:无效。
比如你在.bash_profile内有下面的两行, source ~/.bash_profile 后在这个窗口就只用rbenv的Ruby。
export PATH="$HOME/.rbenv/bin:$PATH"
eval "$(rbenv init -)"
关于keg-only,点击查看参考。
管理Ruby
$ brew update
$ brew install rbenv
在文件 .bashrc 内添加下面内容
eval “$(rbenv init -)”
查看可以安装的ruby版本,并安装
rbenv install -l
rbenv install 3.2.1
设置为全局使用这个ruby版本,并重新‘启用/运行’这个版本的ruby
$ rbenv global 3.2.1
$ rbenv rehash
$ which ruby
$ ruby -v
更新Ruby
替换Ruby镜像
方式1
查看当前的ruby源
$ gem sources -l
打印:
*** CURRENT SOURCES ***
https://rubygems.org/
移除ruby当前源,并替换国内镜像
$ gem sources --remove https://rubygems.org/
$ gem sources -a https://gems.ruby-china.com/
替换国内最新镜像源(淘宝的Ruby镜像已经不更新了,https://gems.ruby-china.org域名更新为https://gems.ruby-china.com)
再次查看是否成功替换
$ gem sources -l
方式2
解决brew update 无法访问问题:
// 执行下面这句命令,更换为中科院的镜像:
$ git clone git://mirrors.ustc.edu.cn/homebrew-core.git/ /usr/local/Homebrew/Library/Taps/homebrew/homebrew-core --depth=1
// 把homebrew-core的镜像地址也设为中科院的国内镜像
$ cd “$(brew --repo)”
$ git remote set-url origin https://mirrors.ustc.edu.cn/brew.git
$ cd “$(brew --repo)/Library/Taps/homebrew/homebrew-core”
$ git remote set-url origin https://mirrors.ustc.edu.cn/homebrew-core.git
// 更新
$ brew update
// 使用
brew install node/xx1/某个组件2/
CocoaPods
安装CocoaPods
$ sudo gem install cocoapods
*可能会报错:ERROR: While executing gem … (Gem::FilePermissionError)
You don’t have write permissions for the /Library/Ruby/Gems/2.3.0 directory
改成下面的方式
$ sudo gem install -n /usr/local/bin cocoapods
然后执行
$ pod setup
*这个执行很慢,耐心等待… pod setup在执行时,会输出Setting up CocoaPods master repo,然后会卡一会儿。这步其实是 Cocoapods 将它的信息下载到 ~/.cocoapods目录下,你可以command+n新建一个终端窗口,执行cd ~/.cocoapods/进入到该文件夹下,然后du -sh *查看文件大小,这个目录最终大小是900多M。出现Setup completed 的时候说明已经完成了
CocoaPods使用
$ pod search AFNetworking
$ cd /user/filename/Your Project
$ vim Podfile
*输入下面的内容
platform :ios, ‘12.0’
target ‘dssf’ do
pod ‘AFNetworking’
end
*退出并保存
$ pod install
创建方式2:
$ pod init
*会自动创建Podfile,打开文件夹,添加需要的‘三方库’,最后
$ pod install
安装的一些问题
$ rbenv install 3.2.1
如下error:
BUILD FAILED (macOS 14.1 using ruby-build 20230208.1) (M1及以上芯片导致的问题)
解决方案:
$ CFLAGS=“-Wno-error=implicit-function-declaration” RUBY_CONFIGURE_OPTS=‘–with-readline-dir=/usr/local/opt/readline/’ arch -x86_64 rbenv install 3.2.1
执行后可能得error如下:
warning: It seems your ruby installation is missing psych (for YAML output).
To eliminate this warning, please install libyaml and reinstall your ruby.
解决方法: brew install libyaml
然后在运行上面一整串代码: CFLAGS… rbenv install 3.2.1
单元测试引用问题
1.关闭当前的工作空间
2.删除掉文件夹中的workspace
3.然后重新pod install
4.通过workspace打开工作空间,clean+build即可
rm -rf MyProject.xcworkspace
pod install
在pod install之前,请确保已经执行pod setup命令。
本质实际就是: Header Search Paths Library Search Paths
将要引用的‘库’名称替换下面代码对应的位置
Targets->ProjectTests->Build Settings->找到path
复制下面的路径,替换最后面的AFNetworking,改成你要引用的‘三方库名称’。
Header Search Paths
$(inherited) "${PODS_ROOT}/Headers/Public" "${PODS_ROOT}/Headers/Public/AFNetworking"
Library Search Paths
$(inherited) "${PODS_CONFIGURATION_BUILD_DIR}/AFNetworking"
参考的链接
(本篇工具链部分参考林永坚的课程,整体思路是从课程来,具体的细节是自己实践后的结果)
MacOS 配置Ruby环境安装 Cocoapods
2023最新cocoaPods、Homebrew、RVM、Ruby 安装教程
M1电脑上升级Ruby
Homebrew - Error: Failed to upgrade Homebrew Portable Ruby
单元测试无法引用CocoaPods的三方库问题


