ESP32/ESP8266基于Arduino框架下驱动1.8"tft_oled屏幕仿数码管时钟
- 📍相关篇《ESP32基于Arduino框架下U8g2驱动I2C OLED 时间显示》
- 📺效果演示:
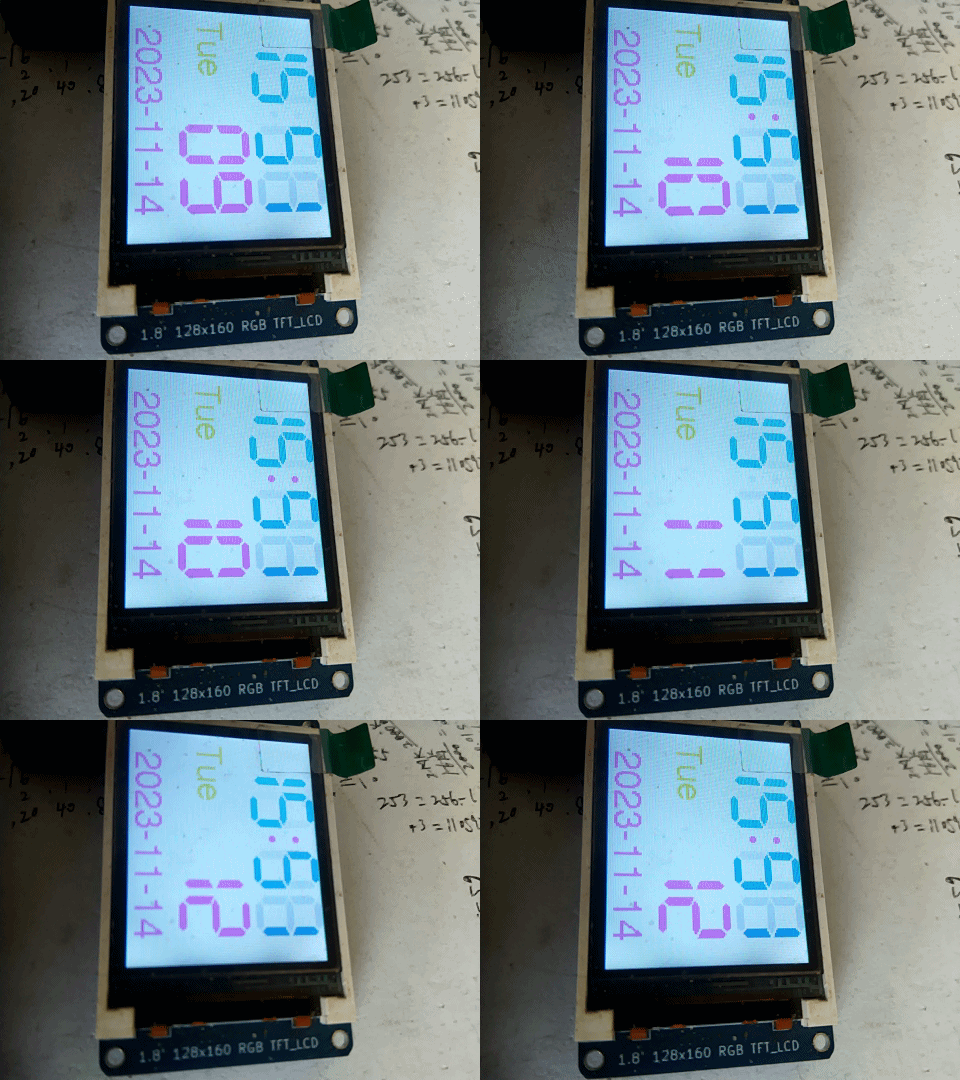
- 🌿屏幕显示部分,采用使用
TFT_eSPI库驱动,利用该库自带的特有字体显示。 - 🌿屏幕采用128*160 1.8"tft_Oled屏幕。
- 🌿本工程仅在esp32上做了验证,esp8266上显示应该也没有问题。
✨主要是熟悉对屏幕驱动显示库的使用,结合利用网络获取时间作为显示内容。
📓所需库
- 🔖所依赖库都可以在Arduino IDE管理库中搜索并直接安装到。
- 🌿TFT_eSPI(屏幕驱动显示)
- 🌿NTPClient (获取网络时间)
⛳注意事项
- 🌿安装好库后,需要自行手动修改
TFT_eSPI库目录下的User_Setup.h配置。根据个人使用的屏幕进行修改。 -
- 🔖如果是esp32:(引脚可以根据个人使用情况设定)
// For ESP32 Dev board (only tested with GC9A01 display)
// The hardware SPI can be mapped to any pins

#define TFT_MOSI 23 // In some display driver board, it might be written as "SDA" and so on.
#define TFT_SCLK 18
#define TFT_CS   5  // Chip select control pin
#define TFT_DC   19  // Data Command control pin
#define TFT_RST  21  // Reset pin (could connect to Arduino RESET pin)
#define TFT_BL   22  // LED back-light
– 🔖如果是esp8266
// For NodeMCU - use pin numbers in the form PIN_Dx where Dx is the NodeMCU pin designation
#define TFT_CS   PIN_D8  // Chip select control pin D8
#define TFT_DC   PIN_D3  // Data Command control pin
#define TFT_RST  PIN_D4  // Reset pin (could connect to NodeMCU RST, see next line)
//#define TFT_RST  -1    // Set TFT_RST to -1 if the display RESET is connected to NodeMCU RST or 3.3V

//#define TFT_BL PIN_D1  // LED back-light (only for ST7789 with backlight control pin)
//#define TOUCH_CS PIN_D2     // Chip select pin (T_CS) of touch screen
SDA ---- D7
SCL ---- D5
CS  ---- D8
DC  ---- D3
BL ---- 3.3V
RST ---- D4或3.3v
📝程序代码
/*
 An example digital clock using a TFT LCD screen to show the time.
 Demonstrates use of the font printing routines. (Time updates but date does not.)

 For a more accurate clock, it would be better to use the RTClib library.
 But this is just a demo.

 This examples uses the hardware SPI only. Non-hardware SPI
 is just too slow (~8 times slower!)

 Based on clock sketch by Gilchrist 6/2/2014 1.0
 Updated by Bodmer
A few colour codes:

code	color
0x0000	Black
0xFFFF	White
0xBDF7	Light Gray
0x7BEF	Dark Gray
0xF800	Red
0xFFE0	Yellow
0xFBE0	Orange
0x79E0	Brown
0x7E0	Green
0x7FF	Cyan
0x1F	Blue
0xF81F	Pink

 */
#ifdef ESP32
#include <WiFi.h>
#else
#include <ESP8266WiFi.h>
//  #include <WiFiClient.h>//3.0.2新增
//  #include <ESP8266HTTPClient.h>
#endif
// 获取网络时间相关库
#include <NTPClient.h>
#include <WiFiUdp.h>//esp32/esp8266核心固件自带
#include <SPI.h>
//屏幕显示
#include <TFT_eSPI.h>  // Graphics and font library for ST7735 driver chip
#include <SPI.h>

#define SERIAL_DEBUG  //是否开启串口调试信息输出

TFT_eSPI tft = TFT_eSPI();               // Invoke library, pins defined in User_Setup.h
TFT_eSprite sprite = TFT_eSprite(&tft);  // 创建双缓冲区

// 定义一个字符串数组
const char weekdays_en[][4] = { "Sun", "Mon", "Tue", "Wed", "Thu", "Fri", "Sat" };

// 网络时间相关定义
const char *ssid = "#######";  // 填写WiFi账号
const char *password = "********";   // WiFi密码
WiFiUDP ntpUDP;
NTPClient timeClient(ntpUDP, "ntp.aliyun.com");  // NTP服务器地址

uint32_t targetTime = 0;  // for next 1 second timeout
//定义时间用变量
int16_t currentYear = 0;
int16_t currentWeekDay = 0;
int16_t currentMonth = 0;
int16_t currentMonthDay = 0;
int16_t currentHour = 0;
int16_t currentMin = 0;
int16_t currentSec = 0;

byte omm = 99;
bool initial = 1;
byte xcolon = 0;
unsigned int colour = 0;
uint8_t ss,mm;
void updateTime();

void setup(void) {

#ifdef SERIAL_DEBUG
  Serial.begin(115200);  // 初始化串口通信,波特率为115200
#endif
  // ===网络时间初始化设定===
  // 连接WiFi
  WiFi.begin(ssid, password);
  while (WiFi.status() != WL_CONNECTED) {  // 等待WiFi连接成功
    delay(500);
#ifdef SERIAL_DEBUG
    Serial.print(".");
#endif
  }
  timeClient.begin();               // 初始化NTPClient
  timeClient.setTimeOffset(28800);  // 时区设置,时间偏移为28800秒(8小时)
  // ===TFT初始化设定===
  tft.begin();                    // 初始化显示寄存器
  tft.setRotation(1);             // 设置显示屏旋转角度(0表示不旋转,根据需要调整)0, 1, 2, 3 分别代表 0°、90°、180°、270°,可设置4为镜像。
  sprite.setColorDepth(16);       // 设置颜色深度(根据你的需求)
  sprite.setSwapBytes(true);      // 设置字节顺序,将RGB颜色顺序转换为BGR以正确显示颜色。
  sprite.createSprite(160, 128);  // 创建一个128x160像素的绘图窗口
  sprite.fillScreen(TFT_BLACK);

  sprite.setTextColor(TFT_YELLOW, TFT_BLACK);  // Note: the new fonts do not draw the background colour
  updateTime();//更新一次
  targetTime = millis() + 1000;
}

void loop() {
  if (targetTime < millis()) {
    targetTime = millis() + 1000;
    updateTime();
    byte Sec_Point = 82;
    if (ss != currentSec) {
      ss = currentSec;  // Advance second
      sprite.setTextColor(TFT_GREEN, TFT_BLACK);
      //    sprite.setCursor (8, 110);
      //sprite.println(timeClient.getFormattedTime());
      char buffer2[11];
      //  sprite.printf("%04d-%02d-%02d", currentYear, currentMonth, currentMonthDay);//显示日期
      sprintf_P(buffer2, "%04d-%02d-%02d", currentYear, currentMonth, currentMonthDay);
      sprite.drawString(buffer2, 16, 105, 4);     //显示日期
      sprite.setTextColor(TFT_BLUE, TFT_BLACK);  //橙色
      //sprite.setTextColor(0xF81F, TFT_BLACK); // Pink
      //   sprite.drawCentreString("",120,48,2); // (居中)Next size up font 2
      sprite.drawString(weekdays_en[currentWeekDay], 8, 64, 4);  //绘制字符串, 打印 星期几
      sprite.pushSprite(0, 0);
      //  sprite.setTextColor(0xFBE0);     // Orange
      sprite.setTextColor(TFT_GREEN, TFT_BLACK);
      if (currentSec < 10) {//显示秒
        Sec_Point +=sprite.drawChar('0', Sec_Point, 50, 7);
      }
      sprite.drawNumber(currentSec, Sec_Point, 50, 7);  //显示秒
      sprite.pushSprite(0, 0);
    }

    // Update digital time
    byte xpos = 6;
    byte ypos = 0;
    if (omm != currentMin) {  // Only redraw every minute to minimise flicker
      sprite.setTextColor(0x39C4, TFT_BLACK);  // Leave a 7 segment ghost image, comment out next line!
      // Font 7 is to show a pseudo 7 segment display.
      // Font 7 only contains characters [space] 0 1 2 3 4 5 6 7 8 9 0 : .
      sprite.drawString("88:88", xpos, ypos, 7);  // Overwrite the text to clear it
      sprite.setTextColor(0xFBE0);                // Orange
      omm = currentMin;

      if (currentHour < 10) xpos += sprite.drawChar('0', xpos, ypos, 7);
      xpos += sprite.drawNumber(currentHour, xpos, ypos, 7);  //显示时
      sprite.pushSprite(0, 0);
      xcolon = xpos;
      xpos += sprite.drawChar(':', xpos, ypos, 7);
      if (currentMin < 10) xpos += sprite.drawChar('0', xpos, ypos, 7);
      sprite.drawNumber(currentMin, xpos, ypos, 7);  //显示分
      sprite.pushSprite(0, 0);
    }

    if (ss % 2) {  // Flash the colon
      sprite.setTextColor(0x39C4, TFT_BLACK);  //字体颜色
      xpos += sprite.drawChar(':', xcolon, ypos, 7);
      sprite.pushSprite(0, 0);

    } else {
      sprite.drawChar(':', xcolon, ypos, 7);
      sprite.pushSprite(0, 0);
      // Erase the old text with a rectangle, the disadvantage of this method is increased display flicker
      sprite.fillRect(0, 64, 160, 20, TFT_BLACK);//区域清除
    }
  }
}

void updateTime() {
  timeClient.update();                                  // 更新时间信息
  unsigned long epochTime = timeClient.getEpochTime();  // 获取当前时间的时间戳
#ifdef ESP32
  struct tm *ptm = gmtime((time_t *)&epochTime);  // 将时间戳转换为tm结构体
#else
  time_t ntpTime = (time_t)epochTime;
  struct tm *ptm = localtime(&ntpTime);  // 将时间戳转换为tm结构体
#endif
  // 将epochTime换算成年月日
  currentYear = ptm->tm_year + 1900;  // 获取年份
  currentMonth = ptm->tm_mon + 1;     // 获取月份
  currentMonthDay = ptm->tm_mday;     // 获取月份中的日期
#ifdef ESP32
  currentWeekDay = ptm->tm_wday;  // 获取星期几
  if (currentWeekDay < 0) {
    currentWeekDay += 7;  // 将负数转换为正数
  }
  currentHour = ptm->tm_hour;  // 获取时
  currentMin = ptm->tm_min;    // 获取分
  currentSec = ptm->tm_sec;    // 获取秒
#else
  currentHour = timeClient.getHours();   // 获取时
  currentMin = timeClient.getMinutes();  // 获取分
  currentSec = timeClient.getSeconds();  // 获取秒
  currentWeekDay = timeClient.getDay();  // 获取星期几
#endif
#ifdef SERIAL_DEBUG
  // 打印时间
  Serial.println("Epoch Time: " + String(epochTime));  // 打印时间戳
  Serial.println(timeClient.getFormattedTime());       // 打印时间格式
  Serial.printf("NTP Time: %04d-%02d-%02d\n", currentYear, currentMonth, currentMonthDay);
#endif
}
