一、前言
本文档包含有关Redhat Linux for Real Time的基本安装和调试信息。许多行业和组织需要极高性能的计算,并且可能需要低且可预测的延迟,尤其是在金融和电信行业中。延迟(或响应时间)定义为事件与系统响应之间的时间,通常以微秒(us)为单位。
对于在 Linux 环境中运行的大多数应用程序,系统基本性能调整可以充分提高延迟。系统调整提供了确定性方面的绝大部分改进,使用实时内核时,系统调整与内核一样重要。实际上,如果您只是简单地运行了一个标准内核的未调整系统,并用实时内核代替了普通内核,那就几乎不会收获到任何好处。标准调整将产生90%的延迟优化,实时内核可提供最苛刻的工作负载所需的最后10%的延迟减少。
实时内核的目标是提供可预测的响应时间,以及一致的低延迟确定性。对于内核延迟要求在毫秒(ms)范围内的典型工作负载,标准的Linux 8内核就足够了。如果您的工作负载对核心内核功能,例如中断处理和微秒(us)范围内的进程调度具有严格的低延迟确定性要求,那么使用实时内核更为适合。
二、物理机环境配置及参数调优
实时环境配置和参数调优需分别在物理机和虚拟机中进行,两者均需安装rt内核,物理机性能测试符合标准才能开始虚拟机的性能测试,其中物理机和虚拟机最终达到的定量目标为长时间测试(cyclictest 12小时以上)最大延迟不超过15us。
2.1宿主机配置调优
首先安装实时内核,重启后查看是否已更换为实时内核
| # yum install -y kernel-rt # uname -r 4.19.0-240.23.2.rt7.79.el8_2.x86_64 |
2.1.1宿主机BIOS配置
2.禁用电源管理功能,包括CPU处理器深度休眠状态c-State。
Reboot后BMC进入远程控制界面,Del进入BIOS设置:
(仅适合浪潮Inspur Ver2.x版本,不同BIOS可参考查找类似字段)
CPU Configuration中:
Hyper Threading=Disable;
CPU Power Management Configuration中:
C1E=Disabled;
Power Technology=Disable;
Energy Performance= Performance;
ACPI Setting中Enable ACPI Auto Configuration=Disable;
启动后lscpu验证 threads per cpu 是否为1。
(或者可以用shell命令禁用超线程技术:
#!/bin/bash

HYPERTHREADING=1

function toggleHyperThreading() {
  for CPU in /sys/devices/system/cpu/cpu[0-9]*; do
      CPUID=`basename $CPU | cut -b4-`
      echo -en "CPU: $CPUID\t"
      [ -e $CPU/online ] && echo "1" > $CPU/online
      THREAD1=`cat $CPU/topology/thread_siblings_list | cut -f1 -d,`
      if [ $CPUID = $THREAD1 ]; then
          echo "-> enable"
          [ -e $CPU/online ] && echo "1" > $CPU/online
      else
        if [ "$HYPERTHREADING" -eq "0" ]; then echo "-> disabled"; else echo "-> enabled"; fi
          echo "$HYPERTHREADING" > $CPU/online
      fi
  done
}

function enabled() {
        echo -en "Enabling HyperThreading\n"
        HYPERTHREADING=1
        toggleHyperThreading
}

function disabled() {
        echo -en "Disabling HyperThreading\n"
        HYPERTHREADING=0
        toggleHyperThreading
}

#
ONLINE=$(cat /sys/devices/system/cpu/online)
OFFLINE=$(cat /sys/devices/system/cpu/offline)
echo "---------------------------------------------------"
echo -en "CPU's online: $ONLINE\t CPU's offline: $OFFLINE\n"
echo "---------------------------------------------------"
while true; do
    read -p "Type in e to enable or d disable hyperThreading or q to quit [e/d/q] ?" ed
    case $ed in
        [Ee]* ) enabled; break;;
        [Dd]* ) disabled;exit;;
        [Qq]* ) exit;;
        * ) echo "Please answer e for enable or d for disable hyperThreading.";;
    esac
done
)
配置完成后,可以通过hwlatdetect命令(yum安装rt-tests.rpm)测试效果:
| # hwlatdetect hwlatdetect: test duration 120 seconds detector: tracer parameters: Latency threshold: 10us Sample window: 1000000us Sample width: 500000us Non-sampling period: 500000us Output File: None Starting test test finished Max Latency: Below threshold Samples recorded: 0 Samples exceeding threshold: 0 |
2.1.2宿主机系统配置
本次是针对Linux V8.2进行的测试,不要在并非绝对必要的地方运行图形,尤其是在服务器上
| systemctl get-default systemctl set-default multi-user.target |
在/etc/yum.repos.d/目录下,vim Linux-Kernel.repo添加实时内核相关rpm包yum源:
| name=Linux-8.2 - kernel-rt baseurl=http://mirrors.……/el8.2/kernel/rt/$basearch/ gpgcheck=1 enabled=1 gpgkey=file:///etc/pki/rpm-gpg/RPM-GPG-KEY-Linux-8 |
| # yum install -y kernel-rt kernel-rt-core kernel-rt-modules kernel-rt-kvm # yum install -y rt-tests rt-setup rtcheck rtctl rteval rteval-loads rteval-common # yum install -y tuned tuned-profiles-nfv tuned-profiles-realtime # rpm -qa |grep tuned-profiles-nfv tuned-profiles-nfv-2.10.0-6.el8.noarch tuned-profiles-nfv-guest-2.10.0-6.el8.noarch tuned-profiles-nfv-host-2.10.0-6.el8.noarch |
(个别系统出现gpg校验失败时,可用rpm --import /etc/pki/rpm-gpg/RPM-GPG-KEY-Linux-8重新导入公钥)
| # systemctl enable tuned # systemctl start tuned |
首先查看NUMA拓扑信息,我们需要隔离部分CPU核以保留给虚机使用:
| # lscpu | grep ^NUMA NUMA node(s): 2 NUMA node0 CPU(s): 0-7 NUMA node1 CPU(s): 8-15 |
| # cat /etc/tuned/realtime-virtual-host-variables.conf isolated_cores=10-13 |
| # tuned-adm profile realtime-virtual-host # tuned-adm active Current active profile: realtime-virtual-host |
该profile配置生效时,会在内核引导项中添加如下启动参数:
isolcpus: 指定配置在realtime-variables.conf 文件里的隔离CPU列表。
nohz:在CPU处于ide状态时,停止周期时钟。默认值是off。
nohz_full:如果只有一个任务运行在某CPU上,停止周期时钟(需要将nohz设置为on)。
intel_pstate=disable:防止intel idel驱动程序管理电源及CPU频率。
nosoftlockup:防止内核检测用户态线程中的softlockup。
rcunocbs:使用rcunocbs来指定cpu进行卸载RCU callback processing。
在grub配置/etc/default/grub对应实时内核CMDLINE_LINUX行添加如下设定
| default_hugepagesz=1G hugepagesz=1G |
default_hugepagesz是默认HugeTLB页大小,hugepagesz是指定HugeTLB页的大小。HugeTLB特性则允许将某些页的尺寸增大到2MB或1GB,从而大大减小TLB的尺寸,提高缓冲区的命中率。
在/etc/sysctl.conf添加如下配置申请32个大页(本例中虚机内存大小32G)
| # cat /etc/sysctl.conf ... vm.nr_hugepages=32 |
在grub配置/etc/default/grub对应实时内核CMDLINE_LINUX行添加如下设定:
| idle=poll intel_idle.max_cstate=0 processor.max_cstate=1 iommu=pt intel_iommu=on mce=off pcie_aspm=off clocksource=tsc tsc=reliable |
idel=poll:poll选项强制CPU轮询并执行空循环,这可以避免频繁唤醒空闲CPU并略微提高性能。
processor.max_cstate=1:强制指定CPU的最大C-state值,C0为正常状态。
iommu=pt和inteliommu=on:使用 igbuio 驱动时必须携带 iommu=pt 参数。 这使得主机可以直接通过DMA重映射查找。 另外,如果内核中没有设置 INTELIOMMUDEFAULTON 参数,那么也必须使用 intel_iommu=on 参数。
mce=off:彻底禁用MCE(Machine Check Exception)。MCE是用来报告主机硬件相关问题的一种日志机制。
pcieaspm=off:使用 pcieaspm kernel 参数可以启用或者禁用ASPM,其中 pcie_aspm=off 会禁用ASPM。
tsc=reliable: 表示TSC时钟源是绝对稳定的,关闭启动时和运行时的稳定性检查。
(以下字段可提高部分性能,但也会导致不可预期的现象,根据具体情况酌情参考:)
| hpet=disable acpi=ht noapic |
hpet=disable :主要是避免hpet产生过多的中断干扰系统。-->但在某些系统导致clocksource=tsc失效
acpi=ht noapic:它禁止了除多处理器配置相关的内容以外的所有ACPI功能 -->但在某些系统导致无法重启
关闭INTER的MeltDown/Spectre漏洞(效果比较显著,不同系统关闭方式可能不太一样)
在grub配置/etc/default/grub对应实时内核CMDLINE_LINUX行添加如下设定:
| mitigations=off |
(若为AMD64架构)在grub配置/etc/default/grub对应实时内核CMDLINE_LINUX行添加如下设定:
| clocksource=tsc powernow-k8.tscsync=1 |
重置grub.cfg以使/etc/grub2.cfg生效。
(根据UEFI和legacy启动方式会有不同,二者只能选一,否则可能会导致系统重启进入grub> )
| Legacy : grub2-mkconfig -o /boot/grub2/grub.cfg UEFI : grub2-mkconfig -o /boot/efi/EFI/bclinux/grub.cfg |
| vim /etc/fstab /dev/mapper/bel-root / xfs noatime,nodiratime 0 0 /dev/mapper/bel-home /home xfs noatime,nodiratime 0 0 |
9.重启(需要下电上电形式)宿主机验证配置
| # tuned-adm active Current active profile: realtime-virtual-host # cat /sys/devices/system/clocksource/clocksource0/current_clocksource tsc # cat /proc/meminfo | grep -i huge HugePages_Total: 32 HugePages_Free: 32 -->若虚拟机启动,则Free应为0 HugePages_Rsvd: 0 HugePages_Surp: 0 Hugepagesize: 1048576 kB Hugetlb: 33554432 kB # cat /proc/cmdline BOOT_IMAGE=(hd0,msdos1)/vmlinuz-4.18.0-240.23.2.rt7.79.el8_2.bclinux.x86_64 root=/dev/mapper/bel-root ro crashkernel=auto resume=/dev/mapper/bel-swap rd.lvm.lv=bel/root rd.lvm.lv=bel/swap rhgb quiet default_hugepagesz=1G hugepagesz=1G idle=poll intel_idle.max_cstate=0 processor.max_cstate=1 iommu=pt intel_iommu=on mce=off pcie_aspm=off tsc=reliable hpet=disable mitigations=off acpi=ht noapic skew_tick=1 isolcpus=10-13 intel_pstate=disable nosoftlockup tsc=nowatchdog nohz=on nohz_full=10-13 rcu_nocbs=10-13 # grep . /sys/devices/system/cpu/vulnerabilities/* /sys/devices/system/cpu/vulnerabilities/itlb_multihit:KVM: Vulnerable /sys/devices/system/cpu/vulnerabilities/l1tf:Mitigation: PTE Inversion; VMX: vulnerable, SMT disabled /sys/devices/system/cpu/vulnerabilities/mds:Vulnerable; SMT disabled /sys/devices/system/cpu/vulnerabilities/meltdown:Vulnerable /sys/devices/system/cpu/vulnerabilities/spec_store_bypass:Vulnerable /sys/devices/system/cpu/vulnerabilities/spectre_v1:Vulnerable: __user pointer sanitization and usercopy barriers only; no swapgs barriers /sys/devices/system/cpu/vulnerabilities/spectre_v2:Vulnerable, IBPB: disabled, STIBP: disabled /sys/devices/system/cpu/vulnerabilities/srbds:Not affected /sys/devices/system/cpu/vulnerabilities/tsx_async_abort:Not affected |
2.1.3宿主机参数调优
| swapoff -a |
2.关闭ksm
| echo 0 > /sys/kernel/mm/ksm/merge_across_nodes echo 0 > /sys/kernel/mm/ksm/run |
| echo 0 > /proc/sys/kernel/watchdog echo 0 > /proc/sys/kernel/nmi_watchdog |
4.禁止带宽限制
| echo -1 > /proc/sys/kernel/sched_rt_period_us echo -1 > /proc/sys/kernel/sched_rt_runtime_us |
5.禁用irqbalance守护程序。在实时部署中,应用程序通常是专用的,并且绑定到特定的CPU,因此irqbalance不需要守护程序。
| systemctl status irqbalance systemctl stop irqbalance systemctl disable irqbalance |
禁用pcscd守护程序(若有)。在实时部署中,虽然 pcscd 通常是一个低优先级的任务, 但它通常比其他守护进程占用更多的 cpu ,这种额外的背景噪声可能导致实时任务的抢占成本增加,并导致对决定论的其他不良影响。
| systemctl status pcscd systemctl stop pcscd systemctl disable pcscd |
禁用mcelog.service守护程序。
| systemctl status mcelog.service systemctl stop mcelog.service systemctl disable mcelog.service |
6. 调整隔离cpu上的ksoftirqd和rcuc的优先级(新建shell并运行,注意删除每行行前空格)
| #!/bin/bash host_isolcpus="10-13" startVal=$(echo ${host_isolcpus} | cut -f 1 -d-) endVal=$(echo ${host_isolcpus} | cut -f 2 -d-) i=0 while [ ${startVal} -le ${endVal} ]; do tid=`pgrep -a ksoftirq | grep "ksoftirqd/${startVal}$" | cut -d ' ' -f 1` chrt -fp 2 ${tid} tid=`pgrep -a rcuc | grep "rcuc/${startVal}$" | cut -d ' ' -f 1` chrt -fp 3 ${tid} cpu[$i]=${startVal} i=`expr $i + 1` startVal=`expr $startVal + 1` done |
#!/bin/bash
echo "---------"
echo -en "set irq to cpu0\n"
echo "----------"
for irq in /proc/irq/[0-9]* ;
do
  echo 0 > ${irq}/smp_affinity_list
done
7.设置中断亲和性 将中断都设置到0号cpu上(新建shell并运行,注意删除每行行前空格)
| #!/bin/bash for irq in /proc/irq/[0-9]* ; do echo 0 > ${irq}/smp_affinity_list done |
#!/bin/bash
host_isolcpus="10-13"
startVal=$(echo ${host_isolcpus} | cut -f 1 -d-)
endVal=$(echo ${host_isolcpus} | cut -f 2 -d-)
i=0
while [ ${startVal} -le ${endVal} ]; do
tid=`pgrep -a ksoftirq | grep "ksoftirqd/${startVal}$" | cut -d ' ' -f 1`
chrt -fp 2 ${tid}
tid=`pgrep -a rcuc | grep "rcuc/${startVal}$" | cut -d ' ' -f 1`
chrt -fp 3 ${tid}
cpu[$i]=${startVal}
i=`expr $i + 1`
startVal=`expr $startVal + 1`

done
8.设置LD_BIND_NOW以在启动时加载动态库
| # export LD_BIND_NOW=1 # echo $LD_BIND_NOW 1 |
9.通过.c文件编译运行,写0到 /dev/cpu_dma_latency文件以完全禁用某些电源管理频率和电压缩放
| #include <stdio.h> #include <stdlib.h> #include <unistd.h> #include <string.h> #include <errno.h> #include <fcntl.h> #include <sys/types.h> #include <sys/stat.h> static int pm_qos_fd = -1; void start_low_latency(void) { int32_t target = 0; if (pm_qos_fd >= 0) return; pm_qos_fd = open("/dev/cpu_dma_latency", O_RDWR); if (pm_qos_fd < 0) { fprintf(stderr, "Failed to open PM QOS file: %s",strerror(errno)); exit(errno); } write(pm_qos_fd, &target, sizeof(target)); } void stop_low_latency(void) { if (pm_qos_fd >= 0) close(pm_qos_fd); } void main(void) { start_low_latency(); } |
检查/dev/cpu_dma_latency是否设置成功。
| # hexdump /dev/cpu_dma_latency 0000000 0000 0000 0000004 |
若该文件没有设置为0,则考虑用配置文件强制修改其为0
| # vim /lib/tuned/latency-performance/tuned.conf [cpu] force_latency=0 |
改完配置后重启tuned。
| # systemctl restart tuned |
10.关闭TCP时间戳以减少与时间戳生成相关的性能峰值。
| # sysctl -w net.ipv4.tcp_timestamps=0 net.ipv4.tcp_timestamps = 0 |
11.关闭跟踪内核中的函数调用。
| # echo 0 > /sys/kernel/debug/tracing/options/function-trace # echo schedule > /sys/kernel/debug/tracing/set_ftrace_filter |
12.降低sched_nr_migrate以限制SCHED_OTHER任务迁移。
| # echo 2 > /proc/sys/kernel/sched_nr_migrate |
2.2 宿主机实时性测试
1.对于实时性的测试,采用的是cyclictest:
(推荐用 git clone git://git.kernel.org/pub/scm/linux/kernel/git/clrkwllms/rt-tests.git
下载源码后在rt-tests目录下make install,期间可能会需要yum安装numactl-devel.rpm以补缺文件
或
rt-tests-2.1-1.el8.x86_64.rpm安装的cyclictest在执行时需要用-s来代替-n)
该测试工具原理比较简单,它会周期性的执行定时器线程并估算时延,关键流程如下:
A.首先线程进入while循环,通过clock_gettime获取当前时间T1;
B.然后执行clock_nanosleep进入睡眠,默认睡眠时间100微秒,本次测试是200微秒;
C.睡眠时间到期后,线程被唤醒(wakeup),同样通过clock_gettime获取当前时间T2,计算(T2-(T1+200us))就是估算的时延了。
在10分钟内测试下cpu的实时性。具体命令如下(taskset用于绑定当前线程到具体的cpu):
| # taskset -c 12 cyclictest -m -n -q -p 95 -D 10m -h 40 -i 200 > cyclictest_phy_10m.out |
2.cyclictest要长时间测试(12小时以上),若用BMC登录去执行命令进行测试则直接跳过本段;若SSH 或者telent 远程登录到Linux 服务器,因为它们执行的时间太长了,必须等待它们执行完毕,在此期间不能关掉窗口或者断开连接,否则这个任务就会被杀掉,一切半途而废了,需要安装screen环境,安装好环境后,可以建立一个自己的screen session:
| # screen -S sessionName |
然后在sessionName里运行
| # taskset -c 12 cyclictest -m -n -q -p 95 -D 12h -h 40 -i 200 > cyclictest_phy_12h.out |
输入完成后,不中断screen窗口中程序的运行而暂时断开(detach)screen会话:
| # Ctrl+a + d |
12个小时之后回来了,找到该screen会话并恢复(远程连接工具已断开,但文件已生成)
| # screen -ls # screen -r sessionID |
3.本次物理机测试12小时cyclictest结果
| # /dev/cpu_dma_latency set to 0us # Histogram 000000 000000 000001 023892 000002 215770466 000003 157368 000004 044101 000005 003999 000006 000167 000007 000006 000008 000001 000009 000000 000010 000000 000011 000000 000012 000000 000013 000000 000014 000000 000015 000000 000016 000000 000017 000000 000018 000000 000019 000000 000020 000000 000021 000000 000022 000000 000023 000000 000024 000000 000025 000000 000026 000000 000027 000000 000028 000000 000029 000000 000030 000000 000031 000000 000032 000000 000033 000000 000034 000000 000035 000000 000036 000000 000037 000000 000038 000000 000039 000000 # Total: 216000000 # Min Latencies: 00001 # Avg Latencies: 00002 # Max Latencies: 00008 # Histogram Overflows: 00000 # Histogram Overflow at cycle number: # Thread 0: |
4.运行完成后可通过proc下文件进行检查,可看到被隔离CPU有明显中断优化。
| # cat /proc/interrupts # cat /proc/softirqs |
三、虚拟机环境配置及参数调优
实时环境配置和参数调优需分别在物理机和虚拟机中进行,两者均需安装rt内核,物理机性能测试符合标准才能开始虚拟机的性能测试,其中物理机和虚拟机最终达到的定量目标为长时间测试(cyclictest 12小时以上)最大延迟不超过15us(非硬性,看具体需求)。
3.1虚拟机配置调优
3.1.1 虚机xml配置
将虚机vcpu绑定到宿主机隔离出来的物理cpu上,本例中将虚机的4个vcpu绑定到CPU 10-13中,其中vcpu 2-3的调度策略是fifo:
| <cputune> <vcpupin vcpu='0' cpuset='10'/> <vcpupin vcpu='1' cpuset='11'/> <vcpupin vcpu='2' cpuset='12'/> <vcpupin vcpu='3' cpuset='13'/> <vcpusched vcpus='2-3' scheduler='fifo' priority='1'/> </cputune> |
这边采用host-passthrough模式,直接将物理CPU暴露给虚拟机使用,在虚拟机上完全可以看到的就是物理CPU的型号:
| <cpu mode='host-passthrough'> <feature policy='require' name='tsc-deadline'/> </cpu> |
| <memory unit='GiB'>32</memory> <memoryBacking> <hugepages> <page size='1048576' unit='KiB' nodeset='0'/> </hugepages> <locked/> </memoryBacking> |
| <clock offset='utc'> <timer name='kvmclock' present='no'/> </clock> |
5.禁用pmu电源管理:
| <features> <pmu state='off'/> </features> |
建议移除所有的USB设备,virtio串口设备,qga通道设备以及声卡设备。
| <controller type='usb' index='0' model='none'/> |
| <memballoon model='none'/> |
<domain type='kvm'>

  <name>linux8.2</name>
  <memory unit='GiB'>32</memory>
  <vcpu>4</vcpu>

  <os>
    <type arch='x86_64' machine='pc'>hvm</type>
  </os>

  <features>
    <acpi/>
  </features>

  <cputune>
    <vcpupin vcpu='0' cpuset='10'/>
    <vcpupin vcpu='1' cpuset='11'/>
    <vcpupin vcpu='2' cpuset='12'/>
    <vcpupin vcpu='3' cpuset='13'/>
    <vcpusched vcpus='2-3' scheduler='fifo' priority='1'/>
  </cputune>

  <cpu mode='host-passthrough'>
    <feature policy='require' name='tsc-deadline'/>
  </cpu>

  <memoryBacking>
    <hugepages>
      <page size='1048576' unit='KiB' nodeset='0'/>
    </hugepages>
    <locked/>
  </memoryBacking>

  <clock offset='utc'>
    <timer name='kvmclock' present='no'/>
  </clock>

  <on_poweroff>destroy</on_poweroff>
  <on_reboot>restart</on_reboot>
  <on_crash>destroy</on_crash>

  <devices>
    <emulator>/usr/libexec/qemu-kvm</emulator>

    <disk type='file' device='disk'>
      <driver name='qemu' type='qcow2' cache='none'/>
      <source file='/root/virbcl/linux8.2.qcow2'/>
      <target dev='hda' bus='ide'/>
      <boot order='2'/>
    </disk>

    <disk type='file' device='cdrom'>
      <driver name='qemu' type='raw'/>
      <source file='/root/virbcl/Linux-R8-U2-Server-x86_64-210617.iso'/>
      <target dev='hdb' bus='ide'/>
      <readonly/>
      <boot order='1'/>
    </disk>

    <interface type='network'>
      <source network='default'/>
      <model type='virtio'/>
    </interface>

    <controller type='usb' index='0' model='none'/>

    <memballoon model='none'/>

    <input type='mouse' bus='ps2'/>

    <graphics type='vnc' listen='0.0.0.0'/>

  </devices>

</domain>
3.1.2 qemu-kvm创建虚机
1.首先我们需要检查一下我们的当前主机是否支持cpu虚拟化:
(若没有请安装kernel-rt-kvm)
| # lsmod | grep kvm kvm_intel 253952 6 kvm 811008 1 kvm_intel irqbypass 16384 3 kvm |
安装qemu-kvm包
| # yum -y install qemu-kvm |
2.安装kvm虚拟机要提前做好准备工作,包括iso文件,硬盘文件linux.qcow2,虚拟机配置文件linux.xml
首先我们需要创建一个虚拟磁盘,相当于我们的系统盘:
| # qemu-img create -f qcow2 /root/linux.qcow2 40G Formatting 'linux.qcow2', fmt=qcow2 size=42949672960 cluster_size=65536 lazy_refcounts=off refcount_bits=16 |
执行 virsh 命令定义一台虚机(保证光盘、硬盘都在root用户目录下以获得权限)
| # virsh define linux.xml |
(若define有qemu:x:107:107报错可参考,没有则跳过此步骤):
| # vim /etc/libvirt/qemu.conf …… user="root" group="root" # systemctl restart libvirt |
执行 virsh 命令启动一台虚机
| # virsh start linux.xml |
查看虚拟机状态
| # virsh list --all Id 名称 状态 ---------------------------------------------------- 17 linux8.2 running |
3.虚拟机启动后,用VNC新建链接session查看,连接的 ip 地址为宿主机的 ip 地址,可以通过 ip a进行查看

此时若vnc链接不到虚拟机,请考虑如下排查手段:
A.如果系统是最小化安装的,要安装xorg-x11-xauth.rpm包 ,不然在使用ssh连接主机时图形无法支持
| # yum -y install xorg-x11-xauth |
B.关闭防火墙,关闭SELINUX
| #systemctl status firewalld #systemctl stop firewalld #systemctl disable firewalld #getenforce #setenforce 0 #vim /etc/selinux/config …… SELINUX=disable |
4.由于第一次进入系统,显示出安装系统的界面,我们正常进行安装就可以了。
安装完成后,系统就写入对应的虚拟磁盘中了,这时重启后会依然进行安装,原因在于bclinux.xml中配置启动顺序为先iso,后qcow2; 所以需要更改配置文件(xml) 中的启动项,将其从 cdrom 启动改为从磁盘启动。
执行 virsh 命令关闭虚机(shutdown命令失效就用destroy),编辑虚机,重启虚机
| # virsh shutdown bclinux.xml # virsh edit bclinux.xml # virsh start bclinux.xml |
(其中第二步edit只需将iso和qcow2的 <boot order='1/2'/>顺序数字互换一下即可)
之后便可正常启动虚拟机,进行后续配置。
5.重启后若虚拟机无法联网,考虑将网络配置由network改成网桥bridge模式。
| # virsh edit linux.xml …… <interface type='bridge'> <mac address='52:54:00:ae:d4:8a'/> <source bridge='virbr0'/> <model type='virtio'/> <address type='pci' domain='0x0000' bus='0x00' slot='0x03' function='0x0'/> </interface> |
参考:
| # cat /etc/libvirt/qemu/networks/default.xml …… <forward mode='net'/> <network name='virbr0' stp='on' delay='0'/> |
若改动default.xml需重启
| # systemctl restart libvirtd |
6.虚拟机启动后,也可由物理机ssh root@192.168.122.17到虚机进行后续操作,其中虚拟机的ip可由VNC登录后获取:

3.1.3虚机系统配置
在/etc/yum.repos.d/目录下,vim Linux-Kernel.repo添加实时内核相关rpm包yum源:
| [kernel-rt] name=Linux-8.2 - kernel-rt baseurl=http://mirrors.……/el8.2/kernel/rt/$basearch/ gpgcheck=1 enabled=1 gpgkey=file:///etc/pki/rpm-gpg/RPM-GPG-KEY-Linux-8 |
| # yum install -y kernel-rt kernel-rt-core kernel-rt-modules # yum install -y rt-tests rt-setup rtcheck rtctl rteval rteval-loads rteval-common # yum install tuned # yum install tuned-profiles-nfv tuned-profiles-realtime # rpm -qa |grep tuned-profiles-nfv tuned-profiles-nfv-2.10.0-6.el8.noarch tuned-profiles-nfv-guest-2.10.0-6.el8.noarch tuned-profiles-nfv-host-2.10.0-6.el8.noarch |
| # systemctl enable tuned # systemctl start tuned |
配置tuned以隔离在libvirt配置中保留的2个实时CPU 2-3:
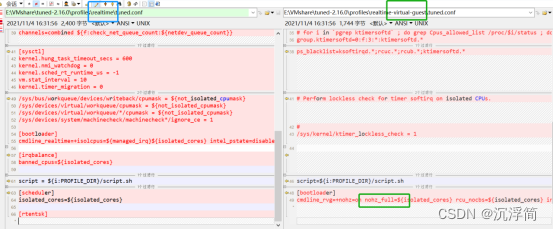
(目前测试realtime-variables.conf性能要好于realtime-virtual-guest-variables.conf
具体参数差异可以对比参考源码目录下两者的tuned-2.1.6/profiles/xxx/tuned.conf文件)
 )
)
| # cat /etc/tuned/realtime-variables.conf isolated_cores=2-3 |
| # tuned-adm profile realtime # tuned-adm active Current active profile: realtime |
在grub配置/etc/default/grub对应实时内核CMDLINE_LINUX行添加如下设定:
| idle=poll mce=off tsc=reliable hpet=disable intel_idle.max_cstate=0 processor.max_cstate=1 mitigations=off acpi=off noapic |
(以下字段可根据具体情况酌情参考,包括大页配置、禁用ASPM、放开cpu漏洞:)
| default_hugepagesz=1G hugepagesz=1G hugepages=12 pcie_aspm=off tsx_async_abort=off |
重置grub.cfg以使/etc/grub2.cfg生效。
(根据UEFI和legacy启动方式会有不同,二者只能选一,否则可能会导致系统重启进入grub> )
| Legacy : grub2-mkconfig -o /boot/grub2/grub.cfg UEFI : grub2-mkconfig -o /boot/efi/EFI/bclinux/grub.cfg |
7.禁止文件系统修改访问时间
| vim /etc/fstab /dev/mapper/bel-root / xfs noatime,nodiratime 0 0 |
分别验证tuned配置,时钟源以及内核调优参数是否已经生效:
| # tuned-adm active Current active profile: realtime # cat /sys/devices/system/clocksource/clocksource0/current_clocksource tsc # cat /proc/cmdline BOOT_IMAGE=(hd0,msdos1)/vmlinuz-4.18.0-240.23.2.rt7.79.el8_2.bclinux.x86_64 root=/dev/mapper/bel-root ro crashkernel=auto resume=/dev/mapper/bel-swap rd.lvm.lv=bel/root rd.lvm.lv=bel/swap rhgb quiet default_hugepagesz=1G hugepagesz=1G hugepages=12 idle=poll mce=off tsc=reliable hpet=disable intel_idle.max_cstate=0 processor.max_cstate=1 mitigations=off acpi=ht noapic skew_tick=1 isolcpus=2-3 intel_pstate=disable nosoftlockup tsc=nowatchdog # grep . /sys/devices/system/cpu/vulnerabilities/* /sys/devices/system/cpu/vulnerabilities/itlb_multihit:Not affected /sys/devices/system/cpu/vulnerabilities/l1tf:Mitigation: PTE Inversion /sys/devices/system/cpu/vulnerabilities/mds:Vulnerable; SMT Host state unknown /sys/devices/system/cpu/vulnerabilities/meltdown:Vulnerable /sys/devices/system/cpu/vulnerabilities/spec_store_bypass:Vulnerable /sys/devices/system/cpu/vulnerabilities/spectre_v1:Vulnerable: __user pointer sanitization and usercopy barriers only; no swapgs barriers /sys/devices/system/cpu/vulnerabilities/spectre_v2:Vulnerable, IBPB: disabled, STIBP: disabled /sys/devices/system/cpu/vulnerabilities/srbds:Not affected /sys/devices/system/cpu/vulnerabilities/tsx_async_abort:Not affected |
9.检查/dev/cpu_dma_latency是否设置成功。
| # hexdump /dev/cpu_dma_latency 0000000 0000 0000 0000004 |
若该文件没有设置为0,则考虑用配置文件强制修改其为0
| # vim /lib/tuned/latency-performance/tuned.conf [cpu] force_latency=0 |
3.1.4虚机参数调优
10.关闭内存交换
| swapoff -a |
| echo 0 > /sys/kernel/mm/ksm/merge_across_nodes echo 0 > /sys/kernel/mm/ksm/run |
| echo 0 > /proc/sys/kernel/watchdog echo 0 > /proc/sys/kernel/nmi_watchdog |
| echo -1 > /proc/sys/kernel/sched_rt_period_us echo -1 > /proc/sys/kernel/sched_rt_runtime_us |
| echo 0 > /proc/sys/kernel/timer_migration |
16.禁用irqbalance守护程序。
| systemctl status irqbalance systemctl stop irqbalance systemctl disable irqbalance |
禁用mcelog.service守护程序。
| systemctl status mcelog.service systemctl stop mcelog.service systemctl disable mcelog.service |
17.设置中断亲和性 将中断都设置到0号cpu上(新建shell并运行,注意删除每行行前空格)
| #!/bin/bash echo "---------" echo -en "set irq to cpu0\n" echo "----------" for irq in /proc/irq/[0-9]* ; do echo 0 > ${irq}/smp_affinity_list done |
18.关闭TCP时间戳以减少与时间戳生成相关的性能峰值。
| # sysctl -w net.ipv4.tcp_timestamps=0 net.ipv4.tcp_timestamps = 0 |
19.关闭跟踪内核中的函数调用。
| # echo 0 > /sys/kernel/debug/tracing/options/function-trace |
20.降低sched_nr_migrate以限制SCHED_OTHER任务迁移。
| # echo 2 > /proc/sys/kernel/sched_nr_migrate |
21.设置LD_BIND_NOW以在启动时加载动态库
| # export LD_BIND_NOW=1 # echo $LD_BIND_NOW 1 |
3.2 虚拟机实时性测试
1.首先在虚机内部CPU 2上通过stress命令模拟负载加压(持续计算平方根,防止cpu睡眠):
| # taskset -c 2 stress -c 1 |
| # taskset -c 2 cyclictest -m -n -q -p 95 -D 10m -h 40 -i 200 > cyclictest_kvm_10m.out |
| # taskset -c 2 cyclictest -m -n -q -p 95 -D 12h -h 40 -i 200 > cyclictest_kvm_12h.out |
| # /dev/cpu_dma_latency set to 0us # Histogram 000000 000000 000001 000000 000002 000000 000003 000000 000004 040613 000005 212147759 000006 3779507 000007 010623 000008 000688 000009 000347 000010 001134 000011 019203 000012 000116 000013 000009 000014 000000 000015 000001 000016 000000 000017 000000 000018 000000 000019 000000 000020 000000 000021 000000 000022 000000 000023 000000 000024 000000 000025 000000 000026 000000 000027 000000 000028 000000 000029 000000 000030 000000 000031 000000 000032 000000 000033 000000 000034 000000 000035 000000 000036 000000 000037 000000 000038 000000 000039 000000 # Total: 216000000 # Min Latencies: 00004 # Avg Latencies: 00005 # Max Latencies: 00015 # Histogram Overflows: 00000 # Histogram Overflow at cycle number: # Thread 0: |
四、参考
Optimizing RHEL 8 for Real Time for low latency operation Red Hat Enterprise Linux for Real Time 8 | Red Hat Customer Portal
【精选】【realtime】红帽 RedHat Linux实时内核配置要点全面分析_redhat linux 实时性调试_rtoax的博客-CSDN博客
cyclictest 测试以及原理浅谈-CSDN博客
Linux 内核实时性测试_cyclictest源码地址-CSDN博客
Linux动态启用/禁用超线程技术的方法详解_Linux_脚本之家
cyclictest 简介-腾讯云开发者社区-腾讯云
https://www.cnblogs.com/sophiascpn/p/13796645.html (cyclictest 的使用)
实时性测试:cyclictest详解 - 知乎
smp irq affinity介绍_smp_affinity-CSDN博客
https://www.cnblogs.com/mchina/archive/2013/01/30/2880680.html (linux screen 命令详解)
https://www.cnblogs.com/mrhonest/p/11610413.html (screen 命令基本操作教程)
压力测试神器stress-ng-CSDN博客
Linux stress 命令-CSDN博客
