文章目录
- 0、多线程编程的步骤
- 1、wait和notify
- 2、synchronized下实现线程的通信(唤醒)
- 3、虚假唤醒
- 4、Lock下实现线程的通信(唤醒)
- 5、线程间的定制化通信
0、多线程编程的步骤
- 步骤一:创建(将来被共享的)资源类,创建属性和操作方法
- 步骤二:在资源类的操作方法中进行:判断、干活儿、通知
- 步骤三:创建多线程调用资源类的方法
- 步骤四:防止虚假唤醒现象
1、wait和notify
- wait 和notify方法是任何一个Java对象都有的方法,因为这两个方法是Object类的方法
- wait方法让正在o对象上活动的线程进入等待状态,
并释放o对象的对象锁,直到被唤醒为止
Object o = new Object();
o.wait();
//public final void wait(long timeout)
//timeout是要等待的最长时间
- 注意是正在o对象上活动的线程,而不是线程对象,所以别t.wait
- notify方法,唤醒在此对象上等待的单个线程,如果此对象上有多个线程在等待,那就随机唤醒一个线程。直到当前线程放弃此对象上的锁定,这个被唤醒的线程才能继续执行,且如果该对象上还有其他主动同步的线程,则被唤醒的线程要与它们进行竞争,如果该对象上就这一个线程(刚被唤醒的线程),那就自然是它抢到对象锁
- notifyAll,即唤醒该对象上等待的所有线程,和notify一样,也是等当前线程释放占用的对象锁后,再竞争、执行
Object的wait()与Thread.sleep()的区别:
- Thread.sleep()是让当前线程
拿着锁睡眠指定时间,时间一到手里拿着锁自动醒来,还可以接着往下执行 - Object的wait则是
睡前释放锁,只有当前锁对象调用了notify或者notifyAll方法才会醒来(不考虑wait带参数指定睡眠时间),且醒来手里也没锁,得再竞争,也就是说wait的线程被唤醒是就绪状态
2、synchronized下实现线程的通信(唤醒)
案例:启动两个线程,实现对同一个数交替的加1和减1操作
//资源类
class Share{
    //初始值
    private int number = 0;

    //+1
    public synchronized void incr() throws InterruptedException {
        if(number != 0){
            this.wait();   //让share对象上的线程等待
        }
        number++;
        System.out.println(Thread.currentThread().getName() + " ==> " + number);
        //通知其他线程
        this.notify();

    }

    //-1
    public synchronized  void decr() throws InterruptedException {
        if(number != 1){
            this.wait();
        }
        number--;
        System.out.println(Thread.currentThread().getName() + " ==> " + number);
        this.notify();
    }
}
启动多线程,共用资源类对象,调用资源类的方法:
public class ThreadMessage {
    public static void main(String[] args) {
        Share share = new Share();
        new Thread(() -> {
            for(int i = 0; i <= 10 ; i++){
                try {
                    share.incr();   //+1
                } catch (InterruptedException e) {
                    e.printStackTrace();
                }
            }
        },"AA").start();

        new Thread(() -> {
            for(int i = 0; i <= 10 ; i++){
                try {
                    share.decr();  //-1
                } catch (InterruptedException e) {
                    e.printStackTrace();
                }
            }
        },"BB").start();

    }

}

3、虚假唤醒
上面的代码改为4个线程对同一个数字进行操作,其中AA、CC负责加一,BB、DD负责减一:
public class ThreadMessage {
    public static void main(String[] args) {
        Share share = new Share();
        new Thread(() -> {
            for(int i = 0; i <= 10 ; i++){
                try {
                    share.incr();   //+1
                } catch (InterruptedException e) {
                    e.printStackTrace();
                }
            }
        },"AA").start();

        new Thread(() -> {
            for(int i = 0; i <= 10 ; i++){
                try {
                    share.decr();  //-1
                } catch (InterruptedException e) {
                    e.printStackTrace();
                }
            }
        },"BB").start();

        new Thread(() -> {
            for(int i = 0; i <= 10 ; i++){
                try {
                    share.incr();   //+1
                } catch (InterruptedException e) {
                    e.printStackTrace();
                }
            }
        },"CC").start();

        new Thread(() -> {
            for(int i = 0; i <= 10 ; i++){
                try {
                    share.decr();  //-1
                } catch (InterruptedException e) {
                    e.printStackTrace();
                }
            }
        },"DD").start();

    }

}
执行发现有非0非1的数值出现:
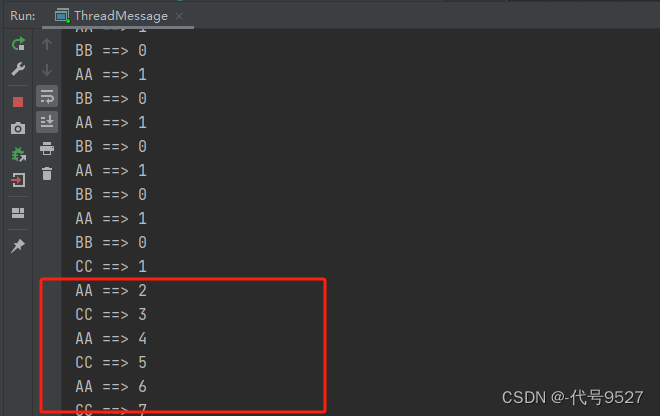
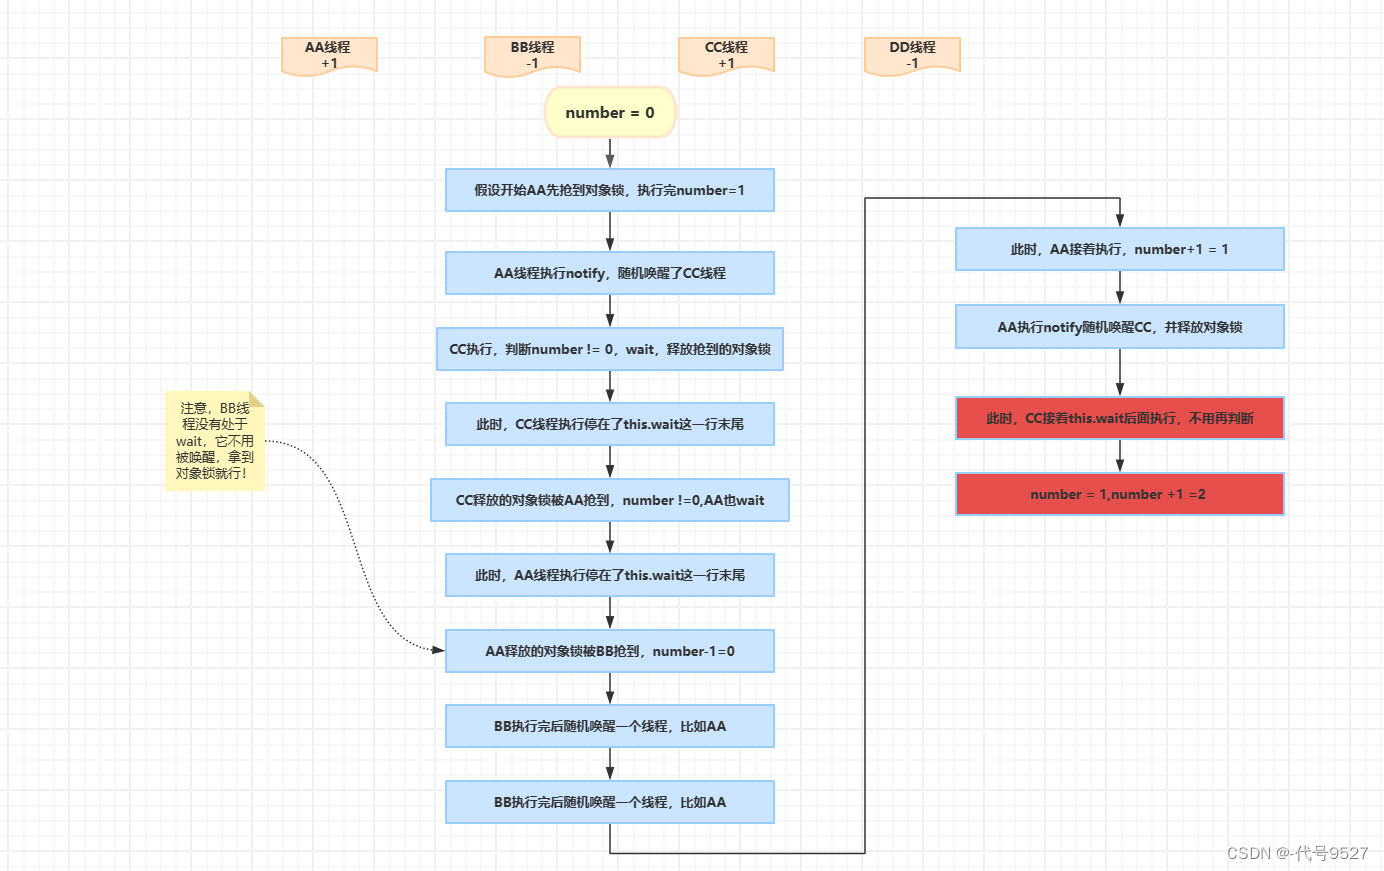
发生这个错误的原因是,wait方法的特点是在哪一行睡,就在哪一行醒,然后接着往下执行,这就导致了wait前面的判断条件只有第一次生效,这就是虚假唤醒。画个草图:
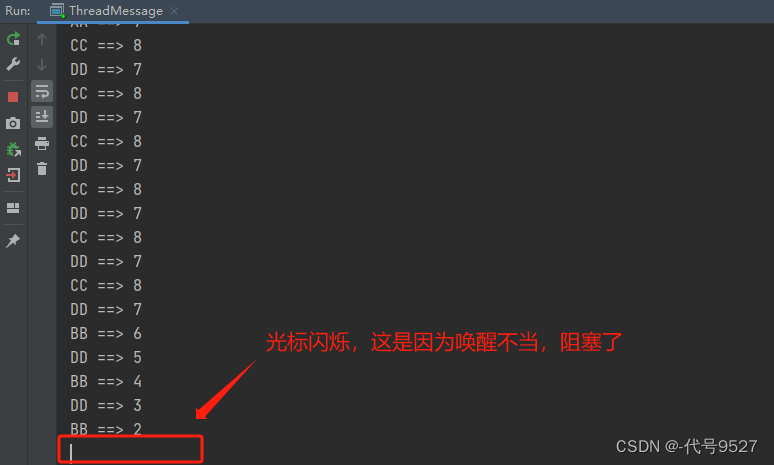
注意,这里可能还有一个因唤醒不当而导致阻塞的情况,多次运行会出现:光标闪烁,但没有输出,也没有exit 0。这个后面篇章再整理。
对于虚假唤醒的解决办法就是把if换成while,即在循环中使用,此时睡醒接着往下执行也会先判断一下。
//资源类
class Share{
    //初始值
    private int number = 0;

    //+1
    public synchronized void incr() throws InterruptedException {
        while(number != 0){  //改为while
            this.wait();   //让share对象上的线程等待
        }
        number++;
        System.out.println(Thread.currentThread().getName() + " ==> " + number);
        //通知其他线程
        this.notify();

    }

    //-1
    public synchronized  void decr() throws InterruptedException {
        while(number != 1){  //改为while
            this.wait();
        }
        number--;
        System.out.println(Thread.currentThread().getName() + " ==> " + number);
        this.notify();
    }
}
虚假唤醒不再出现:
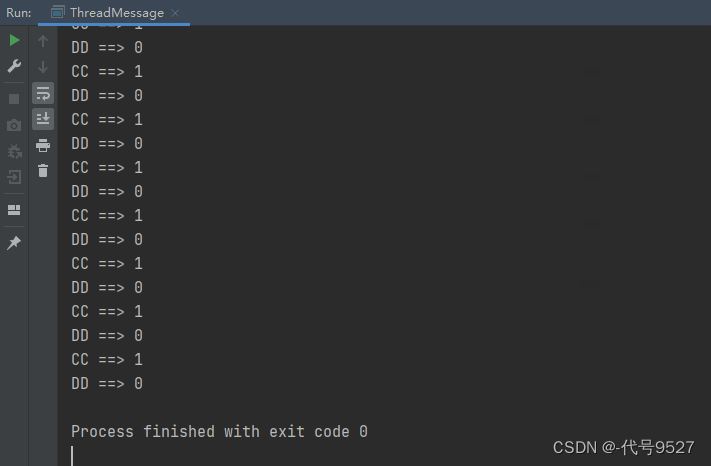
结论:wait方法可能出现虚假唤醒,应该在循环中调用wait方法
synchronized (obj) {

	while (<condition does not hold>){

		obj.wait(timeout);
		... // Perform action appropriate to condition
	}
}
4、Lock下实现线程的通信(唤醒)
Lock代替了synchronized,Condition接口替代Object类的wait、notify等监视器方法。Lock接口下的重要方法:
- newCondition():返回绑定到此 Lock 实例的新 Condition 实例
- await方法类比Object的wait
- signal():唤醒一个等待线程
- signalAll():唤醒所有等待线程
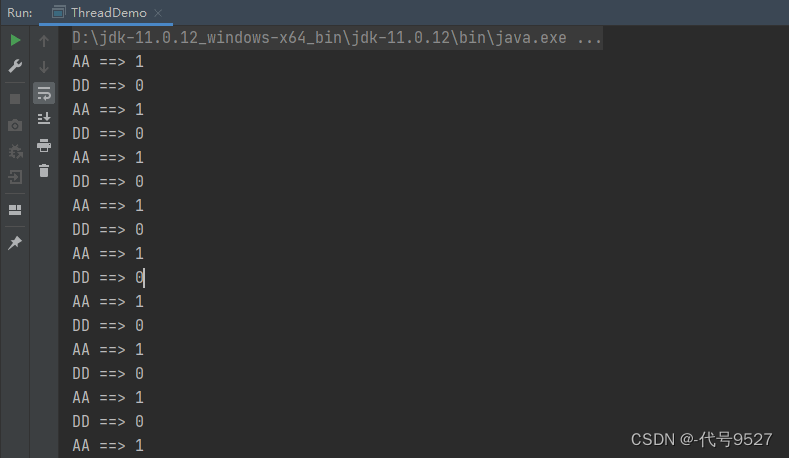
接下来用Lock接口实现上面synchronized的案例,对同一个数字进行加减1:
class ShareObj{

    private int number = 0;

    //创建Lock,用可重复锁的实现类
    Lock lock = new ReentrantLock();

    private Condition condition = lock.newCondition();

    public void incr() throws InterruptedException {
        //上锁
        lock.lock();

        try {
            //判断
            while(number != 0){
                condition.await();;
            }
            //干活儿
            number++;
            System.out.println(Thread.currentThread().getName() + " ==> " + number);
            //通知
            condition.signalAll();
        } finally {
            //解锁
            lock.unlock();
        }
    }

    public void decr() throws InterruptedException {
        lock.lock();
        try {
            //判断
            while(number != 1){
                condition.await();;
            }
            //干活儿
            number--;
            System.out.println(Thread.currentThread().getName() + " ==> " + number);
            //通知
            condition.signalAll();
        } finally {
            lock.unlock();
        }
    }
}
启动多线程调用资源类方法:
public class ThreadDemo {

    public static void main(String[] args) {

        ShareObj shareObj = new ShareObj();

        new Thread(() -> {
            for(int i = 0; i <= 10; i++ ){
                try {
                    shareObj.incr();
                } catch (InterruptedException e) {
                    e.printStackTrace();
                }
            }
        },"AA").start();
        new Thread(() -> {
            for(int i = 0; i <= 10; i++ ){
                try {
                    shareObj.decr();
                } catch (InterruptedException e) {
                    e.printStackTrace();
                }
            }
        },"BB").start();
        new Thread(() -> {
            for(int i = 0; i <= 10; i++ ){
                try {
                    shareObj.incr();
                } catch (InterruptedException e) {
                    e.printStackTrace();
                }
            }
        },"CC").start();
        new Thread(() -> {
            for(int i = 0; i <= 10; i++ ){
                try {
                    shareObj.decr();
                } catch (InterruptedException e) {
                    e.printStackTrace();
                }
            }
        },"DD").start();
    }
}
5、线程间的定制化通信
可以看到,前面的例子中,AA线程执行完后,共享的那把对象锁被谁抢到,或者说接下来是哪个线程执行,这一点是随机的。这里要实现的就是将这个通信变成定制化的。案例:
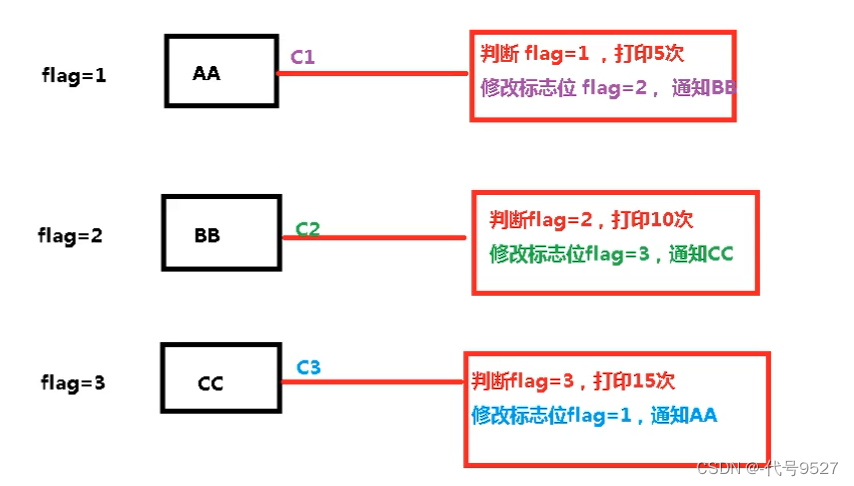
启动三个线程,按照如下顺序运行:

- AA线程打印5次,BB打印10次,CC打印15次
- ...
- 进行10轮这个打印
实现思路是给每一个线程引入一个标志位flag变量:
代码实现:
//定义资源类
class ShareSource {

    //定义标志位,AA线程对应1,BB对应2,CC对应3
    private Integer flag = 1;
    //创建Lock锁
    private Lock lock = new ReentrantLock();

    //创建三个condition
    private Condition c1 = lock.newCondition();
    private Condition c2 = lock.newCondition();
    private Condition c3 = lock.newCondition();

    /**
     * 打印5次
     * @param loop 第几轮
     */
    public void print5(int loop) throws InterruptedException {
        //上锁
        lock.lock();
        try{
            //判断
            while(flag != 1){
                c1.await();
            }
            //干活,fori快捷生成
            for (int i = 0; i < 5; i++) {
                System.out.println(Thread.currentThread().getName() + "==>" + i + ",第"+ loop + "轮");
            }
            //改标志位并通知BB
            flag = 2;
            c2.signal();
        }finally {
           //解锁
           lock.unlock();
        }
    }

    /**
     * 打印10次
     * @param loop 第几轮
     */
    public void print10(int loop) throws InterruptedException {
        //上锁
        lock.lock();
        try{
            //判断
            while(flag != 2){
                c2.await();
            }
            //干活fori快捷生成
            for (int i = 0; i < 10; i++) {
                System.out.println(Thread.currentThread().getName() + "==>" + i + ",第"+ loop + "轮");
            }
            //改标志位并通知CC
            flag = 3;
            c3.signal();
        }finally {
            //解锁
            lock.unlock();
        }
    }

    /**
     * 打印15次
     * @param loop 第几轮
     */
    public void print15(int loop) throws InterruptedException {
        //上锁
        lock.lock();
        try{
            //判断
            while(flag != 3){
                c3.await();
            }
            //干活fori快捷生成
            for (int i = 0; i < 15; i++) {
                System.out.println(Thread.currentThread().getName() + "==>" + i + ",第"+ loop + "轮");
            }
            //改标志位并通知AA
            flag = 1;
            c1.signal();
        }finally {
            //解锁
            lock.unlock();
        }
    }
}
启动多线程,调用资源类中的方法:
public class ThreadDemoTwo {
    public static void main(String[] args) {
        ShareSource shareSource = new ShareSource();
        new Thread(() -> {
            for (int i = 1; i <= 10; i++) {
                try {
                    shareSource.print5(i);
                } catch (InterruptedException e) {
                    e.printStackTrace();
                }
            }
        },"AA").start();

        new Thread(() -> {
            for (int i = 1; i <= 10; i++) {
                try {
                    shareSource.print10(i);
                } catch (InterruptedException e) {
                    e.printStackTrace();
                }
            }
        },"BB").start();

        new Thread(() -> {
            for (int i = 1; i <= 10; i++) {
                try {
                    shareSource.print15(i);
                } catch (InterruptedException e) {
                    e.printStackTrace();
                }
            }
        },"CC").start();
    }
}
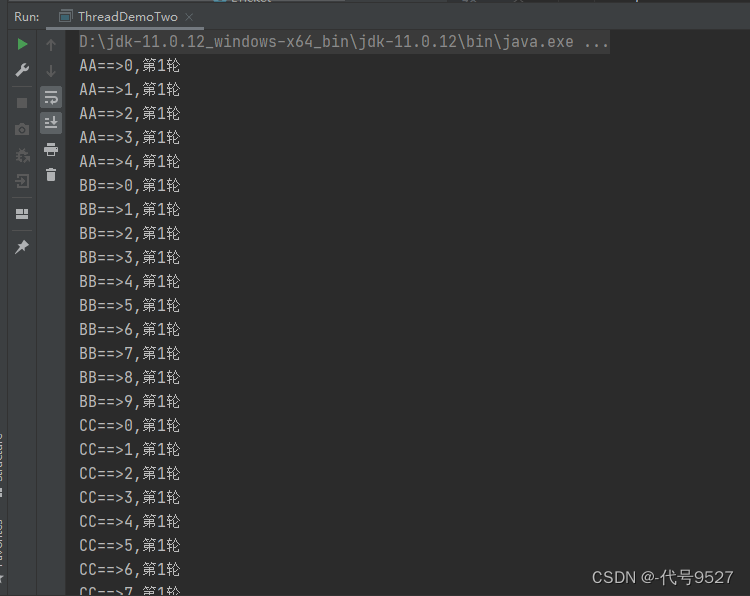
运行:
