SpringBoot 自动配置
Condition
Condition 是在Spring 4.0 增加的条件判断功能,通过这个可以功能可以实现选择性的创建 Bean 操作
思考:SpringBoot是如何知道要创建哪个Bean的?比如SpringBoot是如何知道要创建RedisTemplate的?
演示1:
<dependency>
    <groupId>org.springframework.boot</groupId>
    <artifactId>spring-boot-starter-data-redis</artifactId>
</dependency>
1. 没有添加坐标前,发现为空,报错
    ConfigurableApplicationContext context =
    SpringApplication.run(SpringbootCondition01Application.class, args);
    Object redisTemplate = context.getBean("redisTemplate");
    System.out.println(redisTemplate);
2. 有添加坐标前,发现有对象
    ConfigurableApplicationContext context =
    SpringApplication.run(SpringbootCondition01Application.class, args);
    Object redisTemplate = context.getBean("redisTemplate");
    System.out.println(redisTemplate);
疑问,他怎么知道的配置哪个类案例1:
案例1:
Spring的IOC容器中有一个User的Bean现要求:导入Jedis坐标后,加载该Bean,没导入,则不加载
代码实现:
-
POJO实体类:User
public class User { } -
现在对User的加载有条件,不能直接用@Component注入,需要写配置类通过@Bean的方式注入
@Configuration
public class UserConfig {
    @Bean
    @Conditional(value = ClassCondition.class)    // 注入条件
    public User user(){
        return  new User();
    }
}
@Conditional中的ClassCondition.class的matches方法,返回true执行以下代码,否则反之
-
创建ClassCondition类实现Condition接口,重写matches方法
public class ClassCondition implements Condition { @Override public boolean matches(ConditionContext context, AnnotatedTypeMetadata metadata) { boolean falg = true; try { Class<?> cls = Class.forName("redis.clients.jedis.Jedis"); } catch (ClassNotFoundException e) { falg=false; } return falg; } } -
启动类:
@SpringBootApplication public class SpringbootCondition01Application { public static void main(String[] args) { //启动SpringBoot的应用,返回Spring的IOC容器 ConfigurableApplicationContext context = SpringApplication.run(SpringbootCondition01Application.class,args); //获取Bean,redisTemplate //情况1 没有添加坐标前,发现为空 //情况2 有添加坐标前,发现有对象 Object user = context.getBean("user"); System.out.println(user); } } -
测试,通过pom文件中对Jedis坐标是否注释
-
Jedi坐标未注释,可以打印出User对象地址
-
Jedis坐标被注释掉,报错,不打印User对象地址
-
案例二:
在 Spring 的 IOC 容器中有一个 User 的 Bean,现要求:将类的判断定义为动态的。判断哪个字节码文件存在可以动态指定
实现步骤:
- 不使用@Conditional(ClassCondition.class)注解
- 自定义注解@ConditionOnClass,因为他和之前@Conditional注解功能一直,所以直接复制
- 编写ClassCondition中的matches方法
代码实现:
-
POJO实体类User和案例1相同
-
User的注入条件需要改变,使用@ConditionOnClass
@Configuration public class UserConfig { @Bean // @ConditionOnClass(value = "redis.clients.jedis.Jedis") 有jedis坐标注入User @ConditionOnClass(value = {"redis.clients.jedis.Jedis","com.alibaba.fastjson.JSON"}) //jedis和json都有才注入 public User user(){ return new User(); } } -
重写matches方法
public class ClassCondition implements Condition { @Override public boolean matches(ConditionContext context, AnnotatedTypeMetadata metadata) { Map<String, Object> map = metadata.getAnnotationAttributes(ConditionOnClass.class.getName()); System.out.println("map:"+map); String[] value = (String[]) map.get("value"); boolean isok = true; try { for(String val : value){ Class<?> cls = Class.forName(val); } }catch (ClassNotFoundException e){ isok = false; } return isok; } } -
自定义注解
@Target({ElementType.TYPE,ElementType.METHOD})//可以修饰在类与方法上 @Retention(RetentionPolicy.RUNTIME)//注解生效节点runtime @Documented//生成文档 @Conditional(value = ClassCondition.class) public @interface ConditionOnClass { String[] value(); //设置此注解的属性redis.clients.jedis.Jedis } -
启动类
@SpringBootApplication public class SpringbootCondition02Application { public static void main(String[] args) { ConfigurableApplicationContext context = SpringApplication.run(SpringbootCondition02Application.class, args); Object user = context.getBean("user"); System.out.println(user); } } -
测试:通过pom文件中的Jedis和JSON坐标测试
- Jedis和JSON坐标都有:打印User对象地址
- 只有一个坐标或者都没有:报错,不打印User对象地址
Condition总结
自定义条件:
- 定义条件类:自定义类实现Condition接口,重写 matches 方法,在 matches 方法中进行逻辑判断,返回boolean值 。matches 方法两个参数:
- context:上下文对象,可以获取属性值,获取类加载器,获取BeanFactory等。
- metadata:元数据对象,用于获取注解属性。
- 判断条件: 在初始化Bean时,使用 @Conditional(条件类.class)注解
SpringBoot提供的常用条件注解:
一下注解在springBoot-autoconfigure的condition包下
- ConditionalOnProperty:判断配置文件中是否有对应属性和值才初始化Bean
- ConditionalOnClass:判断环境中是否有对应字节码文件才初始化Bean
- ConditionalOnMissingBean:判断环境中没有对应Bean才初始化Bean
- ConditionalOnBean:判断环境中有对应Bean才初始化Bean
@Enable注解
SpringBoot中提供了很多Enable开头的注解,这些注解都是用于动态启用某些功能的。而其底层原理是使用@Import注 解导入一些配置类,实现Bean的动态加载
思考 SpringBoot 工程是否可以直接获取jar包中定义的Bean?
@Enable的底层核心:@Import
@Enable底层依赖于@Import注解导入一些类,使用@Import导入的类会被Spring加载到IOC容器中。而@Import提供4中用法:
- 导入Bean
- 导入配置类
- 导入 ImportSelector 实现类。一般用于加载配置文件中的类
- 导入 ImportBeanDefinitionRegistrar 实现类
导入Bean
代码实现:
需要用到多模块编程,项目结构如图:
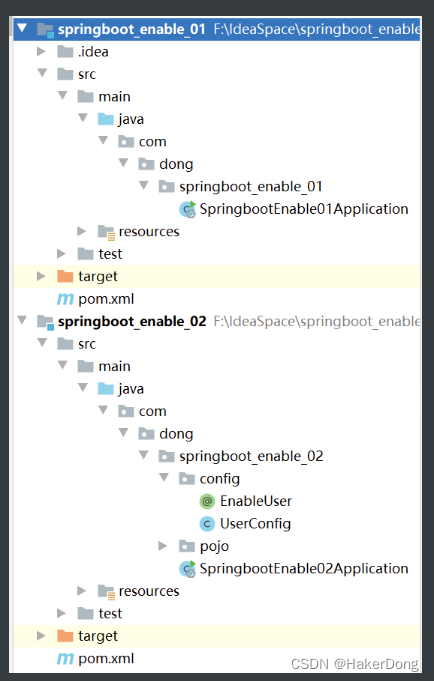
springboot_enable_02:
-
springboot项目,pom文件不需要格外到坐标
-
User
public class User { } -
UserConfig
@Configuration public class UserConfig { @Bean public User user(){ return new User(); } } -
EnableUser自定义注解
@Target(ElementType.TYPE) @Retention(RetentionPolicy.RUNTIME) @Documented @Import(UserConfig.class) public @interface EnableUser { } -
启动类
@SpringBootApplication
public class SpringbootEnable02Application {
    public static void main(String[] args) {
        ConfigurableApplicationContext context = SpringApplication.run(SpringbootEnable02Application.class, args);
        Object user = context.getBean("user");   // enable_02中肯定能取到User
        System.out.println(user);
    }
}
springboot_enable_01:
-
pom文件导入springboot_enable_02的gav:
<dependency> <groupId>org.springframework.boot</groupId> <artifactId>spring-boot-starter-web</artifactId> </dependency> <dependency> <groupId>org.springframework.boot</groupId> <artifactId>spring-boot-starter-test</artifactId> <scope>test</scope> </dependency> <!--模块2--> <dependency> <groupId>com.dong</groupId> <artifactId>springboot_enable_02</artifactId> <version>0.0.1-SNAPSHOT</version> </dependency> -
测试:
//@Import(User.class)
//@Import(UserConfig.class)
//@EnableUser
@ComponentScan("com.dong.springboot_enable_02.config")
@SpringBootApplication
public class SpringbootEnable01Application {
    public static void main(String[] args) {
        ConfigurableApplicationContext context = SpringApplication.run(SpringbootEnable01Application.class, args);
        Object user = context.getBean(User.class);
        System.out.println(user);
    }
}
因为enable_01导如了enable_02的坐标,相当是把02的所有代码拷贝在与01的启动类同级目录下,如果包名和包的层级都相同,就可以直接装配User类,但是包的层级不同就必须加注解
-
@Import(User.class):对应第一个使用场景
导入02中的User类
-
@Import(UserConfig.class):对应第二个使用场景
加载02中的UserConfig配置类,加载配置类中所有的方法和类
-
@EnableUser:
自定义的注解,包装了一个@Import(User.class)
-
@ComponentScan(“com.dong.springboot_enable_02.config”):
扫描包,加载类和配置类
-
导入配置类
见上方示例的@Import(UserConfig.class),导入配置类加载配置类中所有的方法和类
导入ImportSelector 实现类
导入 ImportBeanDefinitionRegistrar 实现类
ImportSelector 和 ImportBeanDefinitionRegistrar 一起演示
代码实现:
项目结构
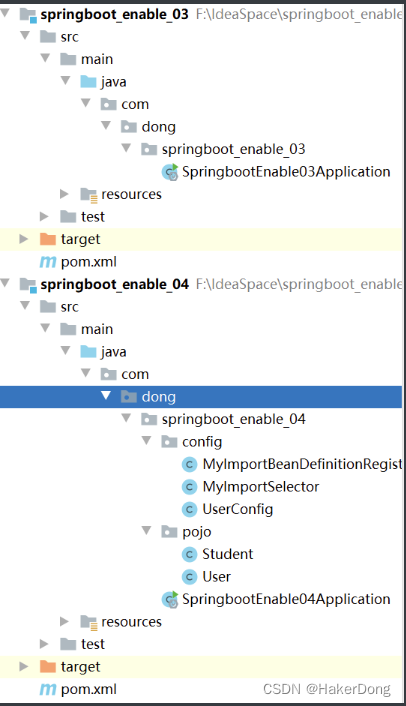
springboot_enable_04
-
springboot项目,pom文件不需要额外到坐标
-
POJO
实体类:User
public class User {
}
Student
public class Student { } -
UserConfig配置类
@Configuration public class UserConfig { @Bean public User user(){ return new User(); } } -
MyImportSelector
public class MyImportSelector implements ImportSelector { @Override public String[] selectImports(AnnotationMetadata importingClassMetadata) { return new String[]{"com.dong.springboot_enable_04.pojo.User","com.dong.springboot_enable_04.pojo.Student"}; } } -
MyImportBeanDefinitionRegistrar
public class MyImportBeanDefinitionRegistrar implements ImportBeanDefinitionRegistrar {
    @Override
    public void registerBeanDefinitions(AnnotationMetadata importingClassMetadata, BeanDefinitionRegistry registry) {
        AbstractBeanDefinition beanDefinition = BeanDefinitionBuilder.rootBeanDefinition(User.class).getBeanDefinition();
        registry.registerBeanDefinition("user1",beanDefinition);
    }
}
springboot_enable_03
-
springboot_enable_03pom文件导入springboot_enable_04坐标
<dependencies> <dependency> <groupId>org.springframework.boot</groupId> <artifactId>spring-boot-starter-web</artifactId> </dependency> <dependency> <groupId>org.springframework.boot</groupId> <artifactId>spring-boot-starter-test</artifactId> <scope>test</scope> </dependency> <!--springboot_enable_04坐标--> <dependency> <groupId>com.dong</groupId> <artifactId>springboot_enable_04</artifactId> <version>0.0.1-SNAPSHOT</version> </dependency> </dependencies> -
测试:启动类
@ComponentScan("com.dong.springboot_enable_04.config") @Import(User.class) @Import(UserConfig.class) @Import(MyImportSelector.class) @Import(MyImportBeanDefinitionRegistrar.class) @SpringBootApplication public class SpringbootEnable03Application { public static void main(String[] args) { ConfigurableApplicationContext context = SpringApplication.run(SpringbootEnable03Application.class, args); User user = context.getBean(User.class); System.out.println(user); Student student = context.getBean(Student.class); System.out.println(student); User user1 = (User) context.getBean("user1"); System.out.println(user1); } }-
@Import(MyImportSelector.class):对应第三个使用场景
MyImportSelector实现了ImportSelector接口,重写了selectImports方法,在字符出数组中的完全相对路径即注入了容器,因为引入了enable_04,所以03中可以获取到User和Student
-
@Import(MyImportBeanDefinitionRegistrar.class):对应第四个使用场景
MyImportBeanDefinitionRegistrar实现了ImportBeanDefinitionRegistrar接口,registerBeanDefinitions方法,在此方法中就可以对Bean进行注册,如案例演示,04注入了一个User对象,id是user1,所以03中就可以获取到User这个对象,打印出地址
-
@EnableAutoConfiguration注解
-
主启动类
//@SpringBootApplication 来标注一个主程序类 //说明这是一个Spring Boot应用 @SpringBootApplication public class SpringbootApplication { public static void main(String[] args) { //以为是启动了一个方法,没想到启动了一个服务 SpringApplication.run(SpringbootApplication.class, args); } } -
@SpringBootApplication注解内部
@SpringBootConfiguration @EnableAutoConfiguration @ComponentScan( excludeFilters = {@Filter( type = FilterType.CUSTOM, classes = {TypeExcludeFilter.class} ), @Filter( type = FilterType.CUSTOM, classes = {AutoConfigurationExcludeFilter.class} )} ) public @interface SpringBootApplication { // ...... }-
@ComponentScan
这个注解在Spring中很重要 ,它对应XML配置中的元素。
作用:自动扫描并加载符合条件的组件或者bean , 将这个bean定义加载到IOC容器中
-
@SpringBootConfiguration
作用:SpringBoot的配置类 ,标注在某个类上 , 表示这是一个SpringBoot的配置类;
//@SpringBootConfiguration注解内部
//这里的 @Configuration,说明这是一个配置类 ,配置类就是对应Spring的xml 配置文件;
@Configuration
public @interface SpringBootConfiguration {}
//里面的 @Component 这就说明,启动类本身也是Spring中的一个组件而已,负责启动应用
@Component
public @interface Configuration {}
-
-
AutoConfigurationPackage :自动配置包
//AutoConfigurationPackage的子注解 //Registrar.class 作用:将主启动类的所在包及包下面所有子包里面的所有组件扫描到Spring容器 @Import({Registrar.class}) public @interface AutoConfigurationPackage { } -
@EnableAutoConfiguration开启自动配置功能
以前我们需要自己配置的东西,而现在SpringBoot可以自动帮我们配置 ;@EnableAutoConfiguration告诉SpringBoot开启自动配置功能,这样自动配置才能生效;
@Import({AutoConfigurationImportSelector.class}):给容器导入组件 ;
AutoConfigurationImportSelector :自动配置导入选择器,给容器中导入一些组件
AutoConfigurationImportSelector.class
					↓
		selectImports方法
					↓
this.getAutoConfigurationEntry(annotationMetadata)方法
					↓
this.getCandidateConfigurations(annotationMetadata, attributes)方法
					↓
方法体:
		List<String> configurations =
SpringFactoriesLoader.loadFactoryNames(this.getSpringFactoriesLoaderFactoryClass
(), this.getBeanClassLoader());
		Assert.notEmpty(configurations, "No auto configuration classes found in META-INF/spring.factories. If you are using a custom packaging, make sure that file is correct.");
return configurations;
					↓
在所有包名叫做autoConfiguration的包下面都有META-INF/spring.factories文件
总结原理:
-
@EnableAutoConfiguration 注解内部使用 @Import(AutoConfigurationImportSelector.class)
来加载配置类。
-
配置文件位置:META-INF/spring.factories,该配置文件中定义了大量的配置类,当 SpringBoot
应用启动时,会自动加载这些配置类,初始化Bean
-
并不是所有的Bean都会被初始化,在配置类中使用Condition来加载满足条件的Bean
SpringBoot自动配置原理扒源代码图解

自定义启动类的实现
案例需求:
自定义redis-starter,要求当导入redis坐标时,SpringBoot自动创建Jedis的Bean
参考:
可以参考mybatis启动类的应用
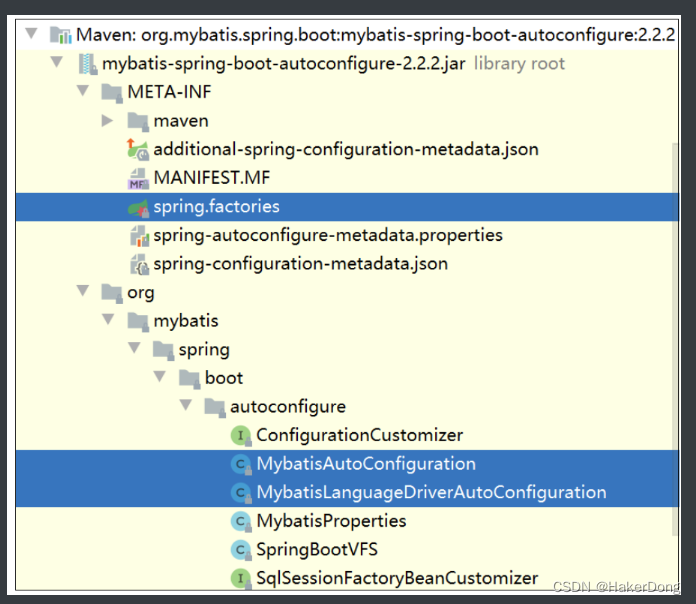
实现步骤:
- 创建redis-spring-boot-autoconfigure模块
- 创建redis-spring-boot-starter模块,依赖redis-spring-boot-autoconfigure的模块
- 在redis-spring-boot-autoconfigure模块中初始化Jedis的Bean,并定义META-INF/spring.factories文件
- 在测试模块中引入自定义的redis-starter依赖,测试获取Jedis的Bean,操作redis
代码实现演示:
目录结构
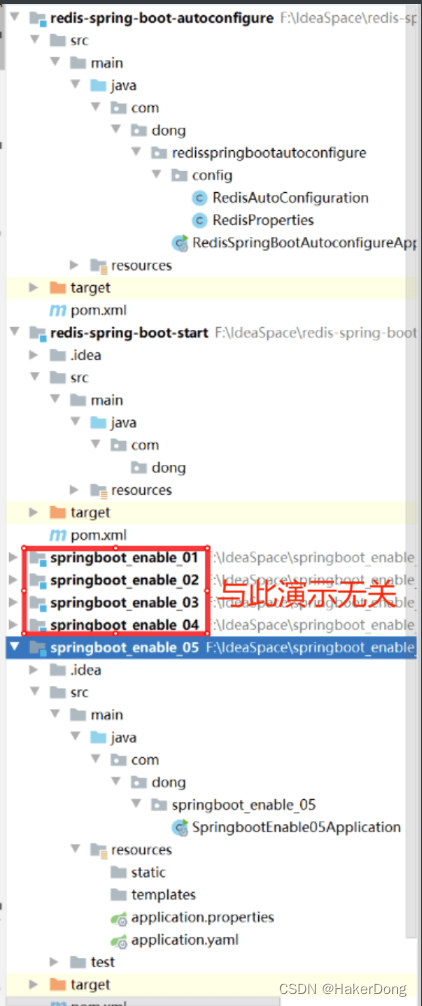
-
redis-spring-boot-autoconfigure模块
-
pom文件
<dependencies> <dependency> <groupId>redis.clients</groupId> <artifactId>jedis</artifactId> </dependency> <dependency> <groupId>org.springframework.boot</groupId> <artifactId>spring-boot-starter</artifactId> </dependency> <!--spring-boot-starter-test注释掉了--> </deendencies> -
RedisAutoConfiguration配置类
@Configuration @EnableConfigurationProperties(RedisProperties.class) public class RedisAutoConfiguration { @Bean public Jedis jedis(RedisProperties redisProperties){ return new Jedis(redisProperties.getHost(),redisProperties.getPort()); } } -
动态获取主机号和端口号的类
@ConfigurationProperties(prefix = "spring.redis") //如果配置文件中有就读取配置文件中的spring.redis下面get、set方法就会对host和port达到动态效果,如果配置文件中没有spring.redis就默认localhost和6379 public class RedisProperties { private String host="localhost"; private int port=6379; public String getHost() { return host; } public void setHost(String host) { this.host = host; } public int getPort() { return port; } public void setPort(int port) { this.port = port; } } -
在resources目录下创建META-INF文件夹,下创建spring.factories文件,写入键值
org.springframework.boot.autoconfigure.EnableAutoConfiguration=\
  com.dong.redisspringbootautoconfigure.config.RedisAutoConfiguration
-
-
redis-spring-boot-start模块
此模块只需要在pom文件中导入上个模块的gav,test文件夹和java下的目录都可以删除
<dependencies> <dependency> <groupId>org.springframework.boot</groupId> <artifactId>spring-boot-starter</artifactId> </dependency> <!--引入自定义的redis-spring-boot-autoconfigure--> <dependency> <groupId>com.dong</groupId> <artifactId>redis-spring-boot-autoconfigure</artifactId> <version>0.0.1-SNAPSHOT</version> </dependency> </dependencies> -
测试模块springboot_enable_05
-
pom文件导入redis-spring-boot-start模块gav
<dependencies> <dependency> <groupId>org.springframework.boot</groupId> <artifactId>spring-boot-starter-web</artifactId> </dependency> <dependency> <groupId>org.springframework.boot</groupId> <artifactId>spring-boot-starter-test</artifactId> <scope>test</scope> </dependency> <!--导入自定义启动类--> <dependency> <groupId>com.dong</groupId> <artifactId>redis-spring-boot-start</artifactId> <version>0.0.1-SNAPSHOT</version> </dependency> </dependencies> -
yaml配置文件修改端口
spring: redis: port: 6060 -
测试:
@SpringBootApplication
public class SpringbootEnable05Application {
    public static void main(String[] args) {
        ConfigurableApplicationContext context = SpringApplication.run(SpringbootEnable05Application.class, args);
        Jedis bean = context.getBean(Jedis.class);
        System.out.println(bean);
    }
}
输出内容:BinaryJedis{Connection{DefaultJedisSocketFactory{localhost:6060}}}
说明走了我们自定义的启动器
-


