本文介绍使用darknet项目原始的预训练模型yolov3.weights,经过tensorrt脚本转换为onnx模型,进一步编译优化编译位engine,最后使用TensorRt运行时进行推理。推理时的结果后处理使用c++实现,也给出了问题的说明。
文章目录
- 1、darkent模型转换转换
- 1.1、yolov3-608.weights模型转换.onnx模型
- 1.2、onnx模型优化为engine测试
- 1.3、使用C++ api转换
- 2、c++ RUNTIME api进行推理
- 2.1、网络前向推理部分代码
- 2.2、yolo detector 后处理代码
- 3、其他问题
- 3.1、yolov3-416模型如何转换
- 3.2、手写后处理的效率问题
1、darkent模型转换转换
1.1、yolov3-608.weights模型转换.onnx模型
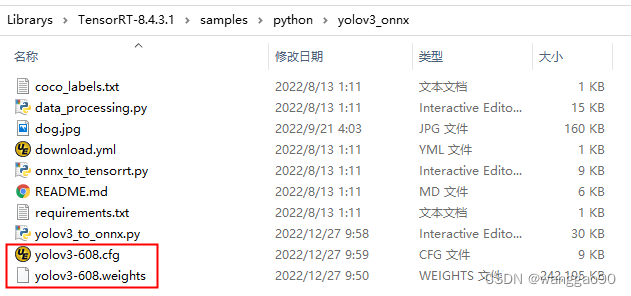
在目录 samples\python\yolov3_onnx下提供了转换脚本,同时也提供了下载地址文件download.yml,注意这里目前脚本是针对模型是 yolov3-608。先手动下载需要的 yolov3-608的模型文件和配置文件,
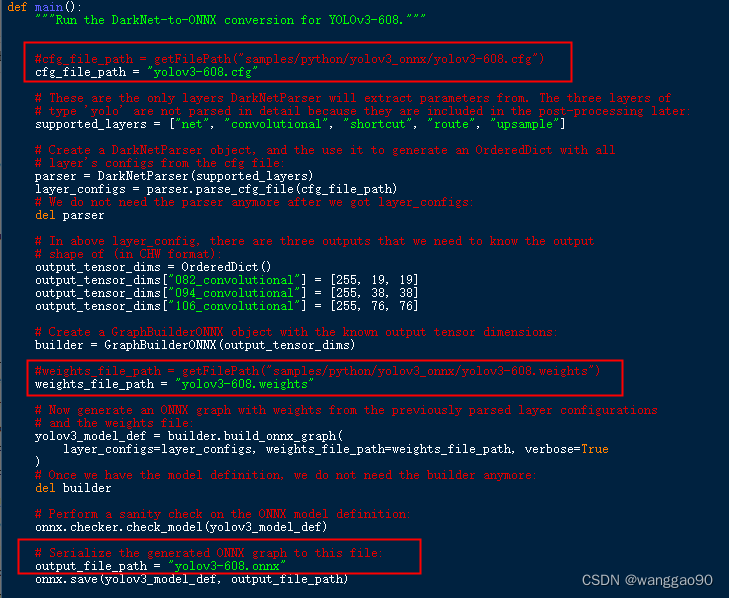
运行脚本 yolov3_to_onnx.py 需要先安装依赖项 requirements.txt。安装后修改脚本中的文件路径(而不是下载),
运行脚本,可能会出现如下错误
RESTART: D:\Librarys\TensorRT-8.4.3.1\samples\python\yolov3_onnx\yolov3_to_onnx.py
Traceback (most recent call last):
  File "D:\Librarys\TensorRT-8.4.3.1\samples\python\yolov3_onnx\yolov3_to_onnx.py", line 713, in <module>
    main()
  File "D:\Librarys\TensorRT-8.4.3.1\samples\python\yolov3_onnx\yolov3_to_onnx.py", line 679, in main
    layer_configs = parser.parse_cfg_file(cfg_file_path)
  File "D:\Librarys\TensorRT-8.4.3.1\samples\python\yolov3_onnx\yolov3_to_onnx.py", line 60, in parse_cfg_file
    layer_dict, layer_name, remainder = self._next_layer(remainder)
  File "D:\Librarys\TensorRT-8.4.3.1\samples\python\yolov3_onnx\yolov3_to_onnx.py", line 101, in _next_layer
    layer_param_block, remainder = remainder.split("\n\n", 1)
ValueError: not enough values to unpack (expected 2, got 1)
错误是因为脚本解析yolov3-608.cfg文件的问题,需要在文件最后增加两个换行

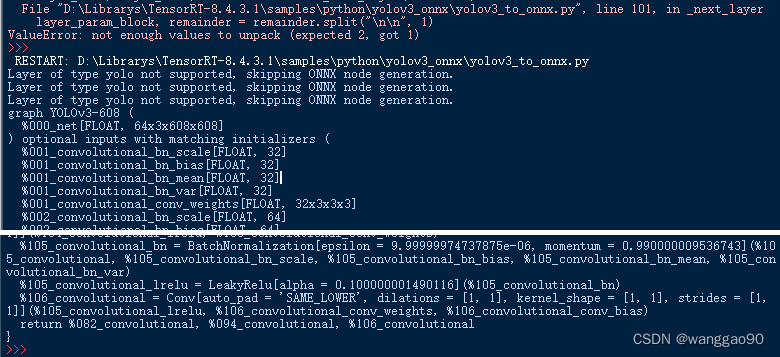
再次执行脚本,运行成功,且生成了 yolov3-608.onnx 文件
1.2、onnx模型优化为engine测试
这里先使用 samples\python\yolov3_onnx\onnx_to_tensorrt.py 脚本进行测试,控制台打印输出为
>>>
 RESTART: D:\Librarys\TensorRT-8.4.3.1\samples\python\yolov3_onnx\onnx_to_tensorrt.py
Loading ONNX file from path yolov3-608.onnx...
Beginning ONNX file parsing
Completed parsing of ONNX file
Building an engine from file yolov3-608.onnx; this may take a while...
Completed creating Engine
Running inference on image dog.jpg...
[[134.94207705 219.31212725 184.33163918 324.49731879]
 [ 98.63979515 136.01691416 499.64743187 298.43303029]
 [477.80247374  81.31213914 210.93741343  86.85370009]] [0.99852537 0.99885143 0.93933186] [16  1  7]
Saved image with bounding boxes of detected objects to dog_bboxes.png.
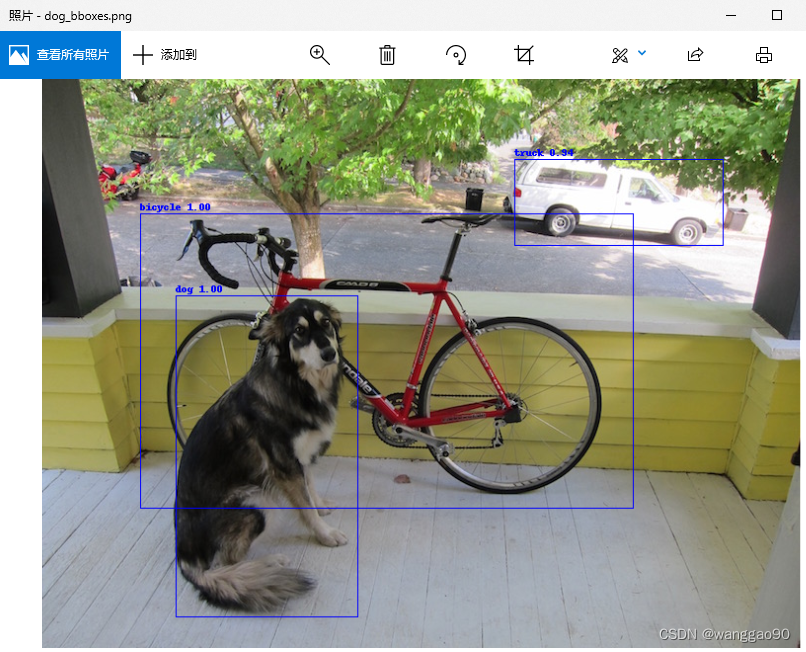
根据输出文本,对应的包围框、置信度、类别,检测到3个目标,输出图像 dog_bboxes.png 为
另外在build过程中,进行的配置有如下项目
config.max_workspace_size = 1 << 28  # 256MiB
builder.max_batch_size = 1

network.get_input(0).shape = [1, 3, 608, 608]
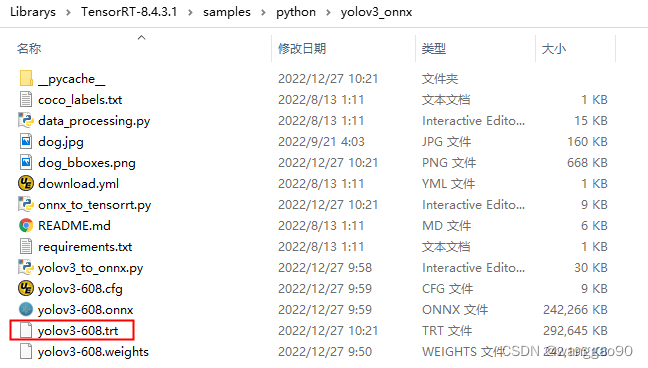
之后生成了一个engine文件,后面可以直接使用运行进行推理。
1.3、使用C++ api转换
int build()
{
    samplesCommon::OnnxSampleParams params;
    params.dataDirs.push_back(R"(data/yolo/)");
    params.dataDirs.push_back(R"(samples\python\yolov3_onnx\)");
    params.onnxFileName = "yolov3-608.onnx";
    params.inputTensorNames.push_back("000_net");               // (1, 3, 608, 608)
    params.outputTensorNames.push_back("082_convolutional");    // (1, 255, 19, 19)
    params.outputTensorNames.push_back("094_convolutional");    // (1, 255, 38, 38)
    params.outputTensorNames.push_back("106_convolutional");    // (1, 255, 76, 76)
    params.dlaCore = -1;
    //params.int8 = true;
   // params.fp16 = true;
    params.batchSize = 1;

    //
    auto builder = SampleUniquePtr<nvinfer1::IBuilder>(nvinfer1::createInferBuilder(sample::gLogger.getTRTLogger()));

    const auto explicitBatch = 1U << static_cast<uint32_t>(NetworkDefinitionCreationFlag::kEXPLICIT_BATCH);
    auto network = SampleUniquePtr<nvinfer1::INetworkDefinition>(builder->createNetworkV2(explicitBatch));

    auto config = SampleUniquePtr<nvinfer1::IBuilderConfig>(builder->createBuilderConfig());

    auto parser = SampleUniquePtr<nvonnxparser::IParser>(nvonnxparser::createParser(*network, sample::gLogger.getTRTLogger()));
    auto parsed = parser->parseFromFile(locateFile(params.onnxFileName, params.dataDirs).c_str(),
                                        static_cast<int>(sample::gLogger.getReportableSeverity()));

    if(params.fp16) {
        config->setFlag(BuilderFlag::kFP16);
    }
    if(params.int8) {
        config->setFlag(BuilderFlag::kINT8);
        samplesCommon::setAllDynamicRanges(network.get(), 127.0f, 127.0f);
    }
    samplesCommon::enableDLA(builder.get(), config.get(), params.dlaCore);

    auto profileStream = samplesCommon::makeCudaStream();
    config->setProfileStream(*profileStream);

	// 对应 python ?
    builder->setMaxBatchSize(params.batchSize);
    config->setMaxWorkspaceSize(1 << 28);
    network->getInput(0)->setDimensions(nvinfer1::Dims{4,{ 1,3,608,608 }});

	//
    SampleUniquePtr<IHostMemory> plan{builder->buildSerializedNetwork(*network, *config)};

    std::ofstream ofs("yolov3-608.trt", std::ostream::binary);
    ofs.write(static_cast<const char*>(plan->data()), plan->size());
    ofs.close();

    return 0;
}
不同编译优化选项,生成的engine文件大小也不一致。
2、c++ RUNTIME api进行推理
2.1、网络前向推理部分代码
int inference()
{
   // engine文件读取到内存
   std::string trtFile = locateFile("yolov3-608.trt", {"."});

   std::ifstream ifs(trtFile, std::ifstream::binary);
   if(!ifs) {
       return false;
   }

   ifs.seekg(0, std::ios_base::end);
   int size = ifs.tellg();
   ifs.seekg(0, std::ios_base::beg);

   std::unique_ptr<char> pData(new char[size]);
   ifs.read(pData.get(), size);

   ifs.close();

   // engine模型
   SampleUniquePtr<IRuntime> runtime{createInferRuntime(sample::gLogger.getTRTLogger())};
   auto mEngine = std::shared_ptr<nvinfer1::ICudaEngine>(
       runtime->deserializeCudaEngine(pData.get(), size), samplesCommon::InferDeleter());

   auto mInputDims =
       mEngine->getBindingDimensions(0);   // [1,3,608,608]
   auto mOutputDims = {
       mEngine->getBindingDimensions(1),   // [1, 255, 19, 19]
       mEngine->getBindingDimensions(2),   // [1, 255, 38, 38]
       mEngine->getBindingDimensions(3)    // [1, 255, 76, 76]
   };

   samplesCommon::BufferManager buffers(mEngine);
   auto context = SampleUniquePtr<nvinfer1::IExecutionContext>(mEngine->createExecutionContext());

   // 输入
   cv::Mat img = cv::imread("dog.jpg");
   cv::Mat blob = cv::dnn::blobFromImage(img, 1 / 255., {608,608}, {0,0,0}, true, false);

   float* hostDataBuffer = static_cast<float*>(buffers.getHostBuffer(mEngine->getBindingName(0))); //  input
   memcpy(hostDataBuffer, blob.data, blob.total() * blob.elemSize());  //   1*3*608*608

   // 推理
   buffers.copyInputToDevice();
   context->executeV2(buffers.getDeviceBindings().data());
   buffers.copyOutputToHost();

   // 输出
   std::vector<cv::Mat> outs{
       cv::Mat({ 1,255,19,19 },CV_32F,static_cast<float*>(buffers.getHostBuffer(mEngine->getBindingName(1)))),
       cv::Mat({ 1,255,38,38 },CV_32F,static_cast<float*>(buffers.getHostBuffer(mEngine->getBindingName(2)))),
       cv::Mat({ 1,255,76,76 },CV_32F,static_cast<float*>(buffers.getHostBuffer(mEngine->getBindingName(3)))),
   };
   // 后处理和可视化
   std::vector<int> inds;
   std::vector<float> confs;
   std::vector<cv::Rect> rects;
   YoloDetector::postprocess(outs, img.rows, img.cols, inds, confs, rects);

   std::vector<std::string> classes = loadClasses(R"(D:\Librarys\TensorRT-8.4.3.1\samples\python\yolov3_onnx\coco_labels.txt)");
   for(int i = 0; i < rects.size(); i++) {
       cv::rectangle(img, rects[i], {0,0,255}, 2);
       cv::putText(img, cv::format("%s: %.2f", classes[inds[i]], confs[i]), rects[i].tl() - cv::Point{16,16}, cv::FONT_HERSHEY_SIMPLEX, 0.5, {0,0,255}, 2);
   }
   cv::imshow("img", img);
   cv::imwrite("result.jpg", img);
   cv::waitKey(0);

   return 0;
}
读取类型文件的代码为
 std::vector<std::string> loadClasses(const std::string& classesFile)
{
    std::vector<std::string> classes;
    if(!classesFile.empty()) {
        const std::string& file = classesFile;
        std::ifstream ifs(file.c_str());
        if(!ifs.is_open())
            CV_Error(cv::Error::StsError, "File " + file + " not found");
        std::string line;
        while(std::getline(ifs, line)) {
            classes.push_back(line);
        }
    }
    return classes;
}
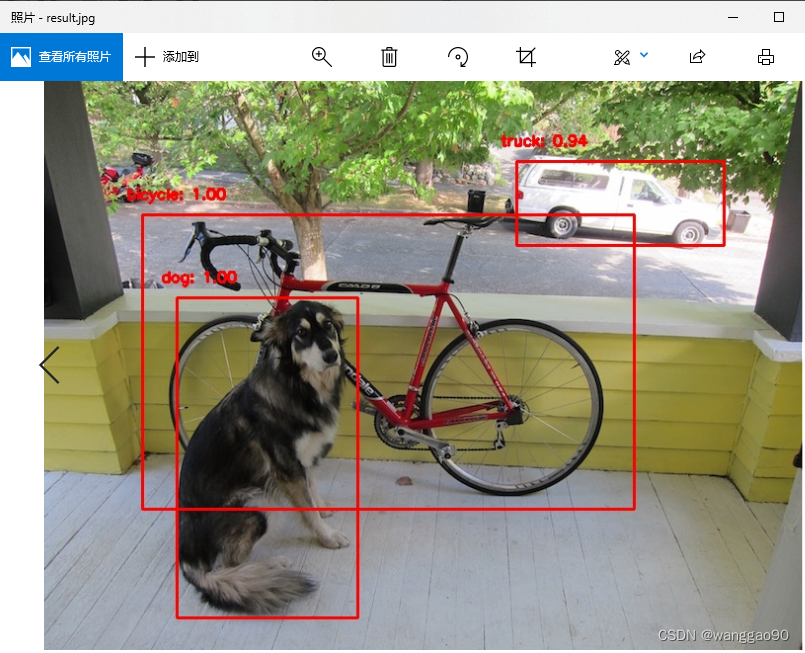
运行结果如图所示,与python代码结果一致。
2.2、yolo detector 后处理代码
yolov3-608的输出有3个,图中显示的batchSize=64,可以将cfg中的batch=64修改为1重新执行转换脚本生成onnx即可。
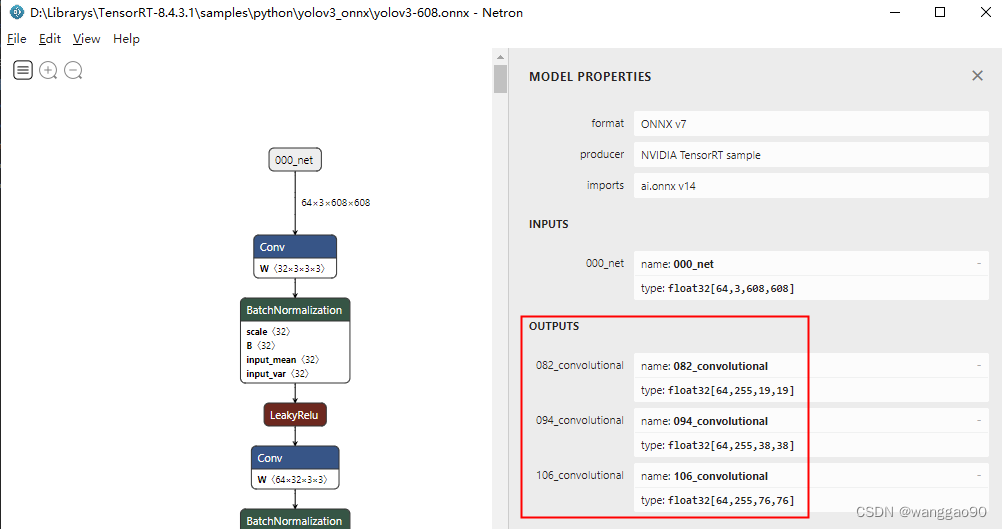
三个输出,对应三个不同的尺度,分别是 19*19、38*38 和 76*76,每个尺度上的每个位置生成3个结果,每个结果包含 位置4个信息、目标置信度、每个类别的置信度,对于目前coco就是 3*(4 + 1 + 80) = 255。
这里直接给出后处理的主要函数部分
void YoloDetector::postprocess(const std::vector<cv::Mat> convBlobs,
    int frameHeight, int frameWidth,
    std::vector<int>& inds,
    std::vector<float>& confs,
    std::vector<cv::Rect>& rects)
{
    std::vector<cv::Mat> yoloBlobs(convBlobs.size());

    for (size_t ii = 0; ii < convBlobs.size(); ii++)
    {
        const cv::Mat& inpBlob = convBlobs[ii];
        cv::Mat& outBlob = yoloBlobs[ii];

        int batch_size = inpBlob.size[0];
        int channels = inpBlob.size[1];
        int rows = inpBlob.size[2];
        int cols = inpBlob.size[3];
        assert(channels == mYolov3Args.cell_size * mYolov3Args.anchor);

        //int hNorm = convBlobs.size() > 1 ? convBlobs[1].size[2] : rows;
        //int wNorm = convBlobs.size() > 1 ? convBlobs[1].size[3] : cols;
        int hNorm = mYolov3Args.input_resolution[0];
        int wNorm = mYolov3Args.input_resolution[1];

        // n*c*h*w => ( n*h*w*3 )*( pos + 1 + cls)
        //
        //int sample_size = mYolov3Args.cell_size * (rows * cols * mYolov3Args.anchor);
        outBlob.create(batch_size * rows * cols * mYolov3Args.anchor, mYolov3Args.cell_size, CV_32F);

        for (int b = 0; b < batch_size; b++) {
            for (int r = 0; r < rows; r++) {
                for (int c = 0; c < cols; c++) {

                    for (int anc = 0; anc < mYolov3Args.anchor; anc++) {

                        int index= b * (mYolov3Args.anchor * rows * cols) + r * (mYolov3Args.anchor * cols) + c * mYolov3Args.anchor + anc;

                        // prob
                        float x = inpBlob.at<float>(cv::Vec4i(b, anc*mYolov3Args.cell_size + 4,r,c));
                        outBlob.at<float>(index, 4) = logistic_activate(x);	// logistic activation

                        // obj
                        for (int cls = 0; cls < mYolov3Args.classes; cls++) {
                            float x = inpBlob.at<float>(cv::Vec4i(b,anc * mYolov3Args.cell_size + 4 + 1 + cls, r,c));
                            outBlob.at<float>(index,4 + 1 + cls) = logistic_activate(x) * outBlob.at<float>(index,4);
                        }

                        // rect
                        const float scale_x_y = 1.0f;
                        float x_tmp = (logistic_activate(inpBlob.at<float>(cv::Vec4i(b,anc * mYolov3Args.cell_size + 0,r,c))) - 0.5f) * scale_x_y + 0.5f;
                        float y_tmp = (logistic_activate(inpBlob.at<float>(cv::Vec4i(b,anc * mYolov3Args.cell_size + 1,r,c))) - 0.5f) * scale_x_y + 0.5f;

                        const std::array<int,2>& anchor_ch = mYolov3Args.anchors[mYolov3Args.masks[ii][anc]];

                        outBlob.at<float>(index,0) = (c + x_tmp) / cols;
                        outBlob.at<float>(index,1) = (r + y_tmp) / rows;
                        outBlob.at<float>(index,2) = std::exp(inpBlob.at<float>(cv::Vec4i(b,anc * mYolov3Args.cell_size + 2,r,c))) * anchor_ch[0] / wNorm ;
                        outBlob.at<float>(index,3) = std::exp(inpBlob.at<float>(cv::Vec4i(b,anc * mYolov3Args.cell_size + 3,r,c))) * anchor_ch[1] / hNorm;

                    }

                }
            }
        }
    }


    // all detections
    inds.clear();
    confs.clear();
    rects.clear();

    for (int i = 0; i < yoloBlobs.size(); ++i)
    {
        // Network produces output blob with a shape NxC where N is a number of
        // detected objects and C is a number of classes + 4 where the first 4
        // numbers are [center_x, center_y, width, height]
        float* data = (float*)yoloBlobs[i].data;
        for (int j = 0; j < yoloBlobs[i].rows; ++j,data += yoloBlobs[i].cols)
        {

            cv::Mat scores = yoloBlobs[i].row(j).colRange(5,yoloBlobs[i].cols);
            cv::Point classIdPoint;
            double conf;
            minMaxLoc(scores,nullptr,&conf,nullptr,&classIdPoint);

            if (static_cast<float>(conf) < mYolov3Args.threshold)
                continue;

            int centerX = data[0] * frameWidth;
            int centerY = data[1] * frameHeight;
            int width = data[2] * frameWidth;
            int height = data[3] * frameHeight;

            int left = std::max(0,std::min(centerX - width / 2,frameWidth - 1));
            int top = std::max(0,std::min(centerY - height / 2,frameHeight - 1));
            width = std::max(1,std::min(width,frameWidth - left));
            height = std::max(1,std::min(height,frameHeight - top));

            inds.push_back(classIdPoint.x);
            confs.push_back(static_cast<float>(conf));
            rects.emplace_back(left,top,width,height);
        }
    }

	// 整体上的nms, 没有对每个类别单独做
    if (mYolov3Args.nms_threshold > 0 ) {

        std::vector<int> classIds;
        std::vector<float> confidences;
        std::vector<cv::Rect> boxes;

        std::vector<int> indices;
        cv::dnn::NMSBoxes(rects,confs, mYolov3Args.threshold ,mYolov3Args.nms_threshold,indices);
        for (int idx : indices)
        {
            boxes.push_back(rects[idx]);
            confidences.push_back(confs[idx]);
            classIds.push_back(inds[idx]);
        }

        rects = std::move(boxes);
        inds = std::move(classIds);
        confs = std::move(confidences);
    }
}


    struct Yolov3Args {
        // A list of 3 three-dimensional tuples for the YOLO masks
        std::vector<std::array<int,3>> masks{
            {6, 7, 8},
            {3, 4, 5},
            {0, 1, 2}
        };
        // A list of 9 two - dimensional tuples for the YOLO anchors
        std::vector<std::array<int,2>> anchors{
            {10, 13},
            {16, 30},
            {33, 23},   //
            {30, 61},
            {62, 45},
            {59, 119},  //
            {116, 90},
            {156, 198},
            {373, 326}, //
        };
        // Threshold for object coverage,float value between 0 and 1
        float threshold{ 0.6f };
        // Threshold for non - max suppression algorithm,float value between 0 and 1
        float nms_threshold = { 0.5f };
        std::array<int,2> input_resolution{ 608,608 };

        int anchor = 3;

        int classes = 80;
        int coords = 4;
        int cell_size = classes + coords + 1;
    };


static float logistic_activate(float x) { return 1.F / (1.F + exp(-x)); }

static void softmax_activate(const float* input,const int n,const float temp,float* output)
{
    int i;
    float sum = 0;
    float largest = -FLT_MAX;
    for (i = 0; i < n; ++i) {
        if (input[i] > largest) largest = input[i];
    }
    for (i = 0; i < n; ++i) {
        float e = exp((input[i] - largest) / temp);
        sum += e;
        output[i] = e;
    }
    for (i = 0; i < n; ++i) {
        output[i] /= sum;
    }
}
3、其他问题
3.1、yolov3-416模型如何转换
在脚本yolov3_to_onnx.py中模型转换是根据cfg文件解析,需要人为的指定输出层的名字以供onnx进行权重值转换,因此仅需要修改如下部分
# shape of (in CHW format):         yolov3-608
output_tensor_dims = OrderedDict()
output_tensor_dims["082_convolutional"] = [255, 19, 19]
output_tensor_dims["094_convolutional"] = [255, 38, 38]
output_tensor_dims["106_convolutional"] = [255, 76, 76]

# shape of (in CHW format):         yolov3-416
output_tensor_dims = OrderedDict()
output_tensor_dims["082_convolutional"] = [255, 13, 13]
output_tensor_dims["094_convolutional"] = [255, 26, 26]
output_tensor_dims["106_convolutional"] = [255, 52, 52]
转换后的查看输出为
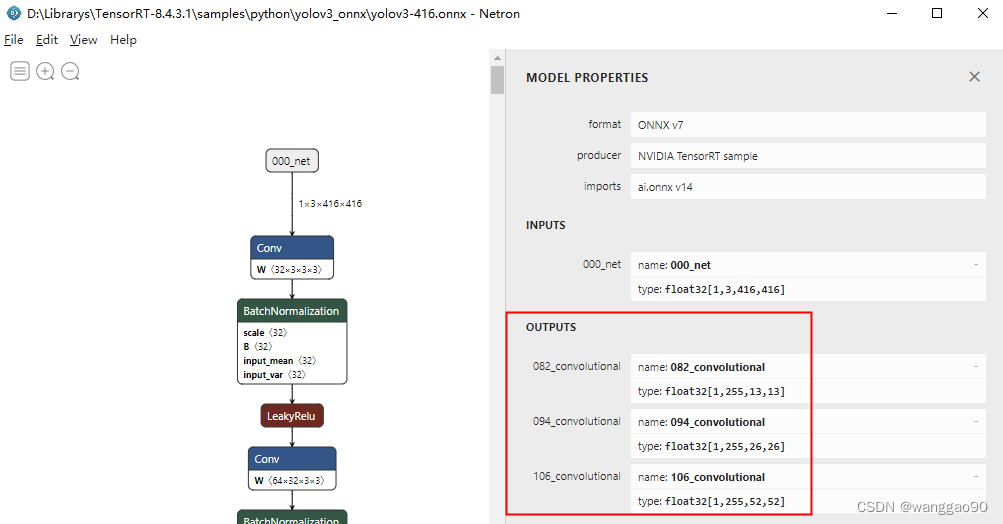
测试脚本,修改加载的onnx和trt文件名称、修改的地方有
onnx_file_path = "yolov3-416.onnx"
engine_file_path = "yolov3-416.trt"

#input_resolution_yolov3_HW = (608, 608)
input_resolution_yolov3_HW = (416, 416)

#output_shapes = [(1, 255, 19, 19), (1, 255, 38, 38), (1, 255, 76, 76)]
output_shapes = [(1, 255, 13, 13), (1, 255, 26, 26), (1, 255, 52, 52)]

#network.get_input(0).shape = [1, 3, 608, 608]
network.get_input(0).shape = [1, 3, 416, 416]
执行结果为
>>>
 RESTART: D:\Librarys\TensorRT-8.4.3.1\samples\python\yolov3_onnx\onnx_to_tensorrt.py
Loading ONNX file from path yolov3-416.onnx...
Beginning ONNX file parsing
Completed parsing of ONNX file
Building an engine from file yolov3-416.onnx; this may take a while...
Completed creating Engine
Running inference on image dog.jpg...
[[122.5109715  225.01062311 199.10577509 317.32366383]
 [114.91165433 128.17760862 456.74105451 302.43399097]
 [472.04688328  86.89298721 219.78270777  79.65799847]] [0.99860307 0.98919281 0.95482076] [16  1  7]
Saved image with bounding boxes of detected objects to dog_bboxes.png.
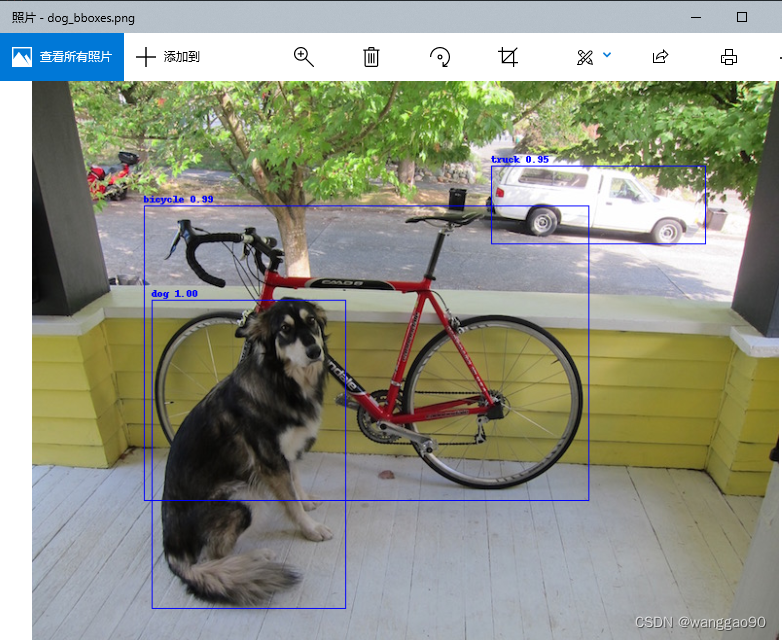
从结果可视化看,608和416的结果框略有差异。
3.2、手写后处理的效率问题
目前使用机器 i7700k,1080ti,使用yolov3-416模型测试。编辑一个统计时间的代码
class TicketMeter {
public:
    TicketMeter(const std::string& info, int count = 1): infoPrefix(info), count(count) {
        start = std::chrono::high_resolution_clock::now();
    }

    ~TicketMeter() {
        end = std::chrono::high_resolution_clock::now();
        std::cout << infoPrefix << ": " << std::chrono::duration_cast<std::chrono::milliseconds>(end - start).count()*1.f / count << " mills" << std::endl;
    }

private:
    std::chrono::steady_clock::time_point start, end;
    int count;
    std::string infoPrefix;
};
之后在c++的测试代码的前向、后处理增加以下代码,分别测试100次:
    // 推理
    buffers.copyInputToDevice();
    context->executeV2(buffers.getDeviceBindings().data());
    buffers.copyOutputToHost();
    {
        TicketMeter tm("========= inference avg time", 100);
        for(int i = 0; i < 100; i++)  context->executeV2(buffers.getDeviceBindings().data());
    }

	YoloDetector::postprocess(outs, img.rows, img.cols, inds, confs, rects);
    {
        TicketMeter tm("========= postprocess avg time", 100);
        for(int i = 0; i < 100; i++)  YoloDetector::postprocess(outs, img.rows, img.cols, inds, confs, rects);
    }
运行提示为
[12/27/2022-14:53:49] [I] [TRT] [MemUsageChange] Init CUDA: CPU +278, GPU +0, now: CPU 22733, GPU 1120 (MiB)
[12/27/2022-14:53:49] [I] [TRT] Loaded engine size: 383 MiB
[12/27/2022-14:53:50] [I] [TRT] [MemUsageChange] TensorRT-managed allocation in engine deserialization: CPU +0, GPU +0, now: CPU 0, GPU 0 (MiB)
[12/27/2022-14:53:50] [I] [TRT] [MemUsageChange] TensorRT-managed allocation in IExecutionContext creation: CPU +0, GPU +0, now: CPU 0, GPU 0 (MiB)
========= inference avg time: 8.61 mills
========= postprocess avg time: 12.86 mills
可以看到推理耗时8.61ms,网络后处理时间耗费12.86ms,一张图的完整处理时间60%耗费在后处理上。
其他配置机器的测试时间结果如下:
TODO
网络输出的格式为 [N,C,H,W],可以整理为 [N,H,W,C]从数据格式上保证每一个候选框的输出数据维度上的255个内存数据是连续的,也就是调整输出为[N*H*W, C]的格式。
TensorRt中也含有NMS的插件,可以替换前面手写的cpu代码,可能进一步提高整体流程效率。
TODO






![[Linux安装软件详解系列]05 安装ElasticSearch和IK分词器](https://img-blog.csdnimg.cn/7a03f79ca19c42b5b366e3808beed99e.png)


