一、按钮组件
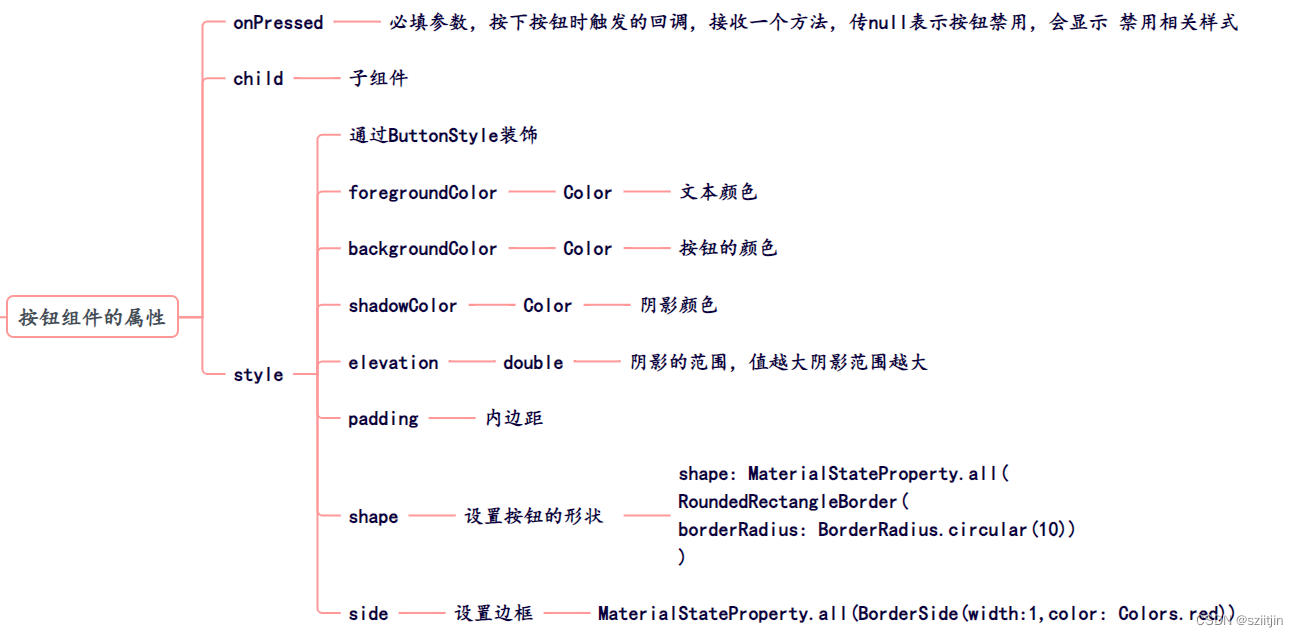
1、按钮类型:
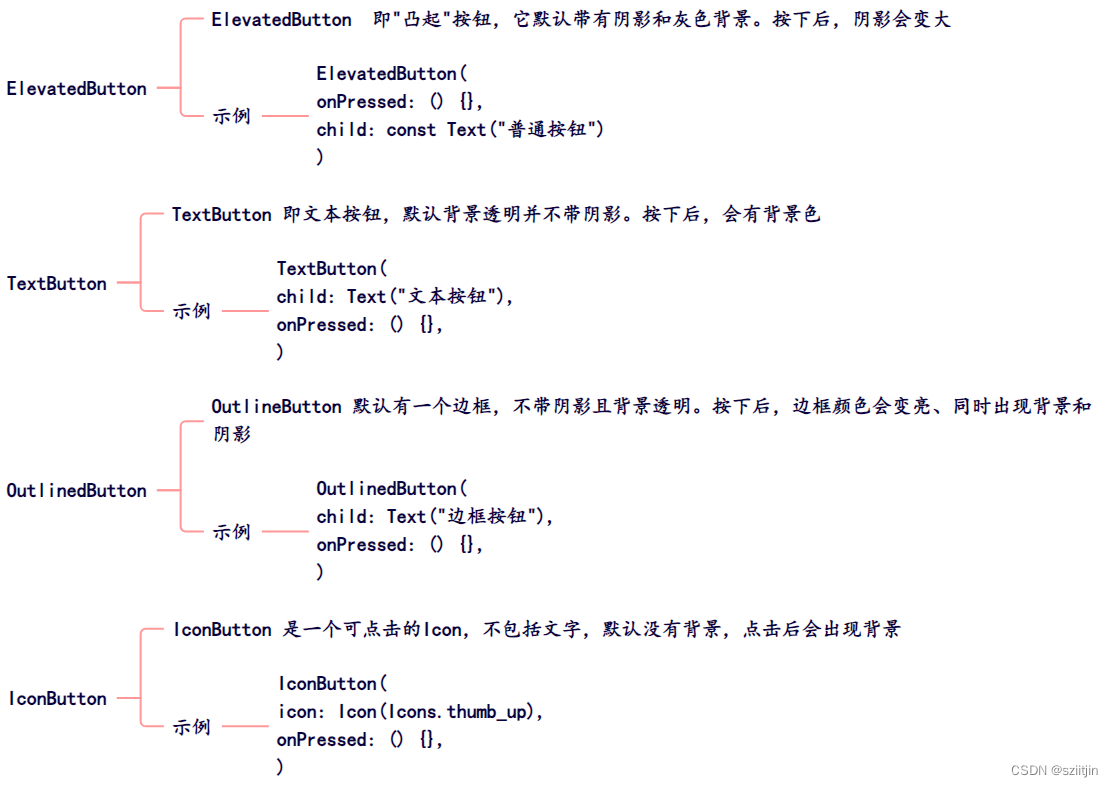
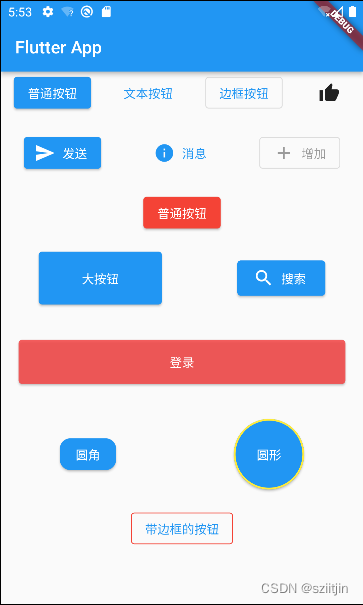
 2、按钮实现效果:
import 'package:flutter/material.dart';

void main() {
  runApp(const MyApp());
}

class MyApp extends StatelessWidget {
  const MyApp({Key? key}) : super(key: key);

  @override
  Widget build(BuildContext context) {
    return MaterialApp(
      title: 'Flutter Demo',
      theme: ThemeData(
        primarySwatch: Colors.blue,
      ),
      home: Scaffold(
        appBar: AppBar(title: const Text("Flutter App")),
        body: const LayoutDemo(),
      ),
    );
  }
}

class LayoutDemo extends StatelessWidget {
  const LayoutDemo({Key? key}) : super(key: key);

  @override
  Widget build(BuildContext context) {
    return ListView(
      children: [
        Row(
          mainAxisAlignment: MainAxisAlignment.spaceAround,
          children: [
            ElevatedButton(
                onPressed: () {
                  print("ElevatedButton....");
                },
                child: const Text("普通按钮")),
            TextButton(onPressed: () {}, child: const Text("文本按钮")),
            OutlinedButton(onPressed: () {}, child: const Text("边框按钮")),
            IconButton(onPressed: () {}, icon: const Icon(Icons.thumb_up))
          ],
        ),
        const SizedBox(
          height: 20,
        ),
        Row(mainAxisAlignment: MainAxisAlignment.spaceAround, children: [
          ElevatedButton.icon(
              onPressed: () {},
              icon: const Icon(Icons.send),
              label: const Text("发送")),
          TextButton.icon(
              onPressed: () {},
              icon: const Icon(Icons.info),
              label: const Text("消息")),
          OutlinedButton.icon(
              onPressed: null,
              icon: const Icon(Icons.add),
              label: const Text("增加"))
        ]),
        const SizedBox(
          height: 20,
        ),
        Row(mainAxisAlignment: MainAxisAlignment.spaceAround, children: [
          ElevatedButton(
              style: ButtonStyle(
                  backgroundColor: MaterialStateProperty.all(Colors.red), //背景颜色
                  foregroundColor:
                  MaterialStateProperty.all(Colors.white) //文字图标颜色
              ),
              onPressed: () {
                print("ElevatedButton");
              },
              child: const Text("普通按钮")),
        ]),
        const SizedBox(
          height: 20,
        ),
        Row(
          mainAxisAlignment: MainAxisAlignment.spaceAround,
          children: [
            Container(
              height: 60,
              width: 140,
              child: ElevatedButton(
                onPressed: () {},
                child: const Text("大按钮"),
              ),
            ),
            SizedBox(
              height: 40,
              width: 100,
              child: ElevatedButton.icon(
                onPressed: () {},
                icon: const Icon(Icons.search),
                label: const Text("搜索"),
              ),
            )
          ],
        ),
        const SizedBox(
          height: 20,
        ),
        Row(
          children: [
            Expanded(
                flex: 1,
                child: Container(
                  margin: const EdgeInsets.all(20),
                  height: 50,
                  child: ElevatedButton(
                    onPressed: () {},
                    style: ButtonStyle(
                        backgroundColor: MaterialStateProperty.all(
                            const Color.fromARGB(220, 245, 71, 71)),
                        foregroundColor:
                        MaterialStateProperty.all(Colors.white)),
                    child: const Text("登录"),
                  ),
                ))
          ],
        ),
        const SizedBox(
          height: 20,
        ),
        Row(
          mainAxisAlignment: MainAxisAlignment.spaceAround,
          children: [
            ElevatedButton(
                style: ButtonStyle(
                    shape: MaterialStateProperty.all(//圆角
                        RoundedRectangleBorder(
                            borderRadius: BorderRadius.circular(12)))),
                onPressed: () {},
                child: const Text("圆角")),
            SizedBox(
              height: 80,
              width: 80,
              child: ElevatedButton(
                  style: ButtonStyle(
                      shape: MaterialStateProperty.all(//圆形
                          const CircleBorder(
                              side:
                              BorderSide(width: 2, color: Colors.yellow)))),
                  onPressed: () {},
                  child: const Text("圆形")),
            ),
          ],
        ),
        const SizedBox(height: 20),
        Row(
          mainAxisAlignment: MainAxisAlignment.center,
          children: [
            OutlinedButton(
                style: ButtonStyle(side: MaterialStateProperty.all(//修改边框颜色
                    const BorderSide(width: 1, color: Colors.red))),
                onPressed: () {},
                child: const Text("带边框的按钮"))
          ],
        )
      ],
    );
  }
}
二、事件处理
1、在Flutter中,手势有两个不同的层次:
第一层:原始指针事件(Pointer Events):描述了屏幕上由触摸板、鼠标、指示笔等触发的指针的位置和移动。
第二层:手势识别(Gesture Detector):这个是在原始事件上的一种封装。
2、指针事件Pointer:
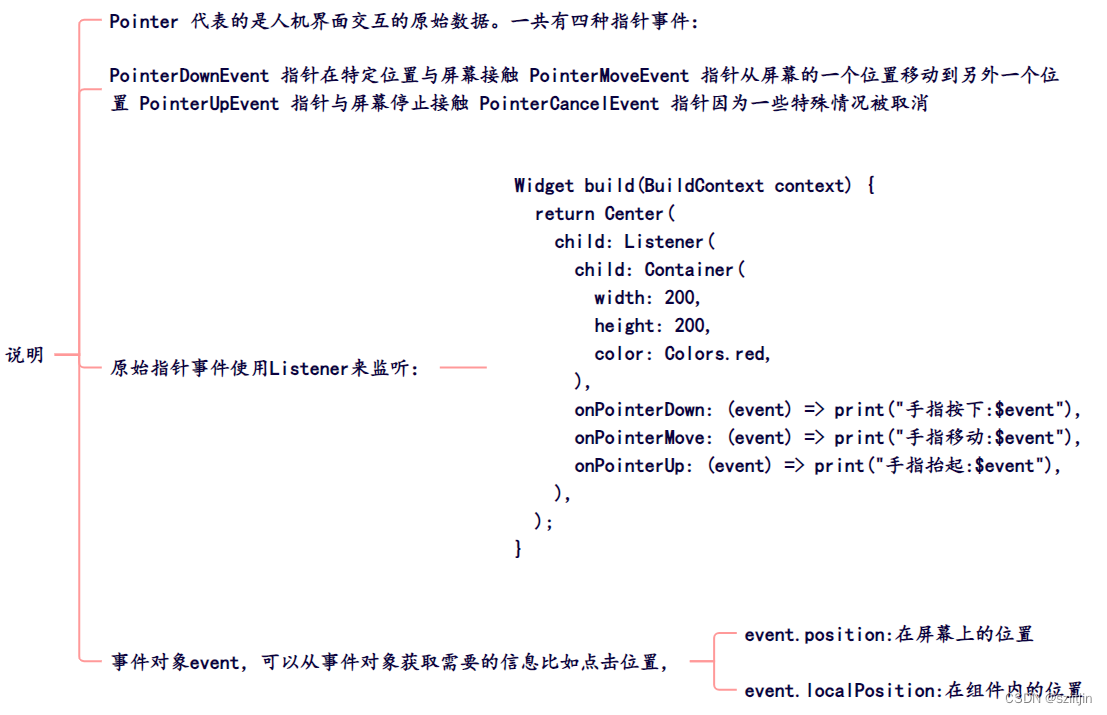
demo:
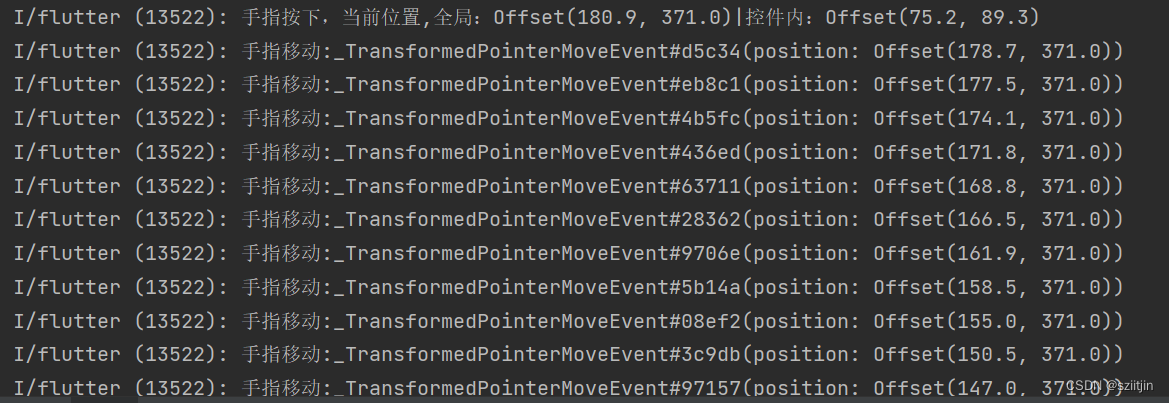
import 'package:flutter/material.dart';

void main() {
  runApp(const MyApp());
}

class MyApp extends StatelessWidget {
  const MyApp({Key? key}) : super(key: key);

  @override
  Widget build(BuildContext context) {
    return MaterialApp(
      title: 'Flutter Demo',
      theme: ThemeData(
        primarySwatch: Colors.blue,
      ),
      home: Scaffold(
        appBar: AppBar(title: const Text("Flutter App")),
        body: MyHomePage(),
      ),
    );
  }
}

//事件基本应用,指针事件(Touch)
class MyHomePage extends StatelessWidget {
  const MyHomePage({super.key});

  @override
  Widget build(BuildContext context) {
    return Center(
      child: Listener(
        child: Container(
          width: 200,
          height: 200,
          color: Colors.red,
          // child:  ElevatedButton(
          //     onPressed: () {
          //       print("ElevatedButton....");
          //     },
          //     child: const Text("普通按钮")),
        ),
        onPointerDown: (event) => print("手指按下,当前位置,全局:${event.position}|控件内:${event.localPosition}"),
        onPointerMove: (event) => print("手指移动:$event"),
        onPointerUp: (event) => print("手指抬起:$event"),
      ),
    );
  }
}
3、手势识别(Gesture Detector):
1)GestureDetector封装了点击、双击、滑动等大量功能,使开发者可以快速使用这些基础性功能:
GestureDetector({
    super.key,
    this.child,
    this.onTapDown,
    this.onTapUp,
    this.onTap,
    this.onTapCancel,
    this.onSecondaryTap,
    this.onSecondaryTapDown,
    this.onSecondaryTapUp,
    this.onSecondaryTapCancel,
    this.onTertiaryTapDown,
    this.onTertiaryTapUp,
    this.onTertiaryTapCancel,
    this.onDoubleTapDown,
    this.onDoubleTap,
    this.onDoubleTapCancel,
    this.onLongPressDown,
    this.onLongPressCancel,
    this.onLongPress,
    this.onLongPressStart,
    this.onLongPressMoveUpdate,
    this.onLongPressUp,
    this.onLongPressEnd,
    this.onSecondaryLongPressDown,
    this.onSecondaryLongPressCancel,
    this.onSecondaryLongPress,
    this.onSecondaryLongPressStart,
    this.onSecondaryLongPressMoveUpdate,
    this.onSecondaryLongPressUp,
    this.onSecondaryLongPressEnd,
    this.onTertiaryLongPressDown,
    this.onTertiaryLongPressCancel,
    this.onTertiaryLongPress,
    this.onTertiaryLongPressStart,
    this.onTertiaryLongPressMoveUpdate,
    this.onTertiaryLongPressUp,
    this.onTertiaryLongPressEnd,
    this.onVerticalDragDown,
    this.onVerticalDragStart,
    this.onVerticalDragUpdate,
    this.onVerticalDragEnd,
    this.onVerticalDragCancel,
    this.onHorizontalDragDown,
    this.onHorizontalDragStart,
    this.onHorizontalDragUpdate,
    this.onHorizontalDragEnd,
    this.onHorizontalDragCancel,
    this.onForcePressStart,
    this.onForcePressPeak,
    this.onForcePressUpdate,
    this.onForcePressEnd,
    this.onPanDown,
    this.onPanStart,
    this.onPanUpdate,
    this.onPanEnd,
    this.onPanCancel,
    this.onScaleStart,
    this.onScaleUpdate,
    this.onScaleEnd,
    this.behavior,
    this.excludeFromSemantics = false,
    this.dragStartBehavior = DragStartBehavior.start,
  })
2)Gesture种类非常多:

3)事件拦截应用:
可以通过Stack布局来解决手势冲突,避免嵌套。
import 'package:flutter/foundation.dart';
import 'package:flutter/gestures.dart';
import 'package:flutter/material.dart';

void main() {
  runApp(const MyApp());
}

class MyApp extends StatelessWidget {
  const MyApp({Key? key}) : super(key: key);

  @override
  Widget build(BuildContext context) {
    return MaterialApp(
      title: 'Flutter Demo',
      theme: ThemeData(
        primarySwatch: Colors.blue,
      ),
      home: Scaffold(
        appBar: AppBar(title: const Text("Flutter App")),
        body: MyHomePage(),
      ),
    );
  }
}

class MyHomePage extends StatelessWidget {
  _onPointerDown(PointerDownEvent event) {
    if (kDebugMode) {
      print("_onPointerDown:$event");
    }
  }

  _onPointerMove(PointerMoveEvent event) {
    if (kDebugMode) {
      print("_onPointerMove:$event");
    }
  }

  _onPointerUp(PointerUpEvent event) {
    if (kDebugMode) {
      print("_onPointerUp:$event");
    }
  }

  _onPointerEnter(PointerEnterEvent event) {
    if (kDebugMode) {
      print("_onPointerEnter:$event");
    }
  }

  _onPointerExit(PointerCancelEvent event) {
    if (kDebugMode) {
      print("_onPointerExit:$event");
    }
  }

  _onPointerHover(PointerHoverEvent event) {
    if (kDebugMode) {
      print("_onPointerHover:$event");
    }
  }

  _onPointerDown1(PointerDownEvent event) {
    if (kDebugMode) {
      print("_onPointerDown1:$event");
    }
  }

  _onPointerMove1(PointerMoveEvent event) {
    if (kDebugMode) {
      print("_onPointerMove1:$event");
    }
  }

  _onPointerUp1(PointerUpEvent event) {
    if (kDebugMode) {
      print("_onPointerUp1:$event");
    }
  }

  @override
  Widget build(BuildContext context) {
    return Listener(
        onPointerDown: _onPointerDown,
        onPointerMove: _onPointerMove,
        onPointerUp: _onPointerUp,
        onPointerCancel: _onPointerExit,
        onPointerHover: _onPointerHover,
        child: Stack(
          children: <Widget>[
            GestureDetector(
              //监听点击事件
              onTap: () => {
                print("点击事件")
              },
              //监听横向滑动事件
              onVerticalDragUpdate: (DragUpdateDetails details) => {
                print("横向滑动:$details")
              },
              child: Listener(
                  onPointerDown: _onPointerDown1,
                  onPointerMove: _onPointerMove1,
                  onPointerUp: _onPointerUp1,
                  child: Center(
                    child: Container(
                      color: Colors.red,
                      width: 200.0,
                      height: 100.0,
                    ),
                  )),
            ),
          ],
        ));
  }
}
三、弹框组件Dialog
Dialog页面代码:
import 'package:flutter/material.dart';
import 'dialog/MyToast.dart';

import 'dialog/dialog.dart';

void main() {
  runApp(const MyApp());
}

class MyApp extends StatelessWidget {
  const MyApp({Key? key}) : super(key: key);

  @override
  Widget build(BuildContext context) {
    return MaterialApp(
      title: 'Flutter Demo',
      theme: ThemeData(
        primarySwatch: Colors.blue,
      ),
      home: Scaffold(
        appBar: AppBar(title: const Text("Flutter App")),
        body: const LayoutDemo(),
      ),
    );
  }
}


class LayoutDemo extends StatelessWidget {
  const LayoutDemo({Key? key}) : super(key: key);

  @override
  Widget build(BuildContext context) {
    return Center(
      child: Column(
        mainAxisAlignment: MainAxisAlignment.center,
        children: <Widget>[
          ElevatedButton(
            onPressed: () async{
              var result = await alertDialog(context);
              print(result);
            },
            child: const Text('alert弹出框-AlertDialog '),
          ),
          const SizedBox(height: 20),
          ElevatedButton(
            onPressed: () async{
              var result = modelBottomSheet(context);
              print("result:$result");
            },
            child: const Text('select弹出框-SimpleDialog'),
          ),
          const SizedBox(height: 20),
          ElevatedButton(
            onPressed: () async{
              var result = await showDialog(
                  barrierDismissible: true, //表示点击灰色背景的时候是否消失弹出框 context: context,
                  builder: (context) {
                    return MyDialog(
                        title: '标题',
                        onClosed: () {
                          print("关闭");
                          Navigator.of(context).pop();
                        },
                        content: "我是一个内容");
                  }, context: context);
              print("result:$result");
            },
            child: const Text('自定义dialog'),
          ),
          const SizedBox(height: 20),
          ElevatedButton(
            onPressed: () async{
              var result = await simpleDialog(context);
              print("result:$result");
            },
            child: const Text('ActionSheet底部弹出框'),
          ),
          const SizedBox(height: 20),
          ElevatedButton(
            onPressed: (){
              // Fluttertoast.showToast(
              //     msg: "提示信息",
              //
              //     toastLength: Toast.LENGTH_LONG,   //值针对 android 平台
              //     timeInSecForIosWeb: 1,  //提示时间 针对ios 和 web
              //     backgroundColor: Colors.black26, //背景颜色
              //     textColor: Colors.white,   //文本颜色
              //     fontSize: 16.0  //文本字体大小
              // );
              Toast.showInfo("message", context: context, duration: 2000);
            },
            child: const Text('Toast'),
          ),
          // fluttertoast
        ],
      ),
    );
  }
}
1、AlertDialog:
最简单的方案是利用AlertDialog组件构建一个弹框

import 'package:flutter/material.dart';

Object alertDialog(BuildContext context) async {
  var result = await showDialog(
      barrierDismissible: false, //表示点击灰色背景的时候是否消失弹出框
      context: context,
      builder: (context) {
        return AlertDialog(
          title: const Text("提示信息!"),
          content: const Text("您确定要删除吗"),
          actions: [
            TextButton(
                onPressed: () {
                  print("ok");
                  Navigator.of(context).pop("ok"); //点击按钮让AlertDialog消失
                },
                child: const Text("确定")),
            TextButton(
                onPressed: () {
                  print("cancel");
                  Navigator.of(context).pop("取消");
                },
                child: const Text("取消"))
          ],
        );
      });

  return result;
}
2、SimpleDialog:
通过SimpleDialog构建一个选择框
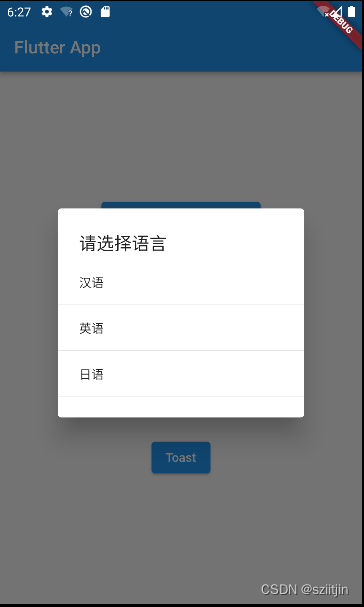
import 'package:flutter/material.dart';

Object simpleDialog(BuildContext context) async {
  var result = await showDialog(
      barrierDismissible: false, //表示点击灰色背景的时候是否消失弹出框
      context: context,
      builder: (context) {
        return SimpleDialog(
          title: const Text("请选择语言"),
          children: [
            SimpleDialogOption(
              onPressed: () {
                print("汉语");
                Navigator.pop(context, "汉语");
              },
              child: const Text("汉语"),
            ),
            const Divider(),
            SimpleDialogOption(
              onPressed: () {
                print("英语");
                Navigator.pop(context, "英语");
              },
              child: const Text("英语"),
            ),
            const Divider(),
            SimpleDialogOption(
              onPressed: () {
                print("日语");
                Navigator.pop(context, "日语");
              },
              child: const Text("日语"),
            ),
            const Divider(),
          ],
        );
      });

 return result;
}
3、showModalBottomSheet:
通过showModalBottomSheet构建一个底部弹框

import 'package:flutter/material.dart';


Object modelBottomSheet(BuildContext context) {
  return showModalBottomSheet(
      context: context,
      builder: (context) {
        return SizedBox(
          height: 240,
          child: Column(
            crossAxisAlignment: CrossAxisAlignment.center,
            children: [
              ListTile(
                title: const Text("分享"),
                onTap: () {
                  print("分享");
                  Navigator.of(context).pop("分享");
                },
              ),
              const Divider(),
              ListTile(
                title: const Text("收藏"),
                onTap: () {
                  print("收藏");
                  Navigator.of(context).pop("收藏");
                },
              ),
              const Divider(),
              ListTile(
                title: const Text("取消"),
                onTap: () {
                  print("取消");
                  Navigator.of(context).pop("取消");
                },
              ),
              const Divider(),
            ],
          ),
        );
      });
}
4、自定义Flutter Dialog:
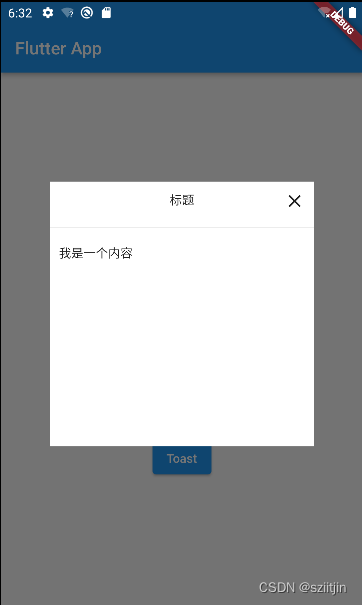
import 'package:flutter/material.dart';


// 自定义dialog
class MyDialog extends Dialog {
  String title;
  String content;
  Function()? onClosed;

  MyDialog({Key? key, required this.title,required
  this.onClosed,this.content=""}) : super(key: key);

  @override
  Widget build(BuildContext context) {
    return Material(
      type: MaterialType.transparency,
      child: Center(
          child: Container(
            height: 300,
            width: 300,
            color: Colors.white,
            child: Column(
              children: <Widget>[
                Padding(
                  padding: const EdgeInsets.all(10),


                  child: Stack(
                    children: <Widget>[
                      Align(
                        alignment: Alignment.center,
                        child: Text(title),
                      ),
                      Align(
                        alignment: Alignment.centerRight,
                        child: InkWell(
                          onTap: onClosed,
                          child: const Icon(Icons.close),
                        ),
                      )
                    ],
                  ),
                ),
                const Divider(),
                Container(
                  padding: const EdgeInsets.all(10),
                  width: double.infinity,
                  child: Text(content,textAlign: TextAlign.left),
                )
              ],
            ),

          )),
    );
  }
}
四、Toast
所谓toast框其实就是在图层的最上面一层插入一个显示图层,在Flutter中利用OverLayEntry构建图层,然后通过Overlay进行插入。
1、自定义Toast:
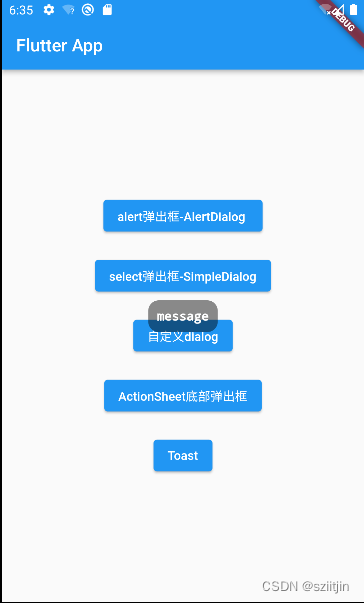
import 'package:flutter/material.dart';

class Toast {
  static var _lastMsg;

  static int _lastShowms = 0;


  static Future _show(BuildContext context, String msg, int duration) {
    OverlayEntry entry = OverlayEntry(
        builder: (BuildContext context) => Positioned(
              //top值,可以改变这个值来改变toast在屏幕中的位置
              top: MediaQuery.of(context).size.height.toDouble() * 0.5,
              child: Container(
                  alignment: Alignment.center,
                  width: MediaQuery.of(context).size.width,
                  child: Padding(
                    padding: const EdgeInsets.symmetric(horizontal: 10.0),
                    child: _buildToastWidget(context, msg),
                  )),
            )
    );

    ///往Overlay中插入插入OverlayEntry
    Overlay.of(context)?.insert(entry);

    ///两秒后,移除Toast
    Future result = Future.delayed(Duration(milliseconds: duration)).then((value) {
      entry.remove();
    });
    return result;
  }

  //toast UI绘制
  static _buildToastWidget(context, String msg) {
    return Row(
      mainAxisSize: MainAxisSize.min,
      children: [
        Container(
            alignment: Alignment.center,
            decoration: BoxDecoration(
              borderRadius: BorderRadius.circular(12.0),
              shape: BoxShape.rectangle,
              color: Colors.black45,
            ),
            child: Padding(
              padding: const EdgeInsets.all(10),
              child: Text(
                  msg,
                  style: const TextStyle(
                      color: Colors.white,
                      decoration: TextDecoration.none,
                      fontSize: 14)
              ),
            )
        )
      ],
    );
  }

  //处理重复多次点击
  static void _handleDuplicateAndShow(
      String message, BuildContext context, int duration) {
    if (_lastMsg == message) {
      //相同信息内容
      int currentms = DateTime.now().millisecondsSinceEpoch;
      int interval = currentms - _lastShowms;
      if (interval > duration) {
        //大于时间间隔 可以显示
        _show(context, message, duration);
        _lastShowms = currentms;
      }
    } else {
      _show(context, message, duration);
      _lastMsg = message;
    }
  }

  /// 提示
  static void showInfo(String message, {required BuildContext context, int duration = 2000}) {
    _handleDuplicateAndShow(message, context, duration);
  }
}
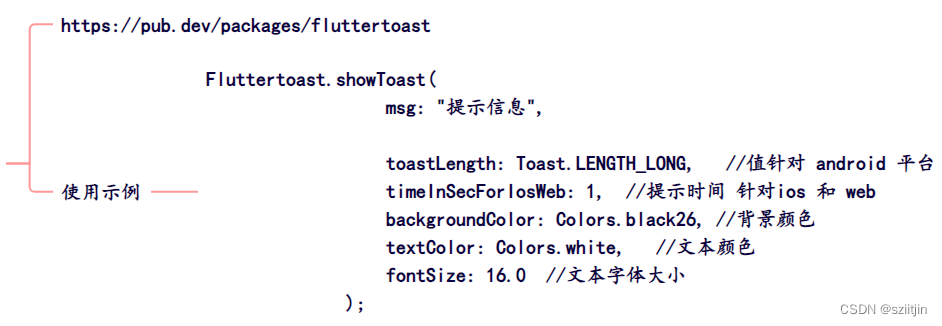
2、使用第三方框架(fluttertoast):
