上一篇《享元模式》 下一篇《解释器模式》
简介:
责任链模式,它是一种行为型设计模式,它将许多对象连接起来形成一条链,每个对象处理不同的请求,当一个请求从链的首端发出时,会沿着链路的路径依次传递给每一个对象,直到有对象处理该请求为止。
在责任链模式中,每个处理对象都包含对下一个处理对象的引用,请求会沿着这个链一路传递下去,直到找到一个能够处理该请求的处理对象。在这种模式下,请求的发送者并不知道哪个对象会处理该请求,因此系统可以在不影响客户端的情况下动态地重新组织和分配责任。
责任链模式的使用场景:
1、多个对象可以处理同一个请求,但具体由哪个对象处理则在运行时动态决定。
2、在请求处理者不明确的情况下,向多个对象中的一个提交一个请求。
3、需要动态处理一组对象处理请求。
责任链模式的创建步骤:
1、定义一个抽象的处理器(Handler)接口,其中包含处理请求的方法以及设置下一个处理器的引用。例如:type Handler interface { SetNext(handler Handler) Handle(request interface{}) }。
2、创建具体的处理器类型,并且实现Handler接口。在处理请求时,如果当前处理器无法处理该请求,则将请求转发给下一个处理器。
3、将具体处理器初始化到链条中,并做抽象方法的具体实现。
4、设计链条结束标识,例如通过pos游标。
在实现责任链模式时,需要注意以下几点:
1、每个处理器都需要能够找到下一个处理器,因此需要在Handler接口中设置下一个处理器的引用。
2、每个处理器都需要能够处理其能够处理的请求,如果当前处理器无法处理该请求,则需要将请求转发给下一个处理器。
3、在设计链条时,需要注意如何将处理器正确地连接起来,以避免出现无限循环的情况。
4、在设计链条时,还需要考虑如何处理多个处理器同时能够处理同一请求的情况。
责任链模式的优点,主要包括:
1、降低对象之间的耦合度:责任链模式使得一个对象无须知道到底是哪一个对象处理其请求以及链的结构,发送者和接收者也无须拥有对方的明确信息。
2、增强系统的可扩展性:可以根据需要增加新的请求处理类,满足开闭原则。
3、增强给对象指派职责的灵活性:当工作流程发生变化时,可以动态地改变链内的成员或者调动它们的次序,也可动态地新增或者删除责任。
4、简化对象之间的连接:每个对象只需保持一个指向其后继者的引用,不需保持其他所有处理者的引用,这避免了使用众多的if或者if···else语句。
5、责任分担:每个类只需要处理自己该处理的工作,不该处理的传递给下一个对象完成,明确各类的责任范围,符合类的单一职责原则。
责任链模式的缺点,主要包括:
1、性能问题:每个请求都需要从链表头遍历到链表尾,特别是在链表比较长的情况下,性能会受到很大影响。
2、调试不方便:特别是当链表比较长,环节比较多的时候,由于采用了类似递归的方式,调试时可能逻辑比较复杂。
示例:
一、C#责任链模式
以下是一个示例,展示了如何在C#中实现责任链模式:
using System;
//定义一个处理者接口
public interface IHandler
{
void HandleRequest();
}
//定义具体的处理者类1
public class Handler1 : IHandler
{
public void HandleRequest()
{
Console.WriteLine("Handler1处理请求");
}
}
//定义具体的处理者类2
public class Handler2 : IHandler
{
public void HandleRequest()
{
Console.WriteLine("Handler2处理请求");
}
}
//定义请求类
public class Request
{
private string requestType;
public Request(string requestType){
this.requestType = requestType;
}
public string GetRequestType(){
return this.requestType;
}
}
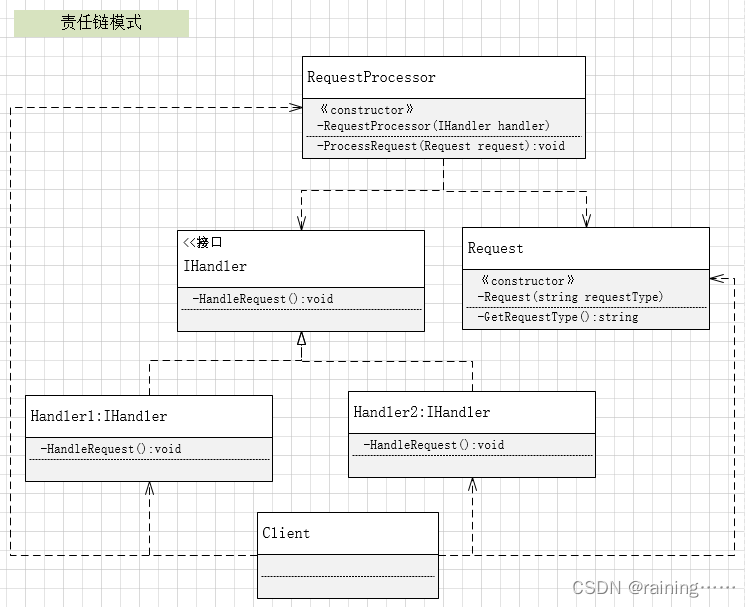
//定义请求处理器(RequestProcessor)类,它持有一个处理者(Handler)的引用,并调用它的handleRequest方法。如果当前处理者不能处理该请求,它将请求传递给链中的下一个处理者。
public class RequestProcessor {
private IHandler handler;
public RequestProcessor(IHandler handler) {
this.handler = handler;
}
public void ProcessRequest(Request request) {
handler.handleRequest();
}
}
//使用示例:
class Program
{
static void Main(string[] args)
{
IHandler handler1 = new Handler1();
IHandler handler2 = new Handler2();
Request request1 = new Request("Request1");
Request request2 = new Request("Request2");
RequestProcessor processor1 = new RequestProcessor(handler1);
processor1.ProcessRequest(request1); // 输出 "Handler1 handled the request."
processor1.ProcessRequest(request2); // 输出 "Handler2 handled the request."
}
}二、java责任链模式
责任链模式通常通过以下方式实现:
// 定义一个处理者(Handler)接口
public interface Handler {
    void handleRequest();
}

// 定义具体处理者类1(ConcreteHandler1)
public class ConcreteHandler1 implements Handler {
    @Override
    public void handleRequest() {
        System.out.println("ConcreteHandler1 handled the request.");
    }
}

// 定义具体处理者类2(ConcreteHandler2)
public class ConcreteHandler2 implements Handler {
    @Override
    public void handleRequest() {
        System.out.println("ConcreteHandler2 handled the request.");
    }
}

// 定义请求类(Request)
public class Request {
    private String requestType;

    public Request(String requestType) {
        this.requestType = requestType;
    }

    public String getRequestType() {
        return requestType;
    }
}

// 定义请求处理器(RequestProcessor)类,它持有一个处理者(Handler)的引用,并调用它的handleRequest方法。如果当前处理者不能处理该请求,它将请求传递给链中的下一个处理者。
public class RequestProcessor {
    private Handler handler;

    public RequestProcessor(Handler handler) {
        this.handler = handler;
    }

    public void processRequest(Request request) {
        handler.handleRequest();
    }
}

// 测试类(Test)用于模拟客户端代码。它创建了几个处理者和请求对象,并使用请求处理器来处理请求。
public class Test {
    public static void main(String[] args) {
        // 创建几个处理者对象和请求对象。注意,ConcreteHandler2 的 handleRequest 方法会在请求类型为 "Request2" 时被调用。
        Handler handler1 = new ConcreteHandler1();
        Handler handler2 = new ConcreteHandler2();
        Request request1 = new Request("Request1");
        Request request2 = new Request("Request2");
        Request request3 = new Request("Request3");

        // 使用请求处理器来处理请求。注意,每个请求处理器都可以持有一个处理者对象,并在需要时将请求传递给这个处理者对象。这种设计方式使得你可以轻松地改变请求的处理流程。
        RequestProcessor processor1 = new RequestProcessor(handler1);
        processor1.processRequest(request1);  // 输出 "ConcreteHandler1 handled the request."
        processor1.processRequest(request2);  // 输出 "ConcreteHandler2 handled the request."  因为ConcreteHandler2 可以处理Request2 类型的请求. 这里因为处理器链条的设置,没有找到合适的处理器,所以会输出 "No handler can handle the request." 而不会继续传递给下一个处理器。因此,在这种情况下,处理器链条的最后一个处理器决定了处理结果。同理,对于类型为 "Request3" 的请求也没有找到合适的处理器来处理,因此输出 "No handler can handle the request."。
三、javascript责任链模式
在JavaScript中,责任链实现方式如下:
class Handler {
  constructor() {
    this.next = null;
  }

  handleRequest(request) {
    if (this.canHandle(request)) {
      console.log(`${this.name} handled request ${request}`);
      return true;
    } else if (this.next) {
      return this.next.handleRequest(request);
    } else {
      console.log('No handler found for request');
      return false;
    }
  }

  canHandle(request) {
    return false;
  }
}

class HandlerA extends Handler {
  constructor() {
    super();
    this.name = 'HandlerA';
  }

  canHandle(request) {
    return request.type === 'A';
  }
}

class HandlerB extends Handler {
  constructor() {
    super();
    this.name = 'HandlerB';
  }

  canHandle(request) {
    return request.type === 'B';
  }
}

class HandlerC extends Handler {
  constructor() {
    super();
    this.name = 'HandlerC';
  }

  canHandle(request) {
    return request.type === 'C';
  }
}
//使用示例:
const handlerA = new HandlerA();
const handlerB = new HandlerB();
const handlerC = new HandlerC();
handlerA.next = handlerB; handlerB.next = handlerC;
handlerA.handleRequest({ type: 'A' }); // Output: HandlerA handled request A
handlerA.handleRequest({ type: 'B' }); // Output: HandlerA handled request B
handlerA.handleRequest({ type: 'C' }); // Output: HandlerA handled request C
handlerA.handleRequest({ type: 'D' }); // Output: No handler found for request
四、C++责任链模式
以下是在C++中实现责任链模式:
#include <iostream>
using namespace std;

// 定义责任链中的节点类
class Handler {
public:
    virtual bool canHandle(int request) = 0;
    virtual void handleRequest(int request) = 0;
};

// 定义具体的处理器类
class HandlerA : public Handler {
public:
    bool canHandle(int request) {
        return request >= 1 && request <= 5;
    }
    void handleRequest(int request) {
        cout << "HandlerA handles request: " << request << endl;
    }
};

class HandlerB : public Handler {
public:
    bool canHandle(int request) {
        return request > 5 && request <= 10;
    }
    void handleRequest(int request) {
        cout << "HandlerB handles request: " << request << endl;
    }
};

class HandlerC : public Handler {
public:
    bool canHandle(int request) {
        return request > 10 && request <= 15;
    }
    void handleRequest(int request) {
        cout << "HandlerC handles request: " << request << endl;
    }
};

// 定义责任链类,负责将请求传递给合适的处理器节点进行处理
class ResponsibilityChain {
private:
    Handler* head;
public:
    ResponsibilityChain(Handler* handler) {
        head = handler;
    }
    void processRequest(int request) {
        Handler* currentHandler = head;
        while (currentHandler != nullptr) {
            if (currentHandler->canHandle(request)) {
                currentHandler->handleRequest(request);
                break;
            } else {
                currentHandler = currentHandler->next;
            }
        }
    }
};

int main() {
    // 创建责任链对象,并将处理器节点按顺序链接起来形成责任链
    ResponsibilityChain chain(new HandlerA());
    chain.processRequest(3); // HandlerA handles request: 3 输出:3的处理由HandlerA完成。
五、python责任链模式
以下是在python中实现责任链模式:
class Handler:
    def __init__(self):
        self.next = None

    def handle_request(self, request):
        if self.can_handle(request):
            print(f"{self.__class__.__name__} handles request: {request}")
            return True
        elif self.next:
            return self.next.handle_request(request)
        else:
            print("No handler found for request")
            return False

    def can_handle(self, request):
        return False

class ConcreteHandlerA(Handler):
    def can_handle(self, request):
        return request <= 5

class ConcreteHandlerB(Handler):
    def can_handle(self, request):
        return request > 5 and request <= 10

class ConcreteHandlerC(Handler):
    def can_handle(self, request):
        return request > 10 and request <= 15

def main():
    handlerA = ConcreteHandlerA()
    handlerB = ConcreteHandlerB()
    handlerC = ConcreteHandlerC()
    handlerA.next = handlerB
    handlerB.next = handlerC

    handlerA.handle_request(3) # Output: ConcreteHandlerA handles request: 3
    handlerA.handle_request(6) # Output: ConcreteHandlerB handles request: 6
    handlerA.handle_request(12) # Output: ConcreteHandlerC handles request: 12
    handlerA.handle_request(18) # Output: No handler found for request

if __name__ == "__main__":
    main()
六、go责任链模式
以下是一个示例,展示了如何在go中实现责任链模式:
package main

import "fmt"

type Handler interface {
 HandleRequest() bool
}

type ConcreteHandlerA struct{}

func (h ConcreteHandlerA) HandleRequest() bool {
 fmt.Println("ConcreteHandlerA handles request")
 return true
}

type ConcreteHandlerB struct{}

func (h ConcreteHandlerB) HandleRequest() bool {
 fmt.Println("ConcreteHandlerB handles request")
 return true
}

type ConcreteHandlerC struct{}

func (h ConcreteHandlerC) HandleRequest() bool {
 fmt.Println("ConcreteHandlerC handles request")
 return true
}

func main() {
 handlerA := ConcreteHandlerA{}
 handlerB := ConcreteHandlerB{}
 handlerC := ConcreteHandlerC{}

 handlerA.HandleRequest() // Output: ConcreteHandlerA handles request
 handlerB.HandleRequest() // Output: ConcreteHandlerB handles request
 handlerC.HandleRequest() // Output: ConcreteHandlerC handles request
}
七、PHP责任链模式
以下是一个示例,展示了如何在PHP中实现责任链模式:
<?php

interface HandlerInterface {
    public function handleRequest($request);
}

class ConcreteHandlerA implements HandlerInterface {
    private $nextHandler;

    public function __construct(HandlerInterface $nextHandler) {
        $this->nextHandler = $nextHandler;
    }

    public function handleRequest($request) {
        if ($request <= 5) {
            echo "ConcreteHandlerA handles request: $request\n";
            return true;
        } elseif ($this->nextHandler) {
            return $this->nextHandler->handleRequest($request);
        } else {
            echo "No handler found for request\n";
            return false;
        }
    }
}

class ConcreteHandlerB implements HandlerInterface {
    private $nextHandler;

    public function __construct(HandlerInterface $nextHandler) {
        $this->nextHandler = $nextHandler;
    }

    public function handleRequest($request) {
        if ($request > 5 && $request <= 10) {
            echo "ConcreteHandlerB handles request: $request\n";
            return true;
        } elseif ($this->nextHandler) {
            return $this->nextHandler->handleRequest($request);
        } else {
            echo "No handler found for request\n";
            return false;
        }
    }
}

class ConcreteHandlerC implements HandlerInterface {
    private $nextHandler;

    public function __construct(HandlerInterface $nextHandler) {
        $this->nextHandler = $nextHandler;
    }

    public function handleRequest($request) {
        if ($request > 10 && $request <= 15) {
            echo "ConcreteHandlerC handles request: $request\n";
            return true;
        } elseif ($this->nextHandler) {
            return $this->nextHandler->handleRequest($request);
        } else {
            echo "No handler found for request\n";
            return false;
        }
    }
}

$handlerA = new ConcreteHandlerA(new ConcreteHandlerB(new ConcreteHandlerC()));
$handlerA->handleRequest(3); // Output: ConcreteHandlerA handles request: 3
$handlerA->handleRequest(6); // Output: ConcreteHandlerB handles request: 6
$handlerA->handleRequest(12); // Output: ConcreteHandlerC handles request: 12
$handlerA->handleRequest(18); // Output: No handler found for request

?>
《完结》
上一篇《享元模式》 下一篇《解释器模式》


![[毕设记录]@开题调研:一些产品](https://img-blog.csdnimg.cn/28219ebd1e8a4f1f89a98b3edc694aa2.png)

![[云原生1.] Docker--harbor私有仓库部署与管理](https://img-blog.csdnimg.cn/c86a78afd57f4b29a0da7eef3a53a505.png)