文章目录
- tensorflow基础介绍
- 基础张量
- 自定义损失函数
- 自定义模型和激活函数
- 图函数(略)
- 自动求导机制
- 自定义fit
tensorflow基础介绍
基础张量
import tensorflow as tf
import numpy as np
import pandas as pd

# constant是常量张量 不能进行再次assign改值
t = tf.constant([[1., 2., 3.], [4., 5.,6.]])

# 转换为numpy
print(t.numpy())

# 转换成列表
print(t.numpy().tolist())

# 调用加减法和numpy一样
# 数学函数就直接就是tf.math当中的函数,使用和numpy的那些一样
# 矩阵乘法用 @ 小老鼠

# 标量是没有维度的
t = tf.constant(2.718)
print(t.shape)

# ragged tensor 和 SparseTensor 个人觉得不用就行,一般来说没啥用,这边不介绍

print('-'*20)
# Variables 可变张量
v = tf.Variable([[1., 2., 3.], [4., 5.,6.]])
print(v)
print(v.value())

# 修改变量时要用assign,改变tensor内某个值,空间没有发生变化,效率高
# assign value
print(id(v))
v.assign(2*v)
print(id(v))
print(v.numpy())
print('-'*20)
v[0, 1].assign(42)  #取某个元素修改
print(v.numpy())
print('-'*20)
v[1].assign([7., 8., 9.])  #取某一行修改
print(v.numpy())
print(id(v))
输出:
[[1. 2. 3.]
 [4. 5. 6.]]
[[1.0, 2.0, 3.0], [4.0, 5.0, 6.0]]
()
--------------------
<tf.Variable 'Variable:0' shape=(2, 3) dtype=float32, numpy=
array([[1., 2., 3.],
       [4., 5., 6.]], dtype=float32)>
tf.Tensor(
[[1. 2. 3.]
 [4. 5. 6.]], shape=(2, 3), dtype=float32)
135725893022432
135725893022432
[[ 2.  4.  6.]
 [ 8. 10. 12.]]
--------------------
[[ 2. 42.  6.]
 [ 8. 10. 12.]]
--------------------
[[ 2. 42.  6.]
 [ 7.  8.  9.]]
135725893022432
自定义损失函数
from sklearn.datasets import fetch_california_housing
from sklearn.model_selection import train_test_split
from sklearn.preprocessing import StandardScaler
import numpy as np
import pandas as pd
import tensorflow as tf
import matplotlib as mpl
import matplotlib.pyplot as plt
%matplotlib inline


# 得到数据
# -----------------------------------------------------------------------------
housing = fetch_california_housing()
x_train_all, x_test, y_train_all, y_test = train_test_split(housing.data, housing.target, random_state = 7)
x_train, x_valid, y_train, y_valid = train_test_split(x_train_all, y_train_all, random_state = 11)
print(x_train.shape, y_train.shape)
print(x_valid.shape, y_valid.shape)
print(x_test.shape, y_test.shape)
scaler = StandardScaler()
x_train_scaled = scaler.fit_transform(x_train)
x_valid_scaled = scaler.transform(x_valid)
x_test_scaled = scaler.transform(x_test)
# -----------------------------------------------------------------------------

# 自定义损失函数 均方差
def customized_mse(y_true, y_pred):
    return tf.reduce_mean(tf.square(y_pred - y_true))


# m=tf.keras.losses.MeanSquaredError()  #用框架提供的对象
model = tf.keras.models.Sequential([
    tf.keras.layers.Dense(30, activation='relu',input_shape=x_train.shape[1:]),
    tf.keras.layers.Dense(1),
])

model.summary()

# 为了验证自定义损失是否正确
model.compile(loss=customized_mse, optimizer="sgd",metrics=["mean_squared_error"])
callbacks = [tf.keras.callbacks.EarlyStopping(patience=5, min_delta=1e-2)]

history = model.fit(x_train_scaled, y_train,validation_data = (x_valid_scaled, y_valid),epochs = 100,callbacks = callbacks)

def plot_learning_curves(history):
    pd.DataFrame(history.history).plot(figsize=(8, 5))
    plt.grid(True)
    plt.gca().set_ylim(0, 3)
    plt.show()
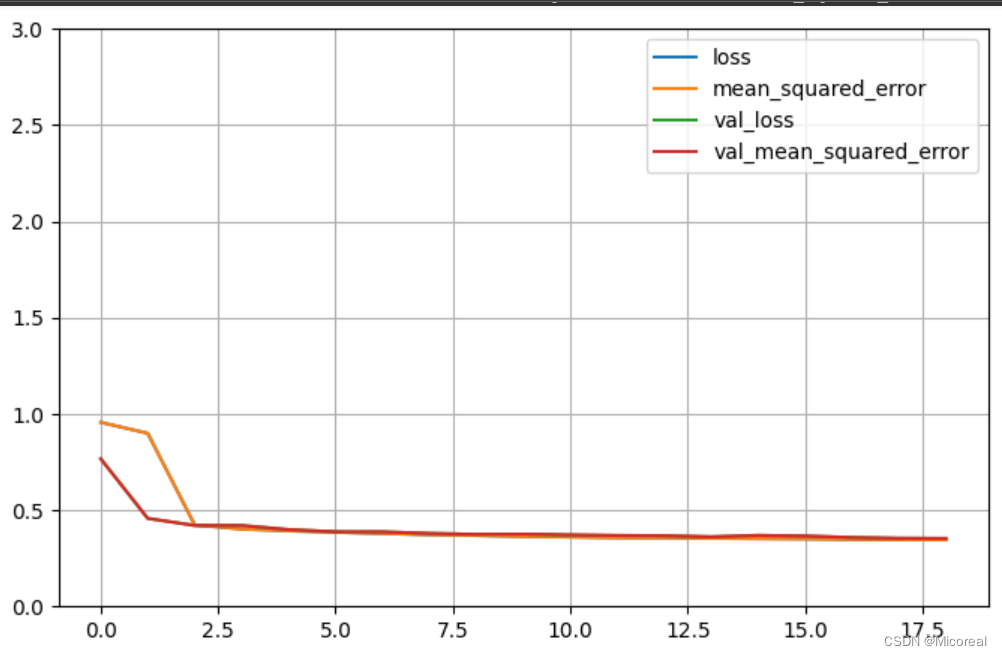
plot_learning_curves(history)

model.evaluate(x_test_scaled, y_test, verbose=0)
输出:
(11610, 8) (11610,)
(3870, 8) (3870,)
(5160, 8) (5160,)
Model: "sequential_1"
_________________________________________________________________
 Layer (type)                Output Shape              Param #
=================================================================
 dense_2 (Dense)             (None, 30)                270

 dense_3 (Dense)             (None, 1)                 31

=================================================================
Total params: 301 (1.18 KB)
Trainable params: 301 (1.18 KB)
Non-trainable params: 0 (0.00 Byte)
_________________________________________________________________
Epoch 1/100
363/363 [==============================] - 3s 7ms/step - loss: 0.9562 - mean_squared_error: 0.9562 - val_loss: 0.7666 - val_mean_squared_error: 0.7666
Epoch 2/100
363/363 [==============================] - 2s 6ms/step - loss: 0.8993 - mean_squared_error: 0.8993 - val_loss: 0.4572 - val_mean_squared_error: 0.4572
Epoch 3/100
363/363 [==============================] - 2s 6ms/step - loss: 0.4234 -

·······

Epoch 17/100
363/363 [==============================] - 2s 5ms/step - loss: 0.3475 - mean_squared_error: 0.3475 - val_loss: 0.3581 - val_mean_squared_error: 0.3581
Epoch 18/100
363/363 [==============================] - 2s 4ms/step - loss: 0.3458 - mean_squared_error: 0.3458 - val_loss: 0.3541 - val_mean_squared_error: 0.3541
Epoch 19/100
363/363 [==============================] - 1s 3ms/step - loss: 0.3453 - mean_squared_error: 0.3453 - val_loss: 0.3532 - val_mean_squared_error: 0.3532
图片见下
[0.35976365208625793, 0.35976365208625793]
自定义模型和激活函数
import tensorflow as tf
from sklearn.datasets import fetch_california_housing
from sklearn.model_selection import train_test_split
from sklearn.preprocessing import StandardScaler
import numpy as np
import pandas as pd
import tensorflow as tf
from tensorflow import keras
import matplotlib as mpl
import matplotlib.pyplot as plt
%matplotlib inline


# 得到数据
# -----------------------------------------------------------------------------
housing = fetch_california_housing()
x_train_all, x_test, y_train_all, y_test = train_test_split(housing.data, housing.target, random_state = 7)
x_train, x_valid, y_train, y_valid = train_test_split(x_train_all, y_train_all, random_state = 11)
print(x_train.shape, y_train.shape)
print(x_valid.shape, y_valid.shape)
print(x_test.shape, y_test.shape)
scaler = StandardScaler()
x_train_scaled = scaler.fit_transform(x_train)
x_valid_scaled = scaler.transform(x_valid)
x_test_scaled = scaler.transform(x_test)
# -----------------------------------------------------------------------------

# customized dense layer.
# -----------------------------------------------------------------------------
class CustomizedDenseLayer(keras.layers.Layer):
    def __init__(self, units, activation=None, **kwargs):
        self.units = units
        self.activation = keras.layers.Activation(activation)  #直接使用tf提供的 激活函数
        super().__init__(**kwargs)

    def build(self, input_shape):
        """构建所需要的参数,也就是kernel还有bias"""
        # x * w + b. x:[batch-size, num1] y:[batch-size, utils] 故:w:[num1,utils],b:[1,utils] 或者 使用[utils]直接和那些数组相加的效果也是一样的。
        # 使用均匀分布的方法去初始化kernel
        self.kernel = self.add_weight(name = 'kernel',shape = (input_shape[1], self.units),initializer = 'uniform',trainable = True)
        self.bias = self.add_weight(name = 'bias',shape = (self.units),initializer = 'zeros',trainable = True)

        #接着我们要继承父类的build
        super(CustomizedDenseLayer, self).build(input_shape)

    def call(self, x):
        """完成正向计算"""
        return self.activation(x @ self.kernel + self.bias)

# 自定义激活函数
customized_softplus = keras.layers.Lambda(lambda x : tf.math.log(1+tf.math.exp(x)))

#完全模仿dense来实现自定义层,因此input_shape传的和dense一致,只需要是特征数,父类Layer自动会转为
#二维的input_shape,然后再传递给build
model = keras.models.Sequential([
    CustomizedDenseLayer(30, activation='relu',input_shape=x_train.shape[1:]),  #这里传入的是特征数
    CustomizedDenseLayer(1,activation=customized_softplus),
])
# -----------------------------------------------------------------------------

model.summary()
model.compile(loss="mean_squared_error", optimizer="sgd")
callbacks = [keras.callbacks.EarlyStopping(patience=5, min_delta=1e-3)]

history = model.fit(x_train_scaled, y_train,validation_data = (x_valid_scaled, y_valid),epochs = 100,callbacks = callbacks)

def plot_learning_curves(history):
    pd.DataFrame(history.history).plot(figsize=(8, 5))
    plt.grid(True)
    plt.gca().set_ylim(0, 3)
    plt.show()
plot_learning_curves(history)

model.evaluate(x_test_scaled, y_test, verbose=0)
输出:
(11610, 8) (11610,)
(3870, 8) (3870,)
(5160, 8) (5160,)
Model: "sequential_3"
_________________________________________________________________
 Layer (type)                Output Shape              Param #
=================================================================
 customized_dense_layer_2 (  (None, 30)                270
 CustomizedDenseLayer)

 customized_dense_layer_3 (  (None, 1)                 31
 CustomizedDenseLayer)

=================================================================
Total params: 301 (1.18 KB)
Trainable params: 301 (1.18 KB)
Non-trainable params: 0 (0.00 Byte)
_________________________________________________________________
Epoch 1/100
363/363 [==============================] - 2s 4ms/step - loss: 1.2189 - val_loss: 0.6802
Epoch 2/100
363/363 [==============================] - 2s 4ms/step - loss: 0.5919 - val_loss: 0.5863
Epoch 3/100
363/363 [==============================] - 1s 4ms/step - loss: 0.5182 - val_loss: 0.5198

······

Epoch 33/100
363/363 [==============================] - 3s 7ms/step - loss: 0.3626 - val_loss: 0.3811
Epoch 34/100
363/363 [==============================] - 1s 4ms/step - loss: 0.3620 - val_loss: 0.3779
Epoch 35/100
363/363 [==============================] - 1s 4ms/step - loss: 0.3610 - val_loss: 0.3801
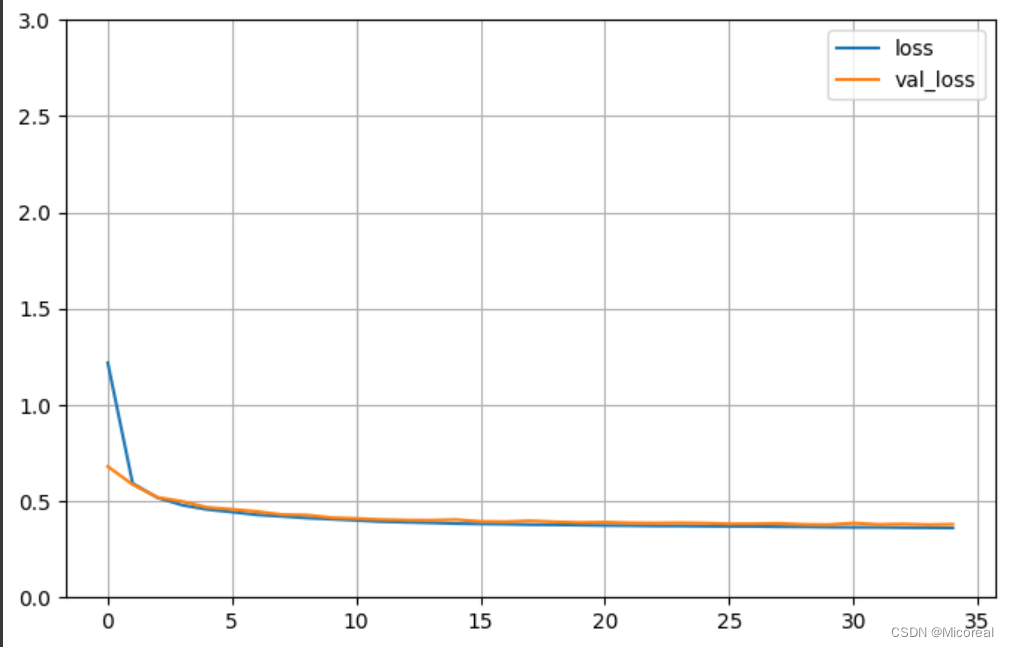
图片见下:
0.3835444152355194
图函数(略)
这个个人觉得好像没啥用,暂时先不介绍,后补。
自动求导机制
import tensorflow as tf


# 对常量没有办法进行求导计算
x1 = tf.constant(2.0)
x2 = tf.constant(3.0)
with tf.GradientTape() as tape:
    z1 = (x1 + 5) * (x2 ** 2)
dz1 = tape.gradient(z1, [x1, x2])
print(dz1)
print('-'*20)

# 对变量进行求导计算
x3 = tf.Variable(2.0)
x4 = tf.Variable(3.0)
with tf.GradientTape() as tape:
    z2 = (x3 + 5) * (x4 ** 2)
dz2 = tape.gradient(z2, [x3, x4])
print(dz2)
print('-'*20)

# 两个目标函数对一个变量求导数
x5 = tf.Variable(5.0)
with tf.GradientTape() as tape:
    z3 = 3 * x5
    z4 = x5 ** 2
    z5 = x5 ** 3
dz3 = tape.gradient([z3, z4, z5], x5)   #3+10+75
print(dz3)
print('-'*20)

# 求二阶导
#因为会执行多次,所以加入persistent
with tf.GradientTape(persistent=True) as outer_tape:
    with tf.GradientTape(persistent=True) as inner_tape:
        z6 = (x3 + 5) * (x4 ** 2)
    inner_grads = inner_tape.gradient(z6, [x3, x4]) # inner_grads是一个列表
outer_grads = [outer_tape.gradient(inner_grad, [x3, x4])for inner_grad in inner_grads]
print(outer_grads)
del inner_tape
del outer_tape
输出:
[None, None]
--------------------
[<tf.Tensor: shape=(), dtype=float32, numpy=9.0>, <tf.Tensor: shape=(), dtype=float32, numpy=42.0>]
--------------------
tf.Tensor(87.99999, shape=(), dtype=float32)
--------------------
[[None, <tf.Tensor: shape=(), dtype=float32, numpy=6.0>], [<tf.Tensor: shape=(), dtype=float32, numpy=6.0>, <tf.Tensor: shape=(), dtype=float32, numpy=14.0>]]
自定义fit
import tensorflow as tf
from sklearn.datasets import fetch_california_housing
from sklearn.model_selection import train_test_split
from sklearn.preprocessing import StandardScaler
import numpy as np
import pandas as pd
import tensorflow as tf
from tensorflow import keras
import matplotlib as mpl
import matplotlib.pyplot as plt
%matplotlib inline


# 得到数据
# -----------------------------------------------------------------------------
housing = fetch_california_housing()
x_train_all, x_test, y_train_all, y_test = train_test_split(housing.data, housing.target, random_state = 7)
x_train, x_valid, y_train, y_valid = train_test_split(x_train_all, y_train_all, random_state = 11)
print(x_train.shape, y_train.shape)
print(x_valid.shape, y_valid.shape)
print(x_test.shape, y_test.shape)
scaler = StandardScaler()
x_train_scaled = scaler.fit_transform(x_train)
x_valid_scaled = scaler.transform(x_valid)
x_test_scaled = scaler.transform(x_test)
# -----------------------------------------------------------------------------


epochs = 100 #多少次
batch_size = 32
steps_per_epoch = len(x_train_scaled) // batch_size  # 一共要取多少次
print(steps_per_epoch)
optimizer = keras.optimizers.SGD()
metric = keras.metrics.MeanSquaredError()

#随机取数据,取出来32个样本
def random_batch(x, y, batch_size=32):
    idx = np.random.randint(0, len(x), size=batch_size)
    return x[idx], y[idx]

model = keras.models.Sequential([
    keras.layers.Dense(30, activation='relu',input_shape=x_train.shape[1:]),
    keras.layers.Dense(1),
])
print('-'*50)

#下面一部分相当于替代了fit函数

for epoch in range(epochs):#每一轮epochs训练所有的样本
    metric.reset_states()  #清空损失
    for step in range(steps_per_epoch):
        #随机取32个样本
        x_batch, y_batch = random_batch(x_train_scaled, y_train,batch_size)

        with tf.GradientTape() as tape:
            # 得到预测值 等价于model.predict 一般来说使用model的是大批量数据也就是train数据 而使用predict的是test数据,只是用于区分而已,实际上两个函数是一样的
            y_pred = model(x_batch)
            # 删减了值为1的维度,二阶张量,变为一阶张量 计算出来的y是[batch-size,1]而y_bacth是[batch-size]所以需要进行调整数据
            y_pred = tf.squeeze(y_pred, 1)
            # 计算损失
            loss = keras.losses.mean_squared_error(y_batch, y_pred)
            #计算均方误差
            metric(y_batch, y_pred)

        # 求梯度 即通过loss需要反向去更新参数
        grads = tape.gradient(loss, model.variables)
        # 梯度和变量绑定
        grads_and_vars = zip(grads, model.variables)
        # 更新,通过grads,去更新模型的model.variables,也就是更新了w,b
        optimizer.apply_gradients(grads_and_vars)
        # 打印,不要在循环内加print,影响\r
        p="Epoch "+str(epoch)+" train mse:"+str(metric.result().numpy())
        print(p, end='\r')
    #打换行的目的是为了新起一行显示
    print('')
    #搞了一个epoch训练后,认为模型可以了,去验证集验证
    y_valid_pred = model(x_valid_scaled)
    y_valid_pred = tf.squeeze(y_valid_pred, 1)
    valid_loss = keras.losses.mean_squared_error(y_valid_pred, y_valid)
    print("\t", "valid mse: ", valid_loss.numpy())
输出:
(11610, 8) (11610,)
(3870, 8) (3870,)
(5160, 8) (5160,)
362
--------------------------------------------------
Epoch 0 train mse:1.3466285
	 valid mse:  0.5476390780096311
Epoch 1 train mse:0.45485455
	 valid mse:  0.4251055461379762
Epoch 2 train mse:0.412074
	 valid mse:  0.46565304912661426
Epoch 3 train mse:0.435362
	 valid mse:  0.40384912219474317

······

Epoch 97 train mse:0.32565653
	 valid mse:  0.32143461024556846
Epoch 98 train mse:0.34540302
	 valid mse:  0.3209666738097622
Epoch 99 train mse:0.3280668
	 valid mse:  0.3186309043590573

